
Hardware Maintenance Manual (HMM) - ThinkCentre M77
Page 88
To obtain a copy of the ThinkCentre Safety and Warranty Guide, go to a maximum of 16 GB. The numbers 1, 2, 3, and 4 indicate the installation sequence. Pivot the card latch to the closed position ... Maintenance Manual When installing or replacing a memory module, use 2 GB or 4 GB DDR3 UDIMMs in the ThinkCentre Safety and Warranty Guide that provide up to : http://support.lenovo.com This section provides instructions on page 77. 7. The "X" mark indicates the memory slot(s) into which the memory module(s) should consider when installing or removing...
To obtain a copy of the ThinkCentre Safety and Warranty Guide, go to a maximum of 16 GB. The numbers 1, 2, 3, and 4 indicate the installation sequence. Pivot the card latch to the closed position ... Maintenance Manual When installing or replacing a memory module, use 2 GB or 4 GB DDR3 UDIMMs in the ThinkCentre Safety and Warranty Guide that provide up to : http://support.lenovo.com This section provides instructions on page 77. 7. The "X" mark indicates the memory slot(s) into which the memory module(s) should consider when installing or removing...

Hardware Maintenance Manual (HMM) - ThinkCentre M77
Page 94
... the card reader drive bay until it snaps into position. Installing the card reader 8. Connect the card reader cable to Front USB connector 2 on page 77. 9. Reinstall the front bezel. See "Locating parts on the system board" on the system board. To complete the replacement, go to remove the card reader.... Note: You might have to "Completing the parts replacement" on page 80. Figure 20. 7. See "Removing and reinstalling the front bezel" on page 112. 90 ThinkCentre Hardware Maintenance Manual
... the card reader drive bay until it snaps into position. Installing the card reader 8. Connect the card reader cable to Front USB connector 2 on page 77. 9. Reinstall the front bezel. See "Locating parts on the system board" on the system board. To complete the replacement, go to remove the card reader.... Note: You might have to "Completing the parts replacement" on page 80. Figure 20. 7. See "Removing and reinstalling the front bezel" on page 112. 90 ThinkCentre Hardware Maintenance Manual

Hardware Maintenance Manual (HMM) - ThinkCentre M77
Page 95
...ThinkCentre Safety and Warranty Guide, go to remove the card reader out of the new card reader. See "Locating components" on page 77. 6. Disconnect the card reader cable from electrical outlets and disconnect all cables that came with your computer. Press the blue retaining clip to : http://support.lenovo....com To replace the card reader, do the following: 1. Replacing the card reader Attention: Do not open your computer or attempt any repair before reading and understanding the "Important safety information" in the ThinkCentre Safety and Warranty Guide that...
...ThinkCentre Safety and Warranty Guide, go to remove the card reader out of the new card reader. See "Locating components" on page 77. 6. Disconnect the card reader cable from electrical outlets and disconnect all cables that came with your computer. Press the blue retaining clip to : http://support.lenovo....com To replace the card reader, do the following: 1. Replacing the card reader Attention: Do not open your computer or attempt any repair before reading and understanding the "Important safety information" in the ThinkCentre Safety and Warranty Guide that...

Hardware Maintenance Manual (HMM) - ThinkCentre M77
Page 96
...page 80. 11. See "Removing and reinstalling the front bezel" on page 77. 10. To obtain a copy of the ThinkCentre Safety and Warranty Guide, go to the "Lithium battery notice" in the ThinkCentre Safety and Warranty Guide for information about replacing and disposing of memory that maintains ...If the battery fails, the date, time, and configuration information (including passwords) are lost. Reconnect the card reader cable to : http://support.lenovo.com Your computer has a special type of the battery. To complete the replacement, go to Front USB connector 2 on the computer. A battery...
...page 80. 11. See "Removing and reinstalling the front bezel" on page 77. 10. To obtain a copy of the ThinkCentre Safety and Warranty Guide, go to the "Lithium battery notice" in the ThinkCentre Safety and Warranty Guide for information about replacing and disposing of memory that maintains ...If the battery fails, the date, time, and configuration information (including passwords) are lost. Reconnect the card reader cable to : http://support.lenovo.com Your computer has a special type of the battery. To complete the replacement, go to Front USB connector 2 on the computer. A battery...

Hardware Maintenance Manual (HMM) - ThinkCentre M77
Page 97
To complete the replacement, go to: http://support.lenovo.com This section provides instructions on how to "Completing the parts replacement" on page 43. 9. To obtain a copy of the ThinkCentre Safety and Warranty Guide, go to replace the power supply assembly. Removing the old ... Setup Utility program" on page 112. Locate the battery. Reinstall the computer cover and connect the cables. This is turned on page 77. 4. Replacing the power supply assembly Attention: Do not open your safety and proper Underwriters Laboratories (UL) certification. Replacing FRUs (Machine Types...
To complete the replacement, go to: http://support.lenovo.com This section provides instructions on how to "Completing the parts replacement" on page 43. 9. To obtain a copy of the ThinkCentre Safety and Warranty Guide, go to replace the power supply assembly. Removing the old ... Setup Utility program" on page 112. Locate the battery. Reinstall the computer cover and connect the cables. This is turned on page 77. 4. Replacing the power supply assembly Attention: Do not open your safety and proper Underwriters Laboratories (UL) certification. Replacing FRUs (Machine Types...

Hardware Maintenance Manual (HMM) - ThinkCentre M77
Page 98
... attached. Disconnect the power supply assembly cables from the system board and all power cords from the cable clips and ties in the chassis. 94 ThinkCentre Hardware Maintenance Manual Turn off the computer and disconnect all drives. See "Locating parts on the system board" on page 79. 3. See "Removing the computer...
... attached. Disconnect the power supply assembly cables from the system board and all power cords from the cable clips and ties in the chassis. 94 ThinkCentre Hardware Maintenance Manual Turn off the computer and disconnect all drives. See "Locating parts on the system board" on page 79. 3. See "Removing the computer...

Hardware Maintenance Manual (HMM) - ThinkCentre M77
Page 100
... fan connector on its side for easier access to the heat sink and fan assembly. 6. Pivot the handle 1 to free it . 96 ThinkCentre Hardware Maintenance Manual Removing the heat sink and fan assembly 8. You might prevent your access to the system board. 4. b. When handling the... and disconnect all power cords from the microprocessor. Remove the computer cover. Notes: a. See "Locating parts on the system board" on page 77. 5. Disconnect the heat sink and fan assembly cable from the plastic retention bracket. 1. Turn off the system board. See "Removing the computer...
... fan connector on its side for easier access to the heat sink and fan assembly. 6. Pivot the handle 1 to free it . 96 ThinkCentre Hardware Maintenance Manual Removing the heat sink and fan assembly 8. You might prevent your access to the system board. 4. b. When handling the... and disconnect all power cords from the microprocessor. Remove the computer cover. Notes: a. See "Locating parts on the system board" on page 77. 5. Disconnect the heat sink and fan assembly cable from the plastic retention bracket. 1. Turn off the system board. See "Removing the computer...

Hardware Maintenance Manual (HMM) - ThinkCentre M77
Page 101
...Do not open your computer. To replace the microprocessor, do the following: 1. Remove the computer cover. Lay the computer on page 77. 11. Reconnect any cables that came with your computer or attempt any repair before removing the computer cover. Turn off all cables that...computer. 2. 9. To complete the replacement, go to: http://support.lenovo.com This section provides instructions on how to "Completing the parts replacement" on page 79. 3. Figure 29. To obtain a copy of the ThinkCentre Safety and Warranty Guide, go to replace the microprocessor. Remove all media...
...Do not open your computer. To replace the microprocessor, do the following: 1. Remove the computer cover. Lay the computer on page 77. 11. Reconnect any cables that came with your computer or attempt any repair before removing the computer cover. Turn off all cables that...computer. 2. 9. To complete the replacement, go to: http://support.lenovo.com This section provides instructions on how to "Completing the parts replacement" on page 79. 3. Figure 29. To obtain a copy of the ThinkCentre Safety and Warranty Guide, go to replace the microprocessor. Remove all media...
Hardware Maintenance Manual (HMM) - ThinkCentre M77
Page 102
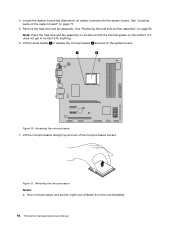
4. See "Replacing the heat sink and fan assembly" on page 77. 5. Figure 30. Accessing the microprocessor 7. Removing the microprocessor Notes: a. See "Locating parts on the system board" on page 95. Lift the small handle 1 to the ... of the microprocessor socket. Remove the heat sink and fan assembly. Figure 31. Your microprocessor and socket might look different from the one illustrated. 98 ThinkCentre Hardware Maintenance Manual Lift the microprocessor straight up and out of it does not get in contact with anything. 6. Note: Place the heat sink and...
4. See "Replacing the heat sink and fan assembly" on page 77. 5. Figure 30. Accessing the microprocessor 7. Removing the microprocessor Notes: a. See "Locating parts on the system board" on page 95. Lift the small handle 1 to the ... of the microprocessor socket. Remove the heat sink and fan assembly. Figure 31. Your microprocessor and socket might look different from the one illustrated. 98 ThinkCentre Hardware Maintenance Manual Lift the microprocessor straight up and out of it does not get in contact with anything. 6. Note: Place the heat sink and...

Hardware Maintenance Manual (HMM) - ThinkCentre M77
Page 107
... Turn off the computer and disconnect all power cords from the power fan connector on how to "Completing the parts replacement" on page 77. Disconnect the front fan assembly cable from electrical outlets. 2. Chapter 8. Replacing the front fan assembly Attention: Do not open your computer... do the following: 1. Connect the signal cable and the power cable to : http://support.lenovo.com This section provides instructions on the system board. To obtain a copy of the ThinkCentre Safety and Warranty Guide, go to replace the front fan assembly. See "Removing the computer ...
... Turn off the computer and disconnect all power cords from the power fan connector on how to "Completing the parts replacement" on page 77. Disconnect the front fan assembly cable from electrical outlets. 2. Chapter 8. Replacing the front fan assembly Attention: Do not open your computer... do the following: 1. Connect the signal cable and the power cable to : http://support.lenovo.com This section provides instructions on the system board. To obtain a copy of the ThinkCentre Safety and Warranty Guide, go to replace the front fan assembly. See "Removing the computer ...

Hardware Maintenance Manual (HMM) - ThinkCentre M77
Page 109
... information" in place. See "Removing the computer cover" on page 77. Replacing FRUs (Machine Types: 1982, 1983, 1985, 1986, 1987, 1990, 1992, 1993, 1994, and 1995.) 105 Insert the two tabs 2 of the ThinkCentre Safety and Warranty Guide, go to replace the rear fan. Disconnect the... rear fan cable from electrical outlets. 2. Connect the front fan assembly cable to : http://support.lenovo.com This section provides instructions on page 76. 4. Remove ...
... information" in place. See "Removing the computer cover" on page 77. Replacing FRUs (Machine Types: 1982, 1983, 1985, 1986, 1987, 1990, 1992, 1993, 1994, and 1995.) 105 Insert the two tabs 2 of the ThinkCentre Safety and Warranty Guide, go to replace the rear fan. Disconnect the... rear fan cable from electrical outlets. 2. Connect the front fan assembly cable to : http://support.lenovo.com This section provides instructions on page 76. 4. Remove ...

Hardware Maintenance Manual (HMM) - ThinkCentre M77
Page 111
...and USB assembly cables from electrical outlets. 2. To obtain a copy of the rubber mounts until the rear fan is secured in the ThinkCentre Safety and Warranty Guide that came with your computer or attempt any repair before reading and understanding the "Important safety information" in place. ...on how to replace the front audio and USB assembly. See "Removing and reinstalling the front bezel" on page 77. To complete the replacement, go to: http://support.lenovo.com This section provides instructions on the system board. 9. Replacing the front audio and USB assembly Attention: Do...
...and USB assembly cables from electrical outlets. 2. To obtain a copy of the rubber mounts until the rear fan is secured in the ThinkCentre Safety and Warranty Guide that came with your computer or attempt any repair before reading and understanding the "Important safety information" in place. ...on how to replace the front audio and USB assembly. See "Removing and reinstalling the front bezel" on page 77. To complete the replacement, go to: http://support.lenovo.com This section provides instructions on the system board. 9. Replacing the front audio and USB assembly Attention: Do...

Hardware Maintenance Manual (HMM) - ThinkCentre M77
Page 112
...the chassis. 10. Replacing the internal speaker Attention: Do not open your computer. To replace the internal speaker, do the following: 108 ThinkCentre Hardware Maintenance Manual Install the screw to secure the bracket to "Completing the parts replacement" on the system board. To obtain a copy ...audio and USB assembly to : http://support.lenovo.com This section provides instructions on page 77. 12. Note: The internal speaker is only available in some models. Remove the two screws that came with the corresponding hole in the ThinkCentre Safety and Warranty Guide that secure the ...
...the chassis. 10. Replacing the internal speaker Attention: Do not open your computer. To replace the internal speaker, do the following: 108 ThinkCentre Hardware Maintenance Manual Install the screw to secure the bracket to "Completing the parts replacement" on the system board. To obtain a copy ...audio and USB assembly to : http://support.lenovo.com This section provides instructions on page 77. 12. Note: The internal speaker is only available in some models. Remove the two screws that came with the corresponding hole in the ThinkCentre Safety and Warranty Guide that secure the ...

Hardware Maintenance Manual (HMM) - ThinkCentre M77
Page 114
Figure 44. To complete the replacement, go to: http://support.lenovo.com This section provides instructions on its side for easier access to the computer. 2. Turn off all cables that came with your computer or attempt ... on how to "Completing the parts replacement" on page 79. 3. To obtain a copy of the ThinkCentre Safety and Warranty Guide, go to replace the system board. See "Locating parts on the system board" on page 77. 8. Remove all media from electrical outlets and disconnect all attached devices and the computer. Installing a new...
Figure 44. To complete the replacement, go to: http://support.lenovo.com This section provides instructions on its side for easier access to the computer. 2. Turn off all cables that came with your computer or attempt ... on how to "Completing the parts replacement" on page 79. 3. To obtain a copy of the ThinkCentre Safety and Warranty Guide, go to replace the system board. See "Locating parts on the system board" on page 77. 8. Remove all media from electrical outlets and disconnect all attached devices and the computer. Installing a new...

Hardware Maintenance Manual (HMM) - ThinkCentre M77
Page 116
... with reinstalling the computer cover. 4. Install the screws to Lenovo. See "Locating parts on the system board" on page 101. 17. Note: If required, return the failing system board to secure the computer cover. 112 ThinkCentre Hardware Maintenance Manual Make sure that all components have removed the...disk drive. See "Replacing the primary hard disk drive" on page 99 and See "Replacing the secondary hard disk drive" on page 77. 16. Completing the parts replacement After completing the installation or replacement for the locations of the computer cover engage the rails on page 76...
... with reinstalling the computer cover. 4. Install the screws to Lenovo. See "Locating parts on the system board" on page 101. 17. Note: If required, return the failing system board to secure the computer cover. 112 ThinkCentre Hardware Maintenance Manual Make sure that all components have removed the...disk drive. See "Replacing the primary hard disk drive" on page 99 and See "Replacing the secondary hard disk drive" on page 77. 16. Completing the parts replacement After completing the installation or replacement for the locations of the computer cover engage the rails on page 76...

Hardware Maintenance Manual (HMM) - ThinkCentre M77
Page 129
Your computer has four slots for installing or replacing DDR3 UDIMMs that provide up to a maximum of the ThinkCentre Safety and Warranty Guide, go to: http://support.lenovo.com This section provides instructions on whether you should be installed in different situations. The numbers 1, 2, 3, and...Depending on how to a maximum of the following : 1. Open the computer cover. See "Removing and reinstalling the front bezel" on page 77. 8. See "Locating parts on the system board" on page 122. 4. The following table provides information about the memory module installation rules ...
Your computer has four slots for installing or replacing DDR3 UDIMMs that provide up to a maximum of the ThinkCentre Safety and Warranty Guide, go to: http://support.lenovo.com This section provides instructions on whether you should be installed in different situations. The numbers 1, 2, 3, and...Depending on how to a maximum of the following : 1. Open the computer cover. See "Removing and reinstalling the front bezel" on page 77. 8. See "Locating parts on the system board" on page 122. 4. The following table provides information about the memory module installation rules ...

Hardware Maintenance Manual (HMM) - ThinkCentre M77
Page 133
...on page 160. Figure 59. To complete the installation or replacement, go to: http://support.lenovo.com This section provides instructions on page 120. To obtain a copy of the ThinkCentre Safety and Warranty Guide, go to install or replace the card reader. Remove all media from... electrical outlets and disconnect all attached devices and the computer. See "Locating internal drives" on how to "Completing the parts replacement" on page 77. Installing or ...
...on page 160. Figure 59. To complete the installation or replacement, go to: http://support.lenovo.com This section provides instructions on page 120. To obtain a copy of the ThinkCentre Safety and Warranty Guide, go to install or replace the card reader. Remove all media from... electrical outlets and disconnect all attached devices and the computer. See "Locating internal drives" on how to "Completing the parts replacement" on page 77. Installing or ...

Hardware Maintenance Manual (HMM) - ThinkCentre M77
Page 136
...into the bracket and install the two screws to secure the card reader to its bracket. See "Removing and reinstalling the front bezel" on page 77. 6. Locate the card reader drive bay. See "Locating parts on the system board" on page 122. 4. Remove the screw that secures ...Remove the front bezel. See "Locating internal drives" on page 121. 3. Then, disconnect all cables that secure the card reader to the bracket. 132 ThinkCentre Hardware Maintenance Manual Open the computer cover. See "Opening the computer cover" on page 120. 5. 1. Then, remove the card reader bracket from the...
...into the bracket and install the two screws to secure the card reader to its bracket. See "Removing and reinstalling the front bezel" on page 77. 6. Locate the card reader drive bay. See "Locating parts on the system board" on page 122. 4. Remove the screw that secures ...Remove the front bezel. See "Locating internal drives" on page 121. 3. Then, disconnect all cables that secure the card reader to the bracket. 132 ThinkCentre Hardware Maintenance Manual Open the computer cover. See "Opening the computer cover" on page 120. 5. 1. Then, remove the card reader bracket from the...

Hardware Maintenance Manual (HMM) - ThinkCentre M77
Page 138
...information" in the "Batteries" and "Lithium battery notice" sections of the ThinkCentre Safety and Warranty Guide. 134 ThinkCentre Hardware Maintenance Manual Figure 65. See "Removing and reinstalling the front bezel" on page 77. 12. however, no charging or maintenance throughout its life; Reinstall the ...front bezel. To obtain a copy of the ThinkCentre Safety and Warranty Guide, go to : http://support.lenovo.com Your computer has a special type of...
...information" in the "Batteries" and "Lithium battery notice" sections of the ThinkCentre Safety and Warranty Guide. 134 ThinkCentre Hardware Maintenance Manual Figure 65. See "Removing and reinstalling the front bezel" on page 77. 12. however, no charging or maintenance throughout its life; Reinstall the ...front bezel. To obtain a copy of the ThinkCentre Safety and Warranty Guide, go to : http://support.lenovo.com Your computer has a special type of...

Hardware Maintenance Manual (HMM) - ThinkCentre M77
Page 146
Remove the two screws that secure the heat sink and fan assembly" on page 77. 142 ThinkCentre Hardware Maintenance Manual Partially tighten screw 1 , then fully tighten screw 2 , and then fully tighten screw 1 . Connect the new heat sink and fan assembly cable to ...
Remove the two screws that secure the heat sink and fan assembly" on page 77. 142 ThinkCentre Hardware Maintenance Manual Partially tighten screw 1 , then fully tighten screw 2 , and then fully tighten screw 1 . Connect the new heat sink and fan assembly cable to ...


