
User Manual
Page 33
v On a second hard disk drive installed in a protected, hidden area of your hard disk drive and transfer them to a network drive or other partitions intact. From the Rescue and Recovery main window, click Back up your hard disk drive, you to the C: partition and leave the other ...To perform a restore operation using the Rescue and Recovery program, do the following: 1. v Restore your hard disk drive to restore the complete contents of the hard disk drive, restore selected files only, or restore only the Windows operating system and applications. Follow the instructions on...
v On a second hard disk drive installed in a protected, hidden area of your hard disk drive and transfer them to a network drive or other partitions intact. From the Rescue and Recovery main window, click Back up your hard disk drive, you to the C: partition and leave the other ...To perform a restore operation using the Rescue and Recovery program, do the following: 1. v Restore your hard disk drive to restore the complete contents of the hard disk drive, restore selected files only, or restore only the Windows operating system and applications. Follow the instructions on...
Hardware Maintenance Manual
Page 91
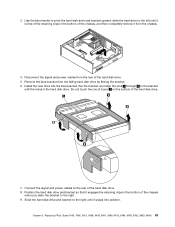
Install the new drive into position. Replacing FRUs (Types 7065, 7096, 9351, 9358, 9438, 9481, 9489, 9703, 9784, 9788, 9792, 9853, 9949) 83 Use the blue handle to pivot the hard disk drive and bracket upward, slide the hard drive to the right. 9. Position the hard disk drive and bracket so that it engages the retaining...when you slide the bracket to the left until it from the chassis. 4. Disconnect the signal and power cables from the failing hard disk drive by flexing the bracket. 6. Connect the signal and power cables to the right until it is free of the retaining clips in the...
Install the new drive into position. Replacing FRUs (Types 7065, 7096, 9351, 9358, 9438, 9481, 9489, 9703, 9784, 9788, 9792, 9853, 9949) 83 Use the blue handle to pivot the hard disk drive and bracket upward, slide the hard drive to the right. 9. Position the hard disk drive and bracket so that it engages the retaining...when you slide the bracket to the left until it from the chassis. 4. Disconnect the signal and power cables from the failing hard disk drive by flexing the bracket. 6. Connect the signal and power cables to the right until it is free of the retaining clips in the...
Hardware Maintenance Manual
Page 105
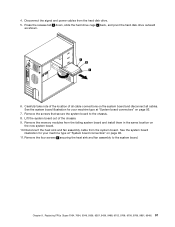
Chapter 9. Disconnect the signal and power cables from the system board. Disconnect the heat sink and fan assembly cable from the hard disk drive. 5. 4. Replacing FRUs (Types 7064, 7094, 9349, 9356, 9357, 9439, 9488, 9702, 9708, 9709, 9789, 9851, 9948) 97 Carefully take note ...failing system board and install them in the same location on page 92. 7. See the system board illustration for your machine type at "System board connectors" on the new system board. 10. Press the release tab 1 down, slide the hard drive cage 2 back, and pivot the hard disk drive outward as shown....
Chapter 9. Disconnect the signal and power cables from the system board. Disconnect the heat sink and fan assembly cable from the hard disk drive. 5. 4. Replacing FRUs (Types 7064, 7094, 9349, 9356, 9357, 9439, 9488, 9702, 9708, 9709, 9789, 9851, 9948) 97 Carefully take note ...failing system board and install them in the same location on page 92. 7. See the system board illustration for your machine type at "System board connectors" on the new system board. 10. Press the release tab 1 down, slide the hard drive cage 2 back, and pivot the hard disk drive outward as shown....
Hardware Maintenance Manual
Page 113
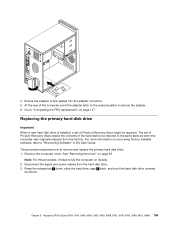
...installed, a set of Product Recovery discs enable the contents of the hard disk to be required. At the rear of Product Recovery discs might be restored to secure the adapter. 6. Press the release tab 1 down, slide the hard drive cage 2 back, and pivot the hard disk drive... outward as when the computer was originally shipped from the hard disk drive. 3. Remove the computer cover. Replacing the primary hard disk drive Important When a new hard disk drive is fully seated into the adapter connector. ...
...installed, a set of Product Recovery discs enable the contents of the hard disk to be required. At the rear of Product Recovery discs might be restored to secure the adapter. 6. Press the release tab 1 down, slide the hard drive cage 2 back, and pivot the hard disk drive... outward as when the computer was originally shipped from the hard disk drive. 3. Remove the computer cover. Replacing the primary hard disk drive Important When a new hard disk drive is fully seated into the adapter connector. ...
Hardware Maintenance Manual
Page 116
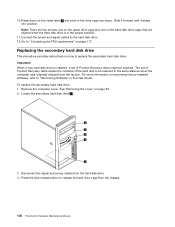
.... Locate the secondary hard disk drive 5 . 3. Note: There are aligned when the hard disk drive is installed, a set of Product Recovery discs enable the contents of Product Recovery discs might be restored to the hard disk drive. 12. To replace the secondary hard disk drive: 1. Disconnect the signal and power cables from the chassis. 108 ThinkCentre Hardware Maintenance Manual Connect...
.... Locate the secondary hard disk drive 5 . 3. Note: There are aligned when the hard disk drive is installed, a set of Product Recovery discs enable the contents of Product Recovery discs might be restored to the hard disk drive. 12. To replace the secondary hard disk drive: 1. Disconnect the signal and power cables from the chassis. 108 ThinkCentre Hardware Maintenance Manual Connect...
Hardware Maintenance Manual
Page 117
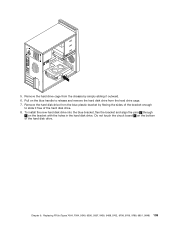
... bracket with the holes in the hard disk drive. To install the new hard disk drive into the blue bracket, flex the bracket and align the pins 1 through 4 on the bottom of the hard disk drive. 8. Chapter 9. 5. Pull on the blue handle to slide it outward. 6. Remove the hard disk drive from the hard drive cage. 7. Replacing FRUs (Types 7064, 7094...
... bracket with the holes in the hard disk drive. To install the new hard disk drive into the blue bracket, flex the bracket and align the pins 1 through 4 on the bottom of the hard disk drive. 8. Chapter 9. 5. Pull on the blue handle to slide it outward. 6. Remove the hard disk drive from the hard drive cage. 7. Replacing FRUs (Types 7064, 7094...
Hardware Maintenance Manual
Page 118
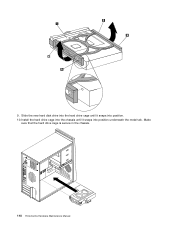
Install the hard drive cage into the chassis until it snaps into position. 10. Slide the new hard disk drive into the hard drive cage until it snaps into position underneath the metal tab. Make sure that the hard drive cage is secure in the chassis. 110 ThinkCentre Hardware Maintenance Manual 9.
Install the hard drive cage into the chassis until it snaps into position. 10. Slide the new hard disk drive into the hard drive cage until it snaps into position underneath the metal tab. Make sure that the hard drive cage is secure in the chassis. 110 ThinkCentre Hardware Maintenance Manual 9.
(English) Rescue and Recovery 4.3 Deployment Guide
Page 5
...Installing... Standalone install for hard drive setup: Option 2 . . 55 Scenario 3 - Installing on OEM systems . . . . . 54 Best practices for hard drive setup: ... 16 Restore system drive only 16 Rejuvenation 16 ... 20 Sysprep Backup/Restore 21 Mapping a network drive for backups . . . . 22 Password ...Installation 5 Installation considerations 5 Installing the Rescue and Recovery program. . . . 6 Installation requirements 6 Installation components 7 Installation log files 8 Rescue and Recovery installation...hard disk drive 51 Installing 51 Updating 53 Enabling the Rescue...
...Installing... Standalone install for hard drive setup: Option 2 . . 55 Scenario 3 - Installing on OEM systems . . . . . 54 Best practices for hard drive setup: ... 16 Restore system drive only 16 Rejuvenation 16 ... 20 Sysprep Backup/Restore 21 Mapping a network drive for backups . . . . 22 Password ...Installation 5 Installation considerations 5 Installing the Rescue and Recovery program. . . . 6 Installation requirements 6 Installation components 7 Installation log files 8 Rescue and Recovery installation...hard disk drive 51 Installing 51 Updating 53 Enabling the Rescue...
(English) Rescue and Recovery 4.3 Deployment Guide
Page 13
... that path it assumes it to install the Rescue and Recovery program as a virtual partition, then Storage Management Subsystem will allow a user to choose the operating system and then gain access to the entire hard drive without needing to your enterprise and then... deploy it is recommended to make the backup by using either a script or the user interface. Chapter 2. It is an operating system. If you can make a new backup after installing the Rescue and Recovery program 4.3 to enter a password. © Copyright Lenovo...
... that path it assumes it to install the Rescue and Recovery program as a virtual partition, then Storage Management Subsystem will allow a user to choose the operating system and then gain access to the entire hard drive without needing to your enterprise and then... deploy it is recommended to make the backup by using either a script or the user interface. Chapter 2. It is an operating system. If you can make a new backup after installing the Rescue and Recovery program 4.3 to enter a password. © Copyright Lenovo...
(English) Rescue and Recovery 4.3 Deployment Guide
Page 14
... up-to-the-minute information on your hard drive. In non-shared memory configurations, 120 MB of free space on software versions, supported systems, system requirements, and other considerations to use and run ; Requirements for Lenovo computers Lenovo-branded computers must be installed. The base install uses 930 MB. Hard disk drive configuration: The Rescue and Recovery program...
... up-to-the-minute information on your hard drive. In non-shared memory configurations, 120 MB of free space on software versions, supported systems, system requirements, and other considerations to use and run ; Requirements for Lenovo computers Lenovo-branded computers must be installed. The base install uses 930 MB. Hard disk drive configuration: The Rescue and Recovery program...
(English) Rescue and Recovery 4.3 Deployment Guide
Page 26
...data from the personalization file and places the data in a manifest file includes component categorization such as follows: v Required components are always installed upon recovery, and are not displayed to perform: v Full factory recovery only v Custom factory recovery only v Either a full factory...full factory recovery method and the custom factory recovery method. The full factory recovery method restores the factory contents of the hard drive that personalization file to the user during the recovery process. Manifest files: Customizing the recovery process is controlled with the...
...data from the personalization file and places the data in a manifest file includes component categorization such as follows: v Required components are always installed upon recovery, and are not displayed to perform: v Full factory recovery only v Custom factory recovery only v Either a full factory...full factory recovery method and the custom factory recovery method. The full factory recovery method restores the factory contents of the hard drive that personalization file to the user during the recovery process. Manifest files: Customizing the recovery process is controlled with the...

(English) Rescue and Recovery 4.3 Deployment Guide
Page 31
..."C:\TVTRR\Rescue and Recovery.msi" /qn With reboot suppressed, enter the following command: : Silent install using the power button. 8. Capture the image for deployment. Perform an administrative installation action: :: Extract the WWW EXE to the Predesktop Area and take sysprep backup. ** ** ...Sysprep Base Backup to take a backup. ** 5. Configurations 23 Enter the following message: ** Ready to Local Hard Drive : Type the following command on the Lenovo Web site Chapter 3. The status bar with a reboot : Type the following command on one line cd "\Program Files...
..."C:\TVTRR\Rescue and Recovery.msi" /qn With reboot suppressed, enter the following command: : Silent install using the power button. 8. Capture the image for deployment. Perform an administrative installation action: :: Extract the WWW EXE to the Predesktop Area and take sysprep backup. ** ** ...Sysprep Base Backup to take a backup. ** 5. Configurations 23 Enter the following message: ** Ready to Local Hard Drive : Type the following command on the Lenovo Web site Chapter 3. The status bar with a reboot : Type the following command on one line cd "\Program Files...
(English) Rescue and Recovery 4.3 Deployment Guide
Page 32
... the machine boots, it will appear. 9. Power off the system using MSIEXE, type the following command on one line cd "\Program Files\Lenovo\Rescue and Recovery" rrcmd sysprepbackup location=L name="Sysprep Base Backup" If you see Include and exclude backup files with Registry settings"Include and exclude... the power button. 10. The status bar with a reboot : Type the following command: : Perform the install of the Rescue and Recovery program. If you want to Local Hard Drive : Type the following command on one line start /WAIT msiexec /i "C:\TVTRR\Rescue and Recovery.msi" /qn...
... the machine boots, it will appear. 9. Power off the system using MSIEXE, type the following command on one line cd "\Program Files\Lenovo\Rescue and Recovery" rrcmd sysprepbackup location=L name="Sysprep Base Backup" If you see Include and exclude backup files with Registry settings"Include and exclude... the power button. 10. The status bar with a reboot : Type the following command: : Perform the install of the Rescue and Recovery program. If you want to Local Hard Drive : Type the following command on one line start /WAIT msiexec /i "C:\TVTRR\Rescue and Recovery.msi" /qn...
(English) Rescue and Recovery 4.3 Deployment Guide
Page 33
...of the employees authentication accounts, the ex-employees would still have access to data. Table 13. When restoring from a local hard drive, the current password will lose Encrypted File System data v You cannot use Password Persistence. Password Persistence The following table shows ... original account and password, not the current account and password. Battery power settings for backups With the corresponding ADM file installed for deciding whether to use Encrypted File System and Password Persistence together. All Internet Explorer favorites and application data do not...
...of the employees authentication accounts, the ex-employees would still have access to data. Table 13. When restoring from a local hard drive, the current password will lose Encrypted File System data v You cannot use Password Persistence. Password Persistence The following table shows ... original account and password, not the current account and password. Battery power settings for backups With the corresponding ADM file installed for deciding whether to use Encrypted File System and Password Persistence together. All Internet Explorer favorites and application data do not...
(English) Rescue and Recovery 4.3 Deployment Guide
Page 63
... product recovery code interferes with this in the Master Boot Record sector. Set up a test client with the Rescue and Recovery Boot Manager installation. However, if an appropriate ISO (.iso) image is already present, because it was preloaded or because it is a problem with the ... not contain the product recovery data. There is running at : http://www.lenovo.com/support/site.wss/document.do not exist as a result of the target hard disk drive. This scenario provides another option for hard drive setup: Option 1 This scenario covers new image deployments that contains the OEM ...
... product recovery code interferes with this in the Master Boot Record sector. Set up a test client with the Rescue and Recovery Boot Manager installation. However, if an appropriate ISO (.iso) image is already present, because it was preloaded or because it is a problem with the ... not contain the product recovery data. There is running at : http://www.lenovo.com/support/site.wss/document.do not exist as a result of the target hard disk drive. This scenario provides another option for hard drive setup: Option 1 This scenario covers new image deployments that contains the OEM ...

(English) Rescue and Recovery 4.3 Deployment Guide
Page 64
... ImageX. Boot to Windows PE 2.0 2. Create desired primary partition of the hard drive, only administrators can create the ISO. Considering this much data around is not rebooted after install. :: Set up the environment set PATH=%PATH%;%SystemDrive%\Program Files\Common Files\Lenovo\Python24 set PATHEXT=%PATHEXT%;.PYW;.PYO;.PYC;.PY set TCL_LIBRARY=%SystemDrive%\Program...
... ImageX. Boot to Windows PE 2.0 2. Create desired primary partition of the hard drive, only administrators can create the ISO. Considering this much data around is not rebooted after install. :: Set up the environment set PATH=%PATH%;%SystemDrive%\Program Files\Common Files\Lenovo\Python24 set PATHEXT=%PATHEXT%;.PYW;.PYO;.PYC;.PY set TCL_LIBRARY=%SystemDrive%\Program...
(Japanese) Rescue and Recovery 4.3 Deployment Guide
Page 34
...install using the MSI without a reboot : Type the following command on one line start /WAIT msiexec /i "C:¥TVTRR¥Rescue and Recovery.msi" /qn REBOOT="R" 3 : Start the Rescue and Recovery Service net start "TVT Backup Service" : Create Sysprep Base Backup to Local Hard Drive... : Type the following command on one line cd "¥Program Files¥Lenovo¥Rescue and Recovery" rrcmd sysprepbackup location=l name="Sysprep Backup" password=pass 4 Sysprep ** Ready ...
...install using the MSI without a reboot : Type the following command on one line start /WAIT msiexec /i "C:¥TVTRR¥Rescue and Recovery.msi" /qn REBOOT="R" 3 : Start the Rescue and Recovery Service net start "TVT Backup Service" : Create Sysprep Base Backup to Local Hard Drive... : Type the following command on one line cd "¥Program Files¥Lenovo¥Rescue and Recovery" rrcmd sysprepbackup location=l name="Sysprep Backup" password=pass 4 Sysprep ** Ready ...
(Japanese) Rescue and Recovery 4.3 Deployment Guide
Page 36
...install using the MSI without a reboot : Type the following command on one line start /WAIT msiexec /i "C:¥TVTRR¥Rescue and Recovery.msi" /qn REBOOT="R" 5 :Start the Rescue and Recovery Service net start "TVT Backup Service" :Create Sysprep Base Backup to Local Hard Drive... : Type the following command on one line cd "¥Program Files¥Lenovo¥Rescue and Recovery" rrcmd sysprepbackup location=L name="Sysprep Base Backup" password=pass 6 Sysprep ...
...install using the MSI without a reboot : Type the following command on one line start /WAIT msiexec /i "C:¥TVTRR¥Rescue and Recovery.msi" /qn REBOOT="R" 5 :Start the Rescue and Recovery Service net start "TVT Backup Service" :Create Sysprep Base Backup to Local Hard Drive... : Type the following command on one line cd "¥Program Files¥Lenovo¥Rescue and Recovery" rrcmd sysprepbackup location=L name="Sysprep Base Backup" password=pass 6 Sysprep ...
(Simplified Chinese) Rescue and Recovery 4.3 Deployment Guide
Page 28
dkTB|n({9XB}
dkTB|n({9XB}
(Simplified Chinese) Rescue and Recovery 4.3 Deployment Guide
Page 29
|,ME}8]D|`E",kND:9C"amhC|,ME}8]D~;( Z 23 3D:9C"amhC|,ME}8]D~;)# 4. 9C MSIEXE 20 Rescue and Recovery Lr: a. TZyP MSI D~,mSTB20U>zIzk: /L*v %temp%\rrinstall.txt b. *9C MSIEXE 20b)20D~,kdkTB|n: : Perform the install of Rescue and Recovery msiexec /i "C:\TVTRR\Rescue and Recovery.msi" c. *9C MSIEXE 2,20b)20D~: dkTB|n(axsXB}
|,ME}8]D|`E",kND:9C"amhC|,ME}8]D~;( Z 23 3D:9C"amhC|,ME}8]D~;)# 4. 9C MSIEXE 20 Rescue and Recovery Lr: a. TZyP MSI D~,mSTB20U>zIzk: /L*v %temp%\rrinstall.txt b. *9C MSIEXE 20b)20D~,kdkTB|n: : Perform the install of Rescue and Recovery msiexec /i "C:\TVTRR\Rescue and Recovery.msi" c. *9C MSIEXE 2,20b)20D~: dkTB|n(axsXB}


