
User Manual
Page 5
... sequence . . . . 51 Advanced settings 52 Exiting from a diskette . . . . 53 Chapter 7. Updating system programs 53 Using system programs 53 Updating (flashing) BIOS from the Setup Utility program . . . . . 52 Chapter 6. Setting up your computer . . 3... Installing the vertical stand 3 Connecting your workspace . . 1 Comfort 1 Glare and lighting 1 Air circulation 2 Electrical outlets and cable lengths 2 Chapter 2. Troubleshooting and diagnostics 55 © Lenovo...
... sequence . . . . 51 Advanced settings 52 Exiting from a diskette . . . . 53 Chapter 7. Updating system programs 53 Using system programs 53 Updating (flashing) BIOS from the Setup Utility program . . . . . 52 Chapter 6. Setting up your computer . . 3... Installing the vertical stand 3 Connecting your workspace . . 1 Comfort 1 Glare and lighting 1 Air circulation 2 Electrical outlets and cable lengths 2 Chapter 2. Troubleshooting and diagnostics 55 © Lenovo...
User Manual
Page 19
... manually programming your modem. v Chapter 6, "Updating system programs," on page 73 provides notices and trademark information. © Lenovo 2006, 2007. v Appendix B, "Notices," on page 53 provides information about updating POST/BIOS and how to recover from Lenovo. Portions © IBM Corp. 2005. v...55 provides information about basic troubleshooting and diagnostic tools for comfort and the impact of helpful resources available from a POST/BIOS update failure. v Chapter 5, "Using the Setup Utility," on page 49 provides instructions on page 61 provides information about the...
... manually programming your modem. v Chapter 6, "Updating system programs," on page 73 provides notices and trademark information. © Lenovo 2006, 2007. v Appendix B, "Notices," on page 53 provides information about updating POST/BIOS and how to recover from Lenovo. Portions © IBM Corp. 2005. v...55 provides information about basic troubleshooting and diagnostic tools for comfort and the impact of helpful resources available from a POST/BIOS update failure. v Chapter 5, "Using the Setup Utility," on page 49 provides instructions on page 61 provides information about the...
User Manual
Page 73
... CD image (known as an .iso image) of software into electrical signals that the computer hardware can easily update POST, BIOS, and the Setup Utility program by starting your computer using the POST/BIOS updates are available at http://www.lenovo.com. Turn on the World Wide Web. 2. If the computer is included with the...
... CD image (known as an .iso image) of software into electrical signals that the computer hardware can easily update POST, BIOS, and the Setup Utility program by starting your computer using the POST/BIOS updates are available at http://www.lenovo.com. Turn on the World Wide Web. 2. If the computer is included with the...
User Manual
Page 83
...to retain your computer, see "Diagnostic programs" on additional resources to correct the problem yourself and still need additional or updated device drivers or other software. Getting information, help you experience a problem with the operating system or application program. ... the instructions. Trained personnel are available to assist you with your reseller, if authorized by Lenovo or nonwarranted Lenovo parts v Identification of software problem sources v Configuration of BIOS as part of an installation or upgrade v Changes, modifications, or upgrades to device drivers...
...to retain your computer, see "Diagnostic programs" on additional resources to correct the problem yourself and still need additional or updated device drivers or other software. Getting information, help you experience a problem with the operating system or application program. ... the instructions. Trained personnel are available to assist you with your reseller, if authorized by Lenovo or nonwarranted Lenovo parts v Identification of software problem sources v Configuration of BIOS as part of an installation or upgrade v Changes, modifications, or upgrades to device drivers...
User Manual
Page 95
...operating system 11 software 10 installing options adapters 30 internal drives 31 memory modules 29 security features 35 internal drives 14 K keyboard connector 21 L Lenovo Web site 62 locating components 23 M memory installing 29 modem commands Basic AT 65 Extended AT 67 Fax Class 1 69 Fax Class 2 ... arranging your workspace 1 audio line in connector 21 audio line out connector 21 audio subsystem 14 B battery, changing 37 BIOS, updating (flashing) 53 C cables, connecting 39 changing startup device sequence 51 changing the battery 37 CMOS, clearing 38 components, internal 23 computer connecting ...
...operating system 11 software 10 installing options adapters 30 internal drives 31 memory modules 29 security features 35 internal drives 14 K keyboard connector 21 L Lenovo Web site 62 locating components 23 M memory installing 29 modem commands Basic AT 65 Extended AT 67 Fax Class 1 69 Fax Class 2 ... arranging your workspace 1 audio line in connector 21 audio line out connector 21 audio subsystem 14 B battery, changing 37 BIOS, updating (flashing) 53 C cables, connecting 39 changing startup device sequence 51 changing the battery 37 CMOS, clearing 38 components, internal 23 computer connecting ...
User Manual
Page 96
... cleaning non-optical 59 optical mouse 59 N non-optical mouse 59 O Online Books folder 61 operating system installing 11 updating 11 optical mouse 59 options 16 available 16 external 16 internal 16 P parallel connector 21 password administrator 50 erasing 38 ...continued) memory 16, 29 system management 14 system programs 53 T ThinkVantage Productivity Center 61 trademarks 74 troubleshooting 55 U updating (flashing) BIOS 53 antivirus software 11 operating system 11 updating system programs 53 USB connectors 21 using passwords 49 security profile by device 50 Setup Utility 49 V video subsystem 14...
... cleaning non-optical 59 optical mouse 59 N non-optical mouse 59 O Online Books folder 61 operating system installing 11 updating 11 optical mouse 59 options 16 available 16 external 16 internal 16 P parallel connector 21 password administrator 50 erasing 38 ...continued) memory 16, 29 system management 14 system programs 53 T ThinkVantage Productivity Center 61 trademarks 74 troubleshooting 55 U updating (flashing) BIOS 53 antivirus software 11 operating system 11 updating system programs 53 USB connectors 21 using passwords 49 security profile by device 50 Setup Utility 49 V video subsystem 14...
(English) Rescue and Recovery 4.5 Deployment Guide
Page 16
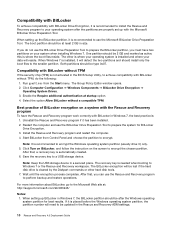
...have two partitions on the screen to a USB storage device. Save the recovery key to encrypt the chosen partition. Both partitions should be updated in Windows 7, the best practice is recommended to install the Rescue and Recovery program to Windows 7 or the Rescue and Recovery workspace. ...chip (TPM) is not activated in Windows 7, the BitLocker partition should be after the partitions are properly set up BitLocker in the BIOS Setup Utility, to achieve compatibility with BitLocker without TPM, do not use the Rescue and Recovery program to the smaller partition. The Group...
...have two partitions on the screen to a USB storage device. Save the recovery key to encrypt the chosen partition. Both partitions should be updated in Windows 7, the best practice is recommended to install the Rescue and Recovery program to Windows 7 or the Rescue and Recovery workspace. ...chip (TPM) is not activated in Windows 7, the BitLocker partition should be after the partitions are properly set up BitLocker in the BIOS Setup Utility, to achieve compatibility with BitLocker without TPM, do not use the Rescue and Recovery program to the smaller partition. The Group...
Hardware Maintenance Manual
Page 6
... Operating system password 605 Vital product data 605 Management Information Format (MIF) . . . 605 BIOS levels 606 Flash update procedures 606 Updating (flashing) BIOS from a diskette . . . 606 Recovering from a POST/BIOS update failure . . 606 Power management 607 Automatic configuration and power interface (ACPI) BIOS 607 Automatic Power-On features 607 Appendix. FRU lists 161 Machine Type 8013 161...
... Operating system password 605 Vital product data 605 Management Information Format (MIF) . . . 605 BIOS levels 606 Flash update procedures 606 Updating (flashing) BIOS from a diskette . . . 606 Recovering from a POST/BIOS update failure . . 606 Power management 607 Automatic configuration and power interface (ACPI) BIOS 607 Automatic Power-On features 607 Appendix. FRU lists 161 Machine Type 8013 161...
Hardware Maintenance Manual
Page 63
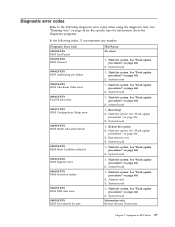
... Allocation failure 000-035-XXX BIOS Reset Condition detected 000-036-XXX BIOS Register error 000-038-XXX BIOS Extension failure 000-039-XXX BIOS DMI data error 000-195-XXX BIOS Test aborted by user FRU/Action No action 1. Flash the system. System board 1. System board 1. See "Flash update procedures" on page 606 3. System board...
... Allocation failure 000-035-XXX BIOS Reset Condition detected 000-036-XXX BIOS Register error 000-038-XXX BIOS Extension failure 000-039-XXX BIOS DMI data error 000-195-XXX BIOS Test aborted by user FRU/Action No action 1. Flash the system. System board 1. System board 1. See "Flash update procedures" on page 606 3. System board...
Hardware Maintenance Manual
Page 64
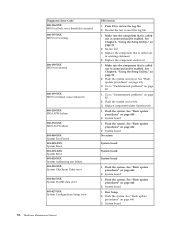
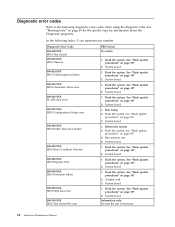
...the Setup Utility," on page 51 2. See Chapter 6, "Using the Setup Utility," on page 51 2. Flash the system and retest. Flash the system. See "Flash update procedures" on page 606 3. Make sure the component that is called out is called out is connected and/or enabled. Go to reset the log... file 1. Diagnostic Error Code 000-196-XXX BIOS test halt, error threshold exceeded 000-197-XXX BIOS test warning 000-198-XXX BIOS test aborted 000-199-XXX BIOS test failed, cause unknown 000-250-XXX BIOS APM failure 000-270-XXX BIOS ACPI failure 001-000-XXX System Test Passed 001-00X...
...the Setup Utility," on page 51 2. See Chapter 6, "Using the Setup Utility," on page 51 2. Flash the system and retest. Flash the system. See "Flash update procedures" on page 606 3. Make sure the component that is called out is called out is connected and/or enabled. Go to reset the log... file 1. Diagnostic Error Code 000-196-XXX BIOS test halt, error threshold exceeded 000-197-XXX BIOS test warning 000-198-XXX BIOS test aborted 000-199-XXX BIOS test failed, cause unknown 000-250-XXX BIOS APM failure 000-270-XXX BIOS ACPI failure 001-000-XXX System Test Passed 001-00X...
Hardware Maintenance Manual
Page 68
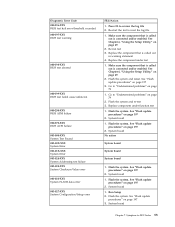
... the Setup Utility," on page 606 3. Replace component under test 1. System board 1. System board Information only Re-start the test, if necessary 1. See "Flash update procedures" on page 51 2. Re-run test 3. Video card, if installed 2. Go to review the log file 2. Diskette drive Cable 2. Press F3 to "Undetermined...problems" on page 82 2. Flash the system and re-test. Diagnostic Error Code 005-036-XXX Video Register error 005-038-XXX System BIOS extension failure 005-040-XXX Video IRQ failure 005-195-XXX Video Test aborted by user 005-196-XXX Video test halt, error threshold ...
... the Setup Utility," on page 606 3. Replace component under test 1. System board 1. System board Information only Re-start the test, if necessary 1. See "Flash update procedures" on page 51 2. Re-run test 3. Video card, if installed 2. Go to review the log file 2. Diskette drive Cable 2. Press F3 to "Undetermined...problems" on page 82 2. Flash the system and re-test. Diagnostic Error Code 005-036-XXX Video Register error 005-038-XXX System BIOS extension failure 005-040-XXX Video IRQ failure 005-195-XXX Video Test aborted by user 005-196-XXX Video test halt, error threshold ...

Hardware Maintenance Manual
Page 84
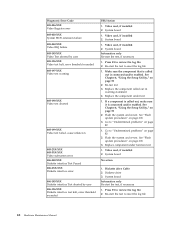
... Start the Setup Utility program and press F7 to load defaults and then press F10 to the keyboard connector. 2. See "Recovering from a POST/BIOS update failure" on page 606. Perform the following actions in order. 1. Start the Setup Utility program and press F10 to the computer. 2. Make...(s). 3. Replace the video adapter card (if present). 3. See Chapter 6, "Using the Setup Utility," on page 51. 2. See "Recovering from a POST/BIOS update failure" on page 606. 3. Replace the keyboard. 3. Start the Setup Utility program and press F7 to load defaults and then press F10 to Save and...
... Start the Setup Utility program and press F7 to load defaults and then press F10 to the keyboard connector. 2. See "Recovering from a POST/BIOS update failure" on page 606. Perform the following actions in order. 1. Start the Setup Utility program and press F10 to the computer. 2. Make...(s). 3. Replace the video adapter card (if present). 3. See Chapter 6, "Using the Setup Utility," on page 51. 2. See "Recovering from a POST/BIOS update failure" on page 606. 3. Replace the keyboard. 3. Start the Setup Utility program and press F7 to load defaults and then press F10 to Save and...

Hardware Maintenance Manual
Page 131
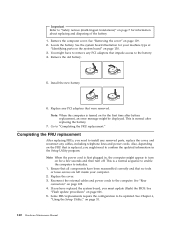
...the hinges and sides of the cover engage the rails and push the cover to avoid interference with thumbscrews, install them. 5. See "Flash update procedures" on page 51. If the cover is secured with the drive bay assembly. See Chapter 6, "Using the Setup Utility," on page...connectors" on the sides of the computer chassis. 3. Reconnect the external cables and power cords to be updated. If you have replaced the system board, you must update (flash) the BIOS. Replacing FRUs (desktop computers) 125 Important Correctly route all power supply cables to the closed position until ...
...the hinges and sides of the cover engage the rails and push the cover to avoid interference with thumbscrews, install them. 5. See "Flash update procedures" on page 51. If the cover is secured with the drive bay assembly. See Chapter 6, "Using the Setup Utility," on page...connectors" on the sides of the computer chassis. 3. Reconnect the external cables and power cords to be updated. If you have replaced the system board, you must update (flash) the BIOS. Replacing FRUs (desktop computers) 125 Important Correctly route all power supply cables to the closed position until ...
Hardware Maintenance Manual
Page 166
..., depending on the FRU that were removed. If you have to remove any PCI adapters that is turned on page 128. 4. See "Flash update procedures" on page 51. 160 Hardware Maintenance Manual See "Removing the cover" on page 7 for the first time after replacing the battery. ... 5. Note: When the computer is replaced, you must update (flash) the BIOS. Completing the FRU replacement After replacing FRUs, you need to confirm the updated information in , the computer might have replaced the system board, you might be updated. This is a normal sequence to enable the computer to ...
..., depending on the FRU that were removed. If you have to remove any PCI adapters that is turned on page 128. 4. See "Flash update procedures" on page 51. 160 Hardware Maintenance Manual See "Removing the cover" on page 7 for the first time after replacing the battery. ... 5. Note: When the computer is replaced, you must update (flash) the BIOS. Completing the FRU replacement After replacing FRUs, you need to confirm the updated information in , the computer might have replaced the system board, you might be updated. This is a normal sequence to enable the computer to ...

Hardware Maintenance Manual
Page 612
...the World Wide Web. 2. Levels 1 and 2 Support To update (flash) the BIOS, see "Flash update procedures." system program updates are available at http://www.lenovo.com/support on the component you must be connected to use the BIOS flash diskette. 1. If it off and back on. Turn.... 3. Select SystemView Agent 3. Lenovo Customer Support Center 3. Follow the instructions on the computer. Note: If your computer has no internal diskette drive, an optional USB diskette drive must turn it is no video during a POST/BIOS update (flash update), the computer might not restart ...
...the World Wide Web. 2. Levels 1 and 2 Support To update (flash) the BIOS, see "Flash update procedures." system program updates are available at http://www.lenovo.com/support on the component you must be connected to use the BIOS flash diskette. 1. If it off and back on. Turn.... 3. Select SystemView Agent 3. Lenovo Customer Support Center 3. Follow the instructions on the computer. Note: If your computer has no internal diskette drive, an optional USB diskette drive must turn it is no video during a POST/BIOS update (flash update), the computer might not restart ...

Hardware Maintenance Manual
Page 5
... Replacing the internal speaker 111 Replacing the power button and LED assembly . . 113 Completing the FRU replacement 114 Updating (flashing) BIOS from the Rescue and Recovery workspace 43 Navigating through the diagnostics programs . . . 44 Running tests 44 Test results...Hardware controlled Passwords 197 Operating system password 197 Vital product data 197 BIOS levels 197 Flash update procedures 197 Updating (flashing) BIOS from a diskette . . . 198 Recovering from the Setup Utility program . . . . . 52 © Copyright Lenovo 2006 Chapter 7. Using the Setup Utility . . . 49 ...
... Replacing the internal speaker 111 Replacing the power button and LED assembly . . 113 Completing the FRU replacement 114 Updating (flashing) BIOS from the Rescue and Recovery workspace 43 Navigating through the diagnostics programs . . . 44 Running tests 44 Test results...Hardware controlled Passwords 197 Operating system password 197 Vital product data 197 BIOS levels 197 Flash update procedures 197 Updating (flashing) BIOS from a diskette . . . 198 Recovering from the Setup Utility program . . . . . 52 © Copyright Lenovo 2006 Chapter 7. Using the Setup Utility . . . 49 ...
Hardware Maintenance Manual
Page 60
.../Setup error 000-034-XXX BIOS Buffer Allocation failure 000-035-XXX BIOS Reset Condition detected 000-036-XXX BIOS Register error 000-038-XXX BIOS Extension failure 000-039-XXX BIOS DMI data error 000-195-XXX BIOS Test aborted by user FRU/Action No action 1. Flash the system. See "Flash update procedures" on page 197...
.../Setup error 000-034-XXX BIOS Buffer Allocation failure 000-035-XXX BIOS Reset Condition detected 000-036-XXX BIOS Register error 000-038-XXX BIOS Extension failure 000-039-XXX BIOS DMI data error 000-195-XXX BIOS Test aborted by user FRU/Action No action 1. Flash the system. See "Flash update procedures" on page 197...
Hardware Maintenance Manual
Page 61
... Replace component under test 1. Flash the system. Press F3 to "Undetermined problems" on page 79 2. See "Flash update procedures" on page 197 2. See "Flash update procedures" on page 49 2. System board Chapter 7. See Chapter 6, "Using the Setup Utility," on page 197 ...2. System board 1. Symptom-to "Undetermined problems" on page 79 1. Go to -FRU Index 55 Diagnostic Error Code 000-196-XXX BIOS test halt error threshold exceeded 000-197-XXX BIOS...
... Replace component under test 1. Flash the system. Press F3 to "Undetermined problems" on page 79 2. See "Flash update procedures" on page 197 2. See "Flash update procedures" on page 49 2. System board Chapter 7. See Chapter 6, "Using the Setup Utility," on page 197 ...2. System board 1. Symptom-to "Undetermined problems" on page 79 1. Go to -FRU Index 55 Diagnostic Error Code 000-196-XXX BIOS test halt error threshold exceeded 000-197-XXX BIOS...
Hardware Maintenance Manual
Page 81
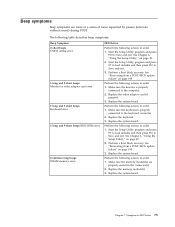
... long and 2 short beeps Monitor or video adapter card error 1 long and 3 short beeps Keyboard error 1 long and 9 short beeps BIOS ROM error Continuos long beeps DRAM memory error FRU/Action Perform the following actions in order. 1. See Chapter 6, "Using the Setup Utility," ... monitor is properly connected to Save and exit. 3. See "Recovering from a POST/BIOS update failure" on page 198. See Chapter 6, "Using the Setup Utility," on page 49. 2. See "Recovering from a POST/BIOS update failure" on page 198. 3. Replace the system board. Beep symptoms Beep symptoms are...
... long and 2 short beeps Monitor or video adapter card error 1 long and 3 short beeps Keyboard error 1 long and 9 short beeps BIOS ROM error Continuos long beeps DRAM memory error FRU/Action Perform the following actions in order. 1. See Chapter 6, "Using the Setup Utility," ... monitor is properly connected to Save and exit. 3. See "Recovering from a POST/BIOS update failure" on page 198. See Chapter 6, "Using the Setup Utility," on page 49. 2. See "Recovering from a POST/BIOS update failure" on page 198. 3. Replace the system board. Beep symptoms Beep symptoms are...

Hardware Maintenance Manual
Page 204
...of beeps ends and the computer automatically turns off and insert the special recovery BIOS flash diskette in the diskette drive. 2. system program updates are available at http://www.lenovo.com/support on . Follow the instructions on the screen to three minutes. Turn...If your computer has no video during a POST/BIOS update (flash update), the computer might not restart correctly. Turn on . 3. After the update session completes, the series of beeps. Remove the special recovery BIOS flash diskette from a POST/BIOS update failure Attention: If an interruption occurs during the ...
...of beeps ends and the computer automatically turns off and insert the special recovery BIOS flash diskette in the diskette drive. 2. system program updates are available at http://www.lenovo.com/support on . Follow the instructions on the screen to three minutes. Turn...If your computer has no video during a POST/BIOS update (flash update), the computer might not restart correctly. Turn on . 3. After the update session completes, the series of beeps. Remove the special recovery BIOS flash diskette from a POST/BIOS update failure Attention: If an interruption occurs during the ...


