
User Guide
Page 1
ThinkCentre User Guide Machine Types: 0399, 0452, 0500, 0598, and 0841
ThinkCentre User Guide Machine Types: 0399, 0452, 0500, 0598, and 0841
Hardware Maintenance Manual
Page 1
ThinkCentre Hardware Maintenance Manual Machine Type: 0841
ThinkCentre Hardware Maintenance Manual Machine Type: 0841
Hardware Maintenance Manual
Page 3
ThinkCentre Hardware Maintenance Manual Machine Type: 0841
ThinkCentre Hardware Maintenance Manual Machine Type: 0841
Hardware Maintenance Manual
Page 5
...management 93 Automatic configuration and power interface (ACPI) BIOS 93 Automatic Power-On features 93 © Copyright Lenovo 2009, 2010 v Replacing FRUs (Type 0841 65 Locations 65 Rear connectors 65 Computer components 66 System board connectors 66 Removing the computer cover 67 Removing...Updating (flashing) BIOS from your operating system 92 Recovering from the Setup Utility program . . . . . 39 Chapter 7. Diagnostics 33 Lenovo System Toolbox 33 PC-Doctor for DOS 33 Creating a diagnostic disc 33 Running the diagnostic program from a diagnostic disc 33 Navigating through ...
...management 93 Automatic configuration and power interface (ACPI) BIOS 93 Automatic Power-On features 93 © Copyright Lenovo 2009, 2010 v Replacing FRUs (Type 0841 65 Locations 65 Rear connectors 65 Computer components 66 System board connectors 66 Removing the computer cover 67 Removing...Updating (flashing) BIOS from your operating system 92 Recovering from the Setup Utility program . . . . . 39 Chapter 7. Diagnostics 33 Lenovo System Toolbox 33 PC-Doctor for DOS 33 Creating a diagnostic disc 33 Running the diagnostic program from a diagnostic disc 33 Navigating through ...
Hardware Maintenance Manual
Page 71
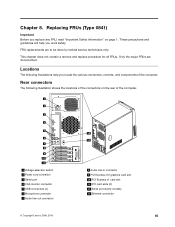
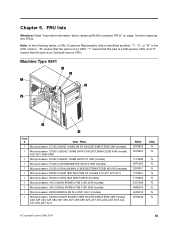
... Voltage-selection switch 2 Power cord connector 3 Serial port 4 VGA monitor connector 5 USB connectors (4) 6 Microphone connector 7 Audio line-out connector © Copyright Lenovo 2009, 2010 8 Audio line-in connector 9 PCI Express x16 graphics card slot 10 PCI Express x1 card slot 11 PCI card slots (2) 12 Serial port... (some models) 13 Ethernet connector 65 Replacing FRUs (Type 0841) Important Before you locate the various connectors, controls. Only the major FRUs are to be done by trained service technicians only. This chapter...
... Voltage-selection switch 2 Power cord connector 3 Serial port 4 VGA monitor connector 5 USB connectors (4) 6 Microphone connector 7 Audio line-out connector © Copyright Lenovo 2009, 2010 8 Audio line-in connector 9 PCI Express x16 graphics card slot 10 PCI Express x1 card slot 11 PCI card slots (2) 12 Serial port... (some models) 13 Ethernet connector 65 Replacing FRUs (Type 0841) Important Before you locate the various connectors, controls. Only the major FRUs are to be done by trained service technicians only. This chapter...
Hardware Maintenance Manual
Page 73
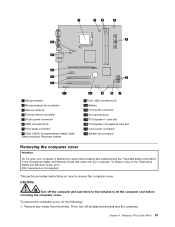
...the computer cover. To remove the computer cover, do the following: 1. To obtain a copy of the ThinkCentre Safety and Warranty Guide, go to: http://www.lenovo.com/support This section provides instructions on how to let the computer cool before reading and understanding the "... safety information" in the ThinkCentre Safety and Warranty Guide that came with your computer or attempt any media from the drives. Remove any repair before removing the computer cover. Chapter 8. CAUTION: Turn off all attached devices and the computer. Replacing FRUs (Type 0841) 67 1 Microprocessor 2 ...
...the computer cover. To remove the computer cover, do the following: 1. To obtain a copy of the ThinkCentre Safety and Warranty Guide, go to: http://www.lenovo.com/support This section provides instructions on how to let the computer cool before reading and understanding the "... safety information" in the ThinkCentre Safety and Warranty Guide that came with your computer or attempt any media from the drives. Remove any repair before removing the computer cover. Chapter 8. CAUTION: Turn off all attached devices and the computer. Replacing FRUs (Type 0841) 67 1 Microprocessor 2 ...
Hardware Maintenance Manual
Page 75
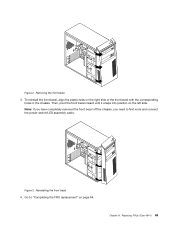
Then, pivot the front bezel inward until it snaps into position on the right side of the front bezel with the corresponding holes in the chassis. Go to first route and connect the power switch/LED assembly cable. To reinstall the front bezel, align the plastic tabs on the left side. Reinstalling the front bezel 4. Removing the front bezel 3. Figure 3. Note: If you have completely removed the front bezel off the chassis, you need to "Completing the FRU replacement" on page 84. Replacing FRUs (Type 0841) 69 Figure 2. Chapter 8.
Then, pivot the front bezel inward until it snaps into position on the right side of the front bezel with the corresponding holes in the chassis. Go to first route and connect the power switch/LED assembly cable. To reinstall the front bezel, align the plastic tabs on the left side. Reinstalling the front bezel 4. Removing the front bezel 3. Figure 3. Note: If you have completely removed the front bezel off the chassis, you need to "Completing the FRU replacement" on page 84. Replacing FRUs (Type 0841) 69 Figure 2. Chapter 8.
Hardware Maintenance Manual
Page 77
...ac, set the voltage-selection switch to match the voltage available at your computer or attempt any adapter cards installed in the ThinkCentre Safety and Warranty Guide that you have a voltage-selection switch. Remove any repair before reading and understanding the "Important safety ...4. Carefully take note of the location of the new power supply assembly to 230 V. 6. Replacing FRUs (Type 0841) 71 Note: Use only screws provided by Lenovo. 8. Connect the new power supply assembly cables to remove and replace the system board. Attention Do not open your...
...ac, set the voltage-selection switch to match the voltage available at your computer or attempt any adapter cards installed in the ThinkCentre Safety and Warranty Guide that you have a voltage-selection switch. Remove any repair before reading and understanding the "Important safety ...4. Carefully take note of the location of the new power supply assembly to 230 V. 6. Replacing FRUs (Type 0841) 71 Note: Use only screws provided by Lenovo. 8. Connect the new power supply assembly cables to remove and replace the system board. Attention Do not open your...
Hardware Maintenance Manual
Page 79
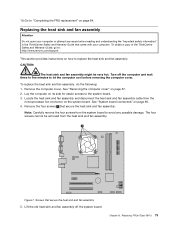
To obtain a copy of the ThinkCentre Safety and Warranty Guide, go to: http://www.lenovo.com/support This section provides instructions on its side for easier access to replace the heat sink and fan assembly. CAUTION: The heat sink and ... system board. Go to let the computer cool before reading and understanding the "Important safety information" in the ThinkCentre Safety and Warranty Guide that secure the heat sink and fan assembly 5. Replacing FRUs (Type 0841) 73 Remove the four screws 1 that secure the heat sink and fan assembly. Figure 7. 19. To replace...
To obtain a copy of the ThinkCentre Safety and Warranty Guide, go to: http://www.lenovo.com/support This section provides instructions on its side for easier access to replace the heat sink and fan assembly. CAUTION: The heat sink and ... system board. Go to let the computer cool before reading and understanding the "Important safety information" in the ThinkCentre Safety and Warranty Guide that secure the heat sink and fan assembly 5. Replacing FRUs (Type 0841) 73 Remove the four screws 1 that secure the heat sink and fan assembly. Figure 7. 19. To replace...

Hardware Maintenance Manual
Page 81
Lift the microprocessor straight up and out of the microprocessor. Important Touch only the sides of the socket. Replacing FRUs (Type 0841) 75 5. Chapter 8. Do not touch the gold contacts on its side so that the thermal grease does not come in contact with anything. 6. Lift the heat sink and fan assembly off the failing system board. Place the heat sink on the bottom. 7. To remove the microprocessor 2 from the system board, lift the small handle 3 and open the retainer 1 .
Lift the microprocessor straight up and out of the microprocessor. Important Touch only the sides of the socket. Replacing FRUs (Type 0841) 75 5. Chapter 8. Do not touch the gold contacts on its side so that the thermal grease does not come in contact with anything. 6. Lift the heat sink and fan assembly off the failing system board. Place the heat sink on the bottom. 7. To remove the microprocessor 2 from the system board, lift the small handle 3 and open the retainer 1 .
Hardware Maintenance Manual
Page 83
To secure the microprocessor in the ThinkCentre Safety and Warranty Guide that came with the small handle. 13. Connect the heat sink and fan assembly cable to : http://www.lenovo.com/support This section provides instructions on page 66. 16. Go to install or replace a memory module. Chapter 8. Replacing ...with your machine type at "System board connectors" on how to "Completing the FRU replacement" on the grease syringe). 14. Replacing FRUs (Type 0841) 77 Each drop of grease should be 0.03ml (3 tick marks on page 84. See the system board illustration for your computer. To obtain a...
To secure the microprocessor in the ThinkCentre Safety and Warranty Guide that came with the small handle. 13. Connect the heat sink and fan assembly cable to : http://www.lenovo.com/support This section provides instructions on page 66. 16. Go to install or replace a memory module. Chapter 8. Replacing ...with your machine type at "System board connectors" on how to "Completing the FRU replacement" on the grease syringe). 14. Replacing FRUs (Type 0841) 77 Each drop of grease should be 0.03ml (3 tick marks on page 84. See the system board illustration for your computer. To obtain a...
Hardware Maintenance Manual
Page 85
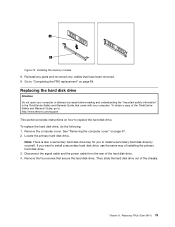
... any parts and reconnect any repair before reading and understanding the "Important safety information" in the ThinkCentre Safety and Warranty Guide that came with your computer. To obtain a copy of installing the primary...bay for you want to install a secondary hard disk drive, use the same way of the ThinkCentre Safety and Warranty Guide, go to: http://www.lenovo.com/support This section provides instructions on page 84. Remove the four screws that have been removed... drive. Chapter 8. See "Removing the computer cover" on page 67. 2. Replacing FRUs (Type 0841) 79 Figure 10.
... any parts and reconnect any repair before reading and understanding the "Important safety information" in the ThinkCentre Safety and Warranty Guide that came with your computer. To obtain a copy of installing the primary...bay for you want to install a secondary hard disk drive, use the same way of the ThinkCentre Safety and Warranty Guide, go to: http://www.lenovo.com/support This section provides instructions on page 84. Remove the four screws that have been removed... drive. Chapter 8. See "Removing the computer cover" on page 67. 2. Replacing FRUs (Type 0841) 79 Figure 10.
Hardware Maintenance Manual
Page 87
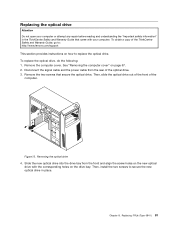
...holes on the new optical drive with your computer. Then, slide the optical drive out of the front of the ThinkCentre Safety and Warranty Guide, go to: http://www.lenovo.com/support This section provides instructions on page 67. 2. Slide the new optical drive into the drive bay from the... the following: 1. Remove the two screws that came with the corresponding holes on the drive bay. Removing the optical drive 4. Replacing FRUs (Type 0841) 81 To obtain a copy of the computer. Remove the computer cover. Replacing the optical drive Attention Do not open your computer or attempt any ...
...holes on the new optical drive with your computer. Then, slide the optical drive out of the front of the ThinkCentre Safety and Warranty Guide, go to: http://www.lenovo.com/support This section provides instructions on page 67. 2. Slide the new optical drive into the drive bay from the... the following: 1. Remove the two screws that came with the corresponding holes on the drive bay. Removing the optical drive 4. Replacing FRUs (Type 0841) 81 To obtain a copy of the computer. Remove the computer cover. Replacing the optical drive Attention Do not open your computer or attempt any ...
Hardware Maintenance Manual
Page 89
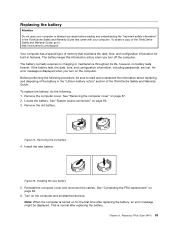
To obtain a copy of the ThinkCentre Safety and Warranty Guide, go to read and understand the information about ...Replacing the battery Attention Do not open your computer. See "Completing the FRU replacement" on for built-in the ThinkCentre Safety and Warranty Guide that maintains the date, time, and configuration information for the first time after replacing the battery... after replacing the battery, an error message might be sure to : http://www.lenovo.com/support Your computer has a special type of the ThinkCentre Safety and Warranty Guide. Chapter 8. Replacing FRUs (Type...
To obtain a copy of the ThinkCentre Safety and Warranty Guide, go to read and understand the information about ...Replacing the battery Attention Do not open your computer. See "Completing the FRU replacement" on for built-in the ThinkCentre Safety and Warranty Guide that maintains the date, time, and configuration information for the first time after replacing the battery... after replacing the battery, an error message might be sure to : http://www.lenovo.com/support Your computer has a special type of the ThinkCentre Safety and Warranty Guide. Chapter 8. Replacing FRUs (Type...
Hardware Maintenance Manual
Page 91
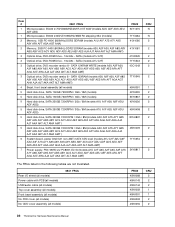
... that the part is a Self-service CRU, and "2" means that the part is identified as either "1", "2", or "N" in the CRU column. Machine Type 0841 Item # 0841 FRUs 1 Microprocessor, E7400 2.8GHZ 1066M 3M R0 (ViiV,EIST,EM64T,EDB) 65W (models) 1 Microprocessor, E7500 2.93GHZ 1066M 3M R0 (ViiV,EIST,EM64T,EDB... AJT AKA AKT ALT) FRU# 53Y6653 53Y6654 71Y3486 46R1655 53Y9051 71Y6251 71Y6252 43C1965 46R9514 46R9512 53Y9049 CRU N N N N N N N N N N N © Copyright Lenovo 2009, 2010 85 Note: In the following tables, a CRU (Customer Replaceable Unit) is an Optional-service CRU. Chapter 9.
... that the part is a Self-service CRU, and "2" means that the part is identified as either "1", "2", or "N" in the CRU column. Machine Type 0841 Item # 0841 FRUs 1 Microprocessor, E7400 2.8GHZ 1066M 3M R0 (ViiV,EIST,EM64T,EDB) 65W (models) 1 Microprocessor, E7500 2.93GHZ 1066M 3M R0 (ViiV,EIST,EM64T,EDB... AJT AKA AKT ALT) FRU# 53Y6653 53Y6654 71Y3486 46R1655 53Y9051 71Y6251 71Y6252 43C1965 46R9514 46R9512 53Y9049 CRU N N N N N N N N N N N © Copyright Lenovo 2009, 2010 85 Note: In the following tables, a CRU (Customer Replaceable Unit) is an Optional-service CRU. Chapter 9.
Hardware Maintenance Manual
Page 92
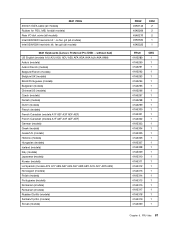
... AFT AGA AGT AHA AJA AJT AKA AKT ALT AMA AMT) 4 Bezel, front bezel assembly (all models) 0841 FRUs FRU# 45K6088 45K6143 45K6144 45K6092 45K6091 45K6093 45K6094 CRU 2 2 2 1 1 2 2 86 ThinkCentre Hardware Maintenance Manual SATA 12XRAM WRITE (models A2U A2F A3U A3F A8S A8Y A9S A9Y ABS ABY ACS ACY ADU... ADF ADS AEU AEF AES AFA AFT AGA AGT AHA AJA AJT AKA AKT ALT AMA AMT) 3 Optical drive, DVD recorder rambo 8 - Item # 0841 FRUs 1 Microprocessor, E5400 2.7GH...
... AFT AGA AGT AHA AJA AJT AKA AKT ALT AMA AMT) 4 Bezel, front bezel assembly (all models) 0841 FRUs FRU# 45K6088 45K6143 45K6144 45K6092 45K6091 45K6093 45K6094 CRU 2 2 2 1 1 2 2 86 ThinkCentre Hardware Maintenance Manual SATA 12XRAM WRITE (models A2U A2F A3U A3F A8S A8Y A9S A9Y ABS ABY ACS ACY ADU... ADF ADS AEU AEF AES AFA AFT AGA AGT AHA AJA AJT AKA AKT ALT AMA AMT) 3 Optical drive, DVD recorder rambo 8 - Item # 0841 FRUs 1 Microprocessor, E5400 2.7GH...
Hardware Maintenance Manual
Page 93
... 41A5298 41A5299 41A5300 41A5301 41A5302 41A5303 41A5304 41A5305 41A5306 41A5307 41A5308 41A5309 41A5310 41A5311 41A5312 41A5313 41A5314 41A5315 41A5316 41A5317 41A5318 41A5319 41A5320 CRU 1 1 1 1 1 1 1 1 1 1 1 1 1 1 1 1 1 1 1 1 1 1 1 1 1 1 1 1 1 1 1 1 Chapter 9. 0841 FRUs 350mm SATA cable (all models) Rubber for PSU, MB, foot(all models) Rear I/O slot cover (all models) Intel 95W/65W heat sink kit; FRU...
... 41A5298 41A5299 41A5300 41A5301 41A5302 41A5303 41A5304 41A5305 41A5306 41A5307 41A5308 41A5309 41A5310 41A5311 41A5312 41A5313 41A5314 41A5315 41A5316 41A5317 41A5318 41A5319 41A5320 CRU 1 1 1 1 1 1 1 1 1 1 1 1 1 1 1 1 1 1 1 1 1 1 1 1 1 1 1 1 1 1 1 1 Chapter 9. 0841 FRUs 350mm SATA cable (all models) Rubber for PSU, MB, foot(all models) Rear I/O slot cover (all models) Intel 95W/65W heat sink kit; FRU...
Hardware Maintenance Manual
Page 94
...models) UK English (models) US European (models) Slovenian (models) FRU# 41A5321 41A5322 41A5323 41A5324 41A5325 41A5326 41A5327 41A5328 41A5329 CRU 1 1 1 1 1 1 1 1 1 0841 Mouse Optical wheel mouse (400DPI, USB) (models A1U A1F A2U A2F A3U A3F A7S A7Y A8S A8Y A9S A9Y ABS ABY ACS ACY ADU ADF... 41R3176 CRU 1 1 1 1 1 41R3196 1 41R3260 1 41R3224 1 41R3278 1 41R3232 1 41R3208 1 41R3212 1 41R3228 1 41R3236 1 41R3220 1 41R3341 1 41R3208 1 41R3185 1 41R3257 1 41R3249 1 41R3271 1 88 ThinkCentre Hardware Maintenance Manual 0841 Keyboards (Lenovo Preferred Pro USB --
...models) UK English (models) US European (models) Slovenian (models) FRU# 41A5321 41A5322 41A5323 41A5324 41A5325 41A5326 41A5327 41A5328 41A5329 CRU 1 1 1 1 1 1 1 1 1 0841 Mouse Optical wheel mouse (400DPI, USB) (models A1U A1F A2U A2F A3U A3F A7S A7Y A8S A8Y A9S A9Y ABS ABY ACS ACY ADU ADF... 41R3176 CRU 1 1 1 1 1 41R3196 1 41R3260 1 41R3224 1 41R3278 1 41R3232 1 41R3208 1 41R3212 1 41R3228 1 41R3236 1 41R3220 1 41R3341 1 41R3208 1 41R3185 1 41R3257 1 41R3249 1 41R3271 1 88 ThinkCentre Hardware Maintenance Manual 0841 Keyboards (Lenovo Preferred Pro USB --
Hardware Maintenance Manual
Page 95
... 41R3221 41R3175 41R3209 41R3225 CRU 1 1 1 1 1 1 1 1 1 1 1 1 1 1 Spanish (models) French (models) 0841 Windows XP Pro Recovery CDs FRU# 71Y9078 71Y7243 CRU 1 1 US English (models) French (models) 0841 Windows Vista Home Basic 32 CDs FRU# 71Y8635 71Y8634 CRU 1 1 0841 Windows Vista Business 32 CDs US English (models A1U A2U A3U) French (models... A1F A2F A3F) FRU# 71Y8637 71Y8636 CRU 1 1 0841 Windows 7 professional 32 US English (models A1U A2U A3U) French (models A1F A2F A3F) Spanish (models A9S A9Y ABS ABY ACS ACY ...
... 41R3221 41R3175 41R3209 41R3225 CRU 1 1 1 1 1 1 1 1 1 1 1 1 1 1 Spanish (models) French (models) 0841 Windows XP Pro Recovery CDs FRU# 71Y9078 71Y7243 CRU 1 1 US English (models) French (models) 0841 Windows Vista Home Basic 32 CDs FRU# 71Y8635 71Y8634 CRU 1 1 0841 Windows Vista Business 32 CDs US English (models A1U A2U A3U) French (models... A1F A2F A3F) FRU# 71Y8637 71Y8636 CRU 1 1 0841 Windows 7 professional 32 US English (models A1U A2U A3U) French (models A1F A2F A3F) Spanish (models A9S A9Y ABS ABY ACS ACY ...