Lenovo Tab 2 A7-30 Research

View Results Below
Free Lenovo Tab 2 A7-30 manuals!
Problems with Lenovo Tab 2 A7-30?
Ask a Question
Free Lenovo Tab 2 A7-30 manuals!
Problems with Lenovo Tab 2 A7-30?
Ask a Question
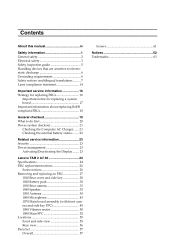
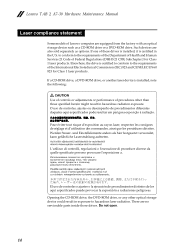
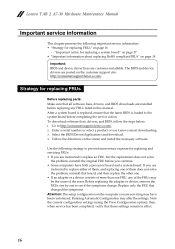
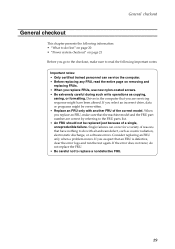
Related Manual Pages


Related Videos

Lenovo Tab 2 A7-30 hard reset
Duration: 6:54
Total Views: 1,388,694
Duration: 6:54
Total Views: 1,388,694
How to Hard Reset LENOVO Tab 2 A7-30 - Unlock Tablet / Format
Duration: 3:08
Total Views: 32,286
Duration: 3:08
Total Views: 32,286
Lenovo Tab 2 A7-30 Screen Replacement
Duration: 6:12
Total Views: 4,014
Duration: 6:12
Total Views: 4,014
Change Language in LENOVO Tab 2 A7-30 - Set Up Language
Duration: 1:21
Total Views: 12,008
Duration: 1:21
Total Views: 12,008
Lenovo Tab 2 A7-30 /Battery Replacement || How to open lenovo A7 Tab Back Panel
Duration: 5:31
Total Views: 223,000
Duration: 5:31
Total Views: 223,000
Similar Questions

Good Day .how Can I Make My Lenovo Tab 2 A7-30gc Signal From 2g Into 3g. Cant Us
good day .how can i make my lenovo tab 2 A7-30GC signal from 2g into 3g. cant used my data conection...
good day .how can i make my lenovo tab 2 A7-30GC signal from 2g into 3g. cant used my data conection...
(Posted by kinneth88 7 years ago)

How To Remove Key Pad Sound When Writing A Message
How to remove key pad sound when writing a message?
How to remove key pad sound when writing a message?
(Posted by anniemeshane 7 years ago)

Related Terms
The following terms were also used when searching for Lenovo Tab 2 A7-30 Research:- tab 2 a7 lenovo price
- tab 2 a7-30 7-inch tablet
- tab 2 a7-30 7-inch
- tab 2 a7-30 3g
- tab 2 a7-30 2g
- tab 2 a7-30
- tab 2 a7-20
- tab 2 a7-10 price
- tab 2 a7-10 features
- tab 2 a7-10
- tab 2 a7 review
- tab 2 a7 price
- tab 2 a7-30 case
- tab 2 a7 lenovo
- tab 2 a7 hard reset
- tab 2 a7 30hc specification
- tab 2 a7 30hc display
- tab 2 a7 30hc
- tab 2 a7 30h
- tab 2 a7 30gc android 5
- tab 2 a7 30gc
- tab 2 a7 30f
- tab 2 a7 30 tablet
- tab 2 a7-30 user manual
- used lenovo tab 2 a7-30
- tab2 a7-30 review
- tab2 a7-30 price
- tab 2 a7-30hc screen replacement
- tab 2 a7-30hc lenovo
- tab 2 a7-30hc display
- tab 2 a7-30hc cover
- tab 2 a7-30hc battery
- tab 2 a7-30hc android 7
- tab 2 a7-30hc
- tab 2 a7-30f
- tab 2 a7 30 review
- tab 2 a7-30 tablet review
- tab 2 a7-30 tablet price
- tab 2 a7-30 tablet
- tab 2 a7-30 root
- tab 2 a7-30 review
- tab 2 a7-30 price
- tab 2 a7-30 lenovo
- tab 2 a7-30 india
- tab 2 a7-30 hard reset
- tab 2 a7-30 gsm
- lenovo tab 2 a7 30gc android 5
- lenovo tab 2 a7-30 india
- lenovo tab 2 a7-30 hard reset
- lenovo tab 2 a7-30 case
- lenovo tab 2 a7-30 7-inch tablet
- lenovo tab 2 a7-30 7-inch
- lenovo tab 2 a7-30 3g
- lenovo tab 2 a7-30
- lenovo tab 2 a7 30hc specification
- lenovo tab 2 a7 30hc display
- lenovo tab 2 a7 30hc
- lenovo tab 2 a7 30h
- lenovo tab 2 a7-30 price
- lenovo tab 2 a7 30gc
- lenovo tab 2 a7 30f
- lenovo tab 2 a7 30 review
- lenovo tab 2 a7 30 price
- lenovo tab 2 a7 30 india
- lenovo tab 2 a7 30 cover
- lenovo tab 2 a7 30 case
- lenovo tab 2 a7 30 3g
- lenovo tab 2 a7 30 2g
- lenovo tab 2 a7 30
- lenovo tab 2 a7-30hc display
- tab 2 a7 30 price
- tab 2 a7 30 india
- tab 2 a7 30 cover
- tab 2 a7 30 case
- tab 2 a7 30 3g
- tab 2 a7 30 2g
- tab 2 a7 30
- tab 2 a7 10
- tab 2 a7
- lenovo tab2 a7-30hc
- lenovo tab 2 a7-30hc screen replacement
- lenovo tab 2 a7 10
- lenovo tab 2 a7-30hc cover
- lenovo tab 2 a7-30hc battery
- lenovo tab 2 a7-30hc android 7
- lenovo tab 2 a7-30hc
- lenovo tab 2 a7-30f
- lenovo tab 2 a7-30 user manual
- lenovo tab 2 a7-30 tablet review
- lenovo tab 2 a7-30 tablet price
- lenovo tab 2 a7-30 tablet
- lenovo tab 2 a7-30 review