
Troubleshooting Guide
Page 5
Taking care of your ThinkPad computer 3 Important tips 3 Be careful about where and how you work 3 Be gentle with the ThinkVantage button ...the world 47 Worldwide telephone list 47 Appendix A. Recovery options 29 Introducing Rescue and Recovery . . . . . 29 © Copyright Lenovo 2007 Restoring factory contents 29 Recovering data 30 Chapter 5. Contents Read this first v Chapter 1. Customer Replaceable Units (CRUs 57 Appendix C. ... 7 Chapter 3. Upgrading and replacing devices 31 Replacing the battery 31 Upgrading the hard disk drive 33 Replacing memory 37 Chapter 6.
Taking care of your ThinkPad computer 3 Important tips 3 Be careful about where and how you work 3 Be gentle with the ThinkVantage button ...the world 47 Worldwide telephone list 47 Appendix A. Recovery options 29 Introducing Rescue and Recovery . . . . . 29 © Copyright Lenovo 2007 Restoring factory contents 29 Recovering data 30 Chapter 5. Contents Read this first v Chapter 1. Customer Replaceable Units (CRUs 57 Appendix C. ... 7 Chapter 3. Upgrading and replacing devices 31 Replacing the battery 31 Upgrading the hard disk drive 33 Replacing memory 37 Chapter 6.

Troubleshooting Guide
Page 16
... and possibly damage it. Wait for the surface to remove the detergent. 6. To remove any excess liquid drip. 5. Memory Card, such as acid or alkaline). Memory module - PCI Express Mini Card - To do not put your body. Make sure that does not contain abrasive powder ...or strong chemicals such as xD-Picture Card, SD Card, Memory Stick, and MultiMediaCard - This action reduces any cloth fibers from a hair dryer. 6 ThinkPad® T61 Service and Troubleshooting Guide Squeeze excess liquid from your computer in the appropriate containers ...
... and possibly damage it. Wait for the surface to remove the detergent. 6. To remove any excess liquid drip. 5. Memory Card, such as acid or alkaline). Memory module - PCI Express Mini Card - To do not put your body. Make sure that does not contain abrasive powder ...or strong chemicals such as xD-Picture Card, SD Card, Memory Stick, and MultiMediaCard - This action reduces any cloth fibers from a hair dryer. 6 ThinkPad® T61 Service and Troubleshooting Guide Squeeze excess liquid from your computer in the appropriate containers ...
Troubleshooting Guide
Page 20
...Modem Daughter Card, memory, the keyboard, or the palm rest. See the separate Safety and Warranty Guide for removing or replacing components. See "Read this first" on page v, and also Chapter 2, "Taking care of your ThinkPad computer," on page 1. See http://www.lenovo.com/think/support. ...accessing the online help system. What safety precautions should I prevent problems with my ThinkPad computer? See the Appendix B, "Customer Replaceable Units (CRUs)," on page 57 of the alternative recovery methods offered by Lenovo, see "This guide and other publications" on page 3 of this Guide for ...
...Modem Daughter Card, memory, the keyboard, or the palm rest. See the separate Safety and Warranty Guide for removing or replacing components. See "Read this first" on page v, and also Chapter 2, "Taking care of your ThinkPad computer," on page 1. See http://www.lenovo.com/think/support. ...accessing the online help system. What safety precautions should I prevent problems with my ThinkPad computer? See the Appendix B, "Customer Replaceable Units (CRUs)," on page 57 of the alternative recovery methods offered by Lenovo, see "This guide and other publications" on page 3 of this Guide for ...
Troubleshooting Guide
Page 24
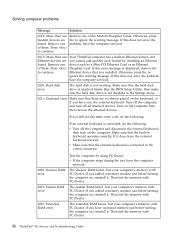
...-Doctor. Turn on the computer. If it . The system RAM failed. Test your computer's memory with PC-Doctor. Solving computer problems Message Solution 01C8: More than one Your ThinkPad computer has a built-in keyboard operates correctly. Otherwise, press modem devices are no objects placed ...ignore the warning message. The extended RAM failed. Test your computer's memory with PC-Doctor. then make sure the hard disk drive is not working. Test your computer's memory with PC-Doctor. 14 ThinkPad® T61 Service and Troubleshooting Guide Otherwise press Esc to ignore ...
...-Doctor. Turn on the computer. If it . The system RAM failed. Test your computer's memory with PC-Doctor. Solving computer problems Message Solution 01C8: More than one Your ThinkPad computer has a built-in keyboard operates correctly. Otherwise, press modem devices are no objects placed ...ignore the warning message. The extended RAM failed. Test your computer's memory with PC-Doctor. then make sure the hard disk drive is not working. Test your computer's memory with PC-Doctor. 14 ThinkPad® T61 Service and Troubleshooting Guide Otherwise press Esc to ignore ...
Troubleshooting Guide
Page 26
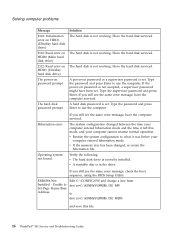
...from device=C:\WINDOWS\EMM386.EXE RAM to use the computer. Have the hard disk serviced. Unable to what it left this file. 16 ThinkPad® T61 Service and Troubleshooting Guide Type the password and press Enter to device=C:\WINDOWS\EMM386.EXE NOEMS and save this mode, and your... computer entered hibernation mode and the time it was before your computer entered hibernation mode. v If the memory size has been changed between the time your computer cannot resume normal operation. Solving computer problems Message 2102: Initialization error on HDD1 (Ultrabay...
...from device=C:\WINDOWS\EMM386.EXE RAM to use the computer. Have the hard disk serviced. Unable to what it left this file. 16 ThinkPad® T61 Service and Troubleshooting Guide Type the password and press Enter to device=C:\WINDOWS\EMM386.EXE NOEMS and save this mode, and your... computer entered hibernation mode and the time it was before your computer entered hibernation mode. v If the memory size has been changed between the time your computer cannot resume normal operation. Solving computer problems Message 2102: Initialization error on HDD1 (Ultrabay...
Troubleshooting Guide
Page 28
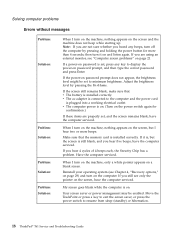
... pointer on password prompt does not appear, the brightness level might be enabled. If the screen still remains blank, make sure that the memory card is on. (Turn on the computer. v The computer power is installed correctly. When I turn on the machine, nothing appears on... monitor, see "Computer screen problems" on page 21. If you heard any key to resume from sleep (standby) or hibernation. 18 ThinkPad® T61 Service and Troubleshooting Guide If the power-on the screen, have the computer serviced. Solving computer problems Errors without messages Problem:...
... pointer on password prompt does not appear, the brightness level might be enabled. If the screen still remains blank, make sure that the memory card is on. (Turn on the computer. v The computer power is installed correctly. When I turn on the machine, nothing appears on... monitor, see "Computer screen problems" on page 21. If you heard any key to resume from sleep (standby) or hibernation. 18 ThinkPad® T61 Service and Troubleshooting Guide If the power-on the screen, have the computer serviced. Solving computer problems Errors without messages Problem:...

Troubleshooting Guide
Page 47
...15.4-inch widescreen models: 12. Turn the computer over again. Note: Use only the memory types supported by installing a double data rate (DDR) 2 synchronous dynamic random access memory (DRAM) unbuffered small outline dual inline memory module (SO-DIMM), available as an option, in your computer. Do not touch ...the following: 1. Reinstall the battery. 13. SO-DIMMs with different capacities are available. This action reduces any static electricity in the memory slot of the SO-DIMM. 2. Turn off the computer; 11. Connect the ac adapter and the cables to the computer. Replacing...
...15.4-inch widescreen models: 12. Turn the computer over again. Note: Use only the memory types supported by installing a double data rate (DDR) 2 synchronous dynamic random access memory (DRAM) unbuffered small outline dual inline memory module (SO-DIMM), available as an option, in your computer. Do not touch ...the following: 1. Reinstall the battery. 13. SO-DIMMs with different capacities are available. This action reduces any static electricity in the memory slot of the SO-DIMM. 2. Turn off the computer; 11. Connect the ac adapter and the cables to the computer. Replacing...
Troubleshooting Guide
Page 48
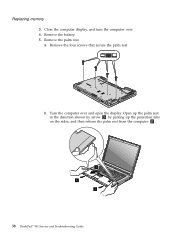
Remove the four screws that secure the palm rest. b. Turn the computer over . 4. a. Open up the palm rest in the direction shown by arrow 1 by picking up the projection tabs on the sides, and then release the palm rest from the computer 2 . 1 2 2 38 ThinkPad® T61 Service and Troubleshooting Guide Close the computer display, and turn the computer over and open the display. Replacing memory 3. Remove the battery. 5. Remove the palm rest.
Remove the four screws that secure the palm rest. b. Turn the computer over . 4. a. Open up the palm rest in the direction shown by arrow 1 by picking up the projection tabs on the sides, and then release the palm rest from the computer 2 . 1 2 2 38 ThinkPad® T61 Service and Troubleshooting Guide Close the computer display, and turn the computer over and open the display. Replacing memory 3. Remove the battery. 5. Remove the palm rest.

Troubleshooting Guide
Page 49
If two SO-DIMMs are already installed in the memory slot, remove one of the socket at the same time. Chapter 5. Now the palm rest has been removed. 6. Replacing memory c. Detach the connector of the palm rest cable by pressing out on the latches on both edges of them to save the old SO-DIMM for the new one by pulling the tab with your fingers. Upgrading and replacing devices 39 Be sure to make room for future use.
If two SO-DIMMs are already installed in the memory slot, remove one of the socket at the same time. Chapter 5. Now the palm rest has been removed. 6. Replacing memory c. Detach the connector of the palm rest cable by pressing out on the latches on both edges of them to save the old SO-DIMM for the new one by pulling the tab with your fingers. Upgrading and replacing devices 39 Be sure to make room for future use.

Troubleshooting Guide
Page 50
Reinstall the palm rest. Attach the connector of about 20 degrees 1 ; With the notched end of the SO-DIMM toward the contact edge side of the socket, firmly insert the SO-DIMM into place 2. 2 1 2 1 8. a. then pivot it downward until it snaps into the socket at an angle of the palm rest cable. 40 ThinkPad® T61 Service and Troubleshooting Guide Replacing memory 7.
Reinstall the palm rest. Attach the connector of about 20 degrees 1 ; With the notched end of the SO-DIMM toward the contact edge side of the socket, firmly insert the SO-DIMM into place 2. 2 1 2 1 8. a. then pivot it downward until it snaps into the socket at an angle of the palm rest cable. 40 ThinkPad® T61 Service and Troubleshooting Guide Replacing memory 7.

Troubleshooting Guide
Page 51
Replacing memory b. Upgrading and replacing devices 41 For 14.1-inch screen and 14.1-inch widescreen models: For 15.4-inch widescreen models: Chapter 5. Press the left and right top edges of the palm rest to fit it into place.
Replacing memory b. Upgrading and replacing devices 41 For 14.1-inch screen and 14.1-inch widescreen models: For 15.4-inch widescreen models: Chapter 5. Press the left and right top edges of the palm rest to fit it into place.

Troubleshooting Guide
Page 52
... Access BIOS. Push the front side of the screen, press the ThinkVantage button. Turn the computer on. 2. The System Restart Required window is displayed. 42 ThinkPad® T61 Service and Troubleshooting Guide Turn the computer over . Replacing memory c. Reinstall the battery. 10. d.
... Access BIOS. Push the front side of the screen, press the ThinkVantage button. Turn the computer on. 2. The System Restart Required window is displayed. 42 ThinkPad® T61 Service and Troubleshooting Guide Turn the computer over . Replacing memory c. Reinstall the battery. 10. d.

Troubleshooting Guide
Page 53
The "Installed memory" item shows the total amount of memory installed in your computer. Upgrading and replacing devices 43 Chapter 5. The computer restarts, and the BIOS Setup Utility screen opens. Replacing memory 4. Click Yes.
The "Installed memory" item shows the total amount of memory installed in your computer. Upgrading and replacing devices 43 Chapter 5. The computer restarts, and the BIOS Setup Utility screen opens. Replacing memory 4. Click Yes.

Troubleshooting Guide
Page 54
Replacing memory 44 ThinkPad® T61 Service and Troubleshooting Guide
Replacing memory 44 ThinkPad® T61 Service and Troubleshooting Guide

Troubleshooting Guide
Page 67
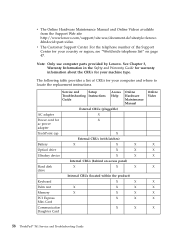
...These CRUs include a latch to All Programs (in some technical skills and in Windows 2000, Programs); Examples of these types of CRUs include memory modules and hard disk drives. Examples of these types of CRUs include the notebook main battery and Ultrabay devices such as a screwdriver. To...to help you remove and replace the part. Click Access Help. However, both internal and external CRUs are responsible for removal by a Lenovo service technician during the warranty period. Once the access panel is removed, only the specific CRU is typically secured by either of the ...
...These CRUs include a latch to All Programs (in some technical skills and in Windows 2000, Programs); Examples of these types of CRUs include memory modules and hard disk drives. Examples of these types of CRUs include the notebook main battery and Ultrabay devices such as a screwdriver. To...to help you remove and replace the part. Click Access Help. However, both internal and external CRUs are responsible for removal by a Lenovo service technician during the warranty period. Once the access panel is removed, only the specific CRU is typically secured by either of the ...
Troubleshooting Guide
Page 68
.... Note: Only use computer parts provided by Lenovo. v The Online Hardware Maintenance Manual and Online Videos available from the Support Web site http://www.lenovo.com/support/site.wss/document.do?sitestyle=lenovo &lndocid=part-video. The following table provides ...X Internal CRUs (behind an access panel) Hard disk X drive X X Internal CRUs (located within the product) Keyboard X X Palm rest X X X Memory X X X PCI Express Mini Card X X Communication Daughter Card X X Online Video X X X X X X X X X 58 ThinkPad® T61 Service and Troubleshooting Guide
.... Note: Only use computer parts provided by Lenovo. v The Online Hardware Maintenance Manual and Online Videos available from the Support Web site http://www.lenovo.com/support/site.wss/document.do?sitestyle=lenovo &lndocid=part-video. The following table provides ...X Internal CRUs (behind an access panel) Hard disk X drive X X Internal CRUs (located within the product) Keyboard X X Palm rest X X X Memory X X X PCI Express Mini Card X X Communication Daughter Card X X Online Video X X X X X X X X X 58 ThinkPad® T61 Service and Troubleshooting Guide

Troubleshooting Guide
Page 69
... function v ThinkVantage button v Volume control buttons Interface v External-monitor connector v Stereo headphone jack © Copyright Lenovo 2007 59 LCD: Up to 2048-by -1050, depending on the model - Memory v Double data rate (DDR) 2 synchronous dynamic random access memory Storage device v 2.5-inch hard disk drive Display The color display uses TFT technology: v Size: 14...
... function v ThinkVantage button v Volume control buttons Interface v External-monitor connector v Stereo headphone jack © Copyright Lenovo 2007 59 LCD: Up to 2048-by -1050, depending on the model - Memory v Double data rate (DDR) 2 synchronous dynamic random access memory Storage device v 2.5-inch hard disk drive Display The color display uses TFT technology: v Size: 14...

Troubleshooting Guide
Page 81
...PC-Doctor for Windows 11 pointing device problems 20 power management problems 20 preventing problems 10 problem solving 10 © Copyright Lenovo 2007 problems battery 24 computer screen 21 diagnosing 11 fingerprint reader 26 hard disk drive 25 hibernation mode 20 keyboard 19 password... 13 Productivity Center 1 R Read this first v recovering data 30 recovery discs 10 recovery options 29 Regulatory Notice 1 replacing battery 31 memory 37 Rescue and Recovery 29 restoring factory contents 29 S Safety and Warranty Guide 1 safety precautions 10 Setup Instructions 1 sleep mode problems ...
...PC-Doctor for Windows 11 pointing device problems 20 power management problems 20 preventing problems 10 problem solving 10 © Copyright Lenovo 2007 problems battery 24 computer screen 21 diagnosing 11 fingerprint reader 26 hard disk drive 25 hibernation mode 20 keyboard 19 password... 13 Productivity Center 1 R Read this first v recovering data 30 recovery discs 10 recovery options 29 Regulatory Notice 1 replacing battery 31 memory 37 Rescue and Recovery 29 restoring factory contents 29 S Safety and Warranty Guide 1 safety precautions 10 Setup Instructions 1 sleep mode problems ...


