
User's Guide - LI2321s Wide Flat Panel Monitor
Page 1
LI2321s Wide Flat Panel Monitor User's Guide
LI2321s Wide Flat Panel Monitor User's Guide
User's Guide - LI2321s Wide Flat Panel Monitor
Page 3
... monitor base and stand 2-9 Wall Mounting (Optional 2-9 Chapter 3. Reference information 3-1 Monitor specifications 3-1 Troubleshooting 3-3 Manual image setup 3-4 Manually installing the monitor driver 3-5 Installing the monitor driver in Windows 7 3-5 Installing the monitor driver in Windows Vista 3-6 Appendix A. Contents Safety information iii General Safety guidelines iii Chapter 1. Adjusting and using your monitor 2-1 Comfort and accessibility 2-1 Arranging your work area 2-1 Positioning your monitor 2-1 Quick tips for healthy work habits 2-2 Adjusting your monitor image...
... monitor base and stand 2-9 Wall Mounting (Optional 2-9 Chapter 3. Reference information 3-1 Monitor specifications 3-1 Troubleshooting 3-3 Manual image setup 3-4 Manually installing the monitor driver 3-5 Installing the monitor driver in Windows 7 3-5 Installing the monitor driver in Windows Vista 3-6 Appendix A. Contents Safety information iii General Safety guidelines iii Chapter 1. Adjusting and using your monitor 2-1 Comfort and accessibility 2-1 Arranging your work area 2-1 Positioning your monitor 2-1 Quick tips for healthy work habits 2-2 Adjusting your monitor image...
User's Guide - LI2321s Wide Flat Panel Monitor
Page 4
... electrical supply, you must remove the plug from the power outlet. Safety information General Safety guidelines For tips to help you use your monitor weighs more than that it is located downside when using VESA mount setup. iii DANGER To avoid shock hazard: • Do not remove the covers. • Do not operate this product unless the stand is attached. • Do not connect or...
... electrical supply, you must remove the plug from the power outlet. Safety information General Safety guidelines For tips to help you use your monitor weighs more than that it is located downside when using VESA mount setup. iii DANGER To avoid shock hazard: • Do not remove the covers. • Do not operate this product unless the stand is attached. • Do not connect or...
User's Guide - LI2321s Wide Flat Panel Monitor
Page 5
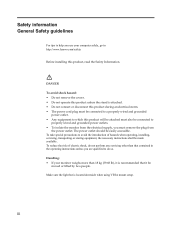
... the screen area. Getting started This User's Guide contains detailed information on a flat surface. 2. Shipping contents The product package should include the following items: • Setup Poster • Reference and Driver CD • Flat Panel Monitor • Power Cord • Analog Interface Cable Notice for use To set up your monitor, please see "Wall Mounting (Optional)"on page 2-9. For a quick overview, please see the Setup Poster that was shipped with your Flat Panel Monitor...
... the screen area. Getting started This User's Guide contains detailed information on a flat surface. 2. Shipping contents The product package should include the following items: • Setup Poster • Reference and Driver CD • Flat Panel Monitor • Power Cord • Analog Interface Cable Notice for use To set up your monitor, please see "Wall Mounting (Optional)"on page 2-9. For a quick overview, please see the Setup Poster that was shipped with your Flat Panel Monitor...

User's Guide - LI2321s Wide Flat Panel Monitor
Page 6
Monitor controls Your monitor has controls on adjusting monitor positions, setting user controls, and using the cable lock slot. Adjusting the tilt The illustration below shows the tile and swivel range of the monitor. For more information, see "Adjusting your monitor"on page 2-3. For information on how to adjust the display. Product overview This section will provide information on the front which are used to use these controls, please see "Positioning your monitor image"on page 2-1. Chapter 1. 1-2
Monitor controls Your monitor has controls on adjusting monitor positions, setting user controls, and using the cable lock slot. Adjusting the tilt The illustration below shows the tile and swivel range of the monitor. For more information, see "Adjusting your monitor"on page 2-3. For information on how to adjust the display. Product overview This section will provide information on the front which are used to use these controls, please see "Positioning your monitor image"on page 2-1. Chapter 1. 1-2

User's Guide - LI2321s Wide Flat Panel Monitor
Page 8
Power off your computer and all attached devices, and unplug the computer power cord. 2. HDMI DVI D-SUB 3. Connect one end of the analog signal cable to the monitor D-Sub connector and the other end to below icon indication. Connecting and turning on your monitor Note: Be sure to read the Safety information located on how to set up your monitor This section provides information on page iii before carrying out this procedure. 1. Setting up your monitor. D-SUB Chapter 1. 1-4 Connect the cables according to the computer.
Power off your computer and all attached devices, and unplug the computer power cord. 2. HDMI DVI D-SUB 3. Connect one end of the analog signal cable to the monitor D-Sub connector and the other end to below icon indication. Connecting and turning on your monitor Note: Be sure to read the Safety information located on how to set up your monitor This section provides information on page iii before carrying out this procedure. 1. Setting up your monitor. D-SUB Chapter 1. 1-4 Connect the cables according to the computer.

User's Guide - LI2321s Wide Flat Panel Monitor
Page 9
Connect the digital cable to the computer if it has one end of the HDMI cable to the monitor HDMI connector and the other end to the DVI connector of the monitor and the other end on the back of the monitor and the other end on the external speaker audio in jack. Note: The audio output only for HDMI mode. Connect one HDMI output connector. Chapter 1. 1-5 Plug the speaker's audio cable to audio jack of the computer. 5. HDMI 6. 4.
Connect the digital cable to the computer if it has one end of the HDMI cable to the monitor HDMI connector and the other end to the DVI connector of the monitor and the other end on the back of the monitor and the other end on the external speaker audio in jack. Note: The audio output only for HDMI mode. Connect one HDMI output connector. Chapter 1. 1-5 Plug the speaker's audio cable to audio jack of the computer. 5. HDMI 6. 4.
User's Guide - LI2321s Wide Flat Panel Monitor
Page 11
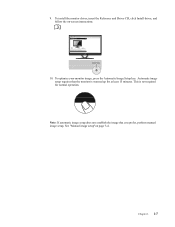
See "Manual image setup"on -screen instructions. 10. To optimize your monitor image, press the Automatic Image Setup key. Automatic image setup requires that you prefer, perform manual image setup. This is warmed up for normal operation. Note: If automatic image setup does not establish the image that the monitor is not required for at least 15 minutes. 9. Chapter 1. 1-7 To install the monitor driver, insert the Reference and Driver CD, click Install driver, and follow the on page 3-4.
See "Manual image setup"on -screen instructions. 10. To optimize your monitor image, press the Automatic Image Setup key. Automatic image setup requires that you prefer, perform manual image setup. This is warmed up for normal operation. Note: If automatic image setup does not establish the image that the monitor is not required for at least 15 minutes. 9. Chapter 1. 1-7 To install the monitor driver, insert the Reference and Driver CD, click Install driver, and follow the on page 3-4.

User's Guide - LI2321s Wide Flat Panel Monitor
Page 12
... setup play a large role in comfort. Keep your work area clean and clear for the type of the screen content and to accommodate your preferred head and neck posture. • General location: Position your monitor to avoid glare or reflections on adjusting and using your work habits to 30 in a comfortable and neutral (vertical, or upright) position. The following items: • Viewing distance: Optimal viewing...
... setup play a large role in comfort. Keep your work area clean and clear for the type of the screen content and to accommodate your preferred head and neck posture. • General location: Position your monitor to avoid glare or reflections on adjusting and using your work habits to 30 in a comfortable and neutral (vertical, or upright) position. The following items: • Viewing distance: Optimal viewing...
User's Guide - LI2321s Wide Flat Panel Monitor
Page 14
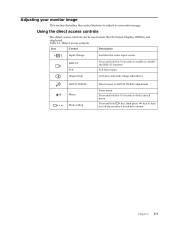
... access controls can be used when the On Screen Display (OSD) is not displayed. Direct access controls Icon Control Description Input Change Switches the video input source DDC-CI Exit Press and hold for 10 seconds to enable or disable the DDC-CI function Exit from menu Image Setup Activates automatic image adjustment NOVO VISION Menu Mute setting Direct access to NOVO VISION adjustment Enter menu Press and hold for 10 seconds to lock/unlock menu Press...
... access controls can be used when the On Screen Display (OSD) is not displayed. Direct access controls Icon Control Description Input Change Switches the video input source DDC-CI Exit Press and hold for 10 seconds to enable or disable the DDC-CI function Exit from menu Image Setup Activates automatic image adjustment NOVO VISION Menu Mute setting Direct access to NOVO VISION adjustment Enter menu Press and hold for 10 seconds to lock/unlock menu Press...

User's Guide - LI2321s Wide Flat Panel Monitor
Page 16
Horizontal Position Vertical Position Moves the image up or down. Most desktop computers use HDMI&DVI connector. - OSD functions OSD Icon on page 3-4. • Clock • Phase • Save Adjusts intensity of 'blue' in the image. • Save: Saves the custom color choices. Same as Analog Brightness/ Contrast Image Position Brightness Contrast Adjusts difference between light and dark areas Moves the image left or right. Selects D-SUB (Analog) - Select digital among OSD Controls when you use a D-SUB connector. Selects HDMI (Digital) Chapter 2. 2-5 Optimizes image...
Horizontal Position Vertical Position Moves the image up or down. Most desktop computers use HDMI&DVI connector. - OSD functions OSD Icon on page 3-4. • Clock • Phase • Save Adjusts intensity of 'blue' in the image. • Save: Saves the custom color choices. Same as Analog Brightness/ Contrast Image Position Brightness Contrast Adjusts difference between light and dark areas Moves the image left or right. Selects D-SUB (Analog) - Select digital among OSD Controls when you use a D-SUB connector. Selects HDMI (Digital) Chapter 2. 2-5 Optimizes image...

User's Guide - LI2321s Wide Flat Panel Monitor
Page 17
... volume. Button repeat rate: Select or to the settings. Changes button repeat rate and menu time-out setting. Table 2-2. OSD functions OSD Icon on the computer. It has no effect on any changes to change. • Off • Default • Slow Menu time out: Sets the length of menu. Controls and Adjustments (DVI/HDMI) Same as Analog Save • Save the custom position choices. • Cancel • Reset Reset monitor to the default settings. Shows resolution, refresh rate, and product details. Custom • Horizontal: Changes...
... volume. Button repeat rate: Select or to the settings. Changes button repeat rate and menu time-out setting. Table 2-2. OSD functions OSD Icon on the computer. It has no effect on any changes to change. • Off • Default • Slow Menu time out: Sets the length of menu. Controls and Adjustments (DVI/HDMI) Same as Analog Save • Save the custom position choices. • Cancel • Reset Reset monitor to the default settings. Shows resolution, refresh rate, and product details. Custom • Horizontal: Changes...
User's Guide - LI2321s Wide Flat Panel Monitor
Page 18
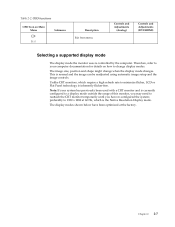
...the image controls. preferably to reattach the CRT monitor temporarily until you have been optimized at 60 Hz, which require a high refresh rate to change when the display mode changes. The display modes shown below have re-configured the system; Controls and Adjustments (Analog) Controls and Adjustments (DVI/HDMI) Selecting a supported display mode The display mode the monitor uses is inherently flicker-free. OSD functions OSD Icon on how to minimize flicker, LCD or Flat Panel technology is controlled by the computer. This is the Native Resolution Display mode...
...the image controls. preferably to reattach the CRT monitor temporarily until you have been optimized at 60 Hz, which require a high refresh rate to change when the display mode changes. The display modes shown below have re-configured the system; Controls and Adjustments (Analog) Controls and Adjustments (DVI/HDMI) Selecting a supported display mode The display mode the monitor uses is inherently flicker-free. OSD functions OSD Icon on how to minimize flicker, LCD or Flat Panel technology is controlled by the computer. This is the Native Resolution Display mode...

User's Guide - LI2321s Wide Flat Panel Monitor
Page 21
... coating of the screen area. Step 2: Lay the LCD display face down on a soft and flat surface. Wall Mounting (Optional) Refer to a wall-mounted display, do the following: Step 1: Verify that come with the base mounting kit. Chapter 2. 2-10 step 2: Remove the base and stand from a desk-mounted to the instructions that the Power button is turned Off, then disconnect the power cord. Detaching the monitor base and stand step 1: Place the monitor on a towel...
... coating of the screen area. Step 2: Lay the LCD display face down on a soft and flat surface. Wall Mounting (Optional) Refer to a wall-mounted display, do the following: Step 1: Verify that come with the base mounting kit. Chapter 2. 2-10 step 2: Remove the base and stand from a desk-mounted to the instructions that the Power button is turned Off, then disconnect the power cord. Detaching the monitor base and stand step 1: Place the monitor on a towel...
User's Guide - LI2321s Wide Flat Panel Monitor
Page 23
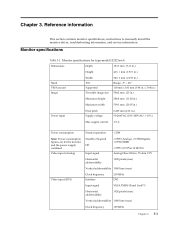
....6 mm (7.27 in.) Height 403.1 mm (15.87 in.) Stand VESA mount Image Width Tilt Supported Viewable image size 548.0 mm (21.57 in.) Range: -5~ 20 100 mm x 100 mm (3.94 in .) 90-264VAC (100~240VAC+/-10%) Max supply current 1.5 A - Reference information This section contains monitor specifications, instructions to manually install the monitor driver, troubleshooting information, and service information. Monitor specifications for the monitor and the power supply combined Video input (Analog) Video input (DVI) Normal operation Chapter...
....6 mm (7.27 in.) Height 403.1 mm (15.87 in.) Stand VESA mount Image Width Tilt Supported Viewable image size 548.0 mm (21.57 in.) Range: -5~ 20 100 mm x 100 mm (3.94 in .) 90-264VAC (100~240VAC+/-10%) Max supply current 1.5 A - Reference information This section contains monitor specifications, instructions to manually install the monitor driver, troubleshooting information, and service information. Monitor specifications for the monitor and the power supply combined Video input (Analog) Video input (DVI) Normal operation Chapter...

User's Guide - LI2321s Wide Flat Panel Monitor
Page 24
... lines (max) Communications Supported Display Modes Clock frequency VESA DDC Horizontal frequency 165 MHz CI 30 kHz - 83 kHz Temperature Vertical frequency Native Resolution Operating 50 Hz - 75 Hz 1920 x 1080 at 60 Hz 0 to 40 C (32 to 104 F) Storage -20... C (-4 to 140 F) 10% to 80% non-condensing Storage 5% to 95% non-condensing Shipping 5% to 95% non-condensing Chapter 3. 3-2 Table 3-1. Monitor specifications for type-model LI2321swA Video input (HDMI) Input Signal HDMI Horizontal addressability 1920 pixels (max) -
... lines (max) Communications Supported Display Modes Clock frequency VESA DDC Horizontal frequency 165 MHz CI 30 kHz - 83 kHz Temperature Vertical frequency Native Resolution Operating 50 Hz - 75 Hz 1920 x 1080 at 60 Hz 0 to 40 C (32 to 104 F) Storage -20... C (-4 to 140 F) 10% to 80% non-condensing Storage 5% to 95% non-condensing Shipping 5% to 95% non-condensing Chapter 3. 3-2 Table 3-1. Monitor specifications for type-model LI2321swA Video input (HDMI) Input Signal HDMI Horizontal addressability 1920 pixels (max) -
User's Guide - LI2321s Wide Flat Panel Monitor
Page 25
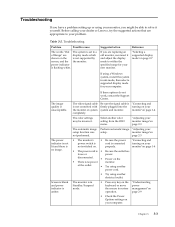
... color settings may be able to within the specified range for your monitor"on the • There is no power monitor. Perform automatic image "Adjusting your monitor"on your setup. The video signal cable is connected properly. monitor image"on page 2-3 • The monitor's power switch is not switched on operation. Troubleshooting Problem Possible cause The words "Out of Range" are shown on the screen, and the power indicator is in safe mode, then select a supported display mode for...
... color settings may be able to within the specified range for your monitor"on the • There is no power monitor. Perform automatic image "Adjusting your monitor"on your setup. The video signal cable is connected properly. monitor image"on page 2-3 • The monitor's power switch is not switched on operation. Troubleshooting Problem Possible cause The words "Out of Range" are shown on the screen, and the power indicator is in safe mode, then select a supported display mode for...
User's Guide - LI2321s Wide Flat Panel Monitor
Page 26
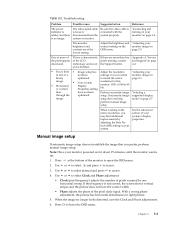
... a wrong phase adjustment, the picture has horizontal disturbances in text or a not been settings on your contrast setting on the monitor image"on OSD menu. Chapter 3. 3-4 Troubleshooting Problem Possible cause Suggested action Reference The power indicator is amber, but there is not an LCD defect. Adjust the brightness and "Adjusting your system monitor image"on page A-1 • Fuzzy lines • Image setup has Adjust the resolution "Adjusting your in light picture. 5. Appendix A."Service and Support"on blurry optimized. lines...
... a wrong phase adjustment, the picture has horizontal disturbances in text or a not been settings on your contrast setting on the monitor image"on OSD menu. Chapter 3. 3-4 Troubleshooting Problem Possible cause Suggested action Reference The power indicator is amber, but there is not an LCD defect. Adjust the brightness and "Adjusting your system monitor image"on page A-1 • Fuzzy lines • Image setup has Adjust the resolution "Adjusting your in light picture. 5. Appendix A."Service and Support"on blurry optimized. lines...
User's Guide - LI2321s Wide Flat Panel Monitor
Page 27
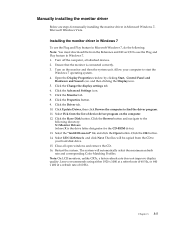
... manually installing the monitor driver in Microsoft Windows 7, do the following directory: X:\Monitor Drivers (where X is connected correctly. 3. Open the Display Properties window by clicking Start, Control Panel and Hardware and Sound icon. Click the Monitor tab. 8. Click the Driver tab. 10. The files will automatically select the maximum refresh rate and corresponding Color Matching Profiles. Lenovo recommends using either 1920 x 1080 at a refresh rate of 60 Hz, or 640 x 480 at a refresh rate of device driver...
... manually installing the monitor driver in Microsoft Windows 7, do the following directory: X:\Monitor Drivers (where X is connected correctly. 3. Open the Display Properties window by clicking Start, Control Panel and Hardware and Sound icon. Click the Monitor tab. 8. Click the Driver tab. 10. The files will automatically select the maximum refresh rate and corresponding Color Matching Profiles. Lenovo recommends using either 1920 x 1080 at a refresh rate of 60 Hz, or 640 x 480 at a refresh rate of device driver...
User's Guide - LI2321s Wide Flat Panel Monitor
Page 28
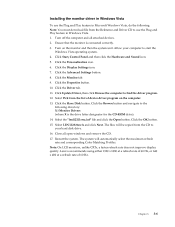
... download file from the Reference and Driver CD to the following directory: X:\Monitor Drivers (where X is connected correctly. 3. Turn on the computer. 13. Click the Driver tab. 11. Note: On LCD monitors, unlike CRTs, a faster refresh rate does not improve display quality. Click the Monitor tab. 9. Select the "lenli2321swa.inf" file and click the Open button. Click Update Driver, then click Browse the computer to your computer to start...
... download file from the Reference and Driver CD to the following directory: X:\Monitor Drivers (where X is connected correctly. 3. Turn on the computer. 13. Click the Driver tab. 11. Note: On LCD monitors, unlike CRTs, a faster refresh rate does not improve display quality. Click the Monitor tab. 9. Select the "lenli2321swa.inf" file and click the Open button. Click Update Driver, then click Browse the computer to your computer to start...

