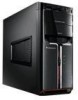
Lenovo IdeaCentre K3 Series Hardware Maintenance Manual
Page 2
... 34 Replacing the system fan assembly 35 Replacing the heat sink assembly 38 Replacing a PCI or AGP adapter 39 Replacing the CPU 45 Replacing the keyboard 49 Replacing the mouse 49 Replacing the External speaker 50 Completing the installation 51 Chapter 8. Additional Service Information(Type G43)..53 Power management 53 Appendix...
Lenovo IdeaCentre K3 Series Hardware Maintenance Manual
Page 18
... your computer, regardless of your password. The Setup Utility might override any similar settings in your computer is already on when you are using a USB keyboard and the Setup Utility program does not display using . Viewing and changing settings The Setup Utility program menu lists items that hardware has been removed...
Lenovo IdeaCentre K3 Series Hardware Maintenance Manual
Page 19
... prevent unauthorized persons from changing configuration settings. Password considerations A password can set a Administrator Password. Chapter 5. See "Starting the Setup Utility program." Using the Setup Utility keyboard. However, if you might want to 16 characters (a-z and 0-9) and symbols. If you are not case sensitive • Not be your name or your user...
Lenovo IdeaCentre K3 Series Hardware Maintenance Manual
Page 20
Start the Setup Utility program (see "Password considerations" on password after you cannot start the Setup Utility program until a valid password is typed from the keyboard. The password dialog box will be installed. a message will display that Enter New Password. Power-on page 16). 2. You should set a power-on page 17. 1. ...
Lenovo IdeaCentre K3 Series Hardware Maintenance Manual
Page 22
... Device, the 2nd Boot Device, the 3rd Boot Deviece and the 4th Boot Device. 5. Note: Not all CDs, hard disks, and diskettes are using a USB keyboard and the Startup Device Menu does not display using this procedure to startup from any boot device. Selecting a temporary startup device Use this method, repeatedly...
Lenovo IdeaCentre K3 Series Hardware Maintenance Manual
Page 28
...POST display screen and a custom POST display screen. 26 The computer loads the default configuration settings. To purposely configure the computer without a keyboard, set PS2 Mouse support is required to show POST screen Description/Action The CMOS Date and/or Time are held pressed during POST. ... to reboot the machine. A reset or power cycle is auto. The CMOS battery is not detected. The BIOS then ignores the missing keyboard during POST. This message appears after a fatal error has been detected. Hardware Maintenance Manual POST Error Message CMOS Date/Time Not Set CMOS...
Lenovo IdeaCentre K3 Series Hardware Maintenance Manual
Page 51
..., CDs, or memory cards) from the drives, shut down your operating system, and turn off all power cords from the computer and connect the new keyboard cable to "Locating connectors on the rear of the computer" and "Locating connectors on the rear of the computer". 49 Note Your... keyboard might be connected to the standard keyboard connector at the rear of the computer or to a USB connector at either the front or rear of the computer". Unplug all attached...
Lenovo IdeaCentre K3 Series Hardware Replacement Guide V1.0
Page 3
... 14 Replacing the system fan assembly 15 Replacing the heat sink assembly 18 Replacing a PCI or AGP adapter 20 Replacing the CPU 26 Replacing the keyboard 29 Replacing the mouse 30 Replacing the External speaker 31 Completing the installation 31 Appendix 33 31037823_K3_HRG_EN_V1.0.indd 2 2009.8.4 4:43:01 PM
Lenovo IdeaCentre K3 Series Hardware Replacement Guide V1.0
Page 4
...: • Memory modules • Hard disk drive • Optical drive • Heatsink, Fan • CPU • VGA card • Keyboard, Mouse (wired) • External speaker Safety information for parts ordering information. Hardware Replacement Guide 31037823_K3_HRG_EN_V1.0.indd 1 2009.8.4 4:43:02 PM If ...computer models that cables, switches, and certain mechanical parts can obtain one online from the Support Web site at http://consumersupport.lenovo.com. Note: Use only parts provided by customers who are replacing Field Replaceable Units (FRUs). In this manual applies ...
Lenovo IdeaCentre K3 Series Hardware Replacement Guide V1.0
Page 9
Optical drive (Some models are equipped with only one optical drive.) Power Dial switch Rear view The following illustration shows the location of connectors on the rear of the computer. 1 2 3 4 5 6 7 8 9 11 10 12 13 14 Voltage selection switch (selected models only) Power connector PS/2 keyboard connector PS/2 mouse connector Serial connector On-board VGA connector (selected models only) USB connectors (6) Ethernet connector Microphone connector Audio line-out connector Audio line-in connector Hardware Replacement Guide 31037823_K3_HRG_EN_V1.0.indd 6 2009.8.4 4:43:06 PM
Lenovo IdeaCentre K3 Series Hardware Replacement Guide V1.0
Page 32
...cards) from the drives, shut down your operating system, and turn off all power cords from the computer and connect the new keyboard cable to "Locating connectors on the rear of the computer" and "Locating connectors on the front of the computer. 4. Locate the connector... for the keyboard. Unplug all attached devices and the computer. 2. Replacing the keyboard To replace the keyboard: 1. Note: Your keyboard might be connected to the standard keyboard connector at the rear of the computer or to the "Completing the installation"....
Lenovo IdeaCentre K3 Series Hardware Replacement Guide V1.1
Page 3
... 14 Replacing the system fan assembly 15 Replacing the heat sink assembly 18 Replacing a PCI or AGP adapter 20 Replacing the CPU 26 Replacing the keyboard 29 Replacing the mouse 30 Replacing the External speaker 31 Completing the installation 31 Appendix 33 31041387_K3_HRG_EN_V1.1.indd 2 2009.10.23 10:29:53 AM
Lenovo IdeaCentre K3 Series Hardware Replacement Guide V1.1
Page 4
... to be used by customers who are replacing Customer Replaceable Units (CRUs) as well as parts. Note: Use only parts provided by Lenovo®. It does not apply to those computer models that do not have the TV-Tuner card installed. Note: Trained service personnel should... parts: • Memory modules • Hard disk drive • Optical drive • Heatsink, Fan • CPU • VGA card • Keyboard, Mouse (wired) • External speaker Safety information for parts ordering information. Overview This guide is expected that was included with your computer or attempt any...
Lenovo IdeaCentre K3 Series Hardware Replacement Guide V1.1
Page 9
... shows the location of connectors on the rear of the computer. 1 2 3 4 5 6 7 8 9 11 10 12 13 14 Voltage selection switch (selected models only) Power connector PS/2 keyboard connector PS/2 mouse connector Serial connector (selected models only) On-board VGA connector (selected models only) USB connectors (6) Ethernet connector Microphone connector Audio line-out...
Lenovo IdeaCentre K3 Series Hardware Replacement Guide V1.1
Page 32
...or memory cards) from the drives, shut down your operating system, and turn off all power cords from the computer and connect the new keyboard cable to the "Completing the installation". 31041387_K3_HRG_EN_V1.1.indd 29 Hardware Replacement Guide 29 2009.10.23 10:31:55 AM Note: Your... keyboard might be connected to the standard keyboard connector at either the front or rear of the computer". Refer to a USB connector at the rear of the computer or ...
Lenovo IdeaCentre K3 Series User Guide V1.0
Page 8
For more information about the graphics adapter, see the description below). User Guide 31037825_K3_UG_EN_V1.0.indd 3 2009.8.4 5:13:10 PM 1.2 Rear view of the chassis 1 2 3 4 5 6 7 8 9 11 10 12 13 14 Voltage selection switch (selected models only) Power connector PS/2 keyboard connector PS/2 mouse connector Serial connector On-board VGA connector (selected models only) USB connectors (6) Ethernet connector Microphone connector Audio line-out connector Audio line-in connector PCI Express x16 graphics adapter connector (Some models are equipped with this connector.
Lenovo IdeaCentre K3 Series User Guide V1.0
Page 10
1.3.2 Connect the keyboard cable to the appropriate keyboard connector. (PS/2 connector or USB connector) 1.3.3 Connect the mouse cable to the appropriate mouse connector. (PS/2 connector or USB connector) Note: If your model has ... cable to the monitor connector on the graphics adapter. 31037825_K3_UG_EN_V1.0.indd 5 User Guide 2009.8.4 5:13:13 PM Note: If your computer is equipped with a wireless keyboard or mouse, follow those installation instructions. 1.3.4 Connect the monitor cable to the connector as shown.
Lenovo IdeaCentre K3 Series User Guide V1.0
Page 16
....8.4 5:13:18 PM To learn more about this model of computer. F2 -- Your computer has the Lenovo Rescue System installed. Micro Secure Digital, Micro Multi Media Card, Micro Secure Digital HC, M2. 1.3.13 Keyboard and Mouse (wired) LV T LV T LVT -- After entering Windows, press this key to run ...on this program, turn on the computer, and when the Lenovo logo appears, press the F2 key and the Lenovo Rescue System will open.
Lenovo IdeaCentre K3 Series User Guide V1.0
Page 23
...: The recovery files and relevant data used by someone other than authorized Lenovo servicers, Lenovo will not be liable for the user to conveniently re-install all of system recovery. Turn on the keyboard to start restoration. 3. Follow the onscreen instructions to select the backup task...install operation system, and press Next to the system default or a previously backed up relevant data before performing system recovery. 2. When the Lenovo logo appears, press the F2 key on the computer. Please wait during the recovery process. 4. Detailed Operation Procedure 1. Do not interrupt...
Lenovo IdeaCentre K3 Series User Guide V1.0
Page 24
...System, then select Drivers and Application Installation. Then select System Setup. 2.3.2 Network Settings Depending on the computer. When the Lenovo logo appears, press the F2 key on the keyboard to install the software which is already on the computer. It is recommended not to start installing the... Lenovo Drivers and Application Installation. If you select "ADSL," input the username and password of the computer, select "ADSL" or "LAN...