Hardware Maintanence Manual
Page 3
...Supplemental Recovery Disc 23 Passwords 24 Power-on password 24 Hard-disk password 24 Supervisor password 24 Power management 25 Screen blank state 25 Putting your computer into sleep state or shutting it down 25 Lenovo IdeaPad S400 26 Specifications 26 Status indicators 28 Hotkeys 30 FRU replacement... notices 31 Screw notices 31 Removing and replacing an FRU 32 1010 Battery pack 33 1020 Hard disk drive 35 1030 DIMM 37 1040 PCI Express Mini ...
...Supplemental Recovery Disc 23 Passwords 24 Power-on password 24 Hard-disk password 24 Supervisor password 24 Power management 25 Screen blank state 25 Putting your computer into sleep state or shutting it down 25 Lenovo IdeaPad S400 26 Specifications 26 Status indicators 28 Hotkeys 30 FRU replacement... notices 31 Screw notices 31 Removing and replacing an FRU 32 1010 Battery pack 33 1020 Hard disk drive 35 1030 DIMM 37 1040 PCI Express Mini ...
Hardware Maintanence Manual
Page 20
...in this manual. Follow the directions on page 16 - Enter the serial number or select a product or use Lenovo smart downloading. 3. Lenovo IdeaPad S400 Hardware Maintenance Manual Important service information This chapter presents the following important service information: • "Strategy for replacing ... 4. To download software fixes, drivers, and BIOS, follow the steps below: 1. Strategy for replacing a hard disk drive" on the customer support site: http://support.lenovo.com. "Strategy for replacing FRUs Before replacing parts: Make sure that the latest BIOS is replaced, ensure ...
...in this manual. Follow the directions on page 16 - Enter the serial number or select a product or use Lenovo smart downloading. 3. Lenovo IdeaPad S400 Hardware Maintenance Manual Important service information This chapter presents the following important service information: • "Strategy for replacing ... 4. To download software fixes, drivers, and BIOS, follow the steps below: 1. Strategy for replacing a hard disk drive" on the customer support site: http://support.lenovo.com. "Strategy for replacing FRUs Before replacing parts: Make sure that the latest BIOS is replaced, ensure ...
Hardware Maintanence Manual
Page 24
... subjected to stress beyond normal use of an optical drive • Diskette drive damage caused by the improper insertion of a PC Card or the installation of an incompatible card • Improper disk insertion or use . Lenovo IdeaPad S400 Hardware Maintenance Manual What to do first When you... do return an FRU, you attach to it may be a symptom of unauthorized service or modification. • If the spindle of a hard disk drive becomes noisy, it : 1. Date of purchase...
... subjected to stress beyond normal use of an optical drive • Diskette drive damage caused by the improper insertion of a PC Card or the installation of an incompatible card • Improper disk insertion or use . Lenovo IdeaPad S400 Hardware Maintenance Manual What to do first When you... do return an FRU, you attach to it may be a symptom of unauthorized service or modification. • If the spindle of a hard disk drive becomes noisy, it : 1. Date of purchase...
Hardware Maintanence Manual
Page 28
... on password (POP), the hard disk password (HDP), and the supervisor password (SVP). Attention: If the SVP has been forgotten and cannot be replaced for it to get access to complete the Windows setup. Lenovo IdeaPad S400 Hardware Maintenance Manual 7. Note:... The remainder of the data has been copied from being powered on . The password must be booted. The system board must be entered before an operating system can be replaced for the system administrator, who can be made available to the hard disk drive...
... on password (POP), the hard disk password (HDP), and the supervisor password (SVP). Attention: If the SVP has been forgotten and cannot be replaced for it to get access to complete the Windows setup. Lenovo IdeaPad S400 Hardware Maintenance Manual 7. Note:... The remainder of the data has been copied from being powered on . The password must be booted. The system board must be entered before an operating system can be replaced for the system administrator, who can be made available to the hard disk drive...
Hardware Maintanence Manual
Page 30
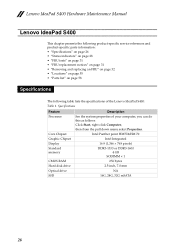
Specifications Feature Description Processor See the system properties of the Lenovo IdeaPad S400: Table 1. Lenovo IdeaPad S400 Hardware Maintenance Manual Lenovo IdeaPad S400 This chapter presents the following product-specific service references and product-specific parts information: • "Specifications" ...Start, right-click Computer; then from the pull down menu select Properties. Core Chipset Graphic Chipset Display Standard memory CMOS RAM Hard disk drive Optical drive SSD Intel Panther point HM77&HM 70 Intel Integrated 16:9 (1,366 × 768 pixels) DDR3-1333 or DDR3-1600 ...
Specifications Feature Description Processor See the system properties of the Lenovo IdeaPad S400: Table 1. Lenovo IdeaPad S400 Hardware Maintenance Manual Lenovo IdeaPad S400 This chapter presents the following product-specific service references and product-specific parts information: • "Specifications" ...Start, right-click Computer; then from the pull down menu select Properties. Core Chipset Graphic Chipset Display Standard memory CMOS RAM Hard disk drive Optical drive SSD Intel Panther point HM77&HM 70 Intel Integrated 16:9 (1,366 × 768 pixels) DDR3-1333 or DDR3-1600 ...
Hardware Maintanence Manual
Page 39
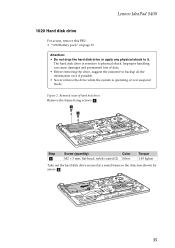
... 33 Attention: • Do not drop the hard disk drive or apply any physical shock to physical shock. The hard disk drive is sensitive to it if possible. • Never remove the drive while the system is operating or is in the direction shown by arrow b . Lenovo IdeaPad S400 1020 Hard disk drive For access, remove this FRU: • "1010...
... 33 Attention: • Do not drop the hard disk drive or apply any physical shock to physical shock. The hard disk drive is sensitive to it if possible. • Never remove the drive while the system is operating or is in the direction shown by arrow b . Lenovo IdeaPad S400 1020 Hard disk drive For access, remove this FRU: • "1010...

Hardware Maintanence Manual
Page 40
Removal steps of hard disk drive (continued) Remove four screws c and detach the metal frame from the hard disk drive. c c c c Step c Screw (quantity) M3.0 × 3.0 mm, flat-head, nylok-coated (4) Color Silver Torque 3.0 kgfcm When installing: Make sure that the HDD connector is attached firmly. 36 Lenovo IdeaPad S400 Hardware Maintenance Manual Figure 2.
Removal steps of hard disk drive (continued) Remove four screws c and detach the metal frame from the hard disk drive. c c c c Step c Screw (quantity) M3.0 × 3.0 mm, flat-head, nylok-coated (4) Color Silver Torque 3.0 kgfcm When installing: Make sure that the HDD connector is attached firmly. 36 Lenovo IdeaPad S400 Hardware Maintenance Manual Figure 2.
Hardware Maintanence Manual
Page 48
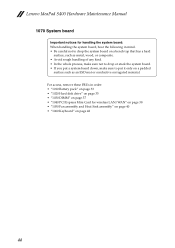
For access, remove these FRUs in order: • "1010 Battery pack" on page 33 • "1020 Hard disk drive" on page 35 • "1030 DIMM" on page 37 • "1040 PCI Express Mini Card for handling the system board: When handling the system board, ...bear the following in mind. • Be careful not to drop the system board on a bench top that has a hard surface, such as an ESD mat or conductive corrugated material. Lenovo IdeaPad S400 Hardware Maintenance Manual 1070 System board Important notices for wireless LAN/WAN" on page 38 • "1050 Fan assembly and...
For access, remove these FRUs in order: • "1010 Battery pack" on page 33 • "1020 Hard disk drive" on page 35 • "1030 DIMM" on page 37 • "1040 PCI Express Mini Card for handling the system board: When handling the system board, ...bear the following in mind. • Be careful not to drop the system board on a bench top that has a hard surface, such as an ESD mat or conductive corrugated material. Lenovo IdeaPad S400 Hardware Maintenance Manual 1070 System board Important notices for wireless LAN/WAN" on page 38 • "1050 Fan assembly and...
Hardware Maintanence Manual
Page 51
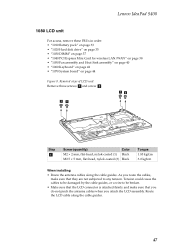
... when you route the cables, make sure that they are not subjected to any tension. Lenovo IdeaPad S400 1080 LCD unit For access, remove these FRUs in order: • "1010 Battery pack" on page 33 • "1020 Hard disk drive" on page 35 • "1030 DIMM" on page 37 • "1040 PCI Express Mini Card...
... when you route the cables, make sure that they are not subjected to any tension. Lenovo IdeaPad S400 1080 LCD unit For access, remove these FRUs in order: • "1010 Battery pack" on page 33 • "1020 Hard disk drive" on page 35 • "1030 DIMM" on page 37 • "1040 PCI Express Mini Card...
Hardware Maintanence Manual
Page 53
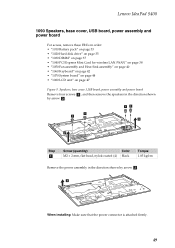
Lenovo IdeaPad S400 1090 Speakers, base cover, USB board, power assembly and power board For access, remove these FRUs in the direction shown by arrow b . c When installing: Make ...; 2 mm, flat-head, nylok-coated (4) Black Torque 1.85 kgfcm Remove the power assembly in order: • "1010 Battery pack" on page 33 • "1020 Hard disk drive" on page 35 • "1030 DIMM" on page 37 • "1040 PCI Express Mini Card for wireless LAN/WAN" on page 38 • "1050 Fan...
Lenovo IdeaPad S400 1090 Speakers, base cover, USB board, power assembly and power board For access, remove these FRUs in the direction shown by arrow b . c When installing: Make ...; 2 mm, flat-head, nylok-coated (4) Black Torque 1.85 kgfcm Remove the power assembly in order: • "1010 Battery pack" on page 33 • "1020 Hard disk drive" on page 35 • "1030 DIMM" on page 37 • "1040 PCI Express Mini Card for wireless LAN/WAN" on page 38 • "1050 Fan...
Hardware Maintanence Manual
Page 56
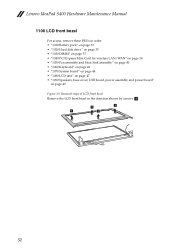
Lenovo IdeaPad S400 Hardware Maintenance Manual 1100 LCD front bezel For access, remove these FRUs in the direction shown by arrows a. a a a a 52 Removal steps of LCD front bezel Remove the LCD front bezel in order: • "1010 Battery pack" on page 33 • "1020 Hard disk drive" on page 35 • "1030 DIMM" on page 37...
Lenovo IdeaPad S400 Hardware Maintenance Manual 1100 LCD front bezel For access, remove these FRUs in the direction shown by arrows a. a a a a 52 Removal steps of LCD front bezel Remove the LCD front bezel in order: • "1010 Battery pack" on page 33 • "1020 Hard disk drive" on page 35 • "1030 DIMM" on page 37...
Hardware Maintanence Manual
Page 57
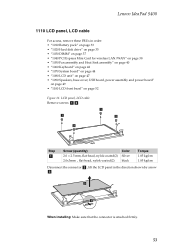
...black Torque 1.85 kgfcm 1.85 kgfcm Disconnect the connector b , lift the LCD panel in order: • "1010 Battery pack" on page 33 • "1020 Hard disk drive" on page 35 • "1030 DIMM" on page 37 • "1040 PCI Express Mini Card for wireless LAN/WAN" on page 38 • "1050 ..." on page 49 • "1100 LCD front bezel" on page 52 Figure 11. c b When installing: Make sure that the connector is attached firmly. 53 Lenovo IdeaPad S400 1110 LCD panel, LCD cable For access, remove these FRUs in the direction shown by arrow c. LCD panel, LCD cable Remove screws a b.
...black Torque 1.85 kgfcm 1.85 kgfcm Disconnect the connector b , lift the LCD panel in order: • "1010 Battery pack" on page 33 • "1020 Hard disk drive" on page 35 • "1030 DIMM" on page 37 • "1040 PCI Express Mini Card for wireless LAN/WAN" on page 38 • "1050 ..." on page 49 • "1100 LCD front bezel" on page 52 Figure 11. c b When installing: Make sure that the connector is attached firmly. 53 Lenovo IdeaPad S400 1110 LCD panel, LCD cable For access, remove these FRUs in the direction shown by arrow c. LCD panel, LCD cable Remove screws a b.
Hardware Maintanence Manual
Page 58
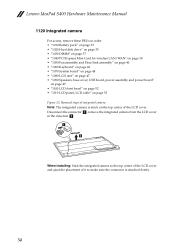
... the LCD cover. Disconnect the connector a, remove the integrated camera from the LCD cover in order: • "1010 Battery pack" on page 33 • "1020 Hard disk drive" on page 35 • "1030 DIMM" on page 37 • "1040 PCI Express Mini Card for wireless LAN/WAN" on page 38 • "1050... 52 • "1110 LCD panel, LCD cable" on the top center of it to make sure the connector is stuck on page 53 Figure 12. Lenovo IdeaPad S400 Hardware Maintenance Manual 1120 Integrated camera For access, remove these FRUs in the direction b.
... the LCD cover. Disconnect the connector a, remove the integrated camera from the LCD cover in order: • "1010 Battery pack" on page 33 • "1020 Hard disk drive" on page 35 • "1030 DIMM" on page 37 • "1040 PCI Express Mini Card for wireless LAN/WAN" on page 38 • "1050... 52 • "1110 LCD panel, LCD cable" on the top center of it to make sure the connector is stuck on page 53 Figure 12. Lenovo IdeaPad S400 Hardware Maintenance Manual 1120 Integrated camera For access, remove these FRUs in the direction b.


