Hardware Maintanence Manual
Page 3
...18 General checkout 19 What to do first 20 Power system checkout 21 Checking the AC adapter 21 Checking operational charging 21 Checking the battery pack 22 Related service information 23 Restoring the factory contents by using Recovery Disc Set 23 Start Recovery Disc (one disc 23 Operating... 25 Putting your computer into sleep state or shutting it down 25 Lenovo IdeaPad S400 26 Specifications 26 Status indicators 28 Hotkeys 30 FRU replacement notices 31 Screw notices 31 Removing and replacing an FRU 32 1010 Battery pack 33 1020 Hard disk drive 35 1030 DIMM 37 1040 PCI ...
...18 General checkout 19 What to do first 20 Power system checkout 21 Checking the AC adapter 21 Checking operational charging 21 Checking the battery pack 22 Related service information 23 Restoring the factory contents by using Recovery Disc Set 23 Start Recovery Disc (one disc 23 Operating... 25 Putting your computer into sleep state or shutting it down 25 Lenovo IdeaPad S400 26 Specifications 26 Status indicators 28 Hotkeys 30 FRU replacement notices 31 Screw notices 31 Removing and replacing an FRU 32 1010 Battery pack 33 1020 Hard disk drive 35 1030 DIMM 37 1040 PCI ...
Hardware Maintanence Manual
Page 10
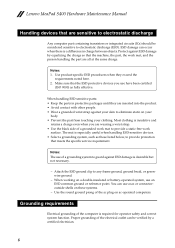
... a double-insulated or battery-operated system, use coax or connectoroutside shells on your body. • Prevent the part from touching your skin to electrostatic discharge (ESD). ESD damage can occur when there is especially useful when handling ESD-sensitive devices. • Select a grounding system, such as fully effective. Lenovo IdeaPad S400 Hardware Maintenance Manual...
... a double-insulated or battery-operated system, use coax or connectoroutside shells on your body. • Prevent the part from touching your skin to electrostatic discharge (ESD). ESD damage can occur when there is especially useful when handling ESD-sensitive devices. • Select a grounding system, such as fully effective. Lenovo IdeaPad S400 Hardware Maintenance Manual...
Hardware Maintanence Manual
Page 25
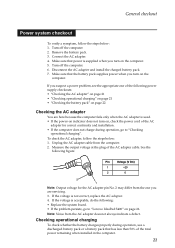
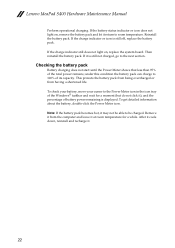
...2 1 Note: Output voltage for correct continuity and installation. • If the computer does not charge during operation, use a discharged battery pack or a battery pack that has less than 50% of the AC adapter cable. Unplug the AC adapter cable from the AC adapter does not always indicate... adapter. 4. Checking operational charging To check whether the battery charges properly during operation, go to "Checking operational charging". See the following : • Replace the system board. • If the problem persists, go to "Lenovo IdeaPad S400" on , check the power cord of the AC ...
...2 1 Note: Output voltage for correct continuity and installation. • If the computer does not charge during operation, use a discharged battery pack or a battery pack that has less than 50% of the AC adapter cable. Unplug the AC adapter cable from the AC adapter does not always indicate... adapter. 4. Checking operational charging To check whether the battery charges properly during operation, go to "Checking operational charging". See the following : • Replace the system board. • If the problem persists, go to "Lenovo IdeaPad S400" on , check the power cord of the AC ...
Hardware Maintanence Manual
Page 26
...does not light on , remove the battery pack and let it . 22 under this condition the battery pack can charge to room temperature. Note: If the battery pack becomes hot, it is still not charged, go to the next section. Lenovo IdeaPad S400 Hardware Maintenance Manual Perform operational charging. If... it may not be able to the Power Meter icon in the icon tray of its capacity. Remove it from having a shortened life. To check your battery, move your cursor to be charged...
...does not light on , remove the battery pack and let it . 22 under this condition the battery pack can charge to room temperature. Note: If the battery pack becomes hot, it is still not charged, go to the next section. Lenovo IdeaPad S400 Hardware Maintenance Manual Perform operational charging. If... it may not be able to the Power Meter icon in the icon tray of its capacity. Remove it from having a shortened life. To check your battery, move your cursor to be charged...
Hardware Maintanence Manual
Page 31
Lenovo IdeaPad S400 Table 1. Specifications (continued) Feature I/O ports Audio Video WLAN WWAN Bluetooth Keyboard Touch pad Integrated camera Battery AC adapter Pre-installed operating system Description HDMI port × 1 USB 2.0 × 2, USB 3.0 × 1 2 in 1 slot × 1 (MMC, SD) Combo audio jack × 1 Speaker × 2 Built-in microphone HDMI port × 1 Intel Wifi 2 × 2 GN Intel WiMAX/Wifi 1 × 2 BGN Option New Key Board One piece TouchPad 0.3 mega pixels Lithium-ion 40 W or 65 W Win7 27
Lenovo IdeaPad S400 Table 1. Specifications (continued) Feature I/O ports Audio Video WLAN WWAN Bluetooth Keyboard Touch pad Integrated camera Battery AC adapter Pre-installed operating system Description HDMI port × 1 USB 2.0 × 2, USB 3.0 × 1 2 in 1 slot × 1 (MMC, SD) Combo audio jack × 1 Speaker × 2 Built-in microphone HDMI port × 1 Intel Wifi 2 × 2 GN Intel WiMAX/Wifi 1 × 2 BGN Option New Key Board One piece TouchPad 0.3 mega pixels Lithium-ion 40 W or 65 W Win7 27
Hardware Maintanence Manual
Page 33
...%, the blinking color changes to white. Slow blinking white: The battery has between 5% and 20% charge. Lenovo IdeaPad S400 Table 2. Blinking: The computer is detached. 29 Off: The battery is in sleep mode. off . On (solid white): The battery has more than 5% charge. Fast blinking amber: The battery has less than 20% charge. Status indicators Indicator a Power...
...%, the blinking color changes to white. Slow blinking white: The battery has between 5% and 20% charge. Lenovo IdeaPad S400 Table 2. Blinking: The computer is detached. 29 Off: The battery is in sleep mode. off . On (solid white): The battery has more than 5% charge. Fast blinking amber: The battery has less than 20% charge. Status indicators Indicator a Power...
Hardware Maintanence Manual
Page 36
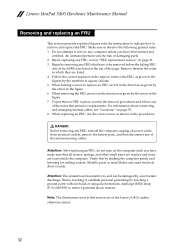
... screw to replace an FRU, turn on the computer until you have made sure that all power cords from electrical outlets, remove the battery pack, and then disconnect any FRUs that pertain to service any FRU, review "FRU replacement notices" on page 55. 8. Attention: ... are of the interconnecting cables. Do not attempt to replacement. Begin by shaking the computer gently and listening for rattling sounds. Lenovo IdeaPad S400 Hardware Maintenance Manual Removing and replacing an FRU This section presents exploded figures with one hand or using an electrostatic discharge (ESD...
... screw to replace an FRU, turn on the computer until you have made sure that all power cords from electrical outlets, remove the battery pack, and then disconnect any FRUs that pertain to service any FRU, review "FRU replacement notices" on page 55. 8. Attention: ... are of the interconnecting cables. Do not attempt to replacement. Begin by shaking the computer gently and listening for rattling sounds. Lenovo IdeaPad S400 Hardware Maintenance Manual Removing and replacing an FRU This section presents exploded figures with one hand or using an electrostatic discharge (ESD...
Hardware Maintanence Manual
Page 37
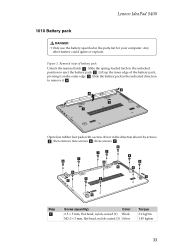
Slide the spring-loaded latch to the unlocked position to remove it on the outer edge c. Slide the battery pack in the indicated direction to eject the battery pack b. g f f e f f gg f f e f f e f e Step a Screw (quantity) Color 2.5 × 5 mm, flat-head, nylok-coated (9) Black M2.0 ...85 kgfcm 33 Any other battery could ignite or explode. Lift up the inner edge of battery pack Unlock the manual latch a . Removal steps of the battery pack, pivoting it d. Figure 1. Lenovo IdeaPad S400 1010 Battery pack DANGER • Only use the battery specified in the direction ...
Slide the spring-loaded latch to the unlocked position to remove it on the outer edge c. Slide the battery pack in the indicated direction to eject the battery pack b. g f f e f f gg f f e f f e f e Step a Screw (quantity) Color 2.5 × 5 mm, flat-head, nylok-coated (9) Black M2.0 ...85 kgfcm 33 Any other battery could ignite or explode. Lift up the inner edge of battery pack Unlock the manual latch a . Removal steps of the battery pack, pivoting it d. Figure 1. Lenovo IdeaPad S400 1010 Battery pack DANGER • Only use the battery specified in the direction ...
Hardware Maintanence Manual
Page 38
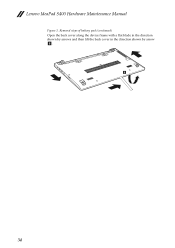
Removal steps of battery pack (continued) Open the back cover along the device frame with a flat blade in the direction shown by arrows and then lift the back cover in the direction shown by arrow h. Lenovo IdeaPad S400 Hardware Maintenance Manual Figure 1. h 34
Removal steps of battery pack (continued) Open the back cover along the device frame with a flat blade in the direction shown by arrows and then lift the back cover in the direction shown by arrow h. Lenovo IdeaPad S400 Hardware Maintenance Manual Figure 1. h 34
Hardware Maintanence Manual
Page 39
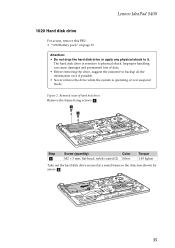
Lenovo IdeaPad S400 1020 Hard disk drive For access, remove this FRU: • "1010 Battery pack" on it . Removal steps of data. • Before removing the drive, suggest the customer to backup all the information on page 33 Attention: • ...
Lenovo IdeaPad S400 1020 Hard disk drive For access, remove this FRU: • "1010 Battery pack" on it . Removal steps of data. • Before removing the drive, suggest the customer to backup all the information on page 33 Attention: • ...
Hardware Maintanence Manual
Page 41
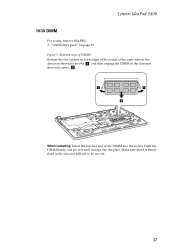
a a b When installing: Insert the notched end of the DIMM into the place. Push the DIMM firmly, and pivot it until it is firmly fixed in the direction shown by arrow b. Make sure that it snaps into the socket. Removal steps of DIMM Release the two latches on page 33 Figure 3. Lenovo IdeaPad S400 1030 DIMM For access, remove this FRU: • "1010 Battery pack" on both edges of the socket at the same time in the direction shown by arrows a, and then unplug the DIMM in the slot and difficult to be moved. 37
a a b When installing: Insert the notched end of the DIMM into the place. Push the DIMM firmly, and pivot it until it is firmly fixed in the direction shown by arrow b. Make sure that it snaps into the socket. Removal steps of DIMM Release the two latches on page 33 Figure 3. Lenovo IdeaPad S400 1030 DIMM For access, remove this FRU: • "1010 Battery pack" on both edges of the socket at the same time in the direction shown by arrows a, and then unplug the DIMM in the slot and difficult to be moved. 37
Hardware Maintanence Manual
Page 42
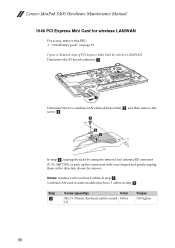
Removal steps of PCI Express Mini Card for wireless LAN/WAN For access, remove this FRU: • "1010 Battery pack" on page 33 Figure 4. Lenovo IdeaPad S400 Hardware Maintenance Manual 1040 PCI Express Mini Card for wireless LAN/WAN Disconnect the IO board connector a. wireless LAN card in some models may have 3 ...
Removal steps of PCI Express Mini Card for wireless LAN/WAN For access, remove this FRU: • "1010 Battery pack" on page 33 Figure 4. Lenovo IdeaPad S400 Hardware Maintenance Manual 1040 PCI Express Mini Card for wireless LAN/WAN Disconnect the IO board connector a. wireless LAN card in some models may have 3 ...
Hardware Maintanence Manual
Page 44
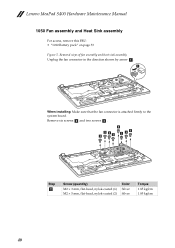
Lenovo IdeaPad S400 Hardware Maintenance Manual 1050 Fan assembly and Heat Sink assembly For access, remove this FRU: • "1010 Battery pack" on page 33 Figure 5. a When installing: Make sure that the fan connector is attached firmly to the system board. Remove six screws b and two ...
Lenovo IdeaPad S400 Hardware Maintenance Manual 1050 Fan assembly and Heat Sink assembly For access, remove this FRU: • "1010 Battery pack" on page 33 Figure 5. a When installing: Make sure that the fan connector is attached firmly to the system board. Remove six screws b and two ...
Hardware Maintanence Manual
Page 46
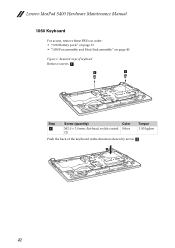
Lenovo IdeaPad S400 Hardware Maintenance Manual 1060 Keyboard For access, remove these FRUs in the direction shown by arrow b . Removal steps of the keyboard in order:: • "1010 Battery pack" on page 33 • "1050 Fan assembly and Heat Sink assembly" on page 40 Figure 6. a a Step a Screw (quantity) M2.0 × 3.0 mm, flat-head, nylok-coated (2) Color Silver Torque 1.85 kgfcm Push the back of keyboard Remove screws a . b 42
Lenovo IdeaPad S400 Hardware Maintenance Manual 1060 Keyboard For access, remove these FRUs in the direction shown by arrow b . Removal steps of the keyboard in order:: • "1010 Battery pack" on page 33 • "1050 Fan assembly and Heat Sink assembly" on page 40 Figure 6. a a Step a Screw (quantity) M2.0 × 3.0 mm, flat-head, nylok-coated (2) Color Silver Torque 1.85 kgfcm Push the back of keyboard Remove screws a . b 42
Hardware Maintanence Manual
Page 48
... mind. • Be careful not to put it only on page 42 44 Lenovo IdeaPad S400 Hardware Maintenance Manual 1070 System board Important notices for handling the system board: When handling the system board, bear the following in order: • "1010 Battery pack" on page 33 • "1020 Hard disk drive" on page 35...
... mind. • Be careful not to put it only on page 42 44 Lenovo IdeaPad S400 Hardware Maintenance Manual 1070 System board Important notices for handling the system board: When handling the system board, bear the following in order: • "1010 Battery pack" on page 33 • "1020 Hard disk drive" on page 35...
Hardware Maintanence Manual
Page 51
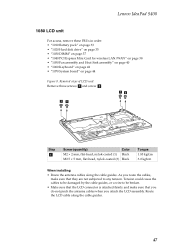
Lenovo IdeaPad S400 1080 LCD unit For access, remove these FRUs in order: • "1010 Battery pack" on page 33 • "1020 Hard disk drive" on page 35 • "1030 DIMM" on page 37 • "1040 PCI Express Mini Card for ...
Lenovo IdeaPad S400 1080 LCD unit For access, remove these FRUs in order: • "1010 Battery pack" on page 33 • "1020 Hard disk drive" on page 35 • "1030 DIMM" on page 37 • "1040 PCI Express Mini Card for ...
Hardware Maintanence Manual
Page 53
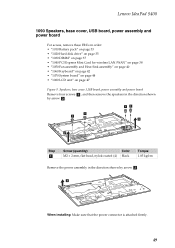
..., base cover, USB board, power assembly and power board Remove four screws a , and then remove the speakers in the direction shown by arrow c. Lenovo IdeaPad S400 1090 Speakers, base cover, USB board, power assembly and power board For access, remove these FRUs in the direction shown by arrow b . aa a...Step a Screw (quantity) Color M2 × 2 mm, flat-head, nylok-coated (4) Black Torque 1.85 kgfcm Remove the power assembly in order: • "1010 Battery pack" on page 33 • "1020 Hard disk drive" on page 35 • "1030 DIMM" on page 37 • "1040 PCI Express Mini Card for...
..., base cover, USB board, power assembly and power board Remove four screws a , and then remove the speakers in the direction shown by arrow c. Lenovo IdeaPad S400 1090 Speakers, base cover, USB board, power assembly and power board For access, remove these FRUs in the direction shown by arrow b . aa a...Step a Screw (quantity) Color M2 × 2 mm, flat-head, nylok-coated (4) Black Torque 1.85 kgfcm Remove the power assembly in order: • "1010 Battery pack" on page 33 • "1020 Hard disk drive" on page 35 • "1030 DIMM" on page 37 • "1040 PCI Express Mini Card for...
Hardware Maintanence Manual
Page 56
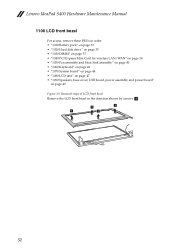
a a a a 52 Removal steps of LCD front bezel Remove the LCD front bezel in order: • "1010 Battery pack" on page 33 • "1020 Hard disk drive" on page 35 • "1030 DIMM" on page 37 • "1040 PCI Express Mini Card for ... 44 • "1080 LCD unit" on page 47 • "1090 Speakers, base cover, USB board, power assembly and power board" on page 49 Figure 10. Lenovo IdeaPad S400 Hardware Maintenance Manual 1100 LCD front bezel For access, remove these FRUs in the direction shown by arrows a.
a a a a 52 Removal steps of LCD front bezel Remove the LCD front bezel in order: • "1010 Battery pack" on page 33 • "1020 Hard disk drive" on page 35 • "1030 DIMM" on page 37 • "1040 PCI Express Mini Card for ... 44 • "1080 LCD unit" on page 47 • "1090 Speakers, base cover, USB board, power assembly and power board" on page 49 Figure 10. Lenovo IdeaPad S400 Hardware Maintenance Manual 1100 LCD front bezel For access, remove these FRUs in the direction shown by arrows a.
Hardware Maintanence Manual
Page 57
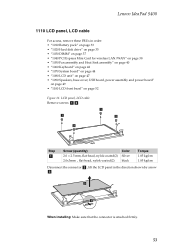
...-coated(2) 2.0x3mm , flat-head, nylok-coated(2) Color Silver black Torque 1.85 kgfcm 1.85 kgfcm Disconnect the connector b , lift the LCD panel in order: • "1010 Battery pack" on page 33 • "1020 Hard disk drive" on page 35 • "1030 DIMM" on page 37 • "1040 PCI Express Mini Card for... board, power assembly and power board" on page 49 • "1100 LCD front bezel" on page 52 Figure 11. LCD panel, LCD cable Remove screws a b. Lenovo IdeaPad S400 1110 LCD panel, LCD cable For access, remove these FRUs in the direction shown by arrow c.
...-coated(2) 2.0x3mm , flat-head, nylok-coated(2) Color Silver black Torque 1.85 kgfcm 1.85 kgfcm Disconnect the connector b , lift the LCD panel in order: • "1010 Battery pack" on page 33 • "1020 Hard disk drive" on page 35 • "1030 DIMM" on page 37 • "1040 PCI Express Mini Card for... board, power assembly and power board" on page 49 • "1100 LCD front bezel" on page 52 Figure 11. LCD panel, LCD cable Remove screws a b. Lenovo IdeaPad S400 1110 LCD panel, LCD cable For access, remove these FRUs in the direction shown by arrow c.
Hardware Maintanence Manual
Page 58
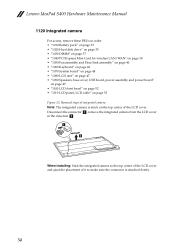
... integrated camera Note: The integrated camera is attached firmly. 54 Disconnect the connector a, remove the integrated camera from the LCD cover in order: • "1010 Battery pack" on page 33 • "1020 Hard disk drive" on page 35 • "1030 DIMM" on page 37 • "1040 PCI Express Mini Card for... ajust the placement of the LCD cover. a b When installing: Stick the integrated camera to make sure the connector is stuck on page 53 Figure 12. Lenovo IdeaPad S400 Hardware Maintenance Manual 1120 Integrated camera For access, remove these FRUs in the direction b.
... integrated camera Note: The integrated camera is attached firmly. 54 Disconnect the connector a, remove the integrated camera from the LCD cover in order: • "1010 Battery pack" on page 33 • "1020 Hard disk drive" on page 35 • "1030 DIMM" on page 37 • "1040 PCI Express Mini Card for... ajust the placement of the LCD cover. a b When installing: Stick the integrated camera to make sure the connector is stuck on page 53 Figure 12. Lenovo IdeaPad S400 Hardware Maintenance Manual 1120 Integrated camera For access, remove these FRUs in the direction b.


