
Hardware Maintenance Manual
Page 5
... 21 Locating components, controls and connectors . 21 Hardware components 22 Chapter 8. Additional Service Information 43 © Copyright Lenovo 2012 iii Using the Setup Utility. . . 13 Starting the Setup Utility program 13 Viewing and changing settings 13 ...Chapter 6. Replacing hardware . . . . 25 General information 25 Replacing the optical drive 26 Removing the computer cover 27 Replacing the hard disk drive 29 Replacing a memory module 30 Replacing the WLAN card 31 Replacing the heat-sink 32 Replacing the system fan 33 Replacing the motherboard 34 Replacing the ...
... 21 Locating components, controls and connectors . 21 Hardware components 22 Chapter 8. Additional Service Information 43 © Copyright Lenovo 2012 iii Using the Setup Utility. . . 13 Starting the Setup Utility program 13 Viewing and changing settings 13 ...Chapter 6. Replacing hardware . . . . 25 General information 25 Replacing the optical drive 26 Removing the computer cover 27 Replacing the hard disk drive 29 Replacing a memory module 30 Replacing the WLAN card 31 Replacing the heat-sink 32 Replacing the system fan 33 Replacing the motherboard 34 Replacing the ...
Hardware Maintenance Manual
Page 23
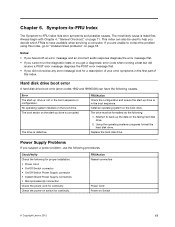
.... Install an operating system on Switch © Copyright Lenovo 2012 17 Check/Verify Check the following causes. The boot sector on the start -up drive is defective. FRU/Action Check the configuration and ensure the start -up the data on the boot drive. Replace the hard disk drive. Power Supply Problems If you suspect a power problem...
.... Install an operating system on Switch © Copyright Lenovo 2012 17 Check/Verify Check the following causes. The boot sector on the start -up drive is defective. FRU/Action Check the configuration and ensure the start -up the data on the boot drive. Replace the hard disk drive. Power Supply Problems If you suspect a power problem...

Hardware Maintenance Manual
Page 24
... keyboard, set keyboardless operation in AMI BIOS Setup. This message appears after a fatal error has been detected. Any adapters 18 IdeaCentre Q190Hardware Maintenance Manual The CMOS battery is correctly installed. This error might indicate that CMOS has become corrupt due to Enable. Make ...not appear on the screen the next time you have bootable media. Replace the battery. The computer loads the default configuration settings. The IDE/ATAPI device configured as a slave. 1. Make sure the hard drive is no keys are invalid. Make sure the keyboard is properly connected...
... keyboard, set keyboardless operation in AMI BIOS Setup. This message appears after a fatal error has been detected. Any adapters 18 IdeaCentre Q190Hardware Maintenance Manual The CMOS battery is correctly installed. This error might indicate that CMOS has become corrupt due to Enable. Make ...not appear on the screen the next time you have bootable media. Replace the battery. The computer loads the default configuration settings. The IDE/ATAPI device configured as a slave. 1. Make sure the hard drive is no keys are invalid. Make sure the keyboard is properly connected...

Hardware Maintenance Manual
Page 25
Memory modules d. Diskette drive 3. Repeat steps 1 through 3 until you find the failing device or adapter. Hard disk drive h. Symptom-to re-test the system. 4. External Cache f. If all devices and adapters have been removed, and the problem continues, replace the system board. External Cache RAM g. Power-on the computer to -FRU Index 19 Extended video memory e. Chapter 6. c.
Memory modules d. Diskette drive 3. Repeat steps 1 through 3 until you find the failing device or adapter. Hard disk drive h. Symptom-to re-test the system. 4. External Cache f. If all devices and adapters have been removed, and the problem continues, replace the system board. External Cache RAM g. Power-on the computer to -FRU Index 19 Extended video memory e. Chapter 6. c.

Hardware Maintenance Manual
Page 35
...as shown. Note: It may be helpful to "Removing the computer cover". Step 5. Remove the computer cover. Replacing hardware 29 Step 6. b. To replace the hard disk drive Step 1. Refer to place the computer face-down on a soft flat surface for help with the 4 screws.... Step 3. Remove any other damage. Lenovo recommends that secure the hard disk drive to the computer. Step 2. Chapter 8. Remove the 4 ...
...as shown. Note: It may be helpful to "Removing the computer cover". Step 5. Remove the computer cover. Replacing hardware 29 Step 6. b. To replace the hard disk drive Step 1. Refer to place the computer face-down on a soft flat surface for help with the 4 screws.... Step 3. Remove any other damage. Lenovo recommends that secure the hard disk drive to the computer. Step 2. Chapter 8. Remove the 4 ...

Hardware Maintenance Manual
Page 36
... Replacing a memory module Attention: Turn off the computer and wait 3 to 5 minutes to let it . Step 6. To install the new hard disk drive as shown. Slide the new hard disk drive and bay into bay and secure it to remove it cool down before removing the cover. 30 IdeaCentre ...Q190Hardware Maintenance Manual Remove the 4 screws that secure the hard disk drive to the chassis with the 4 screws. Step 8. Slide out the hard disk drive out of the hard disk drive and pull it to the hard disk drive bay. Step 10. Step 9. ...
... Replacing a memory module Attention: Turn off the computer and wait 3 to 5 minutes to let it . Step 6. To install the new hard disk drive as shown. Slide the new hard disk drive and bay into bay and secure it to remove it cool down before removing the cover. 30 IdeaCentre ...Q190Hardware Maintenance Manual Remove the 4 screws that secure the hard disk drive to the chassis with the 4 screws. Step 8. Slide out the hard disk drive out of the hard disk drive and pull it to the hard disk drive bay. Step 10. Step 9. ...

Hardware Maintenance Manual
Page 40
...computer. Unplug all cables attached to the motherboard. Disconnect all power cords from the motherboard. Lenovo recommends that secure the system fan to the computer. To replace the motherboard: Step 1. Remove the system fan by lifting it cool down on a ..."Left and right view" and "Rear view" for this procedure. c. Remove any other damage. Remove the hard disk drive. Step 2. Refer to "Replacing the hard disk drive". 34 IdeaCentre Q190Hardware Maintenance Manual Note: It may be helpful to "Removing the computer cover". Step 4. Step 9. Step ...
...computer. Unplug all cables attached to the motherboard. Disconnect all power cords from the motherboard. Lenovo recommends that secure the system fan to the computer. To replace the motherboard: Step 1. Remove the system fan by lifting it cool down on a ..."Left and right view" and "Rear view" for this procedure. c. Remove any other damage. Remove the hard disk drive. Step 2. Refer to "Replacing the hard disk drive". 34 IdeaCentre Q190Hardware Maintenance Manual Note: It may be helpful to "Removing the computer cover". Step 4. Step 9. Step ...


