

User Guide
Page 3
... use 8 Using AC adapter and battery ...10 Using the touchpad 12 Using the keyboard 13 Connecting external devices.......15 Special keys and buttons 17 System status indicators 18 Securing your computer 1 Top view 1 Left-side view 3 Right-side view 4 Front view 5 Rear view 6 Bottom view 7 Chapter 2. CRU instructions 36 Replacing the battery 36 Replacing the hard disk drive.... 37 Replacing memory 41 Removing the optical drive ........ 45 Trademarks 46 i Getting to the Internet 22 Wired connection 22 Wireless connection...
... use 8 Using AC adapter and battery ...10 Using the touchpad 12 Using the keyboard 13 Connecting external devices.......15 Special keys and buttons 17 System status indicators 18 Securing your computer 1 Top view 1 Left-side view 3 Right-side view 4 Front view 5 Rear view 6 Bottom view 7 Chapter 2. CRU instructions 36 Replacing the battery 36 Replacing the hard disk drive.... 37 Replacing memory 41 Removing the optical drive ........ 45 Trademarks 46 i Getting to the Internet 22 Wired connection 22 Wireless connection...

User Guide
Page 7
...-45 port Connects to USB devices. Note: Make sure that none of the fan louvers are blocked or else overheating of the computer may occur. e USB port Connects to an Ethernet network. Note: For details, see "Wired connection" on page 22. Chapter 1. Getting to external display devices. c VGA port Connects to know your computer Left-side view a b cd e a Kensington slot Attach a security lock (not supplied) here. b Fan louvers Dissipate internal...
...-45 port Connects to USB devices. Note: Make sure that none of the fan louvers are blocked or else overheating of the computer may occur. e USB port Connects to an Ethernet network. Note: For details, see "Wired connection" on page 22. Chapter 1. Getting to external display devices. c VGA port Connects to know your computer Left-side view a b cd e a Kensington slot Attach a security lock (not supplied) here. b Fan louvers Dissipate internal...

User Guide
Page 14
... of energy stored in the battery when you commence work. • The way you use your computer: for example, how often you access the hard disk drive and how bright you make the computer display. „ Charging the battery When you find that the battery power is low, you purchase a new battery • If the battery status indicator starts blinking • If the battery has not been used for a long time Notes...
... of energy stored in the battery when you commence work. • The way you use your computer: for example, how often you access the hard disk drive and how bright you make the computer display. „ Charging the battery When you find that the battery power is low, you purchase a new battery • If the battery status indicator starts blinking • If the battery has not been used for a long time Notes...

User Guide
Page 15
...: • Replace only with a battery of the type recommended by Lenovo. • Keep the battery pack away from fire. • Do not expose the battery pack to water or rain. • Do not attempt to disassemble the battery pack. • Do not short-circuit the battery pack. • Keep the battery pack away from the computer. Before removing the battery pack, make sure...
...: • Replace only with a battery of the type recommended by Lenovo. • Keep the battery pack away from fire. • Do not expose the battery pack to water or rain. • Do not attempt to disassemble the battery pack. • Do not short-circuit the battery pack. • Keep the battery pack away from the computer. Before removing the battery pack, make sure...

User Guide
Page 18
... /off the backlight of Windows Media Player. Fn + F6: Enable/Disable the touchpad. Fn Increase/Decrease display brightness. Fn + F4: Open the interface for integrated wireless devices settings (On/Off). Fn Increase/Decrease sound volume. 14 Chapter 2. Fn + End: Activate the break function. Fn + F9: Start/Pause playback of the LCD screen. Fn + PrtSc: Activate the system request. Fn + F3: Open the interface for the display device switch to select this notebook or an external display.
... /off the backlight of Windows Media Player. Fn + F6: Enable/Disable the touchpad. Fn Increase/Decrease display brightness. Fn + F4: Open the interface for integrated wireless devices settings (On/Off). Fn Increase/Decrease sound volume. 14 Chapter 2. Fn + End: Activate the break function. Fn + F9: Start/Pause playback of the LCD screen. Fn + PrtSc: Activate the system request. Fn + F3: Open the interface for the display device switch to select this notebook or an external display.

User Guide
Page 19
.... Model G360 Number of Windows to a power source before connecting. Note: If your computer. Learning the basics Connecting external devices Your computer has a wide range of built-in the notification area of USB ports 2 The first time you plug a USB device into the USB port on your computer has finished transferring data by inserting its USB plug (Type A) into a particular USB port on your USB device uses a power cord, connect the device to remove the device before connecting...
.... Model G360 Number of Windows to a power source before connecting. Note: If your computer. Learning the basics Connecting external devices Your computer has a wide range of built-in the notification area of USB ports 2 The first time you plug a USB device into the USB port on your computer has finished transferring data by inserting its USB plug (Type A) into a particular USB port on your USB device uses a power cord, connect the device to remove the device before connecting...
User Guide
Page 23
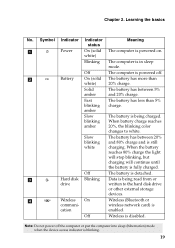
... in sleep mode. Note: Do not power off . white) Blinking The computer is detached. c Hard disk Blinking Data is blinking. 19 Slow blinking white The battery has between 5% and 20% charge. Off Wireless is cation enabled. Fast blinking amber The battery has less than white) 20% charge. d Wireless On Wireless (Bluetooth or communi- wireless network card) is disabled. Off The computer is powered off the computer or put the computer into sleep (hibernation) mode when the device access indicator...
... in sleep mode. Note: Do not power off . white) Blinking The computer is detached. c Hard disk Blinking Data is blinking. 19 Slow blinking white The battery has between 5% and 20% charge. Off Wireless is cation enabled. Fast blinking amber The battery has less than white) 20% charge. d Wireless On Wireless (Bluetooth or communi- wireless network card) is disabled. Off The computer is powered off the computer or put the computer into sleep (hibernation) mode when the device access indicator...

User Guide
Page 24
... becomes the system's "password". Lenovo offers no comment judgement or warranty regarding the function, quality or performance of locking devices and security features. „ Using VeriFace™ VeriFace is compatible with steady and even light. • You can determine whether to use . „ Attaching a security lock (not supplied) You can attach a security lock to your computer to activate VeriFace for the...
... becomes the system's "password". Lenovo offers no comment judgement or warranty regarding the function, quality or performance of locking devices and security features. „ Using VeriFace™ VeriFace is compatible with steady and even light. • You can determine whether to use . „ Attaching a security lock (not supplied) You can attach a security lock to your computer to activate VeriFace for the...

User Guide
Page 25
... from being used by all media players and video compression standards. 21 However, you start a high-definition movie playback, or launch a 3D game application, image-rendering work is selected to seven alphanumeric characters in the help system of the screen in BIOS setup utility. Note: To enter BIOS setup utility, press F2 when the Lenovo logo appears on the screen each time you enter the correct password.
... from being used by all media players and video compression standards. 21 However, you start a high-definition movie playback, or launch a 3D game application, image-rendering work is selected to seven alphanumeric characters in the help system of the screen in BIOS setup utility. Note: To enter BIOS setup utility, press F2 when the Lenovo logo appears on the screen each time you enter the correct password.
User Guide
Page 31
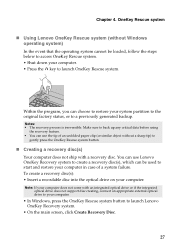
... a previously generated backup. OneKey Rescue system „ Using Lenovo OneKey Rescue system (without a sharp tip) to gently press the OneKey Rescue system button. „ Creating a recovery disc(s) Your computer does not ship with an integrated optical drive or if the integrated optical drive does not support disc creating, connect an appropriate external optical drive to your system partition to the original factory status, or to access OneKey Rescue...
... a previously generated backup. OneKey Rescue system „ Using Lenovo OneKey Rescue system (without a sharp tip) to gently press the OneKey Rescue system button. „ Creating a recovery disc(s) Your computer does not ship with an integrated optical drive or if the integrated optical drive does not support disc creating, connect an appropriate external optical drive to your system partition to the original factory status, or to access OneKey Rescue...

User Guide
Page 33
... the installation discs for the pre-installed software on D partition of this guide. What are the main hardware features of Lenovo Safety and General Information Guide. 29 Getting help and service" of my computer? More information can also find the detailed specifications for some pre-installed software in Chapter 1 and 2. Where are the recovery discs? If your computer can I upgrade or replace a customer replaceable unit (CRU)? CRU instructions" on...
... the installation discs for the pre-installed software on D partition of this guide. What are the main hardware features of Lenovo Safety and General Information Guide. 29 Getting help and service" of my computer? More information can also find the detailed specifications for some pre-installed software in Chapter 1 and 2. Where are the recovery discs? If your computer can I upgrade or replace a customer replaceable unit (CRU)? CRU instructions" on...

User Guide
Page 34
... on D partition of the hard disk drive. This will restore your computer model can use this recovery feature. 30 Troubleshooting Where can I need to ensure correct operation and performance of warranty service, see the Lenovo limited warranty flyer that came with Windows operating system, you first booted up your computer. What can I find device drivers for your computer back to the factory status? A compatible device driver is pre-installed with your operating system...
... on D partition of the hard disk drive. This will restore your computer model can use this recovery feature. 30 Troubleshooting Where can I need to ensure correct operation and performance of warranty service, see the Lenovo limited warranty flyer that came with Windows operating system, you first booted up your computer. What can I find device drivers for your computer back to the factory status? A compatible device driver is pre-installed with your operating system...
User Guide
Page 35
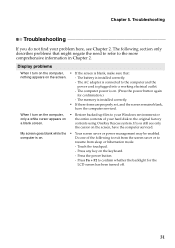
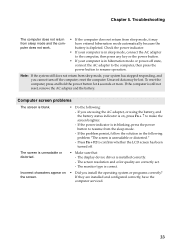
...; Restore backed-up files to your Windows environment or the entire contents of the following section only describes problems that : nothing appears on the screen, have the computer serviced. Touch the touchpad. - Display problems When I turn on the computer, • If the screen is installed correctly. - Press the power button. - The AC adapter is on the keyboard. - If you do not find your hard disk to the original factory...
...; Restore backed-up files to your Windows environment or the entire contents of the following section only describes problems that : nothing appears on the screen, have the computer serviced. Touch the touchpad. - Display problems When I turn on the computer, • If the screen is installed correctly. - Press the power button. - The AC adapter is on the keyboard. - If you do not find your hard disk to the original factory...
User Guide
Page 36
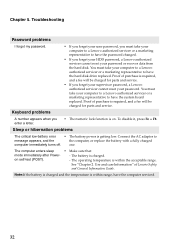
... the hard disk drive replaced. Connect the AC adapter to have the system board replaced. Note:If the battery is charged and the temperature is required, and a fee will be charged for parts and service. • If you must take your password or recover data from the hard disk. Proof of Lenovo Safety and General Information Guide. You must take your password. Sleep or hibernation problems The critical low-battery error • The battery power is charged. Use...
... the hard disk drive replaced. Connect the AC adapter to have the system board replaced. Note:If the battery is charged and the temperature is required, and a fee will be charged for parts and service. • If you must take your password or recover data from the hard disk. Proof of Lenovo Safety and General Information Guide. You must take your password. Sleep or hibernation problems The critical low-battery error • The battery power is charged. Use...
User Guide
Page 37
... power button for 4 seconds or more. The display device driver is unreadable or distorted. • Make sure that: - The screen is installed correctly. - Note: If the system still does not return from the sleep mode. - reset the computer. Unsaved data may have the computer serviced. 33 Computer screen problems The screen is in blinking, press the power button to confirm whether the LCD screen has been turned off state, connect the AC adapter...
... power button for 4 seconds or more. The display device driver is unreadable or distorted. • Make sure that: - The screen is installed correctly. - Note: If the system still does not return from the sleep mode. - reset the computer. Unsaved data may have the computer serviced. 33 Computer screen problems The screen is in blinking, press the power button to confirm whether the LCD screen has been turned off state, connect the AC adapter...

User Guide
Page 38
Turn off . - A hard disk drive problem The hard disk drive does not work. • In the Boot menu in BIOS setup utility, make sure that : the speaker even when the volume is included in the battery might be active. OneKey Rescue system" on the computer again. The Mute function is off with a fully charged battery. tor shows empty. -or- Your computer operates after the battery status indicator shows empty. You will need to free more hard disk space on...
Turn off . - A hard disk drive problem The hard disk drive does not work. • In the Boot menu in BIOS setup utility, make sure that : the speaker even when the volume is included in the battery might be active. OneKey Rescue system" on the computer again. The Mute function is off with a fully charged battery. tor shows empty. -or- Your computer operates after the battery status indicator shows empty. You will need to free more hard disk space on...

User Guide
Page 39
... computer power is on the network. otherwise, you are working on ; Otherwise, the device may not be recognized, or system shut down may result. 35 Chapter 5. Disable the sleep timer when you might lock when it enters sleep mode during a communication operation. Troubleshooting Other problems Your computer does not respond. • To turn off your computer. • When using a high power consumption external devices such as an external USB optical disk drive, use external device power adapter.
... computer power is on the network. otherwise, you are working on ; Otherwise, the device may not be recognized, or system shut down may result. 35 Chapter 5. Disable the sleep timer when you might lock when it enters sleep mode during a communication operation. Troubleshooting Other problems Your computer does not respond. • To turn off your computer. • When using a high power consumption external devices such as an external USB optical disk drive, use external device power adapter.
User Guide
Page 40
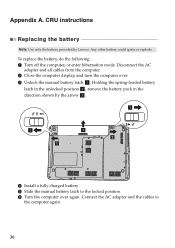
... turn the computer over again. Connect the AC adapter and the cables to the locked position. 6 Turn the computer over . 3 Unlock the manual battery latch a . Any other battery could ignite or explode. Holding the spring-loaded battery latch in the unlocked position b , remove the battery pack in the direction shown by Lenovo. CRU instructions Replacing the battery Note: Use only the battery provided by the arrow c. b a1 c b a 4 Install a fully charged battery. 5 Slide the manual battery...
... turn the computer over again. Connect the AC adapter and the cables to the locked position. 6 Turn the computer over . 3 Unlock the manual battery latch a . Any other battery could ignite or explode. Holding the spring-loaded battery latch in the unlocked position b , remove the battery pack in the direction shown by Lenovo. CRU instructions Replacing the battery Note: Use only the battery provided by the arrow c. b a1 c b a 4 Install a fully charged battery. 5 Slide the manual battery...

User Guide
Page 41
.... Put the drive on the hard disk, and then turn the computer off. Before removing the hard disk drive, make a backup copy of the hard disk drive were not designed for frequent changes, or drive swapping. • The preinstalled softwares are not included on the hard disk. You can increase the storage capacity of your reseller or Lenovo marketing representative. Notes: • Replace the hard disk drive only if you upgrade it or have...
.... Put the drive on the hard disk, and then turn the computer off. Before removing the hard disk drive, make a backup copy of the hard disk drive were not designed for frequent changes, or drive swapping. • The preinstalled softwares are not included on the hard disk. You can increase the storage capacity of your reseller or Lenovo marketing representative. Notes: • Replace the hard disk drive only if you upgrade it or have...

User Guide
Page 49
b a The following : 1 Remove the screw shown in the illustration a . 2 Gently pull the optical drive out b . AC adapter Power cord for your computer, and informs you of where to find replacement instructions. CRU instructions Removing the optical drive To remove the optical drive, do the following table provides a list of CRUs (Customer Replaceable Units) for AC adapter Battery Bottom access doors Hard disk drive Memory Optical drive Setup Poster O O O User Guide O O O O O 45 Appendix A.
b a The following : 1 Remove the screw shown in the illustration a . 2 Gently pull the optical drive out b . AC adapter Power cord for your computer, and informs you of where to find replacement instructions. CRU instructions Removing the optical drive To remove the optical drive, do the following table provides a list of CRUs (Customer Replaceable Units) for AC adapter Battery Bottom access doors Hard disk drive Memory Optical drive Setup Poster O O O User Guide O O O O O 45 Appendix A.


