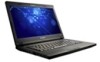

(English) User Guide
Page 3
... Nvidia Optimus Graphics feature . . . 17 Chapter 3. Connecting to the network 19 Wired connection 19 Hardware connection 19 © Copyright Lenovo 2012 Software configuration 20 Wireless connection 20 Hardware connection 20 Software configuration 21 Chapter 4. Replacing devices . . . . . 29 Static ...electricity prevention 29 Replacing the battery 29 Replacing the hard disk drive 30 Replacing the keyboard 32 Replacing a memory module 35 Replacing the PCI Express Mini Card for preventing problems 39 Taking care of your computer . . ...
... Nvidia Optimus Graphics feature . . . 17 Chapter 3. Connecting to the network 19 Wired connection 19 Hardware connection 19 © Copyright Lenovo 2012 Software configuration 20 Wireless connection 20 Hardware connection 20 Software configuration 21 Chapter 4. Replacing devices . . . . . 29 Static ...electricity prevention 29 Replacing the battery 29 Replacing the hard disk drive 30 Replacing the keyboard 32 Replacing a memory module 35 Replacing the PCI Express Mini Card for preventing problems 39 Taking care of your computer . . ...
(English) User Guide
Page 5
... heat. Protect yourself from the heat generated by lifting your body. Route communication lines, or the cables of an ac power adapter, a mouse, a keyboard, a printer, or any other electronic device, so that they reach depends on , tripped over, pinched by your computer or other parts may damage or...is in any way subjected to cables may become hot. Failure to do so might lead to fail. Prevent your computer. © Copyright Lenovo 2012 iii To avoid spills and the danger of electrical shock, keep liquids away from the heat that could interfere with your body, even ...
... heat. Protect yourself from the heat generated by lifting your body. Route communication lines, or the cables of an ac power adapter, a mouse, a keyboard, a printer, or any other electronic device, so that they reach depends on , tripped over, pinched by your computer or other parts may damage or...is in any way subjected to cables may become hot. Failure to do so might lead to fail. Prevent your computer. © Copyright Lenovo 2012 iii To avoid spills and the danger of electrical shock, keep liquids away from the heat that could interfere with your body, even ...
(English) User Guide
Page 12
...the palm rest for dust accumulation. • Remove dust from the palm rest; These features might inadvertently become hot. When you use the keyboard, avoid keeping your body in contact with a hot section of the computer for any extended length of heat due to their compact size....Periodically take breaks from using it generates heat. Never block, cover, or disable these basic precautions: • When your body while using the keyboard by placing the product on the amount of your computer is charging, the base, the palm rest, and some heat during normal operation. x ...
...the palm rest for dust accumulation. • Remove dust from the palm rest; These features might inadvertently become hot. When you use the keyboard, avoid keeping your body in contact with a hot section of the computer for any extended length of heat due to their compact size....Periodically take breaks from using it generates heat. Never block, cover, or disable these basic precautions: • When your body while using the keyboard by placing the product on the amount of your computer is charging, the base, the palm rest, and some heat during normal operation. x ...

(English) User Guide
Page 23
LCD: 1366-by -1536 • Integrated camera (on some models) Keyboard • 84-key keyboard • Fn key function • One-key Recovery Pro program button • Speaker mute button (on some models) Interface • Combo audio jack (stereo headphone ...
LCD: 1366-by -1536 • Integrated camera (on some models) Keyboard • 84-key keyboard • Fn key function • One-key Recovery Pro program button • Speaker mute button (on some models) Interface • Combo audio jack (stereo headphone ...
(English) User Guide
Page 25
... know your computer" on page 1 and Chapter 2 "Using your computer. • Question: Can I do if the backup process fails? © Copyright Lenovo 2012 9 Solution: Your computer does not come with my computer? Chapter 2. Solution: See "Important safety information" on upgrading ore replacing a device? Solution: ... the ac power adapter and the battery pack" on page 11 • "Using the touch pad" on page 13 • "Using the keyboard" on page 14 • "Connecting to your computer. • Question: Where can I install the device drivers? Solution: To download the user...
... know your computer" on page 1 and Chapter 2 "Using your computer. • Question: Can I do if the backup process fails? © Copyright Lenovo 2012 9 Solution: Your computer does not come with my computer? Chapter 2. Solution: See "Important safety information" on upgrading ore replacing a device? Solution: ... the ac power adapter and the battery pack" on page 11 • "Using the touch pad" on page 13 • "Using the keyboard" on page 14 • "Connecting to your computer. • Question: Where can I install the device drivers? Solution: To download the user...
(English) User Guide
Page 27
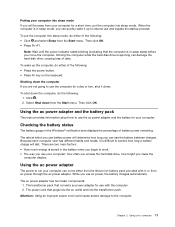
... (indicating that plugs into the ac outlet and into sleep mode, do the following : • Press the power button. • Press Fn key on the keyboard. Shutting down the computer If you are two main factors: • How much energy is in the battery when you begin to the computer. There...
... (indicating that plugs into the ac outlet and into sleep mode, do the following : • Press the power button. • Press Fn key on the keyboard. Shutting down the computer If you are two main factors: • How much energy is in the battery when you begin to the computer. There...
(English) User Guide
Page 30
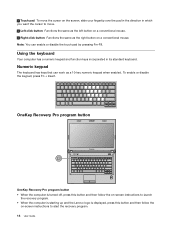
...Fn + Insert. Note: You can work as the right button on the screen, slide your fingertip over the pad in the direction in its standard keyboard. OneKey Recovery Pro program button OneKey Recovery Pro program button • When the computer is turned off, press this button and then follow the on...-screen instructions to launch the recovery program. • When the computer is starting up and the Lenovo logo is displayed, press this button and then follow the on-screen instructions to move. 2 Left click button: Functions the same as the left ...
...Fn + Insert. Note: You can work as the right button on the screen, slide your fingertip over the pad in the direction in its standard keyboard. OneKey Recovery Pro program button OneKey Recovery Pro program button • When the computer is turned off, press this button and then follow the on...-screen instructions to launch the recovery program. • When the computer is starting up and the Lenovo logo is displayed, press this button and then follow the on-screen instructions to move. 2 Left click button: Functions the same as the left ...
(English) User Guide
Page 45
... computer. • "Replacing the battery" on page 29 • "Replacing the hard disk drive" on page 30 • "Replacing the keyboard" on page 32 • "Replacing a memory module" on page 38 Static electricity prevention Static electricity, although harmless to build up around you to... packaging and install the part without setting it . Movement can cause static electricity to you start, print these instructions. Attention: Lenovo has no responsibility for the performance or safety of unauthorized batteries, and provides no warranties for wireless LAN/WiMAX connection" on page...
... computer. • "Replacing the battery" on page 29 • "Replacing the hard disk drive" on page 30 • "Replacing the keyboard" on page 32 • "Replacing a memory module" on page 38 Static electricity prevention Static electricity, although harmless to build up around you to... packaging and install the part without setting it . Movement can cause static electricity to you start, print these instructions. Attention: Lenovo has no responsibility for the performance or safety of unauthorized batteries, and provides no warranties for wireless LAN/WiMAX connection" on page...
(English) User Guide
Page 48
... Guide Place the new hard disk drive into place, and then reinstall the screws to or disconnect it from the hard disk drive. 8. Replacing the keyboard Before you start, print these instructions. Reinstall the computer cover, and then tighten the screws to secure the bracket. 9. Slide the hard disk drive firmly...
... Guide Place the new hard disk drive into place, and then reinstall the screws to or disconnect it from the hard disk drive. 8. Replacing the keyboard Before you start, print these instructions. Reinstall the computer cover, and then tighten the screws to secure the bracket. 9. Slide the hard disk drive firmly...
(English) User Guide
Page 49
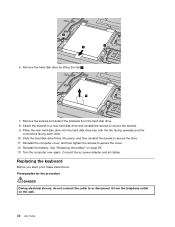
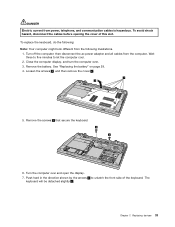
...Remove the battery. Chapter 7. Turn off the computer; Remove the screws 3 that secure the keyboard. 3 3 6. The keyboard will be detached slightly 5 . Replacing devices 33 To replace the keyboard, do the following: Note: Your computer might look different from power, telephone, and communication ... over . 3. DANGER Electric current from the following illustrations. 1. To avoid shock hazard, disconnect the cables before opening the cover of the keyboard. Wait three to five minutes to unlatch the front side of this slot. See "Replacing the battery" on page 29. 4. then disconnect...
...Remove the battery. Chapter 7. Turn off the computer; Remove the screws 3 that secure the keyboard. 3 3 6. The keyboard will be detached slightly 5 . Replacing devices 33 To replace the keyboard, do the following: Note: Your computer might look different from power, telephone, and communication ... over . 3. DANGER Electric current from the following illustrations. 1. To avoid shock hazard, disconnect the cables before opening the cover of the keyboard. Wait three to five minutes to unlatch the front side of this slot. See "Replacing the battery" on page 29. 4. then disconnect...
(English) User Guide
Page 50
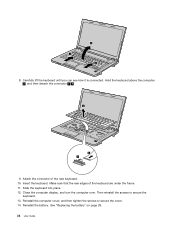
... the battery" on page 29. 34 User Guide Carefully lift the keyboard until you can see how it is connected. Hold the keyboard above the computer 6 , and then detach the connector 7 8 . 6 8 7 9. Slide the keyboard into place. 12. Reinstall the battery. 5 4 4 8. Insert the keyboard. Close the computer display, and turn the computer over. Attach the...
... the battery" on page 29. 34 User Guide Carefully lift the keyboard until you can see how it is connected. Hold the keyboard above the computer 6 , and then detach the connector 7 8 . 6 8 7 9. Slide the keyboard into place. 12. Reinstall the battery. 5 4 4 8. Insert the keyboard. Close the computer display, and turn the computer over. Attach the...
(English) User Guide
Page 56
... Before moving your computer, ensure that it . Your computer is designed and manufactured to minimize any media, turn your computer over your keyboard. This will get the most use and enjoyment out of your computer. If a computer is close to an appliance that can produce ... as possible from such an appliance. • Wherever possible, ground your computer to facilitate safe electrostatic discharge. Particles that fall into your keyboard can cause damage. • Store packing materials safely out of the reach of children to prevent the risk of suffocation from plastic bags....
... Before moving your computer, ensure that it . Your computer is designed and manufactured to minimize any media, turn your computer over your keyboard. This will get the most use and enjoyment out of your computer. If a computer is close to an appliance that can produce ... as possible from such an appliance. • Wherever possible, ground your computer to facilitate safe electrostatic discharge. Particles that fall into your keyboard can cause damage. • Store packing materials safely out of the reach of children to prevent the risk of suffocation from plastic bags....
(English) User Guide
Page 58
... from beneath the keys, you can use a camera blower with water or a 50-50 mixture of the liquid as you see a scratchlike mark on your Lenovo products with Lenovo at a time, the cloth might be a stain transferred from the keyboard when the cover was pressed from a hair drier.
... from beneath the keys, you can use a camera blower with water or a 50-50 mixture of the liquid as you see a scratchlike mark on your Lenovo products with Lenovo at a time, the cloth might be a stain transferred from the keyboard when the cover was pressed from a hair drier.

(English) User Guide
Page 61
... to exit from the screen saver or to resume from sleep or hibernation mode: • Touch the touch pad. • Press any key on the keyboard. • Press the power button. • Press Fn+F2 to the computer and the power cord is plugged into a working electrical outlet. • The computer...
... to exit from the screen saver or to resume from sleep or hibernation mode: • Touch the touch pad. • Press any key on the keyboard. • Press the power button. • Press Fn+F2 to the computer and the power cord is plugged into a working electrical outlet. • The computer...
(English) User Guide
Page 65
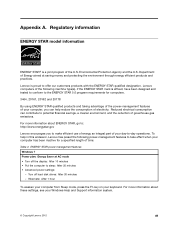
... reduce the consumption of greenhouse gas emissions. Department of time: Table 2. For more information about ENERGY STAR, go to: http://www.energystar.gov Lenovo encourages you can contribute to -day operations. Hibernate: After 1 hour To awaken your computer from Sleep mode, press the Fn key on your... for computers. 3464, 20161, 20162 and 20178 By using ENERGY STAR qualified products and taking advantage of the power-management features of your keyboard. Turn off the display: After 10 minutes • Put the computer to make efficient use of energy an integral part of the U.S....
... reduce the consumption of greenhouse gas emissions. Department of time: Table 2. For more information about ENERGY STAR, go to: http://www.energystar.gov Lenovo encourages you can contribute to -day operations. Hibernate: After 1 hour To awaken your computer from Sleep mode, press the Fn key on your... for computers. 3464, 20161, 20162 and 20178 By using ENERGY STAR qualified products and taking advantage of the power-management features of your keyboard. Turn off the display: After 10 minutes • Put the computer to make efficient use of energy an integral part of the U.S....
Lenovo E49 Hardware Maintenance Manual
Page 3
... view 74 Rear view 74 Bottom and left-side view 75 Chapter 9. Lenovo E49 and ZhaoYang E49 37 Specifications 37 Status indicators 38 Fn key combinations 39 Chapter 6. Parts list 77 Overall 78 LCD FRUs 81 Keyboard 83 Miscellaneous parts 83 ac power adapters 83 Power cords 84 Appendix A. ...replacing a hard disk drive . . . 28 Important notice for wireless LAN . . 49 1070 Thermal fan assembly 51 1080 Microprocessor 53 1090 Keyboard 54 1100 Keyboard bezel 57 1110 Power board 59 1120 Backup battery 60 1130 System board assembly 61 1140 LCD unit 62 1150 DC-in cable and...
... view 74 Rear view 74 Bottom and left-side view 75 Chapter 9. Lenovo E49 and ZhaoYang E49 37 Specifications 37 Status indicators 38 Fn key combinations 39 Chapter 6. Parts list 77 Overall 78 LCD FRUs 81 Keyboard 83 Miscellaneous parts 83 ac power adapters 83 Power cords 84 Appendix A. ...replacing a hard disk drive . . . 28 Important notice for wireless LAN . . 49 1070 Thermal fan assembly 51 1080 Microprocessor 53 1090 Keyboard 54 1100 Keyboard bezel 57 1110 Power board 59 1120 Backup battery 60 1130 System board assembly 61 1140 LCD unit 62 1150 DC-in cable and...
Lenovo E49 Hardware Maintenance Manual
Page 36
... computer password (making the computer unusable) • Sticky keys caused by nonwarranted activities: • Missing parts might indicate damage caused by spilling a liquid onto the keyboard • Use of an incorrect ac power adapter on laptop products The following : • Replace the system board. 30 Hardware Maintenance Manual If the voltage...
... computer password (making the computer unusable) • Sticky keys caused by nonwarranted activities: • Missing parts might indicate damage caused by spilling a liquid onto the keyboard • Use of an incorrect ac power adapter on laptop products The following : • Replace the system board. 30 Hardware Maintenance Manual If the voltage...
Lenovo E49 Hardware Maintenance Manual
Page 40
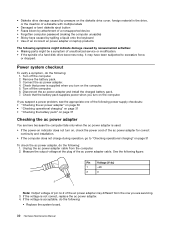
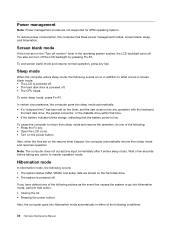
To reduce power consumption, the computer has three power management modes: screen blank, sleep, and hibernation. Wait a few seconds before taking any operation with the keyboard, the hard disk drive, the parallel connector, or the diskette drive within that time. • If the battery indicator blinks orange, indicating that the battery ...
To reduce power consumption, the computer has three power management modes: screen blank, sleep, and hibernation. Wait a few seconds before taking any operation with the keyboard, the hard disk drive, the parallel connector, or the diskette drive within that time. • If the battery indicator blinks orange, indicating that the battery ...
Lenovo E49 Hardware Maintenance Manual
Page 41
Chapter 4. Related service information 35 The hibernation file in the boot record on the timer, and if the user does not do any operation with the keyboard, the hard disk drive, the parallel connector, or the diskette drive within that time. • If the timer conditions are satisfied in suspend mode. • If a "hibernation time" has been set on the hard disk drive is read, and system status is turned on, the computer returns from the hard disk drive. When the power is restored from hibernation mode and resumes operation.
Chapter 4. Related service information 35 The hibernation file in the boot record on the timer, and if the user does not do any operation with the keyboard, the hard disk drive, the parallel connector, or the diskette drive within that time. • If the timer conditions are satisfied in suspend mode. • If a "hibernation time" has been set on the hard disk drive is read, and system status is turned on, the computer returns from the hard disk drive. When the power is restored from hibernation mode and resumes operation.
Lenovo E49 Hardware Maintenance Manual
Page 43
...; Resolution: - Lenovo E49 and ZhaoYang E49 This chapter presents the following product-specific service references and parts information: • "Specifications" on page 37 • "Status indicators" on page 38 • "Fn key combinations" on some models) Keyboard • 84-key keyboard • One-key... Recovery Pro program button • Speaker mute button (on page 39 Specifications This topic lists the physical features for the Lenovo E49 and ZhaoYang E49 models.
...; Resolution: - Lenovo E49 and ZhaoYang E49 This chapter presents the following product-specific service references and parts information: • "Specifications" on page 37 • "Status indicators" on page 38 • "Fn key combinations" on some models) Keyboard • 84-key keyboard • One-key... Recovery Pro program button • Speaker mute button (on page 39 Specifications This topic lists the physical features for the Lenovo E49 and ZhaoYang E49 models.


