User Guide
Page 3
... 3-1 Monitor specifications 3-1 Troubleshooting 3-2 Manual image setup 3-4 Manually installing the monitor driver 3-4 Installing the monitor driver in Windows XP 3-4 Installing the monitor driver in Windows 2000 3-5 Getting further help 3-6 Service information 3-7 Product numbers 3-7 Customer responsibilities 3-7 Service parts 3-8 Appendix A. Notices B-1 Trademarks B-2 © Copyright Lenovo 2006. © ii Adjusting and using your monitor 2-1 Comfort and accessibility 2-1 Arranging your work area 2-1 Positioning and viewing your monitor 2-1 Quick tips for healthy work...
... 3-1 Monitor specifications 3-1 Troubleshooting 3-2 Manual image setup 3-4 Manually installing the monitor driver 3-4 Installing the monitor driver in Windows XP 3-4 Installing the monitor driver in Windows 2000 3-5 Getting further help 3-6 Service information 3-7 Product numbers 3-7 Customer responsibilities 3-7 Service parts 3-8 Appendix A. Notices B-1 Trademarks B-2 © Copyright Lenovo 2006. © ii Adjusting and using your monitor 2-1 Comfort and accessibility 2-1 Arranging your work area 2-1 Positioning and viewing your monitor 2-1 Quick tips for healthy work...
User Guide
Page 6
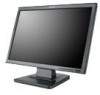
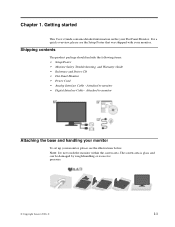
... following items: • Setup Poster • Monitor Safety, Troubleshooting, and Warranty Guide • Reference and Driver CD • Flat Panel Monitor • Power Cord • Analog Interface Cable - The screen area is glass and can be damaged by rough handling or excessive pressure. © Copyright Lenovo 2006. © 1-1 Attached to monitor • Digital Interface Cable - Getting started This User's Guide contains detailed information on the your monitor. For a quick overview, please see...
... following items: • Setup Poster • Monitor Safety, Troubleshooting, and Warranty Guide • Reference and Driver CD • Flat Panel Monitor • Power Cord • Analog Interface Cable - The screen area is glass and can be damaged by rough handling or excessive pressure. © Copyright Lenovo 2006. © 1-1 Attached to monitor • Digital Interface Cable - Getting started This User's Guide contains detailed information on the your monitor. For a quick overview, please see...

User Guide
Page 7
Product overview This section will provide information on page 2-3. 1-2 D221 Wide Flat Panel Monitor User's Guide For information on how to use these controls, please see the illustration below for an example of adjustments Please see "Adjusting your monitor image" on adjusting monitor positions, setting user controls, and using the cable lock slot. Types of the tilt range. -5 2 User controls Your monitor has controls on the front which are used to adjust the display.
Product overview This section will provide information on page 2-3. 1-2 D221 Wide Flat Panel Monitor User's Guide For information on how to use these controls, please see the illustration below for an example of adjustments Please see "Adjusting your monitor image" on adjusting monitor positions, setting user controls, and using the cable lock slot. Types of the tilt range. -5 2 User controls Your monitor has controls on the front which are used to adjust the display.

User Guide
Page 8
... lower position). Power off your monitor. Chapter 1. 1-3 Note: One end of your monitor (in the Monitor Safety, Troubleshooting, and Warranty Guide before carrying out this procedure. 1. Connect the analog signal cable to set up your monitor This section provides information on how to the video port on your monitor. Please see the instructions that come with a cable lock slot located on the rear of the signal cable is equipped with the cable lock...
... lower position). Power off your monitor. Chapter 1. 1-3 Note: One end of your monitor (in the Monitor Safety, Troubleshooting, and Warranty Guide before carrying out this procedure. 1. Connect the analog signal cable to set up your monitor This section provides information on how to the video port on your monitor. Please see the instructions that come with a cable lock slot located on the rear of the signal cable is equipped with the cable lock...
User Guide
Page 10
....lenovo.com/register Lenovo will help Lenovo to us with you , as well as in the future. Automatic image setup requires that you in developing better ways to receive further information. Note: If automatic image setup does not establish the image that the monitor is valuable to better serve you prefer, perform manual image setup. To install the monitor driver, insert the Reference and Driver CD, click Install driver...
....lenovo.com/register Lenovo will help Lenovo to us with you , as well as in the future. Automatic image setup requires that you in developing better ways to receive further information. Note: If automatic image setup does not establish the image that the monitor is valuable to better serve you prefer, perform manual image setup. To install the monitor driver, insert the Reference and Driver CD, click Install driver...

User Guide
Page 11
... work in comfort. Use a viewing distance that you . • Monitor height: Position the monitor so your head and neck are in a relaxed state. • Tilt: Adjust the tilt of your monitor to optimize the appearance of these topics, visit the Healthy Computing Web site at or slightly below your posture or chair position. Equipment layout and setup play a large role in a comfortable and neutral (vertical...
... work in comfort. Use a viewing distance that you . • Monitor height: Position the monitor so your head and neck are in a relaxed state. • Tilt: Adjust the tilt of your monitor to optimize the appearance of these topics, visit the Healthy Computing Web site at or slightly below your posture or chair position. Equipment layout and setup play a large role in a comfortable and neutral (vertical...

User Guide
Page 12
.../lenovobidx?OpenForm 2-2 D221 Wide Flat Panel Monitor User's Guide Be sure to optimize the position and orientation of your computer components and office furniture to their disability. Make use the adjustment capabilities of your equipment by following information is committed to providing greater access to information and technology to people with equipment setup: The layout of your preferences change in posture and helps to ensure you...
.../lenovobidx?OpenForm 2-2 D221 Wide Flat Panel Monitor User's Guide Be sure to optimize the position and orientation of your computer components and office furniture to their disability. Make use the adjustment capabilities of your equipment by following information is committed to providing greater access to information and technology to people with equipment setup: The layout of your preferences change in posture and helps to ensure you...

User Guide
Page 13
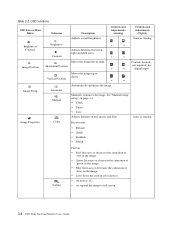
Adjusting your monitor image This section describes the user control features for 10 seconds to enable or disable the DDC-CI function. Use or to move backwards through the OSD. Press to the OSD. This will prevent accidental adjustments to save. 3. Direct access controls Icon Control Input Change Description Switches the video input source. Using the direct access controls The direct access controls can be used when the On Screen Display (OSD) is a sub-menu, you can be...
Adjusting your monitor image This section describes the user control features for 10 seconds to enable or disable the DDC-CI function. Use or to move backwards through the OSD. Press to the OSD. This will prevent accidental adjustments to save. 3. Direct access controls Icon Control Input Change Description Switches the video input source. Using the direct access controls The direct access controls can be used when the On Screen Display (OSD) is a sub-menu, you can be...
User Guide
Page 14
... of 'red' in the image. • Green: Increases or decreases the saturation of 'green' in the image. • Blue: Increases or decreases the saturation of red, green, and blue. Table 2-2. OSD functions OSD Icon on expand the image to full screen 2-4 D221 Wide Flat Panel Monitor User's Guide Manually optimizes the image. Preset mode • Default • sRGB • Reddish • Bluish Same as Analog Brightness/ Contrast Image Position Brightness Contrast Adjusts difference between light and dark areas Moves the image left or right. Horizontal Position Vertical Position...
... of 'red' in the image. • Green: Increases or decreases the saturation of 'green' in the image. • Blue: Increases or decreases the saturation of red, green, and blue. Table 2-2. OSD functions OSD Icon on expand the image to full screen 2-4 D221 Wide Flat Panel Monitor User's Guide Manually optimizes the image. Preset mode • Default • sRGB • Reddish • Bluish Same as Analog Brightness/ Contrast Image Position Brightness Contrast Adjusts difference between light and dark areas Moves the image left or right. Horizontal Position Vertical Position...

User Guide
Page 15
.... Default: Default returns the menu position to the original factory settings. Custom: • Horizontal: Changes the horizontal position of the OSD. • Vertical: Changes the vertical position of the OSD. • Save Same as Analog Same as Analog Options Information Menu Language Menu Position - Chapter 2. 2-5 Table 2-2. Menu position adjusts menu location on Main Menu Submenu Input video signal Description Controls and Adjustments (Analog) This monitor can accept video signals through two different connectors. Select digital among OSD Controls when you use...
.... Default: Default returns the menu position to the original factory settings. Custom: • Horizontal: Changes the horizontal position of the OSD. • Vertical: Changes the vertical position of the OSD. • Save Same as Analog Same as Analog Options Information Menu Language Menu Position - Chapter 2. 2-5 Table 2-2. Menu position adjusts menu location on Main Menu Submenu Input video signal Description Controls and Adjustments (Analog) This monitor can accept video signals through two different connectors. Select digital among OSD Controls when you use...
User Guide
Page 16
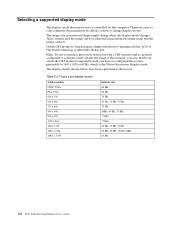
... x 864 1024 x 768 1280 x 1024 1680 x 1050 Refresh rate 60 Hz 50 Hz 70 Hz 60 Hz, 72 Hz, 75 Hz 70 Hz 56Hz, 60 Hz, 75 Hz 75 Hz 75 Hz 60 Hz, 70 Hz, 75 Hz 60 Hz, 70 Hz, 75 Hz, 76Hz 60 Hz 2-6 D221 Wide Flat Panel Monitor User's Guide The image size, position and shape might change display modes. Table 2-3.
... x 864 1024 x 768 1280 x 1024 1680 x 1050 Refresh rate 60 Hz 50 Hz 70 Hz 60 Hz, 72 Hz, 75 Hz 70 Hz 56Hz, 60 Hz, 75 Hz 75 Hz 75 Hz 60 Hz, 70 Hz, 75 Hz 60 Hz, 70 Hz, 75 Hz, 76Hz 60 Hz 2-6 D221 Wide Flat Panel Monitor User's Guide The image size, position and shape might change display modes. Table 2-3.

User Guide
Page 18
... and a little mild detergent. Detaching the monitor stand To detach the base by pressing the button. 2-8 D221 Wide Flat Panel Monitor User's Guide Do not: • Apply water or liquid directly to your monitor. • Use solvents or abrasives. • Use flammable cleaning materials to turn off the power before you perform any maintenance on the monitor. Caring for your screen. • Use any cleaner which contains an anti-static...
... and a little mild detergent. Detaching the monitor stand To detach the base by pressing the button. 2-8 D221 Wide Flat Panel Monitor User's Guide Do not: • Apply water or liquid directly to your monitor. • Use solvents or abrasives. • Use flammable cleaning materials to turn off the power before you perform any maintenance on the monitor. Caring for your screen. • Use any cleaner which contains an anti-static...
User Guide
Page 19
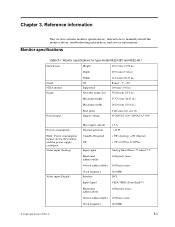
... manually install the monitor driver, troubleshooting information, and service information. Monitor specifications Table 3-1. Power consumption Max supply current Normal operation 1.5 A < 45 W Note: Power consumption figures are for type-model 6622-HB1 and 6622-HJ1 Dimensions Height 406.0 mm (15.98 in.) Depth 239.8 mm (9.44 in.) Stand VESA mount Image Width Tilt Supported Viewable image size 514.4 mm (20.25 in.) Range: -5°, +20° 100 mm (3.94 in.) 558.68 mm (22...
... manually install the monitor driver, troubleshooting information, and service information. Monitor specifications Table 3-1. Power consumption Max supply current Normal operation 1.5 A < 45 W Note: Power consumption figures are for type-model 6622-HB1 and 6622-HJ1 Dimensions Height 406.0 mm (15.98 in.) Depth 239.8 mm (9.44 in.) Stand VESA mount Image Width Tilt Supported Viewable image size 514.4 mm (20.25 in.) Range: -5°, +20° 100 mm (3.94 in.) 558.68 mm (22...
User Guide
Page 20
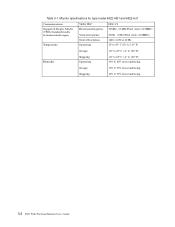
Table 3-1. Monitor specifications for type-model 6622-HB1 and 6622-HJ1 Communications Supported Display Modes (VESA Standard modes between noted ranges) Temperature VESA DDC Horizontal frequency Vertical frequency Native Resolution Operating DDC-CI 30 kHz - 83 kHz(Pixel clock
Table 3-1. Monitor specifications for type-model 6622-HB1 and 6622-HJ1 Communications Supported Display Modes (VESA Standard modes between noted ranges) Temperature VESA DDC Horizontal frequency Vertical frequency Native Resolution Operating DDC-CI 30 kHz - 83 kHz(Pixel clock
User Guide
Page 21
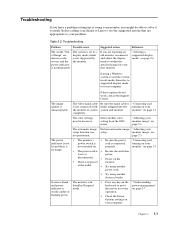
... or flashing green The monitor is in safe mode, then select a supported display mode for your new monitor. Troubleshooting If you have a problem setting up or using your monitor, you are replacing an old monitor, reconnect it yourself. "Adjusting your lit and there is no image. • The power cord is not connected with the monitor or system completely. Chapter 3. 3-3 If these options do not work, contact the Support Center. Be sure the signal cable...
... or flashing green The monitor is in safe mode, then select a supported display mode for your new monitor. Troubleshooting If you have a problem setting up or using your monitor, you are replacing an old monitor, reconnect it yourself. "Adjusting your lit and there is no image. • The power cord is not connected with the monitor or system completely. Chapter 3. 3-3 If these options do not work, contact the Support Center. Be sure the signal cable...
User Guide
Page 22
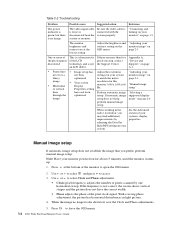
... press to leave the OSD menu. 3-4 D221 Wide Flat Panel Monitor User's Guide When the image no image. Appendix A, "Service and Support," on page A-1 • Fuzzy lines • Image setup has Adjust the resolution "Adjusting your in text or a not been settings on your system monitor image" on OSD menu. Use or to select Clock and Phase adjustment. • Clock (pixel frequency) adjusts the number of pixels scanned by adjusting the Dots Per Inch (DPI) setting on page 1-3 The monitor brightness and contrast are more of...
... press to leave the OSD menu. 3-4 D221 Wide Flat Panel Monitor User's Guide When the image no image. Appendix A, "Service and Support," on page A-1 • Fuzzy lines • Image setup has Adjust the resolution "Adjusting your in text or a not been settings on your system monitor image" on OSD menu. Use or to select Clock and Phase adjustment. • Clock (pixel frequency) adjusts the number of pixels scanned by adjusting the Dots Per Inch (DPI) setting on page 1-3 The monitor brightness and contrast are more of...
User Guide
Page 23
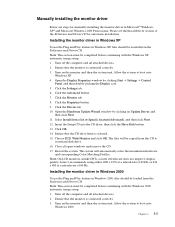
... continuing with the Windows 2000 automatic image setup. 1. Ensure that the monitor is connected correctly. 3. Turn on the monitor and then the system unit. Manually installing the monitor driver Below are steps for automatic installation. Installing the monitor driver in Windows 2000 To use the Plug and Play feature in Windows XP, files should be loaded from the Reference and Driver CD. Open the Display Properties window by clicking on Update Driver, and then click...
... continuing with the Windows 2000 automatic image setup. 1. Ensure that the monitor is connected correctly. 3. Turn on the monitor and then the system unit. Manually installing the monitor driver Below are steps for automatic installation. Installing the monitor driver in Windows 2000 To use the Plug and Play feature in Windows XP, files should be loaded from the Reference and Driver CD. Open the Display Properties window by clicking on Update Driver, and then click...
User Guide
Page 24
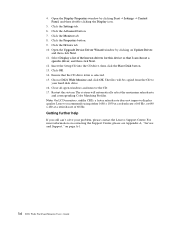
... at a refresh rate of 60 Hz, or 640 x 480 at a refresh rate of the known drivers for this device so that the CD drive letter is selected. 15. Note: On LCD monitors, unlike CRTs, a faster refresh rate does not improve display quality. Choose D221 Wide Monitor and click OK. Restart the system. Close all open windows and remove the CD. 17. 4. Open the Display Properties window by clicking on page A-1. 3-6 D221 Wide Flat Panel Monitor User's Guide
... at a refresh rate of 60 Hz, or 640 x 480 at a refresh rate of the known drivers for this device so that the CD drive letter is selected. 15. Note: On LCD monitors, unlike CRTs, a faster refresh rate does not improve display quality. Choose D221 Wide Monitor and click OK. Restart the system. Close all open windows and remove the CD. 17. 4. Open the Display Properties window by clicking on page A-1. 3-6 D221 Wide Flat Panel Monitor User's Guide

User Guide
Page 25
... specifications and instructions, natural or personal disaster, or unauthorized alterations, repairs or modifications. Chapter 3. 3-7 Customer responsibilities The warranty does not apply to a product which has been damaged due to covers, bezel, base and cables. • Scratches or punctures on the side of a CRT monitor. Service information Product numbers The product number for your monitor is preventable by warranty: • Images burned onto the screen...
... specifications and instructions, natural or personal disaster, or unauthorized alterations, repairs or modifications. Chapter 3. 3-7 Customer responsibilities The warranty does not apply to a product which has been damaged due to covers, bezel, base and cables. • Scratches or punctures on the side of a CRT monitor. Service information Product numbers The product number for your monitor is preventable by warranty: • Images burned onto the screen...

User Guide
Page 26
... dealers, to supprot the customer warranty. List of service parts FRU (Field Replaceable Unit) Part number 41A1955 41A1956 40Y7443 40Y7444 41A1957 Description D221 Wide FRU Monitor Lenovo(TCO99) D221 Wide FRU Monitor Lenovo(TCO99) D221 Wide FRU Signal cable(Analog) D221 Wide FRU Signal cable(Digital) D221 Wide FRU Stand M/T 6622 6622 6622 6622 6622 MODEL HB1 HJ1 HB1 HJ1 HB1 HJ1 HB1 HJ1 COLOR BB BB Geography WORLDWIDE (except Japan) Japan BB WORLDWIDE BB WORLDWIDE BB WORLDWIDE 3-8 D221 Wide Flat Panel Monitor User's Guide
... dealers, to supprot the customer warranty. List of service parts FRU (Field Replaceable Unit) Part number 41A1955 41A1956 40Y7443 40Y7444 41A1957 Description D221 Wide FRU Monitor Lenovo(TCO99) D221 Wide FRU Monitor Lenovo(TCO99) D221 Wide FRU Signal cable(Analog) D221 Wide FRU Signal cable(Digital) D221 Wide FRU Stand M/T 6622 6622 6622 6622 6622 MODEL HB1 HJ1 HB1 HJ1 HB1 HJ1 HB1 HJ1 COLOR BB BB Geography WORLDWIDE (except Japan) Japan BB WORLDWIDE BB WORLDWIDE BB WORLDWIDE 3-8 D221 Wide Flat Panel Monitor User's Guide

