
User Guide
Page 2
... 2-1 Positioning and viewing your monitor 2-1 Quick tips for healthy work habits 2-2 Adjusting your monitor image 2-3 Using the direct access controls 2-3 Using the On-Screen Display (OSD) controls 2-3 Selecting a supported display mode 2-6 Understanding power management 2-7 Caring for your option A-1 Online technical support A-1 Telephone technical support A-1 Appendix B. Notices B-1 Trademarks B-2 © Copyright Lenovo 2009. © ii Reference information 3-1 Monitor specifications 3-1 Troubleshooting 3-3 Manual image setup 3-4 Manually installing the monitor driver...
... 2-1 Positioning and viewing your monitor 2-1 Quick tips for healthy work habits 2-2 Adjusting your monitor image 2-3 Using the direct access controls 2-3 Using the On-Screen Display (OSD) controls 2-3 Selecting a supported display mode 2-6 Understanding power management 2-7 Caring for your option A-1 Online technical support A-1 Telephone technical support A-1 Appendix B. Notices B-1 Trademarks B-2 © Copyright Lenovo 2009. © ii Reference information 3-1 Monitor specifications 3-1 Troubleshooting 3-3 Manual image setup 3-4 Manually installing the monitor driver...

User Guide
Page 5
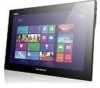
User controls Your monitor has controls on adjusting monitor positions, setting user controls, and using the cable lock slot. Product overview This section will provide information on the front which are used to use these controls, please see the illustration below for an example of the tilt range. For information on how to adjust the display. Types of adjustments Please see "Adjusting your monitor image" on page 2-3. 1-2 D186 Wide Flat Panel Monitor User's Guide
User controls Your monitor has controls on adjusting monitor positions, setting user controls, and using the cable lock slot. Product overview This section will provide information on the front which are used to use these controls, please see the illustration below for an example of the tilt range. For information on how to adjust the display. Types of adjustments Please see "Adjusting your monitor image" on page 2-3. 1-2 D186 Wide Flat Panel Monitor User's Guide

User Guide
Page 12
See "Manual image setup" on Main Menu Submenu Description Adjusts overall brightness Controls and Adjustments Brightness/ Contrast Image Position Brightness Contrast Adjusts difference between light and dark areas Moves the image left or right Horizontal Position Vertical Position Moves the image up or down Image Setup Automatic Manual Automatically optimizes the image Manually optimizes the image. Table 2-2. OSD functions OSD Icon on page 3-4 • Clock • Phase • Save Image Properties Color Adjusts intensity of red, green, and blue Preset mode • ...
See "Manual image setup" on Main Menu Submenu Description Adjusts overall brightness Controls and Adjustments Brightness/ Contrast Image Position Brightness Contrast Adjusts difference between light and dark areas Moves the image left or right Horizontal Position Vertical Position Moves the image up or down Image Setup Automatic Manual Automatically optimizes the image Manually optimizes the image. Table 2-2. OSD functions OSD Icon on page 3-4 • Clock • Phase • Save Image Properties Color Adjusts intensity of red, green, and blue Preset mode • ...
User Guide
Page 14
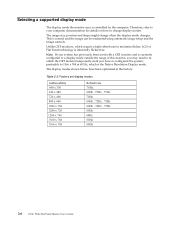
... 2-6 D186 Wide Flat Panel Monitor User's Guide Unlike CRT monitors, which is inherently flicker-free. The image size, position and shape might change display modes. preferably to your system has previously been used with a CRT monitor and is normal and the image can be readjusted using automatic image setup and the image controls. The display modes shown below have re-configured the system; Note: If your computer documentation for details on how to minimize flicker, LCD or Flat Panel technology is the Native Resolution Display mode...
... 2-6 D186 Wide Flat Panel Monitor User's Guide Unlike CRT monitors, which is inherently flicker-free. The image size, position and shape might change display modes. preferably to your system has previously been used with a CRT monitor and is normal and the image can be readjusted using automatic image setup and the image controls. The display modes shown below have re-configured the system; Note: If your computer documentation for details on how to minimize flicker, LCD or Flat Panel technology is the Native Resolution Display mode...
User Guide
Page 17
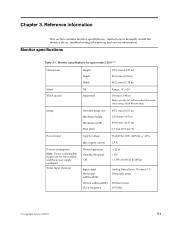
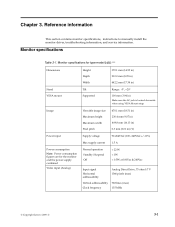
... Power consumption figures are for the monitor and the power supply combined Video input (Analog) Normal operation < 22 W Standby/Suspend < 1W Off < 0.5W at 100Vac & 240Vac - Input signal Horizontal addressability Analog Direct Drive, 75 ohm 0.7 V 1366 pixels (max) -9 Vertical addressability 768 lines (max) Clock frequency 135 MHz © Copyright Lenovo 2009 © 3-1 Reference information This section contains monitor specifications, instructions to manually install the monitor driver, troubleshooting information, and service information. Monitor specifications Table...
... Power consumption figures are for the monitor and the power supply combined Video input (Analog) Normal operation < 22 W Standby/Suspend < 1W Off < 0.5W at 100Vac & 240Vac - Input signal Horizontal addressability Analog Direct Drive, 75 ohm 0.7 V 1366 pixels (max) -9 Vertical addressability 768 lines (max) Clock frequency 135 MHz © Copyright Lenovo 2009 © 3-1 Reference information This section contains monitor specifications, instructions to manually install the monitor driver, troubleshooting information, and service information. Monitor specifications Table...
User Guide
Page 19
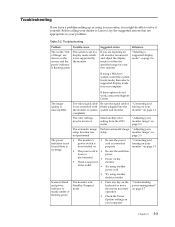
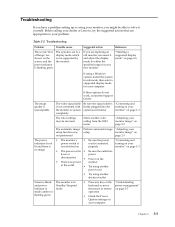
... the power indicator is flashing green The system is set to a display mode which is not supported by the monitor Suggested action If you might be incorrect Select another color setting from the OSD menu "Adjusting your monitor image" on page 2-3 The automatic image setup function was not performed Perform automatic image "Adjusting your setup monitor image" on page 2-3 The power • The monitor's • Be sure the power "Connecting and indictator is not power switch is cord is connected turning...
... the power indicator is flashing green The system is set to a display mode which is not supported by the monitor Suggested action If you might be incorrect Select another color setting from the OSD menu "Adjusting your monitor image" on page 2-3 The automatic image setup function was not performed Perform automatic image "Adjusting your setup monitor image" on page 2-3 The power • The monitor's • Be sure the power "Connecting and indictator is not power switch is cord is connected turning...
User Guide
Page 20
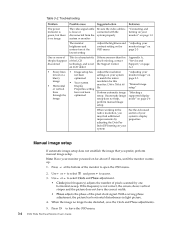
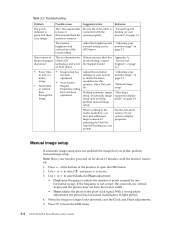
... optimized setup. If the frequency is not an LCD defect If there are at the bottom of the pixel clock signal. Table 3-2. With a wrong phase adjustment, the picture has horizontal disturbances in the native resolution, you prefer, perform manual image setup. Use or to select and press to leave the OSD menu. 3-4 D186 Wide Flat Panel Monitor User's Guide Troubleshooting Problem Possible cause Suggested action Reference The power indicator is green, but there is no longer looks distorted, save...
... optimized setup. If the frequency is not an LCD defect If there are at the bottom of the pixel clock signal. Table 3-2. With a wrong phase adjustment, the picture has horizontal disturbances in the native resolution, you prefer, perform manual image setup. Use or to select and press to leave the OSD menu. 3-4 D186 Wide Flat Panel Monitor User's Guide Troubleshooting Problem Possible cause Suggested action Reference The power indicator is green, but there is no longer looks distorted, save...
User Guide
Page 21
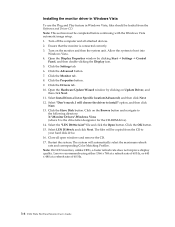
... download files from the Lenovo Monitor CD to use the Plug and Play feature in Microsoft Windows Vista, Microsoft. Close all attached devices. 2. The files will automatically select the maximum refresh rate and corresponding Color Matching Profiles. Click the Browse button and navigate to start the Windows Vista operating system. 4. Open the "Update Driver Software-Generic PnP Monitor" window by clicking Start, Control Panel and then double-clicking the Hardware and Sound...
... download files from the Lenovo Monitor CD to use the Plug and Play feature in Microsoft Windows Vista, Microsoft. Close all attached devices. 2. The files will automatically select the maximum refresh rate and corresponding Color Matching Profiles. Click the Browse button and navigate to start the Windows Vista operating system. 4. Open the "Update Driver Software-Generic PnP Monitor" window by clicking Start, Control Panel and then double-clicking the Hardware and Sound...
User Guide
Page 22
...). 14. Open the Display Properties window by clicking on the Browse button and navigate to the following directory: : Monitor Drivers Windows P (where is connected correctly. 3. Click the Settings tab. 6. Open the Hardware Update Wizard window by clicking Start J Settings J Control Panel, and then double-clicking the Display icon. 5. Lenovo recommends using either 1366 x 768 at a refresh rate of 60 Hz, or 640 x 480 at a refresh rate of 60 Hz. 3-6 D186 Wide Flat Panel Monitor User's Guide Click the Properties button. 9. Select...
...). 14. Open the Display Properties window by clicking on the Browse button and navigate to the following directory: : Monitor Drivers Windows P (where is connected correctly. 3. Click the Settings tab. 6. Open the Hardware Update Wizard window by clicking Start J Settings J Control Panel, and then double-clicking the Display icon. 5. Lenovo recommends using either 1366 x 768 at a refresh rate of 60 Hz, or 640 x 480 at a refresh rate of 60 Hz. 3-6 D186 Wide Flat Panel Monitor User's Guide Click the Properties button. 9. Select...
Lenovo D186 Wide Flat Panel Monitor User Guide
Page 3
... B. Service and Support A-1 Registering your monitor 2-8 Detaching the monitor stand 2-8 Chapter 3. Getting started 1-1 Shipping contents 1-1 Attaching the base and handling your monitor 1-1 Product overview 1-2 Types of adjustments 1-2 User controls 1-2 Cable lock slot 1-3 Setting up your monitor 1-3 Connecting and turning on your monitor 1-3 Chapter 2. Reference information 3-1 Monitor specifications 3-1 Troubleshooting 3-3 Manual image setup 3-4 Manually installing the monitor driver 3-5 Installing the monitor driver in Windows 7 3-5 Installing the monitor driver in...
... B. Service and Support A-1 Registering your monitor 2-8 Detaching the monitor stand 2-8 Chapter 3. Getting started 1-1 Shipping contents 1-1 Attaching the base and handling your monitor 1-1 Product overview 1-2 Types of adjustments 1-2 User controls 1-2 Cable lock slot 1-3 Setting up your monitor 1-3 Connecting and turning on your monitor 1-3 Chapter 2. Reference information 3-1 Monitor specifications 3-1 Troubleshooting 3-3 Manual image setup 3-4 Manually installing the monitor driver 3-5 Installing the monitor driver in Windows 7 3-5 Installing the monitor driver in...

Lenovo D186 Wide Flat Panel Monitor User Guide
Page 6
Product overview This section will provide information on the front which are used to use these controls, please see the illustration below for an example of adjustments Please see "Adjusting your monitor image" on how to adjust the display. Types of the tilt range. For information on page 2-3. 1-2 D186 Wide Flat Panel Monitor User's Guide User controls Your monitor has controls on adjusting monitor positions, setting user controls, and using the cable lock slot.
Product overview This section will provide information on the front which are used to use these controls, please see the illustration below for an example of adjustments Please see "Adjusting your monitor image" on how to adjust the display. Types of the tilt range. For information on page 2-3. 1-2 D186 Wide Flat Panel Monitor User's Guide User controls Your monitor has controls on adjusting monitor positions, setting user controls, and using the cable lock slot.

Lenovo D186 Wide Flat Panel Monitor User Guide
Page 13
See "Manual image setup" on Main Menu Submenu Brightness/ Contrast Brightness Contrast Description Adjusts overall brightness Controls and Adjustments Adjusts difference between light and dark areas Image Position Moves the image left or right Horizontal Position Vertical Position Moves the image up or down Image Setup Image Properties Automatic Manual Color Automatically optimizes the image Manually optimizes the image. OSD functions OSD Icon on page 3-4 • Clock • Phase • Save Adjusts intensity of red, green, and blue Preset mode • Neutral • ...
See "Manual image setup" on Main Menu Submenu Brightness/ Contrast Brightness Contrast Description Adjusts overall brightness Controls and Adjustments Adjusts difference between light and dark areas Image Position Moves the image left or right Horizontal Position Vertical Position Moves the image up or down Image Setup Image Properties Automatic Manual Color Automatically optimizes the image Manually optimizes the image. OSD functions OSD Icon on page 3-4 • Clock • Phase • Save Adjusts intensity of red, green, and blue Preset mode • Neutral • ...

Lenovo D186 Wide Flat Panel Monitor User Guide
Page 15
... 60Hz 60Hz 60Hz 60Hz 2-6 D186 Wide Flat Panel Monitor User's Guide The display modes shown below have re-configured the system; Table 2-3. Unlike CRT monitors, which is currently configured to a display mode outside the range of this monitor, you may need to reattach the CRT monitor temporarily until you have been optimized at 60 Hz, which require a high refresh rate to change when the display mode changes. The image size, position and shape might change display modes. Note: If your computer...
... 60Hz 60Hz 60Hz 60Hz 2-6 D186 Wide Flat Panel Monitor User's Guide The display modes shown below have re-configured the system; Table 2-3. Unlike CRT monitors, which is currently configured to a display mode outside the range of this monitor, you may need to reattach the CRT monitor temporarily until you have been optimized at 60 Hz, which require a high refresh rate to change when the display mode changes. The image size, position and shape might change display modes. Note: If your computer...

Lenovo D186 Wide Flat Panel Monitor User Guide
Page 17
... monitor Be sure to turn off the power before you perform any other electrical equipment. • Touch the screen area of the screen area. Detaching the monitor stand To detach the base by pressing the button. 2-8 D186 Wide Flat Panel Monitor User's Guide Do not: • Apply water or liquid directly to your monitor. • Use solvents or abrasives. • Use flammable cleaning materials to clean your monitor or any maintenance on the monitor...
... monitor Be sure to turn off the power before you perform any other electrical equipment. • Touch the screen area of the screen area. Detaching the monitor stand To detach the base by pressing the button. 2-8 D186 Wide Flat Panel Monitor User's Guide Do not: • Apply water or liquid directly to your monitor. • Use solvents or abrasives. • Use flammable cleaning materials to clean your monitor or any maintenance on the monitor...
Lenovo D186 Wide Flat Panel Monitor User Guide
Page 18
Monitor specifications Table 3-1. Input signal Horizontal addressability Analog Direct Drive, 75 ohm 0.7 V 1366 pixels (max) -9 Vertical addressability 768 lines (max) Clock frequency 135 MHz © Copyright Lenovo 2009. © 3-1 Reference information This section contains monitor specifications, instructions to manually install the monitor driver, troubleshooting information, and service information. Chapter 3. Monitor specifications for type-model 0450-*** Dimensions Stand VESA mount Image Height Depth Width Tilt Supported Viewable image size Maximum height Maximum width ...
Monitor specifications Table 3-1. Input signal Horizontal addressability Analog Direct Drive, 75 ohm 0.7 V 1366 pixels (max) -9 Vertical addressability 768 lines (max) Clock frequency 135 MHz © Copyright Lenovo 2009. © 3-1 Reference information This section contains monitor specifications, instructions to manually install the monitor driver, troubleshooting information, and service information. Chapter 3. Monitor specifications for type-model 0450-*** Dimensions Stand VESA mount Image Height Depth Width Tilt Supported Viewable image size Maximum height Maximum width ...
Lenovo D186 Wide Flat Panel Monitor User Guide
Page 20
... solve it yourself. Table 3-2. Troubleshooting If you have a problem setting up or using your monitor, you might be incorrect Select another color setting from the OSD menu "Adjusting your monitor image" on page 2-3 The automatic image setup function was not performed Perform automatic image "Adjusting your setup monitor image" on page 2-3 The power • The monitor's • Be sure the power "Connecting and indictator is not power switch is cord is connected turning on your lit and there...
... solve it yourself. Table 3-2. Troubleshooting If you have a problem setting up or using your monitor, you might be incorrect Select another color setting from the OSD menu "Adjusting your monitor image" on page 2-3 The automatic image setup function was not performed Perform automatic image "Adjusting your setup monitor image" on page 2-3 The power • The monitor's • Be sure the power "Connecting and indictator is not power switch is cord is connected turning on your lit and there...
Lenovo D186 Wide Flat Panel Monitor User Guide
Page 21
... OSD menu. 3-4 D186 Wide Flat Panel Monitor User's Guide Press at the lowest setting Adjust the brightness and "Adjusting your system monitor image" on page 2-6 perform manual image setup When working in light picture. 4. When the image no image The video signal cable is loose or disconnected from the system or monitor Be sure the video cable is connected with the system properly "Connecting and turning on your monitor" on page 1-3 The monitor brightness and contrast are more than five pixels missing, contact the Support Center Appendix A, "Service and Support...
... OSD menu. 3-4 D186 Wide Flat Panel Monitor User's Guide Press at the lowest setting Adjust the brightness and "Adjusting your system monitor image" on page 2-6 perform manual image setup When working in light picture. 4. When the image no image The video signal cable is loose or disconnected from the system or monitor Be sure the video cable is connected with the system properly "Connecting and turning on your monitor" on page 1-3 The monitor brightness and contrast are more than five pixels missing, contact the Support Center Appendix A, "Service and Support...

Lenovo D186 Wide Flat Panel Monitor User Guide
Page 22
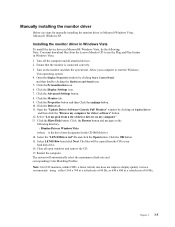
... to use the Plug and Play feature Microsoft Windows 7, do the following directory: X:\Monitor Drivers\Windows 7 (where X is connected correctly. 3. Close all attached devices. 2. Chapter 3. 3-5 Turn off the computer and all open windows and remove the CD. 17. Click the Have Disk button. Click the Display Settings icon. 7. Restart the system. Click the Personalization icon. 6. Click the Properties button. 10. Open the "Update Driver Software-Generic PnP Monitor" window by clicking Start, Control Panel...
... to use the Plug and Play feature Microsoft Windows 7, do the following directory: X:\Monitor Drivers\Windows 7 (where X is connected correctly. 3. Close all attached devices. 2. Chapter 3. 3-5 Turn off the computer and all open windows and remove the CD. 17. Click the Have Disk button. Click the Display Settings icon. 7. Restart the system. Click the Personalization icon. 6. Click the Properties button. 10. Open the "Update Driver Software-Generic PnP Monitor" window by clicking Start, Control Panel...
Lenovo D186 Wide Flat Panel Monitor User Guide
Page 23
...: X:\Monitor Drivers\Windows Vista (where X is connected correctly. 3. Note: This section must be completed before continuing with the Windows Vista automatic image setup. 1. Turn off the computer and all open windows and remove the CD. 17. Allow the system to install" option, and then click Next. 13. Open the Hardware Update Wizard window by clicking Start J Settings J Control Panel, and then double-clicking the Display icon. 5. Click the OK button. 15...
...: X:\Monitor Drivers\Windows Vista (where X is connected correctly. 3. Note: This section must be completed before continuing with the Windows Vista automatic image setup. 1. Turn off the computer and all open windows and remove the CD. 17. Allow the system to install" option, and then click Next. 13. Open the Hardware Update Wizard window by clicking Start J Settings J Control Panel, and then double-clicking the Display icon. 5. Click the OK button. 15...

Lenovo D186 Wide Flat Panel Monitor User Guide
Page 24
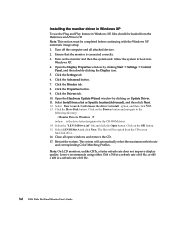
... icon. 6. Open the "Update Driver Software-Generic PnP Monitor" window by clicking Start, Control Panel and Hardware and Sound icon. 5. Click the OK button. 16. Select LEN D186wA and click Next. Restart the system. Installing the monitor driver in Windows XP. 1. Select "Let me pick from the Lenovo Monitor CD to start the Windows XP operating system. 4. Allow your hard disk drive. 17. Click the change display Settings button. 8. Click on Update Driver and then...
... icon. 6. Open the "Update Driver Software-Generic PnP Monitor" window by clicking Start, Control Panel and Hardware and Sound icon. 5. Click the OK button. 16. Select LEN D186wA and click Next. Restart the system. Installing the monitor driver in Windows XP. 1. Select "Let me pick from the Lenovo Monitor CD to start the Windows XP operating system. 4. Allow your hard disk drive. 17. Click the change display Settings button. 8. Click on Update Driver and then...

