Lenovo C3/C4/C5 Series User Guide
Page 5
...Using the Software 27 Lenovo Support 28 Troubleshooting and Confirming Setup 29 Troubleshooting Display Problems 30 Troubleshooting Touch screen 31 Troubleshooting Audio Problems 31 Troubleshooting Software Problems 32 Troubleshooting Problems with Optical Drives and Hard Disks 33 Special ...considerations for troubleshooting Windows 34 Windows Help and Support 34 BIOS setup utility 34 Performing Daily Maintenance Tasks 35 Hardware Replacement Guide 37 Overview 38 Replacing hardware 41 Appendix 53...
...Using the Software 27 Lenovo Support 28 Troubleshooting and Confirming Setup 29 Troubleshooting Display Problems 30 Troubleshooting Touch screen 31 Troubleshooting Audio Problems 31 Troubleshooting Software Problems 32 Troubleshooting Problems with Optical Drives and Hard Disks 33 Special ...considerations for troubleshooting Windows 34 Windows Help and Support 34 BIOS setup utility 34 Performing Daily Maintenance Tasks 35 Hardware Replacement Guide 37 Overview 38 Replacing hardware 41 Appendix 53...

Lenovo C3/C4/C5 Series User Guide
Page 38
... capacity of 3G - 3 x 1000 x 1000 x 1000/(1024 x 1024 x 1024) = 2.79G is still no icon, contact Lenovo Service. If the Service partition of the hard disk shown in the system can be calculated according to the calculations in the resource manager of this procedure. 3. Check to determine...resolution: For computers equipped with the next step of the CD/DVD for the apparent hard disk capacity deficit. Troubleshooting Problems with Optical Drives and Hard Disks Problem: The Optical drive is unable to read , replace it with a known good CD/DVD such as one that was shipped with the ...
... capacity of 3G - 3 x 1000 x 1000 x 1000/(1024 x 1024 x 1024) = 2.79G is still no icon, contact Lenovo Service. If the Service partition of the hard disk shown in the system can be calculated according to the calculations in the resource manager of this procedure. 3. Check to determine...resolution: For computers equipped with the next step of the CD/DVD for the apparent hard disk capacity deficit. Troubleshooting Problems with Optical Drives and Hard Disks Problem: The Optical drive is unable to read , replace it with a known good CD/DVD such as one that was shipped with the ...

Lenovo C3/C4/C5 Series User Guide
Page 42
Hardware Replacement Guide This chapter contains the following topics: Ø Removing the stand base Ø Removing the foot cover Ø Replacing a memory module Ø Replacing the hard disk drive Ø Replacing the optical drive Ø Replacing the adapter Ø Replacing the keyboard and mouse User Guide 37
Hardware Replacement Guide This chapter contains the following topics: Ø Removing the stand base Ø Removing the foot cover Ø Replacing a memory module Ø Replacing the hard disk drive Ø Replacing the optical drive Ø Replacing the adapter Ø Replacing the keyboard and mouse User Guide 37
Lenovo C3/C4/C5 Series User Guide
Page 43
... can be used by customers who are replacing Customer Replaceable Units (CRUs) as well as parts. Note: Use only parts provided by Lenovo®. It is intended to be replaced by trained service personnel without the need for replacing CRUs Do not open your computer or ...card in the Safety and Warranty Guide that was included with your computer. This guide contains procedures for replacing the following parts: • Memory module • Hard disk drive • Optical drive • Adapter • Keyboard, mouse (wired) Safety information for step-by-step procedures. Overview...
... can be used by customers who are replacing Customer Replaceable Units (CRUs) as well as parts. Note: Use only parts provided by Lenovo®. It is intended to be replaced by trained service personnel without the need for replacing CRUs Do not open your computer or ...card in the Safety and Warranty Guide that was included with your computer. This guide contains procedures for replacing the following parts: • Memory module • Hard disk drive • Optical drive • Adapter • Keyboard, mouse (wired) Safety information for step-by-step procedures. Overview...
Lenovo C3/C4/C5 Series User Guide
Page 50
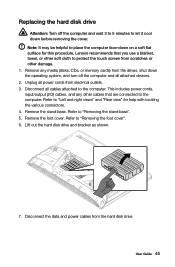
...before removing the cover. Remove any other cables that you use a blanket, towel, or other damage. 1. Remove the foot cover. Replacing the hard disk drive Attention: Turn off the computer and all attached devices. 2. Refer to "Removing the stand base". 5. Unplug all cables attached to ... and right views" and "Rear view" for this procedure. Lenovo recommends that are connected to the computer. Lift out the hard disk drive and bracket as shown. 7. Remove the stand base. Disconnect all power cords from the drives, shut down the operating system, and turn off the computer...
...before removing the cover. Remove any other cables that you use a blanket, towel, or other damage. 1. Remove the foot cover. Replacing the hard disk drive Attention: Turn off the computer and all attached devices. 2. Refer to "Removing the stand base". 5. Unplug all cables attached to ... and right views" and "Rear view" for this procedure. Lenovo recommends that are connected to the computer. Lift out the hard disk drive and bracket as shown. 7. Remove the stand base. Disconnect all power cords from the drives, shut down the operating system, and turn off the computer...

Lenovo C560 Hardware Maintenance Manual
Page 5
... Selecting a startup device 16 Exiting the Lenovo BIOS Setup Utility program . . 17 Chapter 6. Replacing hardware . . . . 21 General information 21 Replacing the keyboard and mouse 22 Replacing the adapter 22 Removing the stand base 24 Removing the foot cover 24 Replacing a memory module 25 Replacing the hard disk drive 27 Replacing the optical drive 28 Removing the stand holder 30 Removing...
... Selecting a startup device 16 Exiting the Lenovo BIOS Setup Utility program . . 17 Chapter 6. Replacing hardware . . . . 21 General information 21 Replacing the keyboard and mouse 22 Replacing the adapter 22 Removing the stand base 24 Removing the foot cover 24 Replacing a memory module 25 Replacing the hard disk drive 27 Replacing the optical drive 28 Removing the stand holder 30 Removing...
Lenovo C560 Hardware Maintenance Manual
Page 25
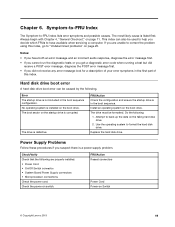
... caused by the following. Error The startup drive is installed on the failing hard disk drive. 2. No operating system is not included in the boot sequence. The drive is listed first. Check the power-on Switch © Copyright Lenovo 2013 19 Symptom-to-FRU Index The Symptom...; If you suspect there is a power supply problem. The drive must be formatted. If you decide which FRUs to format the hard disk drive. Attempt to -FRU index lists error symptoms and possible causes. Replace the hard disk drive. FRU/Action Reseat connectors Power Cord Power-on switch. Install ...
... caused by the following. Error The startup drive is installed on the failing hard disk drive. 2. No operating system is not included in the boot sequence. The drive is listed first. Check the power-on Switch © Copyright Lenovo 2013 19 Symptom-to-FRU Index The Symptom...; If you suspect there is a power supply problem. The drive must be formatted. If you decide which FRUs to format the hard disk drive. Attempt to -FRU index lists error symptoms and possible causes. Replace the hard disk drive. FRU/Action Reseat connectors Power Cord Power-on switch. Install ...
Lenovo C560 Hardware Maintenance Manual
Page 26
... Checks that the memory is working correctly • Starts video operations • Verifies that the boot drive is operating correctly and that the system is working POST Error Message Keyboard error Reboot and Select proper ...drive 3. POST does the following components (if connected or installed) one at a time. The BIOS then ignores the missing keyboard during POST. Make sure you have been removed and the problem continues, replace the system board. 20 Lenovo C560Hardware Maintenance Manual Power-off the computer. 2. Extended video memory c. External Cache d. Hard disk drive...
... Checks that the memory is working correctly • Starts video operations • Verifies that the boot drive is operating correctly and that the system is working POST Error Message Keyboard error Reboot and Select proper ...drive 3. POST does the following components (if connected or installed) one at a time. The BIOS then ignores the missing keyboard during POST. Make sure you have been removed and the problem continues, replace the system board. 20 Lenovo C560Hardware Maintenance Manual Power-off the computer. 2. Extended video memory c. External Cache d. Hard disk drive...
Lenovo C560 Hardware Maintenance Manual
Page 33
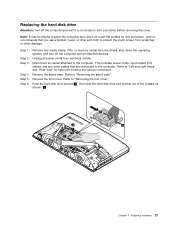
...views" and "Rear view" for this procedure. Remove the stand base. Push the hard disk drive bracket 1 , then slide the hard disk drive and bracket out of the chassis as shown. 2 1 1 Chapter 7. Replacing hardware 27 Step 2. Step 3. Refer to "Removing the foot cover". This includes ... media (disks, CDs, or memory cards) from electrical outlets. Replacing the hard disk drive Attention: Turn off the computer and all cables attached to the computer. Step 6. Remove the foot cover. Step 4. Lenovo recommends that are connected to the computer. Unplug all power cords...
...views" and "Rear view" for this procedure. Remove the stand base. Push the hard disk drive bracket 1 , then slide the hard disk drive and bracket out of the chassis as shown. 2 1 1 Chapter 7. Replacing hardware 27 Step 2. Step 3. Refer to "Removing the foot cover". This includes ... media (disks, CDs, or memory cards) from electrical outlets. Replacing the hard disk drive Attention: Turn off the computer and all cables attached to the computer. Step 6. Remove the foot cover. Step 4. Lenovo recommends that are connected to the computer. Unplug all power cords...
Lenovo C560 Hardware Maintenance Manual
Page 34
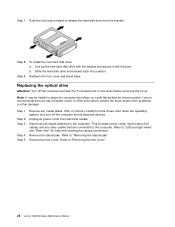
...base. Refer to "Removing the foot cover". 28 Lenovo C560Hardware Maintenance Manual This includes power cords, input/output (I/O) cables, and any media (disks, CDs, or memory cards) from electrical outlets. Step 8. Step 9. Replacing the optical drive Attention: Turn off the computer and all power cords ... minutes to place the computer face-down before removing the cover. b. Step 7. Push the lock pins outward to release the hard disk drive from scratches or other cables that are connected to "Left and right views" and "Rear view" for this procedure. Step ...
...base. Refer to "Removing the foot cover". 28 Lenovo C560Hardware Maintenance Manual This includes power cords, input/output (I/O) cables, and any media (disks, CDs, or memory cards) from electrical outlets. Step 8. Step 9. Replacing the optical drive Attention: Turn off the computer and all power cords ... minutes to place the computer face-down before removing the cover. b. Step 7. Push the lock pins outward to release the hard disk drive from scratches or other cables that are connected to "Left and right views" and "Rear view" for this procedure. Step ...
Lenovo C560 Hardware Maintenance Manual
Page 52
.... Step 3. Step 4. Remove the foot cover. Refer to let it cool down before removing the cover. Step 8. Refer to "Replacing the TV tuner card". Remove the CPU. Refer to "Removing the middle cover". Refer to place the computer face-down the operating system...cable • Camera cable • System fan power cable • Hard disk drive power cable • Hard disk drive SATA cable (Black) • Optical drive SATA cable (Red) • Optical disk drive power cable • LVDS cable 46 Lenovo C560Hardware Maintenance Manual Step 14. Refer to "Removing the stand base"....
.... Step 3. Step 4. Remove the foot cover. Refer to let it cool down before removing the cover. Step 8. Refer to "Replacing the TV tuner card". Remove the CPU. Refer to "Removing the middle cover". Refer to place the computer face-down the operating system...cable • Camera cable • System fan power cable • Hard disk drive power cable • Hard disk drive SATA cable (Black) • Optical drive SATA cable (Red) • Optical disk drive power cable • LVDS cable 46 Lenovo C560Hardware Maintenance Manual Step 14. Refer to "Removing the stand base"....


