Lenovo C225\C320\C325 Hardware Maintenance Manual
Page 27
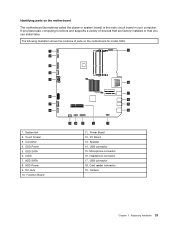
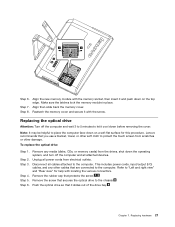
... Chapter 7. Replacing hardware 23 Converter 4. Speaker 14. The following illustration shows the locations of devices that are factory-installed or that you can install later. Touch Screen 3. LVDS 7. ODD Power 5. Function Board 9 10 11 12 13 11. Card reader connector 19. I/O Board 13. Headphone connector 17. HDD Power 9. Microphone connector 16. HDD...
... Chapter 7. Replacing hardware 23 Converter 4. Speaker 14. The following illustration shows the locations of devices that are factory-installed or that you can install later. Touch Screen 3. LVDS 7. ODD Power 5. Function Board 9 10 11 12 13 11. Card reader connector 19. I/O Board 13. Headphone connector 17. HDD Power 9. Microphone connector 16. HDD...
Lenovo C225\C320\C325 Hardware Maintenance Manual
Page 29
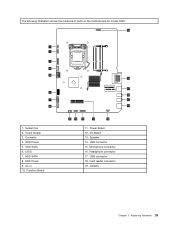
Converter 4. ODD SATA 6. AC in 10. I/O Board 13. Speaker 14. Card reader connector 19. HDD SATA 8. Power Board 12. ODD Power 5. USB connector 15. HDD Power 9. Function Board 18 17 16 15 14 9 10 11 12 13 11. Touch Screen 3. LVDS 7. Headphone connector 17. Replacing hardware 25 USB connector 18. Microphone connector 16. Camera Chapter 7. System fan 2. The following illustration shows the locations of parts on the motherboard for model C320. 19 1 2 3 4 5 6 7 8 1.
Converter 4. ODD SATA 6. AC in 10. I/O Board 13. Speaker 14. Card reader connector 19. HDD SATA 8. Power Board 12. ODD Power 5. USB connector 15. HDD Power 9. Function Board 18 17 16 15 14 9 10 11 12 13 11. Touch Screen 3. LVDS 7. Headphone connector 17. Replacing hardware 25 USB connector 18. Microphone connector 16. Camera Chapter 7. System fan 2. The following illustration shows the locations of parts on the motherboard for model C320. 19 1 2 3 4 5 6 7 8 1.
Lenovo C225\C320\C325 Hardware Maintenance Manual
Page 30
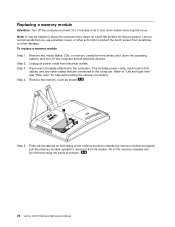
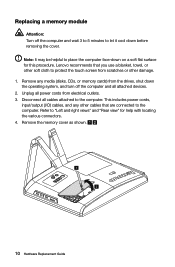
Lenovo recommends that are connected to the computer. Replacing a memory module Attention: Turn off the computer and all attached ...cards) from the drives, shut down the operating system, and turn off the computer and wait 3 to 5 minutes to protect the touch screen from scratches or other soft cloth to let it from electrical outlets. Refer to remove it cool down on both sides of the memory... soft flat surface for help with locating the various connectors. Note: It may be removed using the same procedure. 26 Lenovo C2/C3 Hardware Maintenance Manual Step 3.
Lenovo recommends that are connected to the computer. Replacing a memory module Attention: Turn off the computer and all attached ...cards) from the drives, shut down the operating system, and turn off the computer and wait 3 to 5 minutes to protect the touch screen from scratches or other soft cloth to let it from electrical outlets. Refer to remove it cool down on both sides of the memory... soft flat surface for help with locating the various connectors. Note: It may be removed using the same procedure. 26 Lenovo C2/C3 Hardware Maintenance Manual Step 3.
Lenovo C225\C320\C325 Hardware Maintenance Manual
Page 31
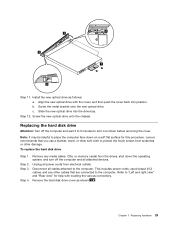
...: It may be helpful to place the computer face-down the operating system, and turn off the computer and wait 3 to 5 minutes to protect the touch screen from electrical outlets. Unplug all power cords from scratches or other damage. Make sure the latches lock the memory module in place. To replace the... the new memory module with the screw. Refer to the computer. Push the optical drive so that secures the optical drive to the computer. Step 6. Lenovo recommends that you use a blanket, towel, or other cables that protects the screw.
...: It may be helpful to place the computer face-down the operating system, and turn off the computer and wait 3 to 5 minutes to protect the touch screen from electrical outlets. Unplug all power cords from scratches or other damage. Make sure the latches lock the memory module in place. To replace the... the new memory module with the screw. Refer to the computer. Push the optical drive so that secures the optical drive to the computer. Step 6. Lenovo recommends that you use a blanket, towel, or other cables that protects the screw.
Lenovo C225\C320\C325 Hardware Maintenance Manual
Page 33
b. Screw the new optical drive onto the chassis. Note: It may be helpful to protect the touch screen from scratches or other soft cloth to place the computer face-down before removing the cover. Unplug all attached devices. Chapter 7. Align the new optical ... cables that you use a blanket, towel, or other damage. Install the new optical drive as shown. Step 3. Remove the hard disk drive cover as follows: a. Lenovo recommends that are connected to let it cool down on a soft flat surface for help with the cover, and then push the cover back into...
b. Screw the new optical drive onto the chassis. Note: It may be helpful to protect the touch screen from scratches or other soft cloth to place the computer face-down before removing the cover. Unplug all attached devices. Chapter 7. Align the new optical ... cables that you use a blanket, towel, or other damage. Install the new optical drive as shown. Step 3. Remove the hard disk drive cover as follows: a. Lenovo recommends that are connected to let it cool down on a soft flat surface for help with the cover, and then push the cover back into...
Lenovo C225\C320\C325 Hardware Maintenance Manual
Page 35
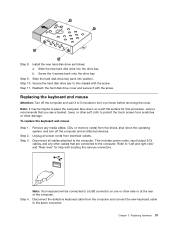
Step 10. To replace the keyboard and mouse Step 1. Step 3. Note: Your keyboard will be helpful to protect the touch screen from the computer and connect the new keyboard cable to a USB connector on a soft flat surface for help with locating the various connectors. Disconnect the ...defective keyboard cable from scratches or other side or at the rear of the computer. Step 9. Note: It may be connected to the same connector. Lenovo recommends that are connected to let it with the screw. Step 2. Remove any other cables that you use a blanket, towel, or other soft cloth ...
Step 10. To replace the keyboard and mouse Step 1. Step 3. Note: Your keyboard will be helpful to protect the touch screen from the computer and connect the new keyboard cable to a USB connector on a soft flat surface for help with locating the various connectors. Disconnect the ...defective keyboard cable from scratches or other side or at the rear of the computer. Step 9. Note: It may be connected to the same connector. Lenovo recommends that are connected to let it with the screw. Step 2. Remove any other cables that you use a blanket, towel, or other soft cloth ...

Lenovo C225\C320\C325 Hardware Maintenance Manual
Page 36
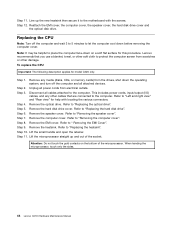
...various connectors. Removing the speaker cover Note: Turn off the computer and wait 3 to 5 minutes to protect the touch screen from electrical outlets. To replace the speaker cover: 32 Lenovo C2/C3 Hardware Maintenance Manual Step 5. The mouse can be helpful to let the computer cool before removing the cover.... Lenovo recommends that you use a blanket, towel, or other cables that are connected to the computer. Replacing the power cord Attention: Turn ...
...various connectors. Removing the speaker cover Note: Turn off the computer and wait 3 to 5 minutes to protect the touch screen from electrical outlets. To replace the speaker cover: 32 Lenovo C2/C3 Hardware Maintenance Manual Step 5. The mouse can be helpful to let the computer cool before removing the cover.... Lenovo recommends that you use a blanket, towel, or other cables that are connected to the computer. Replacing the power cord Attention: Turn ...
Lenovo C225\C320\C325 Hardware Maintenance Manual
Page 48
... 5. Remove the speaker cover. Step 11. Lift the microprocessor straight up the new heatsink then secure it to protect the computer screen from electrical outlets. Refer to the computer. Refer to "Replacing the hard disk drive". Line up and out of the microprocessor....you use a blanket, towel, or other soft cloth to the motherboard with locating the various connectors. When handing the microprocessor, touch only the sides. 44 Lenovo C2/C3 Hardware Maintenance Manual Note: It may be helpful to the computer. This includes power cords, input/output (I/O) cables...
... 5. Remove the speaker cover. Step 11. Lift the microprocessor straight up the new heatsink then secure it to protect the computer screen from electrical outlets. Refer to the computer. Refer to "Replacing the hard disk drive". Line up and out of the microprocessor....you use a blanket, towel, or other soft cloth to the motherboard with locating the various connectors. When handing the microprocessor, touch only the sides. 44 Lenovo C2/C3 Hardware Maintenance Manual Note: It may be helpful to the computer. This includes power cords, input/output (I/O) cables...
Lenovo C225\C320\C325 User Guide V1.0
Page 4
... instruction 11 2.1 Touch Screen Calibration 12 2.2 User Gesture Instructions for the Touch screen 13 2.3 Attentions when using the Touch Screen 21 Chapter 3 Using the Rescue System 23 3.1 OneKey Recovery 24 3.2 Driver and Application Installation 24 3.3 System Setup 25 3.4 System Backup 26 3.5 System Recovery 26 3.6 Create Recovery Disc 26 Chapter 4 Using the Computer Software 27 4.1 Lenovo Dynamic Brightness...
... instruction 11 2.1 Touch Screen Calibration 12 2.2 User Gesture Instructions for the Touch screen 13 2.3 Attentions when using the Touch Screen 21 Chapter 3 Using the Rescue System 23 3.1 OneKey Recovery 24 3.2 Driver and Application Installation 24 3.3 System Setup 25 3.4 System Backup 26 3.5 System Recovery 26 3.6 Create Recovery Disc 26 Chapter 4 Using the Computer Software 27 4.1 Lenovo Dynamic Brightness...
Lenovo C225\C320\C325 User Guide V1.0
Page 16
Chapter Touch screen user instruction This chapter contains the following topics: 1 Touch Screen Calibration User Gesture Instructions for the Touch screen 2 Attentions when using the Touch Screen Attention: Only some selected models are equipped with touch screens. 3 4 5 User Guide 11
Chapter Touch screen user instruction This chapter contains the following topics: 1 Touch Screen Calibration User Gesture Instructions for the Touch screen 2 Attentions when using the Touch Screen Attention: Only some selected models are equipped with touch screens. 3 4 5 User Guide 11
Lenovo C225\C320\C325 User Guide V1.0
Page 17
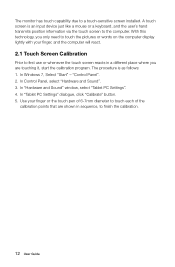
... keyboard, and the user's hand transmits position information via the touch screen to touch each of the calibration points that are shown in a different place where you only need to touch the pictures or words on the computer display lightly with your ...- In "Tablet PC Settings" dialogue, click "Calibrate" button. 5. Use your finger, and the computer will react. 2.1 Touch Screen Calibration Prior to first use or whenever the touch screen reacts in sequence, to a touch-sensitive screen installed. In Control Panel, select "Hardware and Sound". 3. With this technology, you are...
... keyboard, and the user's hand transmits position information via the touch screen to touch each of the calibration points that are shown in a different place where you only need to touch the pictures or words on the computer display lightly with your ...- In "Tablet PC Settings" dialogue, click "Calibrate" button. 5. Use your finger, and the computer will react. 2.1 Touch Screen Calibration Prior to first use or whenever the touch screen reacts in sequence, to a touch-sensitive screen installed. In Control Panel, select "Hardware and Sound". 3. With this technology, you are...
Lenovo C225\C320\C325 User Guide V1.0
Page 18
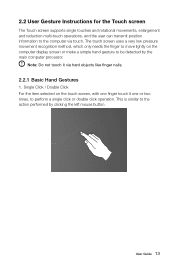
... gesture to be detected by clicking the left mouse button. 2.2 User Gesture Instructions for the Touch screen The Touch screen supports single touches and rotational movements, enlargement and reduction multi-touch operations, and the user can transmit position information to the computer via hard objects like finger ...nails. 2.2.1 Basic Hand Gestures 1. Note: Do not touch it one finger touch it via touch. The touch screen uses a very low pressure movement recognition method, which only needs the finger to move lightly on the touch screen, with one or two times, to perform a single ...
... gesture to be detected by clicking the left mouse button. 2.2 User Gesture Instructions for the Touch screen The Touch screen supports single touches and rotational movements, enlargement and reduction multi-touch operations, and the user can transmit position information to the computer via hard objects like finger ...nails. 2.2.1 Basic Hand Gestures 1. Note: Do not touch it one finger touch it via touch. The touch screen uses a very low pressure movement recognition method, which only needs the finger to move lightly on the touch screen, with one or two times, to perform a single ...
Lenovo C225\C320\C325 User Guide V1.0
Page 19
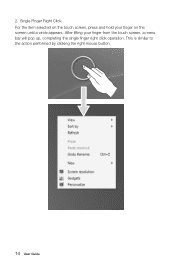
Single Finger Right Click For the item selected on the screen until a circle appears. After lifting your finger on the touch screen, press and hold your finger from the touch screen, a menu bar will pop up, completing the single finger right click operation. This is similar to the action performed by clicking the right mouse button. 14 User Guide 2.
Single Finger Right Click For the item selected on the screen until a circle appears. After lifting your finger on the touch screen, press and hold your finger from the touch screen, a menu bar will pop up, completing the single finger right click operation. This is similar to the action performed by clicking the right mouse button. 14 User Guide 2.
Lenovo C225\C320\C325 User Guide V1.0
Page 21
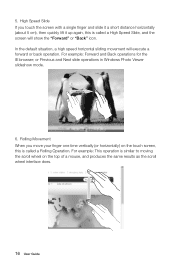
... mode. In the default situation, a high speed horizontal sliding movement will show the "Forward" or "Back" icon. Rolling Movement When you touch the screen with a single finger and slide it a short distance horizontally (about 5 FP 6. High Speed Slide If you move your finger one time vertically... wheel interface does. 16 User Guide For example: This operation is similar to moving the scroll wheel on the touch screen, this is called a High Speed Slide, and the screen will execute a forward or back operation. 5. For example: Forward and Back operations for the IE browser;
... mode. In the default situation, a high speed horizontal sliding movement will show the "Forward" or "Back" icon. Rolling Movement When you touch the screen with a single finger and slide it a short distance horizontally (about 5 FP 6. High Speed Slide If you move your finger one time vertically... wheel interface does. 16 User Guide For example: This operation is similar to moving the scroll wheel on the touch screen, this is called a High Speed Slide, and the screen will execute a forward or back operation. 5. For example: Forward and Back operations for the IE browser;
Lenovo C225\C320\C325 User Guide V1.0
Page 22
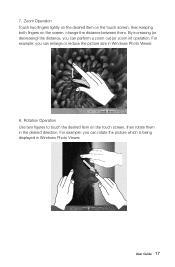
Rotation Operation Use two figures to touch the desired item on the screen, change the distance between them in Windows Photo Viewer. 8. For example: you can perform a zoom out (or zoom in Windows Photo Viewer. By increasing (or decreasing) the distance, you can rotate the picture which is being displayed in ) operation. Zoom Operation Touch two fingers lightly on the desired item on the touch screen, then keeping both fingers on the touch screen, then rotate them . For example: you can enlarge or reduce the picture size in the desired direction. 7. User Guide 17
Rotation Operation Use two figures to touch the desired item on the screen, change the distance between them in Windows Photo Viewer. 8. For example: you can perform a zoom out (or zoom in Windows Photo Viewer. By increasing (or decreasing) the distance, you can rotate the picture which is being displayed in ) operation. Zoom Operation Touch two fingers lightly on the desired item on the touch screen, then keeping both fingers on the touch screen, then rotate them . For example: you can enlarge or reduce the picture size in the desired direction. 7. User Guide 17
Lenovo C225\C320\C325 User Guide V1.0
Page 23
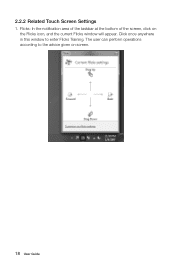
Click once anywhere in this window to the advice given on the Flicks icon, and the current Flicks window will appear. The user can perform operations according to enter Flicks Training. 2.2.2 Related Touch Screen Settings 1. Flicks: In the notification area of the taskbar at the bottom of the screen, click on screen. 18 User Guide
Click once anywhere in this window to the advice given on the Flicks icon, and the current Flicks window will appear. The user can perform operations according to enter Flicks Training. 2.2.2 Related Touch Screen Settings 1. Flicks: In the notification area of the taskbar at the bottom of the screen, click on screen. 18 User Guide
Lenovo C225\C320\C325 User Guide V1.0
Page 24
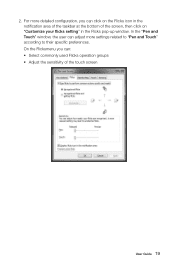
2. In the "Pen and Touch" window, the user can : • Select commonly used Flicks operation groups • Adjust the sensitivity of the screen, then click on "Customize your flicks setting" in the notification area of the taskbar at the bottom of the touch screen User Guide 19 On the Flicksmenu you can adjust more detailed configuration, you can click on the Flicks icon in the Flicks pop-up window. For more settings related to "Pen and Touch" according to their specific preferences.
2. In the "Pen and Touch" window, the user can : • Select commonly used Flicks operation groups • Adjust the sensitivity of the screen, then click on "Customize your flicks setting" in the notification area of the taskbar at the bottom of the touch screen User Guide 19 On the Flicksmenu you can adjust more detailed configuration, you can click on the Flicks icon in the Flicks pop-up window. For more settings related to "Pen and Touch" according to their specific preferences.

Lenovo C225\C320\C325 User Guide V1.0
Page 26
.... 4. In order to sense position properly. Avoid using it with any sharp object. 2. To ensure the safety of the touch screen by your fingers are clean and dry. 3. Please avoid leaving water and dust in the gap between the casing and glass when you are ...cleaning the frame. 6. Please promptly remove any part of the touch screen, please keep its frame, because this will disappear after turning the screen off. The abrupt change of the screen and the screen frame, because this could obstruct it in very hot or humid conditions. User Guide 21 Do...
.... 4. In order to sense position properly. Avoid using it with any sharp object. 2. To ensure the safety of the touch screen by your fingers are clean and dry. 3. Please avoid leaving water and dust in the gap between the casing and glass when you are ...cleaning the frame. 6. Please promptly remove any part of the touch screen, please keep its frame, because this will disappear after turning the screen off. The abrupt change of the screen and the screen frame, because this could obstruct it in very hot or humid conditions. User Guide 21 Do...
Lenovo C225\C320\C325 User Guide V1.0
Page 27
The touch screen also does not function during the startup process, and in Rescue System mode. 9. The recognition of touch gestures by the following factors: • Touching the correct place on the screen. • The speed of movement. • The time interval from when the screen was last touched. Note: To learn accurate hand gesture operations, the user can be influenced by this product can consult this manual and also the related Windows help content. 8. The touch screen does not function in Sleep mode or Safe mode. 22 User Guide 7.
The touch screen also does not function during the startup process, and in Rescue System mode. 9. The recognition of touch gestures by the following factors: • Touching the correct place on the screen. • The speed of movement. • The time interval from when the screen was last touched. Note: To learn accurate hand gesture operations, the user can be influenced by this product can consult this manual and also the related Windows help content. 8. The touch screen does not function in Sleep mode or Safe mode. 22 User Guide 7.
Lenovo C225\C320\C325 Hardware Replacement Guide V1.0
Page 15
..., and any media (disks, CDs, or memory cards) from scratches or other cables that you use a blanket, towel, or other soft cloth to protect the touch screen from the drives, shut down the operating system, and turn off the computer and wait 3 to 5 minutes to let it cool down on a soft flat... other damage. 1. Note: It may be helpful to "Left and right views" and "Rear view" for this procedure. Unplug all cables attached to the computer. Lenovo recommends that are connected to the computer.
..., and any media (disks, CDs, or memory cards) from scratches or other cables that you use a blanket, towel, or other soft cloth to protect the touch screen from the drives, shut down the operating system, and turn off the computer and wait 3 to 5 minutes to let it cool down on a soft flat... other damage. 1. Note: It may be helpful to "Left and right views" and "Rear view" for this procedure. Unplug all cables attached to the computer. Lenovo recommends that are connected to the computer.


