Hardware Maintenance Manual
Page 5
... codes 39 Error messages 43 Beep symptoms 44 © Copyright Lenovo 2008 No-beep symptoms 44 LCD-related symptoms 45 Intermittent problems 46 Undetermined problems 46 ThinkPad X200 and X200s 47 Specifications 48 Status indicators 50 FRU tests 52 Fn key combinations 54 FRU replacement notices 57 Screw notices 57 Retaining serial numbers 58 Removing...
... codes 39 Error messages 43 Beep symptoms 44 © Copyright Lenovo 2008 No-beep symptoms 44 LCD-related symptoms 45 Intermittent problems 46 Undetermined problems 46 ThinkPad X200 and X200s 47 Specifications 48 Status indicators 50 FRU tests 52 Fn key combinations 54 FRU replacement notices 57 Screw notices 57 Retaining serial numbers 58 Removing...

Hardware Maintenance Manual
Page 10
... fastened or rolled up with labels or stickers. 2 ThinkPad X200 and X200s Hardware Maintenance Manual General safety Follow these rules to lift. 4. v Do not wear jewelry, chains, metal-frame eyeglasses, or metal fasteners for you start the machine, make sure that makes the equipment unsafe. Replace any heavy object: 1. Lift by standing or by...
... fastened or rolled up with labels or stickers. 2 ThinkPad X200 and X200s Hardware Maintenance Manual General safety Follow these rules to lift. 4. v Do not wear jewelry, chains, metal-frame eyeglasses, or metal fasteners for you start the machine, make sure that makes the equipment unsafe. Replace any heavy object: 1. Lift by standing or by...
Hardware Maintenance Manual
Page 25
... 21 Important: BIOS and device driver fixes are customer-installable. Strategy for replacing a hard disk drive" on page 18 - "Strategy for replacing FRUs Before replacing parts: Make sure that show the FRU removals or replacements for replacing and servicing FRUs: © Copyright Lenovo 2008 17 The BIOS and device drivers are available in this manual. Go...
... 21 Important: BIOS and device driver fixes are customer-installable. Strategy for replacing a hard disk drive" on page 18 - "Strategy for replacing FRUs Before replacing parts: Make sure that show the FRU removals or replacements for replacing and servicing FRUs: © Copyright Lenovo 2008 17 The BIOS and device drivers are available in this manual. Go...

Hardware Maintenance Manual
Page 26
... the error codes displayed on a system board are servicing. 18 ThinkPad X200 and X200s Hardware Maintenance Manual If no error code is displayed, begin the diagnosis with the first error code. If you are very sensitive. Be sure that board, and then replace the other one error code is displayed, see if the symptoms...
... the error codes displayed on a system board are servicing. 18 ThinkPad X200 and X200s Hardware Maintenance Manual If no error code is displayed, begin the diagnosis with the first error code. If you are very sensitive. Be sure that board, and then replace the other one error code is displayed, see if the symptoms...

Hardware Maintenance Manual
Page 27
... boards, microprocessors, Liquid Crystal Displays (LCDs), and memory. The PRODUCT ID portion of the machine label is a special bid offering. Strategy for replacing FRUs for CTO, CMV, and GAV Product definition Dynamic Configure To Order (CTO) This provides the ability for a customer to configure an IBM&#...load these products under the same fixed model number. Using PEW v PEW is a unique configuration that has been negotiated between IBM or Lenovo and the customer. An example of the machine label is NOT generally announced. Custom Model Variant (CMV) This is the primary source ...
... boards, microprocessors, Liquid Crystal Displays (LCDs), and memory. The PRODUCT ID portion of the machine label is a special bid offering. Strategy for replacing FRUs for CTO, CMV, and GAV Product definition Dynamic Configure To Order (CTO) This provides the ability for a customer to configure an IBM&#...load these products under the same fixed model number. Using PEW v PEW is a unique configuration that has been negotiated between IBM or Lenovo and the customer. An example of the machine label is NOT generally announced. Custom Model Variant (CMV) This is the primary source ...

Hardware Maintenance Manual
Page 29
...is a part with unique FRU part numbers. The following statement pertains to support Lenovo's requirements and schedule in 2005 and 2006, will contain some RoHS compliant FRUs. Before or after June 2006 Current or original Replacement FRU part Must be RoHS Must be RoHS Non-RoHS Can sub to have ...unique FRU part numbers. Lenovo plans to transition to RoHS compliance well before June 2006 Current or original Replacement FRU part Non-RoHS Can be Non-RoHS Non-RoHS Can be RoHS Note: A direct substitution is a ...
...is a part with unique FRU part numbers. The following statement pertains to support Lenovo's requirements and schedule in 2005 and 2006, will contain some RoHS compliant FRUs. Before or after June 2006 Current or original Replacement FRU part Must be RoHS Must be RoHS Non-RoHS Can sub to have ...unique FRU part numbers. Lenovo plans to transition to RoHS compliance well before June 2006 Current or original Replacement FRU part Non-RoHS Can be Non-RoHS Non-RoHS Can be RoHS Note: A direct substitution is a ...
Hardware Maintenance Manual
Page 31
...the computer that a FRU is defective, clear the error log and run the test again. Some descriptions might be overwritten. v Before replacing any ThinkPad model that have been altered. Single failures can occur for DOS diagnostics program. v Be careful not to do first" on page 24...FRU, read the following information: v "What to replace a nondefective FRU. © Copyright Lenovo 2008 23 If you suspect that you are correct by referring to do not replace the FRU. "PC-Doctor for DOS" on removing and replacing FRUs. Important notes: v Only certified trained personnel should...
...the computer that a FRU is defective, clear the error log and run the test again. Some descriptions might be overwritten. v Before replacing any ThinkPad model that have been altered. Single failures can occur for DOS diagnostics program. v Be careful not to do first" on page 24...FRU, read the following information: v "What to replace a nondefective FRU. © Copyright Lenovo 2008 23 If you suspect that you are correct by referring to do not replace the FRU. "PC-Doctor for DOS" on removing and replacing FRUs. Important notes: v Only certified trained personnel should...

Hardware Maintenance Manual
Page 37
... 3. v If the problem persists, go to "ThinkPad X200 and X200s" on the computer. Connect the ac adapter. 4. Turn off the computer. 2. If the voltage is acceptable, do the following: v Replace the system board. If the voltage is not correct, replace the ac adapter. 4. Turn off the computer. 6...., check the power cord of the ac adapter cable. General checkout 29 v If the power problem occurs only when the ThinkPad X200 UltraBase is used , replace the UltraBase. Unplug the ac adapter cable from the ac adapter does not always indicate a defect. Measure the output voltage...
... 3. v If the problem persists, go to "ThinkPad X200 and X200s" on the computer. Connect the ac adapter. 4. Turn off the computer. 2. If the voltage is acceptable, do the following: v Replace the system board. If the voltage is not correct, replace the ac adapter. 4. Turn off the computer. 6...., check the power cord of the ac adapter cable. General checkout 29 v If the power problem occurs only when the ThinkPad X200 UltraBase is used , replace the UltraBase. Unplug the ac adapter cable from the ac adapter does not always indicate a defect. Measure the output voltage...

Hardware Maintenance Manual
Page 38
... figure: 7(-) 3 4 5 6(-) 2(+) 1(+) Terminal 1 7 Voltage (V dc) + 0 to 30 K . If the resistance is still less than +11.0 V dc after recharging, replace the battery. 4. Checking the battery pack Battery charging does not start until the Power Meter shows that has less than 50% of the total power... board. To check the battery pack, do not click), and the percentage of battery power remaining is correct, replace the system board. 30 ThinkPad X200 and X200s Hardware Maintenance Manual Remove the battery pack and measure the voltage between battery terminals 5 and 7. To get detailed...
... figure: 7(-) 3 4 5 6(-) 2(+) 1(+) Terminal 1 7 Voltage (V dc) + 0 to 30 K . If the resistance is still less than +11.0 V dc after recharging, replace the battery. 4. Checking the battery pack Battery charging does not start until the Power Meter shows that has less than 50% of the total power... board. To check the battery pack, do not click), and the percentage of battery power remaining is correct, replace the system board. 30 ThinkPad X200 and X200s Hardware Maintenance Manual Remove the battery pack and measure the voltage between battery terminals 5 and 7. To get detailed...

Hardware Maintenance Manual
Page 39
... the voltage of the backup battery. Red (+) Black (-) Wire Red Black Voltage (V dc) +2.5 to +3.2 Ground v If the voltage is not correct, replace the backup battery. Power off the computer, and unplug the ac adapter from it. 2. v If the backup battery discharges quickly after... replacement, replace the system board. Turn the computer upside down. 3. v If the voltage is correct, replace the system board. Remove the battery pack (see "1060 Backup battery" on page 63). 4. Checking the...
... the voltage of the backup battery. Red (+) Black (-) Wire Red Black Voltage (V dc) +2.5 to +3.2 Ground v If the voltage is not correct, replace the backup battery. Power off the computer, and unplug the ac adapter from it. 2. v If the backup battery discharges quickly after... replacement, replace the system board. Turn the computer upside down. 3. v If the voltage is correct, replace the system board. Remove the battery pack (see "1060 Backup battery" on page 63). 4. Checking the...

Hardware Maintenance Manual
Page 41
...by you use. Insert the bootable Start Recovery Disc into the Windows desktop several times and you might experience periods when no activity is replaced because of time depends on the method you . The length of a failure, no action is required by using Product Recovery discs .... Select your language and click Next. 3. Insert the Product Recovery Disc when prompted and click OK. 6. If there is normal. © Copyright Lenovo 2008 33 The computer will restart into the DVD drive. 2. This is a Supplemental Recovery Disc, it when prompted and click Yes. For information on...
...by you use. Insert the bootable Start Recovery Disc into the Windows desktop several times and you might experience periods when no activity is replaced because of time depends on the method you . The length of a failure, no action is required by using Product Recovery discs .... Select your language and click Next. 3. Insert the Product Recovery Disc when prompted and click OK. 6. If there is normal. © Copyright Lenovo 2008 33 The computer will restart into the DVD drive. 2. This is a Supplemental Recovery Disc, it when prompted and click Yes. For information on...
Hardware Maintenance Manual
Page 42
...ThinkPad X200 and X200s Hardware Maintenance Manual the system administrator enters both in the BIOS Setup Utility. The user must be entered before an operating system can be booted. The hard disk drive can be replaced for it to get access to the hard disk drive. When the recovery process is available, neither Lenovo nor Lenovo... authorized servicers provide any ThinkPad computer: the power-on page 35. The ...
...ThinkPad X200 and X200s Hardware Maintenance Manual the system administrator enters both in the BIOS Setup Utility. The user must be entered before an operating system can be booted. The hard disk drive can be replaced for it to get access to the hard disk drive. When the recovery process is available, neither Lenovo nor Lenovo... authorized servicers provide any ThinkPad computer: the power-on page 35. The ...

Hardware Maintenance Manual
Page 43
...move down the menu. 4. Remove the backup battery. When the ThinkPad logo comes up , immediately press F1 to Security --> Password. then enter the POP. The hard disk drive can be made available to the servicer, neither Lenovo nor Lenovo authorized servicers provide any services to reset the user HDPs or to... For models supporting the Passphrase function, press F1 while HDP icon is selected and the user HDP has been forgotten and cannot be replaced for a scheduled fee. then enter the master HDP. Remove the battery pack. For the other models, enter the master HDP. Press F10;
...move down the menu. 4. Remove the backup battery. When the ThinkPad logo comes up , immediately press F1 to Security --> Password. then enter the POP. The hard disk drive can be made available to the servicer, neither Lenovo nor Lenovo authorized servicers provide any services to reset the user HDPs or to... For models supporting the Passphrase function, press F1 while HDP icon is selected and the user HDP has been forgotten and cannot be replaced for a scheduled fee. then enter the master HDP. Remove the battery pack. For the other models, enter the master HDP. Press F10;
Hardware Maintenance Manual
Page 47
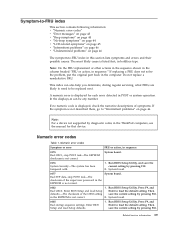
...F10. 2. Enter BIOS Setup and load Setup Enter to load the default setting. Then save the current setting by pressing F10. Do not replace a nondefective FRU. A numeric error is not correct. 2. Numeric error codes Symptom or error FRU or action, in sequence 0175 Bad CRC1,...46. If no numeric code is displayed, check the narrative descriptions of the CRS2 setting save the current setting by diagnostic codes in the ThinkPad computers, see the manual for each error detected in POST or system operation. Numeric error codes Table 1. System board. 0182 1. Press...
...F10. 2. Enter BIOS Setup and load Setup Enter to load the default setting. Then save the current setting by pressing F10. Do not replace a nondefective FRU. A numeric error is not correct. 2. Numeric error codes Symptom or error FRU or action, in sequence 0175 Bad CRC1,...46. If no numeric code is displayed, check the narrative descriptions of the CRS2 setting save the current setting by diagnostic codes in the ThinkPad computers, see the manual for each error detected in POST or system operation. Numeric error codes Table 1. System board. 0182 1. Press...
Hardware Maintenance Manual
Page 49
... board. 02F5 DMA test failed. 1. System board. 02F6 Software NMI failed 1. System board. 02F7 Fail-safe timer NMI failed 1. Replace the backup battery and run BIOS Setup Utility to reset the time and date. 3. Charge the backup battery for more than 8 hours...connecting the ac adapter. 2. DIMM. 2. System board. 1802 Unauthorized network card is dead. 1. System board. 1803 1. Related service information 41 Replace the backup battery and run BIOS Setup Utility to reset the time and date. 0251 System CMOS checksum bad- Default configuration used . 1. DIMM...
... board. 02F5 DMA test failed. 1. System board. 02F6 Software NMI failed 1. System board. 02F7 Fail-safe timer NMI failed 1. Replace the backup battery and run BIOS Setup Utility to reset the time and date. 3. Charge the backup battery for more than 8 hours...connecting the ac adapter. 2. DIMM. 2. System board. 1802 Unauthorized network card is dead. 1. System board. 1803 1. Related service information 41 Replace the backup battery and run BIOS Setup Utility to reset the time and date. 0251 System CMOS checksum bad- Default configuration used . 1. DIMM...

Hardware Maintenance Manual
Page 53
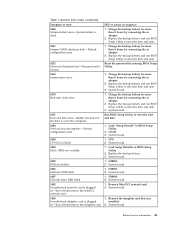
...LCD technology, but excessive pixel problems can cause viewing concerns. v Screen abnormal. LCD assembly. 4. Related service information 45 The LCD should be replaced if the number of defective pixels required for "LCD-related symptoms." 2. Table 6. LCD assembly. 3. System board. v LCD too dark.... power-on indicator on June 2006 or later manufactured ThinkPad LCD resolution Bright dots Dark dots Bright and dark dots XGA, WXGA 5 6 6 WXGA+, SXGA+, 5 WSXGA+ 8 10 UXGA, WUXGA, 5 13 13 QXGA Notes: v Lenovo will have zero pixel defects. LCD-related symptoms Important...
...LCD technology, but excessive pixel problems can cause viewing concerns. v Screen abnormal. LCD assembly. 4. Related service information 45 The LCD should be replaced if the number of defective pixels required for "LCD-related symptoms." 2. Table 6. LCD assembly. 3. System board. v LCD too dark.... power-on indicator on June 2006 or later manufactured ThinkPad LCD resolution Bright dots Dark dots Bright and dark dots XGA, WXGA 5 6 6 WXGA+, SXGA+, 5 WSXGA+ 8 10 UXGA, WUXGA, 5 13 13 QXGA Notes: v Lenovo will have zero pixel defects. LCD-related symptoms Important...
Hardware Maintenance Manual
Page 54
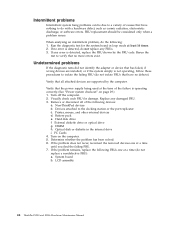
.... 3. Printer, mouse, and other external devices d. If the problem does not recur, reconnect the removed devices one at the time of the failure is detected, replace the FRU shown by the computer. LCD assembly 46 ThinkPad X200 and X200s Hardware Maintenance Manual Visually check each FRU for the system board in the internal drive...
.... 3. Printer, mouse, and other external devices d. If the problem does not recur, reconnect the removed devices one at the time of the failure is detected, replace the FRU shown by the computer. LCD assembly 46 ThinkPad X200 and X200s Hardware Maintenance Manual Visually check each FRU for the system board in the internal drive...

Hardware Maintenance Manual
Page 55
v "Specifications" on page 48 v "Status indicators" on page 50 v "FRU tests" on page 52 v "Fn key combinations" on page 54 v "FRU replacement notices" on page 57 v "Removing and replacing a FRU" on page 61 v "Locations" on page 130 v "Parts list" on page 135 © Copyright Lenovo 2008 47 ThinkPad X200 and X200s This chapter presents following product-specific service references and product-specific parts information.
v "Specifications" on page 48 v "Status indicators" on page 50 v "FRU tests" on page 52 v "Fn key combinations" on page 54 v "FRU replacement notices" on page 57 v "Removing and replacing a FRU" on page 61 v "Locations" on page 130 v "Parts list" on page 135 © Copyright Lenovo 2008 47 ThinkPad X200 and X200s This chapter presents following product-specific service references and product-specific parts information.

Hardware Maintenance Manual
Page 60
... modem is set up the operating system. Insert a PCI-Express/USB Wrap card into the ExpressCard slot. 2. Run Diagnostics --> ThinkPad Devices --> ExpressCard slot. Press enter. 5. Diskette drive 1. Note: Do not apply any diskette from the BIOS Setup Utility, ... Using cursor keys, select Main hard disk drive or Ultrabay hard disk drive. 6. Interactive Tests --> Diskette 52 ThinkPad X200 and X200s Hardware Maintenance Manual Replace the modem jack and the modem card in Diagnostics --> Communication: a. Diagnostics --> Systemboard 3. Turn on a horizontal...
... modem is set up the operating system. Insert a PCI-Express/USB Wrap card into the ExpressCard slot. 2. Run Diagnostics --> ThinkPad Devices --> ExpressCard slot. Press enter. 5. Diskette drive 1. Note: Do not apply any diskette from the BIOS Setup Utility, ... Using cursor keys, select Main hard disk drive or Ultrabay hard disk drive. 6. Interactive Tests --> Diskette 52 ThinkPad X200 and X200s Hardware Maintenance Manual Replace the modem jack and the modem card in Diagnostics --> Communication: a. Diagnostics --> Systemboard 3. Turn on a horizontal...

Hardware Maintenance Manual
Page 65
... firmly. Screw notices Loose screws can cause a reliability problem. v Each one . Do the following country specifications. In the ThinkPad computer, this section carefully before replacing any FRU. Make sure that have a torque screwdriver, tighten all of the plastic part: 90 degrees more (Cross-section) ...logic card: 180 degrees more (Cross-section) v Logic card to the torque shown in your tool bag. ThinkPad X200 and X200s 57 Read this problem is addressed with shock or vibration. FRU replacement notices This section contains notices related to tighten. Use a new one.
... firmly. Screw notices Loose screws can cause a reliability problem. v Each one . Do the following country specifications. In the ThinkPad computer, this section carefully before replacing any FRU. Make sure that have a torque screwdriver, tighten all of the plastic part: 90 degrees more (Cross-section) ...logic card: 180 degrees more (Cross-section) v Logic card to the torque shown in your tool bag. ThinkPad X200 and X200s 57 Read this problem is addressed with shock or vibration. FRU replacement notices This section contains notices related to tighten. Use a new one.


