
User Manual
Page 5
... Using a recovery repair diskette 54 Installing or reinstalling device drivers . . . . . 55 Setting a rescue device in the startup sequence . . 56 Solving recovery problems 56 Chapter 4. Installing options and replacing hardware 13 Handling static-sensitive devices 13 Installing options and replacing hardware . . . . 13 Installing external options 14 Removing the computer cover 14 Removing and reinstalling the front bezel . . . 16 Installing or replacing a memory module . . . 16 Installing or replacing a PCI card 18 Installing internal drives 21 Replacing the primary hard disk...
... Using a recovery repair diskette 54 Installing or reinstalling device drivers . . . . . 55 Setting a rescue device in the startup sequence . . 56 Solving recovery problems 56 Chapter 4. Installing options and replacing hardware 13 Handling static-sensitive devices 13 Installing options and replacing hardware . . . . 13 Installing external options 14 Removing the computer cover 14 Removing and reinstalling the front bezel . . . 16 Installing or replacing a memory module . . . 16 Installing or replacing a PCI card 18 Installing internal drives 21 Replacing the primary hard disk...
User Manual
Page 9
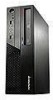
...Intel Celeron dual-core processor v Intel Pentium® dual-core processor v Intel Core™ 2 Duo processor v Intel Core 2 Quad processor v Internal cache (size varies by model type) Memory v Supports up to two double data rate 2 dual inline memory modules (DDR2 DIMMs) Internal drives v Diskette drive or card reader (varies by model type) v Optical drive v Serial Advanced Technology Attachment (SATA) internal hard disk drive Video subsystem v Integrated graphics card for a discrete graphics card © Copyright Lenovo 2009 1 System information The following information covers a variety...
...Intel Celeron dual-core processor v Intel Pentium® dual-core processor v Intel Core™ 2 Duo processor v Intel Core 2 Quad processor v Internal cache (size varies by model type) Memory v Supports up to two double data rate 2 dual inline memory modules (DDR2 DIMMs) Internal drives v Diskette drive or card reader (varies by model type) v Optical drive v Serial Advanced Technology Attachment (SATA) internal hard disk drive Video subsystem v Integrated graphics card for a discrete graphics card © Copyright Lenovo 2009 1 System information The following information covers a variety...

User Manual
Page 10
...) audio v Microphone connector and headphone connector on the front panel v Audio line-in connector, audio line-out connector, and microphone connector on the rear panel v Internal speaker (some models) Connectivity v 10/100/1000 Mbps integrated Ethernet controller v PCI V.90 Data/Fax modem (some models) System management features v Ability to store power-on self-test (POST) hardware test results v Automatic power-on startup v Preboot Execution Environment (PXE) v Remote Administration v System Management (SM) Basic Input/Output System (BIOS) and SM software v Wake on LAN v Wake...
...) audio v Microphone connector and headphone connector on the front panel v Audio line-in connector, audio line-out connector, and microphone connector on the rear panel v Internal speaker (some models) Connectivity v 10/100/1000 Mbps integrated Ethernet controller v PCI V.90 Data/Fax modem (some models) System management features v Ability to store power-on self-test (POST) hardware test results v Automatic power-on startup v Preboot Execution Environment (PXE) v Remote Administration v System Management (SM) Basic Input/Output System (BIOS) and SM software v Wake on LAN v Wake...

User Manual
Page 58
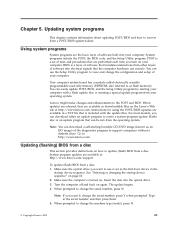
... hard disk drive will be deleted and replaced by the factory default settings. See "Installing or reinstalling device drivers" on page 55 for this option) 50 User Guide Insert the boot disc into your CD or DVD drive. 2. Follow the instructions on the screen. Depending on the type of your hard disk drive v On a secondary hard disk drive installed in your recovery media, select the proper startup device and press Enter. Depending on the type of your recovery media, connect your boot medium (memory key or USB hard disk drive) to reinstall some software...
... hard disk drive will be deleted and replaced by the factory default settings. See "Installing or reinstalling device drivers" on page 55 for this option) 50 User Guide Insert the boot disc into your CD or DVD drive. 2. Follow the instructions on the screen. Depending on the type of your hard disk drive v On a secondary hard disk drive installed in your recovery media, select the proper startup device and press Enter. Depending on the type of your recovery media, connect your boot medium (memory key or USB hard disk drive) to reinstall some software...

User Manual
Page 63
... see "Creating and using rescue media" on the software media that you want to install the device driver using rescue media, see a logo screen, release the F11 key. Use a rescue medium to display the directory structure of the following : 1. Turn on the screen. Use Windows Explorer or My Computer to access the Rescue and Recovery workspace. Within the DRIVERS folder, there are also available at http://www.lenovo.com/ support. Double-click...
... see "Creating and using rescue media" on the software media that you want to install the device driver using rescue media, see a logo screen, release the F11 key. Use a rescue medium to display the directory structure of the following : 1. Turn on the screen. Use Windows Explorer or My Computer to access the Rescue and Recovery workspace. Within the DRIVERS folder, there are also available at http://www.lenovo.com/ support. Double-click...

User Manual
Page 66
... to the SATA controller (such as hard disk drives or the optical drive) are responsible for maintaining the settings of several computers, you might want . After you set an Administrator Password, a password prompt is displayed each time the computer is turned on how to enable or disable user access to the following devices: SATA Controller Floppy A When this feature is set to Disabled, the diskette drive cannot be accessed. 58 User Guide Start the Setup Utility program. Enabling or disabling a device This...
... to the SATA controller (such as hard disk drives or the optical drive) are responsible for maintaining the settings of several computers, you might want . After you set an Administrator Password, a password prompt is displayed each time the computer is turned on how to enable or disable user access to the following devices: SATA Controller Floppy A When this feature is set to Disabled, the diskette drive cannot be accessed. 58 User Guide Start the Setup Utility program. Enabling or disabling a device This...
User Manual
Page 69
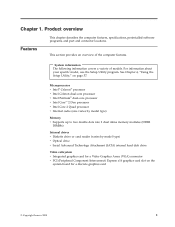
..., the BIOS code, and the Setup Utility program. You can use is set of the diagnostics program to update (flash) BIOS from your computer with the update files. You can download a self-starting your operating system. Note: You can easily update POST, BIOS, and the Setup Utility program by starting bootable CD/DVD image (known as downloadable files on your computer. Insert the disc into your computer. Chapter 5. Instructions for using the POST/BIOS updates are the...
..., the BIOS code, and the Setup Utility program. You can use is set of the diagnostics program to update (flash) BIOS from your computer with the update files. You can download a self-starting your operating system. Note: You can easily update POST, BIOS, and the Setup Utility program by starting bootable CD/DVD image (known as downloadable files on your computer. Insert the disc into your computer. Chapter 5. Instructions for using the POST/BIOS updates are the...
User Manual
Page 70
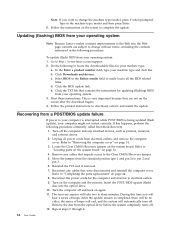
... impede access to the Clear CMOS/Recovery jumper. 5. Turn off . 12. The recovery session will automatically turn off and back on the screen after the download begins. 4. During this happens, perform the following to locate the downloadable files for updating (flashing) BIOS from the optical drive before the system completely turns off the computer and any attached devices, such as printers, monitors, and external drives. 2. Note: If you will hear a series of beeps will...
... impede access to the Clear CMOS/Recovery jumper. 5. Turn off . 12. The recovery session will automatically turn off and back on the screen after the download begins. 4. During this happens, perform the following to locate the downloadable files for updating (flashing) BIOS from the optical drive before the system completely turns off the computer and any attached devices, such as printers, monitors, and external drives. 2. Note: If you will hear a series of beeps will...
User Manual
Page 80
... use the left panel to find a particular word or phrase. v Purchase additional services, such as : v Client Security Solution v Power Manager v Product Recovery v Rescue and Recovery v System Update Note: The ThinkVantage Productivity Center is only available on Windows 7, click Start → Help and Support → Lenovo Access Help. Note: The Lenovo Welcome program is provided with Windows Vista or Windows XP from Lenovo. After you make a selection from Lenovo. v Purchase upgrades and extended hardware repair services. Access...
... use the left panel to find a particular word or phrase. v Purchase additional services, such as : v Client Security Solution v Power Manager v Product Recovery v Rescue and Recovery v System Update Note: The ThinkVantage Productivity Center is only available on Windows 7, click Start → Help and Support → Lenovo Access Help. Note: The Lenovo Welcome program is provided with Windows Vista or Windows XP from Lenovo. After you make a selection from Lenovo. v Purchase upgrades and extended hardware repair services. Access...
User Manual
Page 86
... 67 PCI card 18 connectors 18 installing 18 physical specifications 4 power Advanced Configuration and Power Interface (ACPI) support 3 features 2 power supply assembly, replacing 34 Power-On Password 58 78 User Guide power-on self-test (POST) 61 productivity center, ThinkVantage 71 programs, updating system 61 protection, password 46 purchasing additional services 74 R rear connectors 9 rear fan assembly, replacing 40 recovering from a POST/BIOS update failure 62 software 49 recovery boot-block 62 operations, backup and 50 problems, solving 56 recovery repair diskette, creating and using 54...
... 67 PCI card 18 connectors 18 installing 18 physical specifications 4 power Advanced Configuration and Power Interface (ACPI) support 3 features 2 power supply assembly, replacing 34 Power-On Password 58 78 User Guide power-on self-test (POST) 61 productivity center, ThinkVantage 71 programs, updating system 61 protection, password 46 purchasing additional services 74 R rear connectors 9 rear fan assembly, replacing 40 recovering from a POST/BIOS update failure 62 software 49 recovery boot-block 62 operations, backup and 50 problems, solving 56 recovery repair diskette, creating and using 54...
User Manual
Page 87
... connectors 12 locating parts 12 locations 12 memory module 16 T television output notice 76 temporary startup device 59 ThinkVantage productivity center 71 trademarks 76 troubleshooting, basic 65 troubleshooting, diagnostics 65 U updating (flashing) BIOS 61 system programs 61 updating (flashing) BIOS 62 USB connector 10 using diagnostic programs 73 documentation 73 other services 74 passwords 57 recovery repair diskette, creating and using 54 rescue media, creating and 53 Setup Utility 57 utility program, starting 57 V VGA monitor connector 10 video subsystem 1 viewing and changing settings...
... connectors 12 locating parts 12 locations 12 memory module 16 T television output notice 76 temporary startup device 59 ThinkVantage productivity center 71 trademarks 76 troubleshooting, basic 65 troubleshooting, diagnostics 65 U updating (flashing) BIOS 61 system programs 61 updating (flashing) BIOS 62 USB connector 10 using diagnostic programs 73 documentation 73 other services 74 passwords 57 recovery repair diskette, creating and using 54 rescue media, creating and 53 Setup Utility 57 utility program, starting 57 V VGA monitor connector 10 video subsystem 1 viewing and changing settings...
Hardware Maintenance Manual
Page 5
... board 72 Replacing the heat sink and fan assembly . . . . 74 Replacing the microprocessor 75 Replacing a memory module 79 Installing or replacing an adapter card . . . . . 80 Replacing the primary hard disk drive. . . . . . 82 Replacing the secondary hard disk drive . . . . 85 Replacing an optical drive 88 Replacing the diskette drive or card reader . . . 88 Replacing the front fan assembly 90 Replacing the rear fan assembly 91 Replacing the front audio/USB assembly . . . . 93 Replacing the power switch/LED assembly . . . 93 Replacing the CMOS battery 94 Replacing the Internal speaker...
... board 72 Replacing the heat sink and fan assembly . . . . 74 Replacing the microprocessor 75 Replacing a memory module 79 Installing or replacing an adapter card . . . . . 80 Replacing the primary hard disk drive. . . . . . 82 Replacing the secondary hard disk drive . . . . 85 Replacing an optical drive 88 Replacing the diskette drive or card reader . . . 88 Replacing the front fan assembly 90 Replacing the rear fan assembly 91 Replacing the front audio/USB assembly . . . . 93 Replacing the power switch/LED assembly . . . 93 Replacing the CMOS battery 94 Replacing the Internal speaker...

Hardware Maintenance Manual
Page 39
... incorrect drive. What, when, where, single, or multiple systems? - Power-on page 33. Data or programs can be overwritten if you hear beep codes during write operations such as copying, saving, or formatting. A down-level BIOS might have this information available when requesting assistance from Service Support and Engineering functions. • Machine type and model • Processor or hard disk upgrades • Failure symptom - Check all external devices. 5.
... incorrect drive. What, when, where, single, or multiple systems? - Power-on page 33. Data or programs can be overwritten if you hear beep codes during write operations such as copying, saving, or formatting. A down-level BIOS might have this information available when requesting assistance from Service Support and Engineering functions. • Machine type and model • Processor or hard disk upgrades • Failure symptom - Check all external devices. 5.
Hardware Maintenance Manual
Page 46
... a Power-On Password is set a Privileged Access Password. From the Setup Utility program menu, select Devices ® ATA Drives Setup ® SATA Controller. 3. Select the desired devices and settings and press Enter. 40 ThinkCentre Hardware Maintenance Manual • Not be your name or your user name • Not be a common word or a common name • Be significantly different from changing configuration settings. For more information, see "Password considerations" on page 39. 2. See Chapter 6 "Diagnostics, Test and Recovery...
... a Power-On Password is set a Privileged Access Password. From the Setup Utility program menu, select Devices ® ATA Drives Setup ® SATA Controller. 3. Select the desired devices and settings and press Enter. 40 ThinkCentre Hardware Maintenance Manual • Not be your name or your user name • Not be a common word or a common name • Be significantly different from changing configuration settings. For more information, see "Password considerations" on page 39. 2. See Chapter 6 "Diagnostics, Test and Recovery...
Hardware Maintenance Manual
Page 69
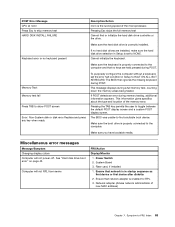
.... Power Switch 2. Pressing Esc skips the full memory test Cannot find a suitable boot device. See "Hard disk drive boot error" on page 43. System Board 3. Network adapter (Advise network administrator of the microprocessor. If no keys are installed, make sure the hard disk drive selection in startup sequence as first device or first device after diskette 2. This information gives specifics about the type and location of the memory error. Miscellaneous error messages Message/Symptom Changing display colors Computer will not RPL from server...
.... Power Switch 2. Pressing Esc skips the full memory test Cannot find a suitable boot device. See "Hard disk drive boot error" on page 43. System Board 3. Network adapter (Advise network administrator of the microprocessor. If no keys are installed, make sure the hard disk drive selection in startup sequence as first device or first device after diskette 2. This information gives specifics about the type and location of the memory error. Miscellaneous error messages Message/Symptom Changing display colors Computer will not RPL from server...

Hardware Maintenance Manual
Page 71
... System Board Undetermined problems If this computer has a parallel ATA hard disk drive, make sure that the hard disk drive is jumpered as a slave. 1. External devices (modem, printer, or mouse) b. Power-on the keyboard do not work 1. External Device 3. External Device 3. a. Diskette drive 3. If all keys on the computer to -FRU Index 65 Check startup sequence 2. System Board Serial or parallel port device failure (adapter port) 1. Remove or disconnect the following components (if installed) one at a time. Memory modules d. Diskette Drive Cable 4. RPL...
... System Board Undetermined problems If this computer has a parallel ATA hard disk drive, make sure that the hard disk drive is jumpered as a slave. 1. External devices (modem, printer, or mouse) b. Power-on the keyboard do not work 1. External Device 3. External Device 3. a. Diskette drive 3. If all keys on the computer to -FRU Index 65 Check startup sequence 2. System Board Serial or parallel port device failure (adapter port) 1. Remove or disconnect the following components (if installed) one at a time. Memory modules d. Diskette Drive Cable 4. RPL...
Hardware Maintenance Manual
Page 85
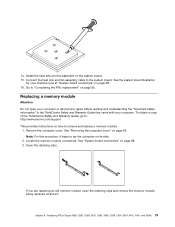
... procedure, it helps to : http://www.lenovo.com/support This provides instructions on the system board. 15. If you are replacing an old memory module, open your computer or attempt any repair before reading and understanding the "Important safety information" in the ThinkCentre Safety and Warranty Guide that came with your machine type at "System board connectors" on page 68. 16. See the...
... procedure, it helps to : http://www.lenovo.com/support This provides instructions on the system board. 15. If you are replacing an old memory module, open your computer or attempt any repair before reading and understanding the "Important safety information" in the ThinkCentre Safety and Warranty Guide that came with your machine type at "System board connectors" on page 68. 16. See the...
Hardware Maintenance Manual
Page 528
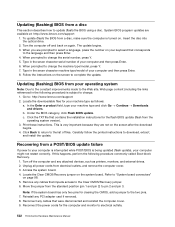
... BIOS using a disc. Click Back to return to the list of your computer and then press Enter. 8. Remove any PCI adapter card if removed. 8. When you are prompted to select a language, press the number on the screen to complete the update. Follow the instructions on your keyboard that were disconnected and reinstall the computer cover. 9. Locate the downloadable files for the computer and monitor to electrical outlets. 522 ThinkCentre Hardware Maintenance Manual...
... BIOS using a disc. Click Back to return to the list of your computer and then press Enter. 8. Remove any PCI adapter card if removed. 8. When you are prompted to select a language, press the number on the screen to complete the update. Follow the instructions on your keyboard that were disconnected and reinstall the computer cover. 9. Locate the downloadable files for the computer and monitor to electrical outlets. 522 ThinkCentre Hardware Maintenance Manual...
Hardware Maintenance Manual
Page 529
.... Remove the disc from the two pins. 15. Replace the Clear CMOS/Recovery jumper to three minutes. Automatic configuration and power interface (ACPI) BIOS Being an ACPI BIOS system, the operating system is detected on the internal modem. • PCI Wake Up: This feature allows PCI cards that support this capability to Enabled, the computer will be turned on LAN feature. Additional Service Information 523 Insert the POST/BIOS update (flash) disc into the optical drive. 11. Reconnect any cables...
.... Remove the disc from the two pins. 15. Replace the Clear CMOS/Recovery jumper to three minutes. Automatic configuration and power interface (ACPI) BIOS Being an ACPI BIOS system, the operating system is detected on the internal modem. • PCI Wake Up: This feature allows PCI cards that support this capability to Enabled, the computer will be turned on LAN feature. Additional Service Information 523 Insert the POST/BIOS update (flash) disc into the optical drive. 11. Reconnect any cables...
Hardware Maintenance Manual
Page 533
...advanced settings 41 B battery, replacing 101 bezel, replacing 70 BIOS, updating (flashing) 522 boot-block recovery 522 C card reader, replacing 116 changing password 40 startup device sequence 41 considerations, passwords 39 cover removing 69 D deleting password 40 diskette drive or card reader, replacing 88 E environment, operating 30 exiting, setup utility 41 F failure, recovering from POST/BIOS 522 flashing BIOS 522 front bezel bezel, removing 70 front fan assembly, replacing 90 H hard disk drive, replacing 110 heat sink and fan assembly, replacing 74, 109 I installing options adapter card...
...advanced settings 41 B battery, replacing 101 bezel, replacing 70 BIOS, updating (flashing) 522 boot-block recovery 522 C card reader, replacing 116 changing password 40 startup device sequence 41 considerations, passwords 39 cover removing 69 D deleting password 40 diskette drive or card reader, replacing 88 E environment, operating 30 exiting, setup utility 41 F failure, recovering from POST/BIOS 522 flashing BIOS 522 front bezel bezel, removing 70 front fan assembly, replacing 90 H hard disk drive, replacing 110 heat sink and fan assembly, replacing 74, 109 I installing options adapter card...


