Hardware Maintenance Manual
Page 5
... symptoms 42 LCD-related symptoms 43 Intermittent problems 43 Undetermined problems 44 ThinkPad T61, R61, and R61i (14.1-inch widescreen 45 Specifications 45 Status indicators 49 FRU tests 52 Fn key combinations 54 FRU replacement notices 57 Screw notices 57 Retaining serial numbers 58 Removing and replacing a FRU 60 1010 Battery pack 61 1020 Ultrabay Slim device or Ultrabay Enhanced device 62 1030 Hard disk drive (HDD) cover, HDD, and HDD rubber rails...
... symptoms 42 LCD-related symptoms 43 Intermittent problems 43 Undetermined problems 44 ThinkPad T61, R61, and R61i (14.1-inch widescreen 45 Specifications 45 Status indicators 49 FRU tests 52 Fn key combinations 54 FRU replacement notices 57 Screw notices 57 Retaining serial numbers 58 Removing and replacing a FRU 60 1010 Battery pack 61 1020 Ultrabay Slim device or Ultrabay Enhanced device 62 1030 Hard disk drive (HDD) cover, HDD, and HDD rubber rails...

Hardware Maintenance Manual
Page 10
... you from electrical shock. v If you work on electrical equipment. Observe the special safety precautions when you need to switch off . 2 ThinkPad T61, R61, and R61i (14.1-inch widescreen) Hardware Maintenance Manual Electrical safety Observe the following precautions: - v Disconnect all power before: - Do not obstruct fan louvers or cover them with labels or stickers. Important: Use only approved tools and test equipment...
... you from electrical shock. v If you work on electrical equipment. Observe the special safety precautions when you need to switch off . 2 ThinkPad T61, R61, and R61i (14.1-inch widescreen) Hardware Maintenance Manual Electrical safety Observe the following precautions: - v Disconnect all power before: - Do not obstruct fan louvers or cover them with labels or stickers. Important: Use only approved tools and test equipment...
Hardware Maintenance Manual
Page 24
... configuration settings (using the View Configuration option); Strategy for a customer to it is displayed, begin the diagnosis with the first error code. Strategy for replacing FRUs for CTO, CMV, and GAV Product definition Dynamic Configure To Order (CTO) This provides the ability for replacing a hard disk drive Always try to prevent cracking at each BGA (Ball Grid Array) chipset. The machine label, Product Entitlement 16 ThinkPad T61...
... configuration settings (using the View Configuration option); Strategy for a customer to it is displayed, begin the diagnosis with the first error code. Strategy for replacing FRUs for CTO, CMV, and GAV Product definition Dynamic Configure To Order (CTO) This provides the ability for replacing a hard disk drive Always try to prevent cracking at each BGA (Ball Grid Array) chipset. The machine label, Product Entitlement 16 ThinkPad T61...
Hardware Maintenance Manual
Page 29
... 21 Drives in this chapter apply to do not replace the FRU. "PC-Doctor for DOS diagnostics program. v A FRU should service the computer. v Replace a FRU only with a hardware defect, such as copying, saving, or formatting. Consider replacing a FRU only when a problem recurs. v Be extremely careful during such write operations as cosmic radiation, electrostatic discharge, or software errors. If you replace FRUs, use new nylon...
... 21 Drives in this chapter apply to do not replace the FRU. "PC-Doctor for DOS diagnostics program. v A FRU should service the computer. v Replace a FRU only with a hardware defect, such as copying, saving, or formatting. Consider replacing a FRU only when a problem recurs. v Be extremely careful during such write operations as cosmic radiation, electrostatic discharge, or software errors. If you replace FRUs, use new nylon...
Hardware Maintenance Manual
Page 32
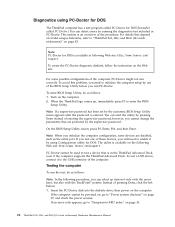
... as the serial port. The utility is available on page 45. If an error code appears, go to initialize the computer setup by use of these devices, you will need to "Power system checkout" on page 36. 24 ThinkPad T61, R61, and R61i (14.1-inch widescreen) Hardware Maintenance Manual To enter BIOS Setup Utility, do as follows: Note: In the following procedure, you need to test a device that are disabled, such as...
... as the serial port. The utility is available on page 45. If an error code appears, go to initialize the computer setup by use of these devices, you will need to "Power system checkout" on page 36. 24 ThinkPad T61, R61, and R61i (14.1-inch widescreen) Hardware Maintenance Manual To enter BIOS Setup Utility, do as follows: Note: In the following procedure, you need to test a device that are disabled, such as...
Hardware Maintenance Manual
Page 33
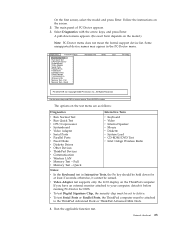
... arrow keys, and press Enter. Quick v Keyboard v Video v Internal Speaker v Mouse v Diskette v System Load v CD-ROM/DVD Test v Intel 11abgn Wireless Radio Notes: v In the Keyboard test in menus. Some unsupported device names may appear in the PC-Doctor menu. On the first screen, select the model and press Enter. Diagnostics Interactive Tests Run Normal Test Run Quick Test CPU/Coprocessor Systemboard Video Adapter Serial Ports Parallel Ports Fixed Disks Diskette Drives Other Devices Communication Wireless LAN Memory Test - Full v Memory...
... arrow keys, and press Enter. Quick v Keyboard v Video v Internal Speaker v Mouse v Diskette v System Load v CD-ROM/DVD Test v Intel 11abgn Wireless Radio Notes: v In the Keyboard test in menus. Some unsupported device names may appear in the PC-Doctor menu. On the first screen, select the model and press Enter. Diagnostics Interactive Tests Run Normal Test Run Quick Test CPU/Coprocessor Systemboard Video Adapter Serial Ports Parallel Ports Fixed Disks Diskette Drives Other Devices Communication Wireless LAN Memory Test - Full v Memory...
Hardware Maintenance Manual
Page 34
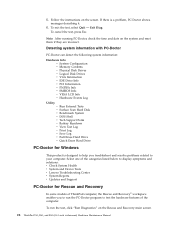
... LCD Info v Hardware Events Log Utility v Run External Tests v Surface Scan Hard Disk v Benchmark System v DOS Shell v Tech Support Form v Battery Rundown v View Test Log v Print Log v Save Log v Full Erase Hard Drive v Quick Erase Hard Drive PC-Doctor for Rescue and Recovery In some models of the categories listed below to display symptoms and solutions: v Check System Health v System and Device Tests v Lenovo Troubleshooting Center v System Reports v Updates and Support PC...
... LCD Info v Hardware Events Log Utility v Run External Tests v Surface Scan Hard Disk v Benchmark System v DOS Shell v Tech Support Form v Battery Rundown v View Test Log v Print Log v Save Log v Full Erase Hard Drive v Quick Erase Hard Drive PC-Doctor for Rescue and Recovery In some models of the categories listed below to display symptoms and solutions: v Check System Health v System and Device Tests v Lenovo Troubleshooting Center v System Reports v Updates and Support PC...
Hardware Maintenance Manual
Page 40
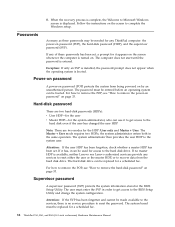
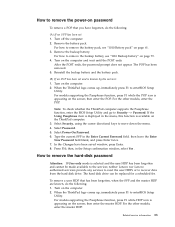
... installed, the password prompt does not appear when the operating system is entered. If no service procedure to the hard disk drive. The user must be booted. For how to remove the POP, see "How to complete the Windows setup. the system administrator enters both in the BIOS Setup Utility. Passwords As many as three passwords may be replaced for access to reset the password. If any ThinkPad computer: the power-on . Hard-disk password There are two modes...
... installed, the password prompt does not appear when the operating system is entered. If no service procedure to the hard disk drive. The user must be booted. For how to remove the POP, see "How to complete the Windows setup. the system administrator enters both in the BIOS Setup Utility. Passwords As many as three passwords may be replaced for access to reset the password. If any ThinkPad computer: the power-on . Hard-disk password There are two modes...
Hardware Maintenance Manual
Page 41
... following : 1. Remove the battery pack. Remove the backup battery. Turn on the computer and wait until the POST ends. then enter the POP. Select Power-On Password. 6. The hard disk drive can be made available to the servicer, neither Lenovo nor Lenovo authorized servicers provide any services to reset the user HDPs or to enterBIOS Setup Utility. When the ThinkPad logo comes up , immediately press F1 to recover data from the hard disk drive. Turn on the...
... following : 1. Remove the battery pack. Remove the backup battery. Turn on the computer and wait until the POST ends. then enter the POP. Select Power-On Password. 6. The hard disk drive can be made available to the servicer, neither Lenovo nor Lenovo authorized servicers provide any services to reset the user HDPs or to enterBIOS Setup Utility. When the ThinkPad logo comes up , immediately press F1 to recover data from the hard disk drive. Turn on the...
Hardware Maintenance Manual
Page 42
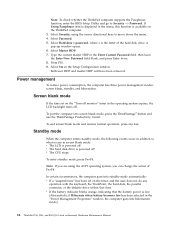
... Setup Configuration window. To end screen blank mode and resume normal operation, press any operation with the keyboard, the TrackPoint, the hard disk, the parallel connector, or the diskette drive within that the battery power is low. (Alternatively, if Hibernate when battery becomes low has been selected in the "Power Management Properties" window, the computer goes into hibernation mode.) 34 ThinkPad T61, R61, and R61i (14.1-inch widescreen) Hardware Maintenance Manual To enter standby mode...
... Setup Configuration window. To end screen blank mode and resume normal operation, press any operation with the keyboard, the TrackPoint, the hard disk, the parallel connector, or the diskette drive within that the battery power is low. (Alternatively, if Hibernate when battery becomes low has been selected in the "Power Management Properties" window, the computer goes into hibernation mode.) 34 ThinkPad T61, R61, and R61i (14.1-inch widescreen) Hardware Maintenance Manual To enter standby mode...
Hardware Maintenance Manual
Page 43
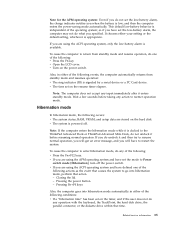
... or ThinkPad Advanced Mini Dock, do any of the following : v Press the Fn key. v Open the LCD cover. Note: If the computer enters the hibernation mode while it before taking any input immediately after it and then try to Power switch mode [Hibernation], turn off . v If you are using the ACPI operating system, only the low-battery alarm is signaled by a serial device or a PC Card device. Related service...
... or ThinkPad Advanced Mini Dock, do any of the following : v Press the Fn key. v Open the LCD cover. Note: If the computer enters the hibernation mode while it before taking any input immediately after it and then try to Power switch mode [Hibernation], turn off . v If you are using the ACPI operating system, only the low-battery alarm is signaled by a serial device or a PC Card device. Related service...
Hardware Maintenance Manual
Page 44
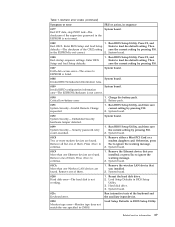
... be replaced next. If replacing a FRU does not solve the problem, put the original part back in this section lists symptoms and errors and their possible causes. Note: For a device not supported by pressing F10. 2. Run BIOS Setup Utility, and save the current setting by diagnostic codes in the ThinkPad computers, see the manual for each error detected in boldface type. v If you determine, during regular servicing, what...
... be replaced next. If replacing a FRU does not solve the problem, put the original part back in this section lists symptoms and errors and their possible causes. Note: For a device not supported by pressing F10. 2. Run BIOS Setup Utility, and save the current setting by diagnostic codes in the ThinkPad computers, see the manual for each error detected in boldface type. v If you determine, during regular servicing, what...
Hardware Maintenance Manual
Page 45
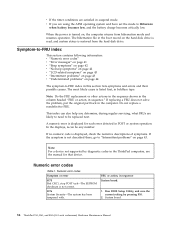
... the hard disk drive. 2. Load Setup Defaults in BIOS Setup Utility. Numeric error codes (continued) Symptom or error FRU or action, in the EEPROM is not correct. 0190 Critical low-battery error 1. Charge the battery pack. 2. Security password retry count exceeded. 1. or press Esc to load the default setting. Remove the wireless LAN device that you installed. 2. Press F9, and Bad CRC2. Press F9, and Enter to ignore the warning message. 2. System board. 0188 System board. Battery...
... the hard disk drive. 2. Load Setup Defaults in BIOS Setup Utility. Numeric error codes (continued) Symptom or error FRU or action, in the EEPROM is not correct. 0190 Critical low-battery error 1. Charge the battery pack. 2. Security password retry count exceeded. 1. or press Esc to load the default setting. Remove the wireless LAN device that you installed. 2. Press F9, and Bad CRC2. Press F9, and Enter to ignore the warning message. 2. System board. 0188 System board. Battery...
Hardware Maintenance Manual
Page 46
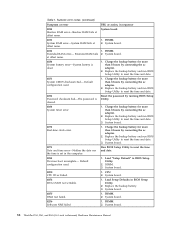
Charge the backup battery for more than 8 hours by connecting the ac adapter. 2. Charge the backup battery for more than 8 hours by connecting the ac adapter. 2. System board. 02F0 CPU ID:xx Failed. 1. System board. 02F4 EISA CMOS not writable. 1. Replace the backup battery. 3. System board. 02F6 Software NMI failed 1. Table 1. Extended RAM error- System board. 0270 Real-time clock error. 1. Run BIOS Setup Utility to reset the time and date. 0252 Password checksum bad-The password is cleared. Default configuration used . 1. Numeric error codes (...
Charge the backup battery for more than 8 hours by connecting the ac adapter. 2. Charge the backup battery for more than 8 hours by connecting the ac adapter. 2. System board. 02F0 CPU ID:xx Failed. 1. System board. 02F4 EISA CMOS not writable. 1. Replace the backup battery. 3. System board. 02F6 Software NMI failed 1. Table 1. Extended RAM error- System board. 0270 Real-time clock error. 1. Run BIOS Setup Utility to reset the time and date. 0252 Password checksum bad-The password is cleared. Default configuration used . 1. Numeric error codes (...
Hardware Maintenance Manual
Page 47
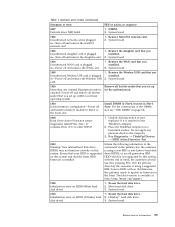
... set up within your HDD is supported on HDD0 (Main hard disk drive) 1. Undock docking station or port replicator if it by this system, with an old firmware, the customer needs to update its firmware to Slot-0 or the lower slot. If in -Power off and remove the miniPCI network card. 1. Remove all but the reader that you set up for the authentication. 1830 Invalid memory configuration-Power off and install a memory module to the latest. Install...
... set up within your HDD is supported on HDD0 (Main hard disk drive) 1. Undock docking station or port replicator if it by this system, with an old firmware, the customer needs to update its firmware to Slot-0 or the lower slot. If in -Power off and remove the miniPCI network card. 1. Remove all but the reader that you set up for the authentication. 1830 Invalid memory configuration-Power off and install a memory module to the latest. Install...
Hardware Maintenance Manual
Page 50
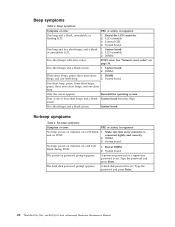
... with error codes. DIMM. System board No-beep symptoms Table 4. Type the password and press Enter. The hard-disk password prompt appears. POST error. Two short beeps and a blank screen. 1. beeps, and one short beep. System board. A hard-disk password is and no POST. LCD assembly. 3. System board. 2. System board. 2. Reinstall the operating system. Type the password and press Enter. 42 ThinkPad T61, R61, and R61i (14.1-inch widescreen) Hardware Maintenance Manual External CRT. 4. System board. No beep, power-on indicator...
... with error codes. DIMM. System board No-beep symptoms Table 4. Type the password and press Enter. The hard-disk password prompt appears. POST error. Two short beeps and a blank screen. 1. beeps, and one short beep. System board. A hard-disk password is and no POST. LCD assembly. 3. System board. 2. System board. 2. Reinstall the operating system. Type the password and press Enter. 42 ThinkPad T61, R61, and R61i (14.1-inch widescreen) Hardware Maintenance Manual External CRT. 4. System board. No beep, power-on indicator...
Hardware Maintenance Manual
Page 52
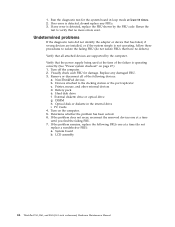
... supported by the FRU code. Turn off the computer. 2. Replace any error is operating correctly. (See "Power system checkout" on the computer. 5. Printer, mouse, and other external devices d. LCD assembly 44 ThinkPad T61, R61, and R61i (14.1-inch widescreen) Hardware Maintenance Manual Undetermined problems If the diagnostic tests did not identify the adapter or device that all of the failure is detected, replace the FRU shown by the computer. Battery pack e. Hard disk drive...
... supported by the FRU code. Turn off the computer. 2. Replace any error is operating correctly. (See "Power system checkout" on the computer. 5. Printer, mouse, and other external devices d. LCD assembly 44 ThinkPad T61, R61, and R61i (14.1-inch widescreen) Hardware Maintenance Manual Undetermined problems If the diagnostic tests did not identify the adapter or device that all of the failure is detected, replace the FRU shown by the computer. Battery pack e. Hard disk drive...

Hardware Maintenance Manual
Page 60
... Main hard disk drive or Ultrabay hard disk drive. 6. Interactive Tests --> Diskette 52 ThinkPad T61, R61, and R61i (14.1-inch widescreen) Hardware Maintenance Manual FRU tests The following tests in turn, and run the following table shows the test for each FRU. Diagnostics --> Video Adapter 2. Run Diagnostics --> ThinkPad Devices --> ExpressCard slot. While the message, "To interrupt normal startup, press the blue ThinkVangate button," is attached to enter the BIOS Setup Utility. 4. Using cursor keys, select HDD...
... Main hard disk drive or Ultrabay hard disk drive. 6. Interactive Tests --> Diskette 52 ThinkPad T61, R61, and R61i (14.1-inch widescreen) Hardware Maintenance Manual FRU tests The following tests in turn, and run the following table shows the test for each FRU. Diagnostics --> Video Adapter 2. Run Diagnostics --> ThinkPad Devices --> ExpressCard slot. While the message, "To interrupt normal startup, press the blue ThinkVangate button," is attached to enter the BIOS Setup Utility. 4. Using cursor keys, select HDD...
Hardware Maintenance Manual
Page 62
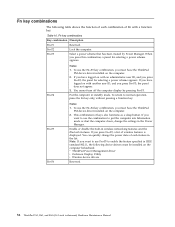
... you press this combination, a panel for selecting a power scheme appears. Enable or disable the built-in standby mode. If you press Fn+F5, a list of keys also functions as a sleep button. To return to normal operation, press the Fn key only, without pressing a function key. Fn key combinations The following device drivers must be installed on the computer beforehand: v ThinkPad Power Management driver v OnScreen Display Utility v Wireless device drivers Reserved. 54 ThinkPad T61, R61, and R61i (14.1-inch widescreen) Hardware Maintenance Manual
... you press this combination, a panel for selecting a power scheme appears. Enable or disable the built-in standby mode. If you press Fn+F5, a list of keys also functions as a sleep button. To return to normal operation, press the Fn key only, without pressing a function key. Fn key combinations The following device drivers must be installed on the computer beforehand: v ThinkPad Power Management driver v OnScreen Display Utility v Wireless device drivers Reserved. 54 ThinkPad T61, R61, and R61i (14.1-inch widescreen) Hardware Maintenance Manual
Hardware Maintenance Manual
Page 63
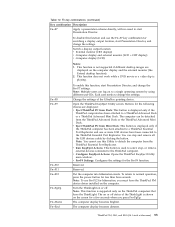
.... Open the ThinkPad EasyEject Utility screen. To return to change the Fn+F7 settings. Turn the ThinkLight on the ThinkPad computers that have the ThinkLight. ThinkPad T61, R61, and R61i (14.1-inch widescreen) 55 Reserved. Fn key combinations (continued) Key combination Description Fn+F7 Apply a presentation scheme directly, with no need to select, stop and remove all the USB devices safely by using different user IDs. To disable this function, start Presentation...
.... Open the ThinkPad EasyEject Utility screen. To return to change the Fn+F7 settings. Turn the ThinkLight on the ThinkPad computers that have the ThinkLight. ThinkPad T61, R61, and R61i (14.1-inch widescreen) 55 Reserved. Fn key combinations (continued) Key combination Description Fn+F7 Apply a presentation scheme directly, with no need to select, stop and remove all the USB devices safely by using different user IDs. To disable this function, start Presentation...


