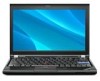
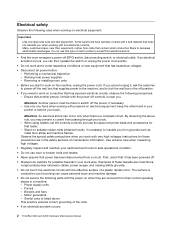
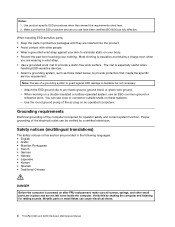
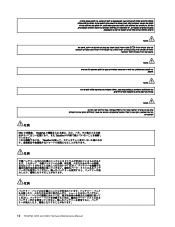
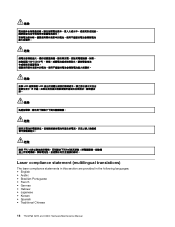
Hardware Maintenance Manual
Page 3
...UUID 59 Reading or writing the ECA information . . . 59 Chapter 8. Status indicators . . . . . 51 Chapter 6. Removing and replacing a FRU 61 Before servicing ThinkPad X220 and X220i models 62 1010 Battery pack 63 1020 Hard disk drive (HDD) and solid state drive (SSD 63 1030 DIMM 65 1040 Keyboard... 37 Restoring the factory contents by using Product Recovery discs 37 Restoring the factory contents by using PC-Doctor for DOS. . . . 28 Lenovo ThinkVantage Toolbox 31 PC-Doctor for Windows 31 PC-Doctor for wireless WAN . . 74 1090 Keyboard bezel 76 1100 LCD assembly 77 1110 Base...
Hardware Maintenance Manual
Page 4
... 100 Rear view 101 Bottom view 102 Top view (ThinkPad X220 UltraBase 103 Bottom view (ThinkPad X220 UltraBase). . . . . 103 Front View (ThinkPad Port Replicator Series 3) . . 104 Rear View (ThinkPad Port Replicator Series 3) . . 104 Front View (ThinkPad Mini Dock Series 3) . . . . 105 Rear View (ThinkPad Mini Dock Series 3) . . . . 106 Front View (ThinkPad Mini Dock Plus Series 3) . . 107 Rear View...
Hardware Maintenance Manual
Page 5
... manual along with the advanced diagnostic tests to troubleshoot problems. Important: This manual is intended only for the following ThinkPad® products. ThinkPad X220 and X220i Machine Type 4286, 4287, 4289, 4290, 4291, 4292, and 4293 Use this manual along ... Chapter 1 "Safety information" on page 1 and Chapter 2 "Important service information" on page 23. © Copyright Lenovo 2011 iii Before servicing a ThinkPad product, be sure to troubleshoot problems effectively. About this manual This manual contains service and reference information for trained service technicians...
Hardware Maintenance Manual
Page 7
...louvers on the machine help to prevent overheating of your necktie or scarf inside clothing or fasten it with labels or stickers. © Copyright Lenovo 2011 1 Lift by standing or by pushing up above your elbows. Make sure that is worn or defective. • Reinstall all covers... correctly before you service a ThinkPad Notebook. • "General safety" on page 1 • "Electrical safety" on page 2 • "Safety inspection guide" on page 16 General safety ...
Hardware Maintenance Manual
Page 8
... through your body. - Instructions for that tester. - Examples of these precautions are in the safety sections of the units. • If an electrical accident occurs: 2 ThinkPad X220 and X220i Hardware Maintenance Manual The surface is a complete circuit. such touching can cause personal injury and machine damage. • Do not service the...
Hardware Maintenance Manual
Page 9
... purpose of this inspection guide. As each machine was designed and built, required safety items were installed to get medical aid. If any obvious non-ThinkPad alterations. Begin the checks with . Check exterior covers for : a. Check the power cord for damage (loose, broken, or sharp edges). 2. ...judgment as metal filings, contamination, water or other liquids, or signs of every service task. Use a meter to the safety of non-ThinkPad features or options not covered by equalizing the charge so that the power-supply cover fasteners (screws or rivets) have not been removed or ...
Hardware Maintenance Manual
Page 10
... of the electrical outlet can be verified by shaking the computer and listening for operator safety and correct system function. You can cause electrical shorts. 4 ThinkPad X220 and X220i Hardware Maintenance Manual Notes: 1. When handling ESD-sensitive parts: • Keep the parts in place and are wearing a wrist strap. • Use...
Hardware Maintenance Manual
Page 12
DANGER Unless hot swap is allowed for the FRU being replaced, do as follows before removing it: power off the computer, unplug all power cords from electrical outlets, remove the battery pack, and disconnect any interconnecting cables. 6 ThinkPad X220 and X220i Hardware Maintenance Manual
Hardware Maintenance Manual
Page 22
Laser compliance statement (multilingual translations) The laser compliance statements in this section are provided in the following languages: • English • Arabic • Brazilian Portuguese • French • German • Hebrew • Japanese • Korean • Spanish • Traditional Chinese 16 ThinkPad X220 and X220i Hardware Maintenance Manual
Hardware Maintenance Manual
Page 30
...a system board Some components mounted on the screen to run a low-level format before doing this configuration sent to configure an IBM® or a Lenovo solution from an eSite, and have been customized. Attention: When handling a system board: • Do not drop a system board or apply any ... configuration on the hard disk to see whether the error symptom is the 4-digit MT and 3-digit CMV model (Example: 1829-W15). 24 ThinkPad X220 and X220i Hardware Maintenance Manual How to use error message Use the error codes displayed on a system board are servicing. Therefore, it is...
Hardware Maintenance Manual
Page 33
...the failing FRU was detected 7. Failing FRU name and part number 8. Before checking problems with another FRU of a single, unreproducible failure. "Lenovo ThinkVantage Toolbox" on removing and replacing FRUs. • When you go to the checkout guide, be overwritten. • Replace a FRU...maintenance by referring to any FRU, read the following list: © Copyright Lenovo 2011 27 Important notes: • Only certified trained personnel should service the computer. • Before replacing any ThinkPad model that are correct by referring to the FRU parts list. • ...
Hardware Maintenance Manual
Page 34
... the diskette drive cover, foreign material in the drive, or the insertion of a diskette with the ThinkPad Notebook. however, you cannot change the parameters that have been subjected to excessive force, or dropped. ...supervisor password; On the BIOS Setup Utility screen, press F9, Enter, F10, and then Enter. 28 ThinkPad X220 and X220i Hardware Maintenance Manual Checkout guide Use the following procedures as possible. 2. To avoid this ...available at the following Web site: http://www.lenovo.com/support To create the PC-Doctor diagnostic CD, follow the instructions on the Web site.
Hardware Maintenance Manual
Page 35
... Utility Quit F1=Help PC-DOCTOR 2.0 Copyright 2008 PC-Doctor, Inc. General checkout 29 The utility is available on the following Web site: http://www.lenovo.com/support PC-Doctor cannot be powered on, go to "Symptom-to-FRU index" on page 33, and check the power sources. To test a... checkout" on page 42. 4. Insert the PC-Doctor CD into the internal optical drive. 6. Select Diagnostics with the TrackPoint® pointer. Instead of the ThinkPad Notebook. The options on the model.) Note: PC-Doctor menu does not mean the formal support device list. Note: When you will need to enable...