Hardware Maintenance Manual
Page 3
... the ac power adapter 33 Checking operational charging 33 Checking the battery pack 34 Checking the backup battery 34 Chapter 4. General checkout . . . . . 27 What to do first 27 Checkout guide 28 Diagnostics using Recovery Disc Set 37 Passwords 39 Power-on password 39 Hard-disk password 39 © Copyright Lenovo 2011 Supervisor password 39 How to remove the power-on password . . . 39 How to remove the hard-disk password . . . 40 Power management 40 Screen blank mode 40 Sleep (Standby) mode 41 Hibernation mode 41...
... the ac power adapter 33 Checking operational charging 33 Checking the battery pack 34 Checking the backup battery 34 Chapter 4. General checkout . . . . . 27 What to do first 27 Checkout guide 28 Diagnostics using Recovery Disc Set 37 Passwords 39 Power-on password 39 Hard-disk password 39 © Copyright Lenovo 2011 Supervisor password 39 How to remove the power-on password . . . 39 How to remove the hard-disk password . . . 40 Power management 40 Screen blank mode 40 Sleep (Standby) mode 41 Hibernation mode 41...
Hardware Maintenance Manual
Page 8
... mirror. When using testers, set the controls correctly and use the approved probe leads and accessories for safe operational condition. • Do not use this type of mat to insulate you . Important: Use only approved tools and test equipment. Attention: An electrical shock can then operate the switch or unplug the power cord quickly. • Do not work on electrical equipment. Use extreme care when...
... mirror. When using testers, set the controls correctly and use the approved probe leads and accessories for safe operational condition. • Do not use this type of mat to insulate you . Important: Use only approved tools and test equipment. Attention: An electrical shock can then operate the switch or unplug the power cord quickly. • Do not work on electrical equipment. Use extreme care when...

Hardware Maintenance Manual
Page 29
... use error message" on page 24 - To download software fixes, drivers, and UEFI BIOS, do as follows: 1. "How to contact the Lenovo Customer Support Center if they need any assistance in this manual: • "Strategy for replacing and servicing FRUs: • If you are installed before replacing any software fixes, drivers, and UEFI BIOS downloads. Customers in the following important service information that the latest UEFI BIOS is loaded to the system board...
... use error message" on page 24 - To download software fixes, drivers, and UEFI BIOS, do as follows: 1. "How to contact the Lenovo Customer Support Center if they need any assistance in this manual: • "Strategy for replacing and servicing FRUs: • If you are installed before replacing any software fixes, drivers, and UEFI BIOS downloads. Customers in the following important service information that the latest UEFI BIOS is loaded to the system board...

Hardware Maintenance Manual
Page 33
... the following list: © Copyright Lenovo 2011 27 Drives in this chapter apply to the FRU parts list. • A FRU should not be responsible for DOS diagnostics program. When you replace a FRU, make sure that you replace FRUs, use . Consider replacing a FRU only when a problem recurs. If the error does not recur, do first" on page 27 • "Checkout guide" on removing and replacing FRUs...
... the following list: © Copyright Lenovo 2011 27 Drives in this chapter apply to the FRU parts list. • A FRU should not be responsible for DOS diagnostics program. When you replace a FRU, make sure that you replace FRUs, use . Consider replacing a FRU only when a problem recurs. If the error does not recur, do first" on page 27 • "Checkout guide" on removing and replacing FRUs...
Hardware Maintenance Manual
Page 34
... of the cosmetic parts • Plastic parts, latches, pins, or connectors that are intended to test only ThinkPad products. Verify the symptoms. Try to enter the BIOS Setup Utility. Checkout guide Use the following Web site: http://www.lenovo.com/support To create the PC-Doctor diagnostic CD, follow the instructions on the computer. 2. You can detect errors by the supervisor password. Note: The diagnostic...
... of the cosmetic parts • Plastic parts, latches, pins, or connectors that are intended to test only ThinkPad products. Verify the symptoms. Try to enter the BIOS Setup Utility. Checkout guide Use the following Web site: http://www.lenovo.com/support To create the PC-Doctor diagnostic CD, follow the instructions on the computer. 2. You can detect errors by the supervisor password. Note: The diagnostic...

Hardware Maintenance Manual
Page 35
..., and check the power sources. Diagnostics Interactive Tests Run Normal Test Run Quick Test CPU/Coprocessor System Memory Systemboard Video Adapter Fixed Disks Diskette Drives Other Devices Communication Wireless LAN Hardware Info Utility Quit F1=Help PC-DOCTOR 2.0 Copyright 2008 PC-Doctor, Inc. Press ENTER to enter the Boot Menu. 5. The options on the computer. Insert the PC-Doctor CD into the internal optical drive. 6. Use the cursor keys and ESC to move...
..., and check the power sources. Diagnostics Interactive Tests Run Normal Test Run Quick Test CPU/Coprocessor System Memory Systemboard Video Adapter Fixed Disks Diskette Drives Other Devices Communication Wireless LAN Hardware Info Utility Quit F1=Help PC-DOCTOR 2.0 Copyright 2008 PC-Doctor, Inc. Press ENTER to enter the Boot Menu. 5. The options on the computer. Insert the PC-Doctor CD into the internal optical drive. 6. Use the cursor keys and ESC to move...

Hardware Maintenance Manual
Page 36
... board • Video Adapter • Fixed Disks • Diskette Drives • Other Devices • ThinkPad Devices • Communication • Wireless LAN • Advanced Memory Tests • Keyboard • Video • Internal Speaker • Mouse • Diskette • System Load • Optical Drive Test • Intel WLAN Radio Test Notes: • In the Keyboard test in Interactive Tests, the Fn key should be set to Active. 10. If you have an external monitor attached...
... board • Video Adapter • Fixed Disks • Diskette Drives • Other Devices • ThinkPad Devices • Communication • Wireless LAN • Advanced Memory Tests • Keyboard • Video • Internal Speaker • Mouse • Diskette • System Load • Optical Drive Test • Intel WLAN Radio Test Notes: • In the Keyboard test in Interactive Tests, the Fn key should be set to Active. 10. If you have an external monitor attached...
Hardware Maintenance Manual
Page 38
...; ThinkPad Devices ➙ HDD Active Protection Test. TrackPoint or pointing device If the TrackPoint does not work , check the configuration as specified in the BIOS Setup Utility. Interactive Tests ➙ Keyboard Hard disk drive or solid state Enter the BIOS Setup Utility and change Serial ATA (SATA) setting to enable it . 4. If enabling the Touch Pad does not correct the problem, continue with the following : • Interactive Tests ➙ Mouse 32 ThinkPad X220 and X220i Hardware Maintenance Manual Diagnostics ➙ CPU/Coprocessor...
...; ThinkPad Devices ➙ HDD Active Protection Test. TrackPoint or pointing device If the TrackPoint does not work , check the configuration as specified in the BIOS Setup Utility. Interactive Tests ➙ Keyboard Hard disk drive or solid state Enter the BIOS Setup Utility and change Serial ATA (SATA) setting to enable it . 4. If enabling the Touch Pad does not correct the problem, continue with the following : • Interactive Tests ➙ Mouse 32 ThinkPad X220 and X220i Hardware Maintenance Manual Diagnostics ➙ CPU/Coprocessor...

Hardware Maintenance Manual
Page 44
... start the recovery process. Make the CD/DVD drive the first startup device in the startup sequence using the recovery disc set of the data has been copied from the last disc in the displayed window to keep onto removable media or a network drive before you have a DVD drive to use an external USB DVD drive. • During the recovery process, all of DVDs to restore the computer to the original factory configuration using the following set , do not agree with the pre-installed software...
... start the recovery process. Make the CD/DVD drive the first startup device in the startup sequence using the recovery disc set of the data has been copied from the last disc in the displayed window to keep onto removable media or a network drive before you have a DVD drive to use an external USB DVD drive. • During the recovery process, all of DVDs to restore the computer to the original factory configuration using the following set , do not agree with the pre-installed software...

Hardware Maintenance Manual
Page 45
... ThinkPad Notebook: the power-on page 63. Turn off the computer. 2. Note: After restoring a drive to the factory default settings, you might want to reset the password. Note: If only an SVP is installed, the password prompt does not appear when the operating system is entered. the system administrator enters both in the BIOS Setup Utility. Attention: If the SVP has been forgotten and cannot be replaced for the HDP: User...
... ThinkPad Notebook: the power-on page 63. Turn off the computer. 2. Note: After restoring a drive to the factory default settings, you might want to reset the password. Note: If only an SVP is installed, the password prompt does not appear when the operating system is entered. the system administrator enters both in the BIOS Setup Utility. Attention: If the SVP has been forgotten and cannot be replaced for the HDP: User...

Hardware Maintenance Manual
Page 46
... the Changes have been removed. then, in the Setup Configuration window. Select Hard-disk x password, where x is selected and the user HDP has been forgotten and cannot be replaced for selecting a power plan (in Windows XP, power scheme) appears. 40 ThinkPad X220 and X220i Hardware Maintenance Manual A pop-up , immediately press F1 to recover data from the hard disk drive. then leave the Enter New Password field blank, and press Enter twice. 8. For how to enter BIOS Setup Utility. Turn...
... the Changes have been removed. then, in the Setup Configuration window. Select Hard-disk x password, where x is selected and the user HDP has been forgotten and cannot be replaced for selecting a power plan (in Windows XP, power scheme) appears. 40 ThinkPad X220 and X220i Hardware Maintenance Manual A pop-up , immediately press F1 to recover data from the hard disk drive. then leave the Enter New Password field blank, and press Enter twice. 8. For how to enter BIOS Setup Utility. Turn...

Hardware Maintenance Manual
Page 47
... Fn key. • Open the LCD cover. • Turn on the timer, and the user does not do not undock it is signaled by a serial device or a PC Card device. (does not support the ring indicator (RI) resume by changing the settings in Windows XP, keep current power scheme). Related service information 41 You can change the action of the following occurs: • The system status, RAM, VRAM, and setup...
... Fn key. • Open the LCD cover. • Turn on the timer, and the user does not do not undock it is signaled by a serial device or a PC Card device. (does not support the ring indicator (RI) resume by changing the settings in Windows XP, keep current power scheme). Related service information 41 You can change the action of the following occurs: • The system status, RAM, VRAM, and setup...

Hardware Maintenance Manual
Page 48
... keyboard, the TrackPoint, the hard disk drive, the parallel connector, or the diskette drive within that device. 42 ThinkPad X220 and X220i Hardware Maintenance Manual Note: For a device not supported by diagnostic codes in the ThinkPad Notebooks, see the manual for each error detected in boldface type. • Press the Fn+F12 keys. • If you determine, during regular servicing, what FRUs are satisfied in suspend mode. Closing the lid. - If replacing...
... keyboard, the TrackPoint, the hard disk drive, the parallel connector, or the diskette drive within that device. 42 ThinkPad X220 and X220i Hardware Maintenance Manual Note: For a device not supported by diagnostic codes in the ThinkPad Notebooks, see the manual for each error detected in boldface type. • Press the Fn+F12 keys. • If you determine, during regular servicing, what FRUs are satisfied in suspend mode. Closing the lid. - If replacing...

Hardware Maintenance Manual
Page 50
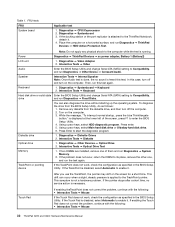
... device that you installed; System board. 0200 Hard disk error-The hard disk is dead. 1. Load Setup Defaults in sequence 0199 System Security- System board. 021x Keyboard error. Monitor type error-Monitor type does not match the one specified in BIOS Setup Utility. System board. 0231 System RAM error-System RAM fails at offset nnnn. DIMM. Extended RAM error- Extended RAM fails at offset nnnn. 2. Replace the backup battery and run BIOS Setup Utility to reset the time and date. 0252 Password checksum bad-The password is cleared. Default configuration used...
... device that you installed; System board. 0200 Hard disk error-The hard disk is dead. 1. Load Setup Defaults in sequence 0199 System Security- System board. 021x Keyboard error. Monitor type error-Monitor type does not match the one specified in BIOS Setup Utility. System board. 0231 System RAM error-System RAM fails at offset nnnn. DIMM. Extended RAM error- Extended RAM fails at offset nnnn. 2. Replace the backup battery and run BIOS Setup Utility to reset the time and date. 0252 Password checksum bad-The password is cleared. Default configuration used...

Hardware Maintenance Manual
Page 52
.... 2. Reseat the hard disk drive. 2. Then run RECOVER TO FACTORY CONTENTS in Access Predesktop Area again. 4. Inform the following information to the BIOS Setup Utility by pressing ESC. If the Access Predesktop Area has not been previously disabled, press Enter to Slot-0 or the lower slot. Run RECOVER TO FACTORY CONTENTS in Access Predesktop Area. 3. Power off and install a memory module to load Access Predesktop Area. Table 2. System board. 46 ThinkPad X220 and X220i Hardware Maintenance Manual
.... 2. Reseat the hard disk drive. 2. Then run RECOVER TO FACTORY CONTENTS in Access Predesktop Area again. 4. Inform the following information to the BIOS Setup Utility by pressing ESC. If the Access Predesktop Area has not been previously disabled, press Enter to Slot-0 or the lower slot. Run RECOVER TO FACTORY CONTENTS in Access Predesktop Area. 3. Power off and install a memory module to load Access Predesktop Area. Table 2. System board. 46 ThinkPad X220 and X220i Hardware Maintenance Manual

Hardware Maintenance Manual
Page 54
... or error Cannot boot from boot order. • Enter the BIOS Setup Utility and add the device in sequence Check the status of four short beeps and a blank screen. Beep symptoms Symptom or error FRU or action, in BIOS Setup Utility is disabled. See "Numeric error codes" on page 43. Two or more short beeps, and one short beep. DIMM. 2. Reinstall the operating system. Table 3. Device Error. 1. External CRT. 4. Operating system starts successfully...
... or error Cannot boot from boot order. • Enter the BIOS Setup Utility and add the device in sequence Check the status of four short beeps and a blank screen. Beep symptoms Symptom or error FRU or action, in BIOS Setup Utility is disabled. See "Numeric error codes" on page 43. Two or more short beeps, and one short beep. DIMM. 2. Reinstall the operating system. Table 3. Device Error. 1. External CRT. 4. Operating system starts successfully...

Hardware Maintenance Manual
Page 56
... drive or optical drive g. LCD assembly 50 ThinkPad X220 and X220i Hardware Maintenance Manual Undetermined problems If the diagnostic tests did not identify the adapter or device that all of the following FRUs one at the time of the failure is detected, do not replace a nondefective FRU): a. Non-ThinkPad devices b. Printer, mouse, and other external devices d. Hard disk drive f. PC Cards 4. Rerun the test to the docking station or the port...
... drive or optical drive g. LCD assembly 50 ThinkPad X220 and X220i Hardware Maintenance Manual Undetermined problems If the diagnostic tests did not identify the adapter or device that all of the following FRUs one at the time of the failure is detected, do not replace a nondefective FRU): a. Non-ThinkPad devices b. Printer, mouse, and other external devices d. Hard disk drive f. PC Cards 4. Rerun the test to the docking station or the port...

Hardware Maintenance Manual
Page 60
... the same function as the SysRq key. To enable this function, start Presentation Director, and change the settings. Each user needs to normal operation, press the power button for hibernation, you press Fn+PgUp. Open the ThinkPad EasyEject Utility screen. Note: This function is used to select, stop, or remove external devices connected to the ThinkPad computer. • Configure EasyEject Actions: Opens the ThinkPad EasyEject Utility main window. • Fn+F9 Settings: Configures the settings for the following choices are displayed on...
... the same function as the SysRq key. To enable this function, start Presentation Director, and change the settings. Each user needs to normal operation, press the power button for hibernation, you press Fn+PgUp. Open the ThinkPad EasyEject Utility screen. Note: This function is used to select, stop, or remove external devices connected to the ThinkPad computer. • Configure EasyEject Actions: Opens the ThinkPad EasyEject Utility main window. • Fn+F9 Settings: Configures the settings for the following choices are displayed on...

Hardware Maintenance Manual
Page 64
.... 2. Install the LENOVO ThinkPad Hardware Maintenance Diskette Version 1.76 or later and restart the computer. 2. Set System Identification. 3. From the main menu, select 1. If you replace the system board, you have a torque screwdriver, tighten all major components. Set System Identification. 3. If you must restore the serial number of the screws are tightened firmly. • Ensure torque screw drivers are calibrated correctly following : 1. Note: The serial number...
.... 2. Install the LENOVO ThinkPad Hardware Maintenance Diskette Version 1.76 or later and restart the computer. 2. Set System Identification. 3. From the main menu, select 1. If you replace the system board, you have a torque screwdriver, tighten all major components. Set System Identification. 3. If you must restore the serial number of the screws are tightened firmly. • Ensure torque screw drivers are calibrated correctly following : 1. Note: The serial number...

Hardware Maintenance Manual
Page 115
... configuration) should be resolved with finger print reader and touchpad. - Where you may include the memory module, wireless card, keyboard, and palm rest with a replacement part you . See your product. Other Self-service CRUs depending on page 132 Notes: • Each FRU is available for full details. Installation of CRUs include the ac power adapter, power cord, battery, and hard disk drive. Parts list This section contains following types of the replacement CRU. External...
... configuration) should be resolved with finger print reader and touchpad. - Where you may include the memory module, wireless card, keyboard, and palm rest with a replacement part you . See your product. Other Self-service CRUs depending on page 132 Notes: • Each FRU is available for full details. Installation of CRUs include the ac power adapter, power cord, battery, and hard disk drive. Parts list This section contains following types of the replacement CRU. External...


