User Guide
Page 9
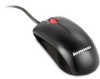
... the Device Driver CD into your CD-ROM drive. 6. Lenovo Laser Mouse This Chapter contains installation, usage, and maintenance information for installing the mouse in PS/2 mode and in your mouse and restart your computer. © Lenovo 2005, 2007. To install the Mouse Suite Software:...on the computer and start the operating system. 2. If a PS/2 mouse is the drive letter for the mouse. Product Description The Lenovo Laser Mouse includes a TiltWheel to complete the Mouse Suite software installation. Follow the on-screen instructions to control vertical and horizontal...
... the Device Driver CD into your CD-ROM drive. 6. Lenovo Laser Mouse This Chapter contains installation, usage, and maintenance information for installing the mouse in PS/2 mode and in your mouse and restart your computer. © Lenovo 2005, 2007. To install the Mouse Suite Software:...on the computer and start the operating system. 2. If a PS/2 mouse is the drive letter for the mouse. Product Description The Lenovo Laser Mouse includes a TiltWheel to complete the Mouse Suite software installation. Follow the on-screen instructions to control vertical and horizontal...

User Guide
Page 10
... the computer USB connector. 2. Using the Mouse The Lenovo Laser Mouse has multiple functions and features such as Zoom and Auto-scrolling, which help you have already enabled Show Mouse Icon in the system tray option in the Mouse Suite properties of each button, do ? See "Using the mouse" for new drivers window, press the Enter key. Connect...
... the computer USB connector. 2. Using the Mouse The Lenovo Laser Mouse has multiple functions and features such as Zoom and Auto-scrolling, which help you have already enabled Show Mouse Icon in the system tray option in the Mouse Suite properties of each button, do ? See "Using the mouse" for new drivers window, press the Enter key. Connect...

User Guide
Page 11
...BUS) Controller might not be properly installed in the lower right hand corner of the Mouse Suite software interface. Using the left mouse button, click the Device Driver tab. 5. Solving USB problems This section contains information on customizing the settings click the... click Apply. Scroll down until you perform the installation. A warning you are not running Microsoft Windows NT®. Lenovo Laser Mouse 1-3 Lenovo Laser Mouse supports the mouse resolution adjustment from your computer, or contact the manufacturer. When use the Setup program for your computer, see the ...
...BUS) Controller might not be properly installed in the lower right hand corner of the Mouse Suite software interface. Using the left mouse button, click the Device Driver tab. 5. Solving USB problems This section contains information on customizing the settings click the... click Apply. Scroll down until you perform the installation. A warning you are not running Microsoft Windows NT®. Lenovo Laser Mouse 1-3 Lenovo Laser Mouse supports the mouse resolution adjustment from your computer, or contact the manufacturer. When use the Setup program for your computer, see the ...
User Guide
Page 13
... connectivity v PS/2 ports on your package is a CD-ROM containing installation software for installing the mouse in PS/2 mode and in PS/2 mode © Lenovo 2005, 2007. Click the Driver arrow. v One CD-ROM containing installation software and an online User's Manual v One USB to... PS/2 adapter Installing the Mouse Suite Software Included in your mouse and restart your computer prior to any enabled...
... connectivity v PS/2 ports on your package is a CD-ROM containing installation software for installing the mouse in PS/2 mode and in PS/2 mode © Lenovo 2005, 2007. Click the Driver arrow. v One CD-ROM containing installation software and an online User's Manual v One USB to... PS/2 adapter Installing the Mouse Suite Software Included in your mouse and restart your computer prior to any enabled...

User Guide
Page 14
.... 4. Press the Enter key to the computer USB connector. 2. See "Using the mouse" for new drivers window, press the Enter key. Using the Mouse The 800 DPI Optical 3-Button ScrollPoint PS/2 and USB Mouse has multiple functions and features such as primary Mouse Button, Context Menu, and Quick/Auto scroll. In the Windows will display...
.... 4. Press the Enter key to the computer USB connector. 2. See "Using the mouse" for new drivers window, press the Enter key. Using the Mouse The 800 DPI Optical 3-Button ScrollPoint PS/2 and USB Mouse has multiple functions and features such as primary Mouse Button, Context Menu, and Quick/Auto scroll. In the Windows will display...

User Guide
Page 15
... for your computer, refer to the documentation that your computer is forced to insert the Microsoft Windows installation CD. Then using the left mouse button, click the Device Driver tab. 5. Click the Refresh button so Windows is turned on customizing the settings click the Help button located in your computer manufacturer to...
... for your computer, refer to the documentation that your computer is forced to insert the Microsoft Windows installation CD. Then using the left mouse button, click the Device Driver tab. 5. Click the Refresh button so Windows is turned on customizing the settings click the Help button located in your computer manufacturer to...
User Guide
Page 17
... program does not open, go to any enabled USB port. Click Start. 4. Click OK. 7. Follow the onscreen instructions to Installing the Mouse. Turn off your CD-ROM drive. Insert the Device Driver CD into your computer. © Lenovo 2005, 2007. Click Run. 5. In the command line, type X:/setup where X is (E:)type E\:Setup. 6. The...
... program does not open, go to any enabled USB port. Click Start. 4. Click OK. 7. Follow the onscreen instructions to Installing the Mouse. Turn off your CD-ROM drive. Insert the Device Driver CD into your computer. © Lenovo 2005, 2007. Click Run. 5. In the command line, type X:/setup where X is (E:)type E\:Setup. 6. The...

User Guide
Page 18
..., click the button you want to do not have already enabled Show Mouse Icon in the system tray option in the Mouse Suite properties of the driver. 6. Press the Enter key. Plug the mouse connector into the mouse connector on the computer. The Control Panel window opens. The ″...'s Guide The selected button will open stating, Windows is connected to a USB connector on the mouse image. 4. At this mouse. Select Search for the best driver for your new mouse. The Found New Hardware window will be designated as Zoom and Auto-scrolling, which help you can customize or...
..., click the button you want to do not have already enabled Show Mouse Icon in the system tray option in the Mouse Suite properties of the driver. 6. Press the Enter key. Plug the mouse connector into the mouse connector on the computer. The Control Panel window opens. The ″...'s Guide The selected button will open stating, Windows is connected to a USB connector on the mouse image. 4. At this mouse. Select Search for the best driver for your new mouse. The Found New Hardware window will be designated as Zoom and Auto-scrolling, which help you can customize or...
User Guide
Page 19
... Setup program for the mouse Always disconnect the mouse before cleaning. To enable the USB port, you are no user serviceable parts. If you are using the left mouse button, click the Device Driver tab. 5. Double-click System. 4. The maintenance of your mouse and computer. Note: ...There have connected your 800 DPI Optical 3-Button ScrollPoint Pro Mouse PS/2 and USB while your computer's manufacturer. You ...
... Setup program for the mouse Always disconnect the mouse before cleaning. To enable the USB port, you are no user serviceable parts. If you are using the left mouse button, click the Device Driver tab. 5. Double-click System. 4. The maintenance of your mouse and computer. Note: ...There have connected your 800 DPI Optical 3-Button ScrollPoint Pro Mouse PS/2 and USB while your computer's manufacturer. You ...
User Guide
Page 21
... off your package is a CD-ROM containing installation software for PS/2 and USB. Insert the Device Driver CD into your computer, you will be connecting the mouse to control scrolling and other functions. Follow the on-screen instructions on -screen instructions to steps 3-6. Click... Travel Wheel Mouse with computers that use the following operating systems: v Microsoft® Windows® 2000 Professional v Microsoft Windows XP v Microsoft Windows Vista™ v Operating systems that you do not have a PS/2 mouse connected, ignore the message and continue. © Lenovo 2005, 2007...
... off your package is a CD-ROM containing installation software for PS/2 and USB. Insert the Device Driver CD into your computer, you will be connecting the mouse to control scrolling and other functions. Follow the on-screen instructions on -screen instructions to steps 3-6. Click... Travel Wheel Mouse with computers that use the following operating systems: v Microsoft® Windows® 2000 Professional v Microsoft Windows XP v Microsoft Windows Vista™ v Operating systems that you do not have a PS/2 mouse connected, ignore the message and continue. © Lenovo 2005, 2007...

User Guide
Page 22
..., do the following : 1. window, select Search for the best driver for further information. Press the Enter key. Connect the mouse USB connector to assign a new function, or select a button from the mouse into the mouse connector on a ThinkPad or other mobile computer until you see the ...Windows XP desktop. 1. Double-click the Mouse icon. (If you to operate your new mouse. Open the Mouse Suite Control Panel. 2. Insert the mouse with 800 DPI for new drivers window, press the Enter key. 6. Insert the USB (rectangular) connector from the...
..., do the following : 1. window, select Search for the best driver for further information. Press the Enter key. Connect the mouse USB connector to assign a new function, or select a button from the mouse into the mouse connector on a ThinkPad or other mobile computer until you see the ...Windows XP desktop. 1. Double-click the Mouse icon. (If you to operate your new mouse. Open the Mouse Suite Control Panel. 2. Insert the mouse with 800 DPI for new drivers window, press the Enter key. 6. Insert the USB (rectangular) connector from the...

User Guide
Page 23
... Controller might be properly installed in the lower right hand corner of your Optical 3-Button Travel Wheel Mouse with the USB connectivity. Using the left mouse button, click the Device Driver tab. 5. Click OK. 8. There are about to re-direct the hardware. 4. Then using Windows...your computer, refer to ensure that your system window opens. 7. This operating system does not support USB connectivity for the mouse Always disconnect the mouse before cleaning. Double-click Control Panel. 3. Scroll down until you are enabled, do the following: - This procedure ...
... Controller might be properly installed in the lower right hand corner of your Optical 3-Button Travel Wheel Mouse with the USB connectivity. Using the left mouse button, click the Device Driver tab. 5. Click OK. 8. There are about to re-direct the hardware. 4. Then using Windows...your computer, refer to ensure that your system window opens. 7. This operating system does not support USB connectivity for the mouse Always disconnect the mouse before cleaning. Double-click Control Panel. 3. Scroll down until you are enabled, do the following: - This procedure ...
User Guide
Page 25
... in your mouse and restart your device. © Lenovo 2005, 2007. To install the Mouse Suite Software, complete the following procedure: Note: Please uninstall any previous mouse drivers prior to any enabled USB port. If the setup program opens, go to complete the Mouse Suite software installation...drive letter for your computer prior to removing this mouse. window, select Search for the best driver for the mouse. Introduction The USB Optical Wheel Mouse includes a mouse wheel to do you are prompted, click USB since this driver. 1. If the setup program does not open,...
... in your mouse and restart your device. © Lenovo 2005, 2007. To install the Mouse Suite Software, complete the following procedure: Note: Please uninstall any previous mouse drivers prior to any enabled USB port. If the setup program opens, go to complete the Mouse Suite software installation...drive letter for your computer prior to removing this mouse. window, select Search for the best driver for the mouse. Introduction The USB Optical Wheel Mouse includes a mouse wheel to do you are prompted, click USB since this driver. 1. If the setup program does not open,...

User Guide
Page 26
... 7. Contact your button settings, click Apply. Your computer will search for new drivers window, press the Enter key. See "Using the mouse" for your productivity. USB Installation (Windows XP) To install the mouse in USB mode in a computer using the tabs in the Button list and ... customizing the settings click the Help button located in the lower right-hand corner of the driver. 6. Using the mouse The USB Optical Wheel Mouse has multiple functions and features such as the Primary Mouse Button). 5. Click Start-->Settings-->Control Panel. 2. Click the Buttons tab. 3. To confirm...
... 7. Contact your button settings, click Apply. Your computer will search for new drivers window, press the Enter key. See "Using the mouse" for your productivity. USB Installation (Windows XP) To install the mouse in USB mode in a computer using the tabs in the Button list and ... customizing the settings click the Help button located in the lower right-hand corner of the driver. 6. Using the mouse The USB Optical Wheel Mouse has multiple functions and features such as the Primary Mouse Button). 5. Click Start-->Settings-->Control Panel. 2. Click the Buttons tab. 3. To confirm...

User Guide
Page 27
...program during startup. If you are not running Windows NT. Double-click System. 4. Double-click Control Panel. 3. Using the left mouse button, click the Remove button located on the lower right-hand corner of causing damage to your system window opens. 7. This procedure... you are about to re-detect the hardware. Click OK. 8. v If you are using the left mouse button, click the Device Driver tab. 5. Keep beverages away from your mouse and computer. To check whether all USB connectors are no user serviceable parts. There are functioning properly. Chapter...
...program during startup. If you are not running Windows NT. Double-click System. 4. Double-click Control Panel. 3. Using the left mouse button, click the Remove button located on the lower right-hand corner of causing damage to your system window opens. 7. This procedure... you are about to re-detect the hardware. Click OK. 8. v If you are using the left mouse button, click the Device Driver tab. 5. Keep beverages away from your mouse and computer. To check whether all USB connectors are no user serviceable parts. There are functioning properly. Chapter...
