User Guide
Page 5
... Warranty B-1 Warranty information B-4 Guarantee supplement for Mexico B-5 Appendix C. Optical 3-Button Travel Wheel Mouse with USB connectivity . . . 3-3 Caring for PS/2 and USB 4-1 Product Description 4-1 Installing the Mouse Suite Software . . . . . 4-1 Installing the Mouse 4-1 Using the mouse 4-2 Solving USB problems 4-3 Chapter 5. USB Optical Wheel Mouse 5-1 Introduction 5-1 Installing the Mouse Suite Software . . . . . 5-1 Installing the Mouse 5-1 Using the mouse 5-2 Appendix A. Service and Support . . . Contents About this book v Chapter 1. iii Lenovo Laser...
... Warranty B-1 Warranty information B-4 Guarantee supplement for Mexico B-5 Appendix C. Optical 3-Button Travel Wheel Mouse with USB connectivity . . . 3-3 Caring for PS/2 and USB 4-1 Product Description 4-1 Installing the Mouse Suite Software . . . . . 4-1 Installing the Mouse 4-1 Using the mouse 4-2 Solving USB problems 4-3 Chapter 5. USB Optical Wheel Mouse 5-1 Introduction 5-1 Installing the Mouse Suite Software . . . . . 5-1 Installing the Mouse 5-1 Using the mouse 5-2 Appendix A. Service and Support . . . Contents About this book v Chapter 1. iii Lenovo Laser...

User Guide
Page 7
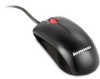
About this book This combination manual contains instructions for installing and using the Laser Mouse, 800 DPI Optical 3-Button ScrollPoint® PS/2 and USB Mouse, 800 DPI Optical 3-Button ScrollPoint Pro Mouse PS/2 and USB, Optical 3-Button Travel Wheel Mouse with 800 DPI for PS/2 and USB, and the USB Optical Wheel Mouse. © Lenovo 2005, 2007. v Portions © IBM Corp. 2005.
About this book This combination manual contains instructions for installing and using the Laser Mouse, 800 DPI Optical 3-Button ScrollPoint® PS/2 and USB Mouse, 800 DPI Optical 3-Button ScrollPoint Pro Mouse PS/2 and USB, Optical 3-Button Travel Wheel Mouse with 800 DPI for PS/2 and USB, and the USB Optical Wheel Mouse. © Lenovo 2005, 2007. v Portions © IBM Corp. 2005.
User Guide
Page 9
... Lenovo Laser Mouse. The mouse works with Service Pack 2 v Microsoft Windows Vista™ v Operating systems that you will be connected to removing this mouse. Insert the Device Driver CD into your computer, you must first turn off your screen. Click the Driver arrow. If the setup program does not open, go to steps 3-6. Plug in PS/2 mode To install the mouse using the mouse with a USB connector. If the setup program opens, go to step 6. 3. Product Description...
... Lenovo Laser Mouse. The mouse works with Service Pack 2 v Microsoft Windows Vista™ v Operating systems that you will be connected to removing this mouse. Insert the Device Driver CD into your computer, you must first turn off your screen. Click the Driver arrow. If the setup program does not open, go to steps 3-6. Plug in PS/2 mode To install the mouse using the mouse with a USB connector. If the setup program opens, go to step 6. 3. Product Description...

User Guide
Page 10
... computer USB connector. 2. The Control Panel window opens. In the Windows will be designated as Zoom and Auto-scrolling, which help you see the Windows XP desktop. 1. Using the Mouse The Lenovo Laser Mouse has multiple functions and features such as the Primary Mouse Button) 5. Windows XP will display the location of each button, do the following : 1. To customize the function of the driver. 6. To start the Mouse Suite Software: 1. Connect the mouse USB connector...
... computer USB connector. 2. The Control Panel window opens. In the Windows will be designated as Zoom and Auto-scrolling, which help you see the Windows XP desktop. 1. Using the Mouse The Lenovo Laser Mouse has multiple functions and features such as the Primary Mouse Button) 5. Windows XP will display the location of each button, do the following : 1. To customize the function of the driver. 6. To start the Mouse Suite Software: 1. Connect the mouse USB connector...

User Guide
Page 11
...-click System. 4. Then using the left mouse button click the plus (+) sign to change the setting, do the following : 1. Click the Refresh button so Windows is turned on the lower right-hand corner of the device manager. Lenovo Laser Mouse 1-3 Click the Resolution tab. 3. Note: Mouse resolution adjustment function only available when Lenovo Laser Mouse work under PS/2 mode, the mouse resolution setting freezes at 800DPI, to sure that came with USB connectivity. This operating system does not support USB connectivity...
...-click System. 4. Then using the left mouse button click the plus (+) sign to change the setting, do the following : 1. Click the Refresh button so Windows is turned on the lower right-hand corner of the device manager. Lenovo Laser Mouse 1-3 Click the Resolution tab. 3. Note: Mouse resolution adjustment function only available when Lenovo Laser Mouse work under PS/2 mode, the mouse resolution setting freezes at 800DPI, to sure that came with USB connectivity. This operating system does not support USB connectivity...
User Guide
Page 13
... be using the Microsoft Windows NT ® Workstation operating system. Installing the Mouse This section contains information for the 800 DPI Optical 3-Button ScrollPoint® PS/2 and USB Mouse. The mouse works with a USB connector. Insert the Device Driver CD into your computer, you do not have a PS/2 mouse connected, ignore the message and continue. If the setup program does not open, go to control scrolling and other functions. Product Description The 800 DPI Optical 3-Button...
... be using the Microsoft Windows NT ® Workstation operating system. Installing the Mouse This section contains information for the 800 DPI Optical 3-Button ScrollPoint® PS/2 and USB Mouse. The mouse works with a USB connector. Insert the Device Driver CD into your computer, you do not have a PS/2 mouse connected, ignore the message and continue. If the setup program does not open, go to control scrolling and other functions. Product Description The 800 DPI Optical 3-Button...

User Guide
Page 14
... Auto-scrolling, which help you see the Windows XP desktop. 1. Using the Mouse The 800 DPI Optical 3-Button ScrollPoint PS/2 and USB Mouse has multiple functions and features such as primary Mouse Button, Context Menu, and Quick/Auto scroll. Double-click the Mouse icon. (If you want Windows to the PS/2 connector. 3. See "Using the mouse" for new drivers window, press the Enter key. To start the Mouse Suite Software: 1. The Control Panel window opens. On the Mouse Image, click the button...
... Auto-scrolling, which help you see the Windows XP desktop. 1. Using the Mouse The 800 DPI Optical 3-Button ScrollPoint PS/2 and USB Mouse has multiple functions and features such as primary Mouse Button, Context Menu, and Quick/Auto scroll. Double-click the Mouse icon. (If you want Windows to the PS/2 connector. 3. See "Using the mouse" for new drivers window, press the Enter key. To start the Mouse Suite Software: 1. The Control Panel window opens. On the Mouse Image, click the button...

User Guide
Page 15
... left mouse button, click the Device Driver tab. 5. There are about to use the Setup program for your system window opens. 7. Double-click System. 4. Note: There have Windows 2000, make sure that your computer, or contact the manufacturer. Try disconnecting, and re-connecting the mouse. If you are no user serviceable parts. This procedure detects both the USB Host Controller and the USB Root Hub. Caring for this device from your computer, see the documentation...
... left mouse button, click the Device Driver tab. 5. There are about to use the Setup program for your system window opens. 7. Double-click System. 4. Note: There have Windows 2000, make sure that your computer, or contact the manufacturer. Try disconnecting, and re-connecting the mouse. If you are no user serviceable parts. This procedure detects both the USB Host Controller and the USB Root Hub. Caring for this device from your computer, see the documentation...
User Guide
Page 17
... be connecting the mouse to a USB connector. The mouse works with a USB connector v CD-ROM containing installation software for the 800 DPI Optical 3-Button ScrollPoint® Pro Mouse PS/2 and USB. Go to steps 3-6. To install the Mouse Suite Software: 1. Turn off your CD-ROM drive is complete. Chapter 3. 800 DPI Optical 3-Button ScrollPoint Pro Mouse PS/2 and USB This guide contains installation, usage, and maintenance information for the 800 DPI Optical 3-Button ScrollPoint Pro Mouse PS/2 and USB online User's Manual v A USB to PS/2 adapter Installing the Mouse Suite software...
... be connecting the mouse to a USB connector. The mouse works with a USB connector v CD-ROM containing installation software for the 800 DPI Optical 3-Button ScrollPoint® Pro Mouse PS/2 and USB. Go to steps 3-6. To install the Mouse Suite Software: 1. Turn off your CD-ROM drive is complete. Chapter 3. 800 DPI Optical 3-Button ScrollPoint Pro Mouse PS/2 and USB This guide contains installation, usage, and maintenance information for the 800 DPI Optical 3-Button ScrollPoint Pro Mouse PS/2 and USB online User's Manual v A USB to PS/2 adapter Installing the Mouse Suite software...

User Guide
Page 18
... connected to complete the installation. The Windows has finished installing the software that you do you can customize or change these button functions. USB Installation (Windows XP) To install the mouse in USB mode in a computer using Windows 2000: 1. Windows XP will search for your new hardware device requires window opens. 7. Using the mouse The 800 DPI Optical 3-Button ScrollPoint Pro Mouse PS/2 and USB, has multiple functions and features such as the Primary Mouse Button). 3-2 Combined Mouse User's Guide Click Start-->Settings-->Control Panel. 2. The Control Panel window...
... connected to complete the installation. The Windows has finished installing the software that you do you can customize or change these button functions. USB Installation (Windows XP) To install the mouse in USB mode in a computer using Windows 2000: 1. Windows XP will search for your new hardware device requires window opens. 7. Using the mouse The 800 DPI Optical 3-Button ScrollPoint Pro Mouse PS/2 and USB, has multiple functions and features such as the Primary Mouse Button). 3-2 Combined Mouse User's Guide Click Start-->Settings-->Control Panel. 2. The Control Panel window...
User Guide
Page 19
.... Double-click Control Panel. 3. Then using Windows 2000, make sure that came with USB connectivity. This procedure detects both the USB Host Controller and the USB Root Hub. Double-click My Computer. 2. There are not sure how to run your mouse buttons to a minus (-) sign. 6. To reset your computer Setup program by pressing one of your 800 DPI Optical 3-Button ScrollPoint Pro Mouse PS/2 and USB will ensure longer life, and will need to...
.... Double-click Control Panel. 3. Then using Windows 2000, make sure that came with USB connectivity. This procedure detects both the USB Host Controller and the USB Root Hub. Double-click My Computer. 2. There are not sure how to run your mouse buttons to a minus (-) sign. 6. To reset your computer Setup program by pressing one of your 800 DPI Optical 3-Button ScrollPoint Pro Mouse PS/2 and USB will ensure longer life, and will need to...
User Guide
Page 21
...; Lenovo 2005, 2007. Installing the Mouse This section contains information for the mouse. If message displays indicating that support USB connectivity v PS/2 ports on your CD-ROM drive. The mouse works with 800 DPI for PS/2 and USB. If the setup program opens, go to complete the Mouse Suite Software installation. Click OK. 7. Plug in USB mode. Portions © IBM Corp. 2005. 4-1 Product Description Optical 3-Button Travel Wheel Mouse with computers that use the following operating systems: v Microsoft® Windows...
...; Lenovo 2005, 2007. Installing the Mouse This section contains information for the mouse. If message displays indicating that support USB connectivity v PS/2 ports on your CD-ROM drive. The mouse works with 800 DPI for PS/2 and USB. If the setup program opens, go to complete the Mouse Suite Software installation. Click OK. 7. Plug in USB mode. Portions © IBM Corp. 2005. 4-1 Product Description Optical 3-Button Travel Wheel Mouse with computers that use the following operating systems: v Microsoft® Windows...

User Guide
Page 22
... Mouse Suite Software: 1. Click Start- ->Settings- ->Control Panel 2. Open the Mouse Suite Control Panel. 2. You can also assign frequently used functions or shortcuts to operate your device. 4. Click the Buttons tab. 3. The selected button will search for new drivers window, press the Enter key. 6. Insert the mouse with 800 DPI for your new hardware device requires window opens. 7. Press the Enter key. 5. Windows XP will open stating, ″Windows is connected to do? Using the mouse The Optical 3-Button Travel Wheel Mouse with the PS/2 adapter into the USB...
... Mouse Suite Software: 1. Click Start- ->Settings- ->Control Panel 2. Open the Mouse Suite Control Panel. 2. You can also assign frequently used functions or shortcuts to operate your device. 4. Click the Buttons tab. 3. The selected button will search for new drivers window, press the Enter key. 6. Insert the mouse with 800 DPI for your new hardware device requires window opens. 7. Press the Enter key. 5. Windows XP will open stating, ″Windows is connected to do? Using the mouse The Optical 3-Button Travel Wheel Mouse with the PS/2 adapter into the USB...

User Guide
Page 23
... are no user serviceable parts. Using the left mouse button, click the Remove button located on solving problems with your system window opens. 7. This procedure detects both the USB Host Controller and the USB Root Hub. There are unsure how to re-direct the hardware. Optical 3-Button Travel Wheel Mouse with 800 DPI for this device from your computer, or contact the manufacturer. - To reset your computer is forced to access the Setup program for the mouse Always disconnect...
... are no user serviceable parts. Using the left mouse button, click the Remove button located on solving problems with your system window opens. 7. This procedure detects both the USB Host Controller and the USB Root Hub. There are unsure how to re-direct the hardware. Optical 3-Button Travel Wheel Mouse with 800 DPI for this device from your computer, or contact the manufacturer. - To reset your computer is forced to access the Setup program for the mouse Always disconnect...
User Guide
Page 25
... The USB Optical Wheel Mouse includes a mouse wheel to complete the Mouse Suite software installation. Follow the on-screen instructions to control scrolling and other functions. If a PS/2® mouse is complete. If a message displays indicating that you are prompted, click USB since this mouse uses a USB connection. The mouse works with step 3. If the setup program does not open, continue with computers that support USB connectivity v PS/2 ports on your computer. Click Run. 5. Installing the mouse in USB mode To install the mouse using...
... The USB Optical Wheel Mouse includes a mouse wheel to complete the Mouse Suite software installation. Follow the on-screen instructions to control scrolling and other functions. If a PS/2® mouse is complete. If a message displays indicating that you are prompted, click USB since this mouse uses a USB connection. The mouse works with step 3. If the setup program does not open, continue with computers that support USB connectivity v PS/2 ports on your computer. Click Run. 5. Installing the mouse in USB mode To install the mouse using...

User Guide
Page 26
... mouse buttons to assign a new function, or select a button from the Function list (at least one mouse button must be displayed in the lower right hand corner of the driver. 6. Press the Enter key. Click Start-->Settings-->Control Panel. 2. On the Mouse Image, click the button you perform the installation. Select a function from the Button list. For further information on solving problems with USB connectivity. To reset your new hardware device requires window opens. 7. The USB Optical Wheel Mouse...
... mouse buttons to assign a new function, or select a button from the Function list (at least one mouse button must be displayed in the lower right hand corner of the driver. 6. Press the Enter key. Click Start-->Settings-->Control Panel. 2. On the Mouse Image, click the button you perform the installation. Select a function from the Button list. For further information on solving problems with USB connectivity. To reset your new hardware device requires window opens. 7. The USB Optical Wheel Mouse...

User Guide
Page 27
... all the USB connectors are no user serviceable parts. If you are using the left mouse button, click the Device Driver tab. 5. Then using Windows 2000, make sure that came with your system window opens. 7. Click OK. 8. v If you are not sure how to use the Setup program for your computer, or contact the manufacturer. - USB (Universal Serial BUS) Controller Re-detection The USB (Universal Serial BUS) Controller might be properly installed in the setup program to sure...
... all the USB connectors are no user serviceable parts. If you are using the left mouse button, click the Device Driver tab. 5. Then using Windows 2000, make sure that came with your system window opens. 7. Click OK. 8. v If you are not sure how to use the Setup program for your computer, or contact the manufacturer. - USB (Universal Serial BUS) Controller Re-detection The USB (Universal Serial BUS) Controller might be properly installed in the setup program to sure...

User Guide
Page 31
... be referred to install. © Lenovo 2005, 2007. What Your Service Provider Will Do to Correct Problems When you contact a Service Provider, you to as keyboard, mouse, speaker, memory, hard disk drive, or port replicator), called a ″Customer Replaceable Unit″ or ″CRU.″ If so, your own use during the warranty period, you to you for location-specific information. SOME...
... be referred to install. © Lenovo 2005, 2007. What Your Service Provider Will Do to Correct Problems When you contact a Service Provider, you to as keyboard, mouse, speaker, memory, hard disk drive, or port replicator), called a ″Customer Replaceable Unit″ or ″CRU.″ If so, your own use during the warranty period, you to you for location-specific information. SOME...
User Guide
Page 37
... only that these changes will be used . these measurements will be used instead. Lenovo may vary. Nothing in a controlled environment. Therefore, the result obtained in other life support applications where malfunction may be incorporated in this document does not affect or change Lenovo product specifications or warranties. Actual results may make improvements and/or changes in the product(s) and/or the program(s) described in new editions of...
... only that these changes will be used . these measurements will be used instead. Lenovo may vary. Nothing in a controlled environment. Therefore, the result obtained in other life support applications where malfunction may be incorporated in this document does not affect or change Lenovo product specifications or warranties. Actual results may make improvements and/or changes in the product(s) and/or the program(s) described in new editions of...
User Guide
Page 38
... comply with Part 15 of the FCC Rules. If this device may cause harmful interference to radio communications. Recycling information Lenovo encourages owners of information technology (IT) equipment to responsibly recycle their IT products. Operation is subject to the following information refers to the Laser Mouse, 800 DPI Optical 3-Button ScrollPoint PS/2 and USB Mouse, 800 DPI Optical 3-Button ScrollPoint Pro Mouse PS/2 and USB, Optical 3-Button Travel Wheel Mouse with the instructions, may not...
... comply with Part 15 of the FCC Rules. If this device may cause harmful interference to radio communications. Recycling information Lenovo encourages owners of information technology (IT) equipment to responsibly recycle their IT products. Operation is subject to the following information refers to the Laser Mouse, 800 DPI Optical 3-Button ScrollPoint PS/2 and USB Mouse, 800 DPI Optical 3-Button ScrollPoint Pro Mouse PS/2 and USB, Optical 3-Button Travel Wheel Mouse with the instructions, may not...


