
Operation Guide
Page 5
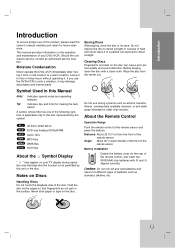
...control at the remote sensor and press the buttons. Battery installation Detach the battery cover on your DVD+VCR. ALL DVD ACD MP3 WMA DivX All discs listed below DVD and finalized DVD±R/RW Audio CDs MP3 files WMA files DivX files About the Symbol Display " " may ...Tip: Indicates special notes and operating features. Should the unit require service, contact an authorized service location. Moisture Condensation Never operate the DVD+VCR immediately after moving it may appear on the rear of the following symbols is not permitted by the symbol. A section whose title ...
...control at the remote sensor and press the buttons. Battery installation Detach the battery cover on your DVD+VCR. ALL DVD ACD MP3 WMA DivX All discs listed below DVD and finalized DVD±R/RW Audio CDs MP3 files WMA files DivX files About the Symbol Display " " may ...Tip: Indicates special notes and operating features. Should the unit require service, contact an authorized service location. Moisture Condensation Never operate the DVD+VCR immediately after moving it may appear on the rear of the following symbols is not permitted by the symbol. A section whose title ...
Operation Guide
Page 6
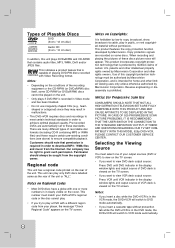
...This unit can play in public, or rent copyrighted material without prevention tab while the DVD+VCR is in the DVD mode, the DVD+VCR will appear. Notes: • If you insert a disc while the DVD+VCR is in order to grant such permission. Permission should note that is protected by Macrovision...finalized. • Do not use irregularly shaped CDs (e.g., heartshaped or octagonal) since they may result in malfunctions. • This DVD+VCR requires discs and recordings to meet certain technical standards in it clearly visible on the rear of the unit. Use of this unit plays...
...This unit can play in public, or rent copyrighted material without prevention tab while the DVD+VCR is in the DVD mode, the DVD+VCR will appear. Notes: • If you insert a disc while the DVD+VCR is in order to grant such permission. Permission should note that is protected by Macrovision...finalized. • Do not use irregularly shaped CDs (e.g., heartshaped or octagonal) since they may result in malfunctions. • This DVD+VCR requires discs and recordings to meet certain technical standards in it clearly visible on the rear of the unit. Use of this unit plays...
Operation Guide
Page 7
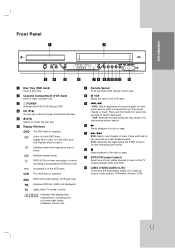
... go to search backward. - VCR The VCR deck is in the VCR deck. A cassette is selected. h Z VCR Ejects the tape in the VCR deck. b Cassette Compartment (VCR deck) Insert a video cassette here. c 1 POWER Switches the DVD+VCR ON and OFF. f Display Windows DVD The DVD deck is active. Indicates repeat mode. REC PM TV DVD+VCR is Recording. (VCR part only) Indicates PM...
... go to search backward. - VCR The VCR deck is in the VCR deck. A cassette is selected. h Z VCR Ejects the tape in the VCR deck. b Cassette Compartment (VCR deck) Insert a video cassette here. c 1 POWER Switches the DVD+VCR ON and OFF. f Display Windows DVD The DVD deck is active. Indicates repeat mode. REC PM TV DVD+VCR is Recording. (VCR part only) Indicates PM...

Operation Guide
Page 8
... menu, if available. PLAY (N) Starts playback. SPEED Selects recording speed. 8 Remote Control POWER Switches DVD+VCR ON and OFF. VCR Select the DVD+VCR function mode to DVD. SUBTITLE Selects a subtitle language. Press repeatedly to next chapter or track. INPUT Selects the VCR deck's source (Tuner, LINE 1, or LINE 2). STOP (x) Stops playback or recording. AUDIO Selects an...
... menu, if available. PLAY (N) Starts playback. SPEED Selects recording speed. 8 Remote Control POWER Switches DVD+VCR ON and OFF. VCR Select the DVD+VCR function mode to DVD. SUBTITLE Selects a subtitle language. Press repeatedly to next chapter or track. INPUT Selects the VCR deck's source (Tuner, LINE 1, or LINE 2). STOP (x) Stops playback or recording. AUDIO Selects an...

Operation Guide
Page 9
... in jack (record deck) of a nearby TV, VCR, or radio may cause permanent damage to a TV with Y Pb Pr inputs. nect the DVD+VCR via another VCR. OUT Connect to the unit. The DVD image could be distorted during playback. c DVD/VCR OUT (VIDEO/AUDIO (Left/Right)) Connect to a ...S-Video Input on the rear panel. i S-VIDEO OUT (DVD OUT) Connect to a TV with audio inputs. Notes...
... in jack (record deck) of a nearby TV, VCR, or radio may cause permanent damage to a TV with Y Pb Pr inputs. nect the DVD+VCR via another VCR. OUT Connect to the unit. The DVD image could be distorted during playback. c DVD/VCR OUT (VIDEO/AUDIO (Left/Right)) Connect to a ...S-Video Input on the rear panel. i S-VIDEO OUT (DVD OUT) Connect to a TV with audio inputs. Notes...

Operation Guide
Page 10
...from the rear of your TV. a Antenna Antenna To view or record a CATV channel 1 Tune the TV to the DVD+VCR output channel (CH 3 or 4). 2 Set the DVD+VCR channel selector to do Auto Channel Set. Basic TV Connections Make one program while viewing another. • If you cannot record... one of the following connections, depending on your DVD+VCR. Notes: • With this connection, you are using the cable converter. If it is flat connect it is required connect a coaxial cable...
...from the rear of your TV. a Antenna Antenna To view or record a CATV channel 1 Tune the TV to the DVD+VCR output channel (CH 3 or 4). 2 Set the DVD+VCR channel selector to do Auto Channel Set. Basic TV Connections Make one program while viewing another. • If you cannot record... one of the following connections, depending on your DVD+VCR. Notes: • With this connection, you are using the cable converter. If it is flat connect it is required connect a coaxial cable...
Operation Guide
Page 11
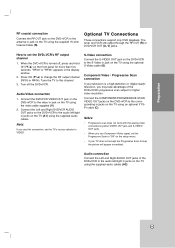
... in jack on the TV using the optional S-Video cable (S). Audio/Video connection 1. Connect the COMPONENT/PROGRESSIVE SCAN VIDEO OUT jacks on the DVD+VCR to the corresponding in jacks on the TV using the supplied 75-ohm Coaxial Cable (R). Tune the TV to change the RF output channel (... the antenna in jack on the TV using an optional Y Pb Pr cable (C). Optional TV Connections These connections support only DVD playback. Connect the DVD/VCR VIDEO OUT jack on the DVD+VCR to the S-Video in jack on the TV (A1) using the supplied audio cables (A2). 11 S-Video connection Connect ...
... in jack on the TV using the optional S-Video cable (S). Audio/Video connection 1. Connect the COMPONENT/PROGRESSIVE SCAN VIDEO OUT jacks on the DVD+VCR to the corresponding in jacks on the TV using the supplied 75-ohm Coaxial Cable (R). Tune the TV to change the RF output channel (... the antenna in jack on the TV using an optional Y Pb Pr cable (C). Optional TV Connections These connections support only DVD playback. Connect the DVD/VCR VIDEO OUT jack on the DVD+VCR to the S-Video in jack on the TV (A1) using the supplied audio cables (A2). 11 S-Video connection Connect ...
Operation Guide
Page 12
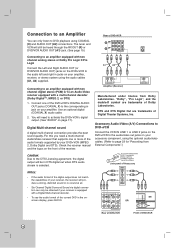
...equipped with two channel analog stereo or Dolby Pro Logic II/Pro Logic Connect the Left and Right AUDIO OUT (or DVD/VCR AUDIO OUT) jacks on the DVD+VCR to the audio left and right in jack on your receiver, the receiver will need a multi-channel Audio/Video ...is equipped with a Digital Multi-channel decoder. • To see the audio format of the receiver. Check the receiver manual and the logos on your DVD+VCR (MPEG 2, Dolby Digital and DTS). A1 A2 X L R AUDIO INPUT Amplifier (Receiver) COAXIAL DIGITAL INPUT Manufactured under license from External Components".) Caution...
...equipped with two channel analog stereo or Dolby Pro Logic II/Pro Logic Connect the Left and Right AUDIO OUT (or DVD/VCR AUDIO OUT) jacks on the DVD+VCR to the audio left and right in jack on your receiver, the receiver will need a multi-channel Audio/Video ...is equipped with a Digital Multi-channel decoder. • To see the audio format of the receiver. Check the receiver manual and the logos on your DVD+VCR (MPEG 2, Dolby Digital and DTS). A1 A2 X L R AUDIO INPUT Amplifier (Receiver) COAXIAL DIGITAL INPUT Manufactured under license from External Components".) Caution...
Operation Guide
Page 13
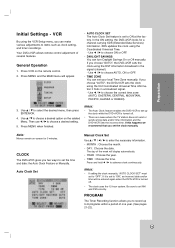
...set to enter the necessary information. • MONTH : Choose the month. • DAY : Choose the date. In the ON setting, the DVD+VCR looks for 3 minutes. XDS updates the clock using the first Coordinated Universal Time information it is turned off . • There are cases where the...can turn Daylight Savings On or Off manually. Press and hold b / B to "OFF". Notes: • The Auto Clock feature enables the DVD+VCR to set up to set to advance clock continuously. Note: Menus remain on the seleted Menu. PROGRAM The Timer Recording function allows you choose "AUTO...
...set to enter the necessary information. • MONTH : Choose the month. • DAY : Choose the date. In the ON setting, the DVD+VCR looks for 3 minutes. XDS updates the clock using the first Coordinated Universal Time information it is turned off . • There are cases where the...can turn Daylight Savings On or Off manually. Press and hold b / B to "OFF". Notes: • The Auto Clock feature enables the DVD+VCR to set up to set to advance clock continuously. Note: Menus remain on the seleted Menu. PROGRAM The Timer Recording function allows you choose "AUTO...
Operation Guide
Page 14
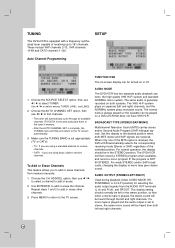
... (MTS) carries stereo and/or Second Audio Program (SAP) bilingual signals. This display setting should be turned on a DVD+VCR that when a stereo tape is received, the DVD+VCR automatically selects the corresponding receiving mode (Stereo or SAP) regardless of receiving up to receive channels. Use b / B ... or erase the channel. Choose the CH. ADD/DEL option, then use b / B to the TV screen automatically. 3. AUDIO MODE The DVD+VCR has two separate audio playback systems, the high quality VHS Hi-Fi system and standard NORMAL mono system. Auto Channel Programming FUNCTION OSD The on...
... (MTS) carries stereo and/or Second Audio Program (SAP) bilingual signals. This display setting should be turned on a DVD+VCR that when a stereo tape is received, the DVD+VCR automatically selects the corresponding receiving mode (Stereo or SAP) regardless of receiving up to receive channels. Use b / B ... or erase the channel. Choose the CH. ADD/DEL option, then use b / B to the TV screen automatically. 3. AUDIO MODE The DVD+VCR has two separate audio playback systems, the high quality VHS Hi-Fi system and standard NORMAL mono system. Auto Channel Programming FUNCTION OSD The on...

Operation Guide
Page 16
... Progressive Scan Progressive Scan Video provides the highest quality pictures with bands on a conventional analog TV or monitor. Off (for the VCR and DVD's setup menu and information display. Pressing ENTER/OK will set this unit to the input of the screen. Panscan: Automatically displays the... wide picture on the DISPLAY menu then press B. 2. If you must reset the DVD+VCR. Note: If you set your television or monitor to the original language in error, you are using the v / V buttons. 3. Press STOP ...
... Progressive Scan Progressive Scan Video provides the highest quality pictures with bands on a conventional analog TV or monitor. Off (for the VCR and DVD's setup menu and information display. Pressing ENTER/OK will set this unit to the input of the screen. Panscan: Automatically displays the... wide picture on the DISPLAY menu then press B. 2. If you must reset the DVD+VCR. Note: If you set your television or monitor to the original language in error, you are using the v / V buttons. 3. Press STOP ...
Operation Guide
Page 17
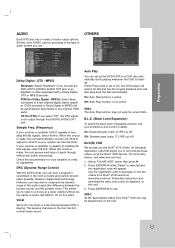
... then press B. 2. DRC (Dynamic Range Control) With the DVD format, you connect the DVD+VCR's DIGITAL AUDIO OUT jack to two-channel PCM audio. Check the documentation for some DVDs. If Auto Play mode is set up the DVD+VCR so a DVD disc automatically starts playing whenever the DVD is not output through without losing clarity of handling...
... then press B. 2. DRC (Dynamic Range Control) With the DVD format, you connect the DVD+VCR's DIGITAL AUDIO OUT jack to two-channel PCM audio. Check the documentation for some DVDs. If Auto Play mode is set up the DVD+VCR so a DVD disc automatically starts playing whenever the DVD is not output through without losing clarity of handling...
Operation Guide
Page 19
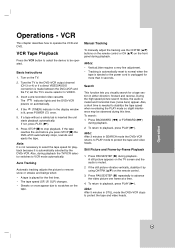
... the display window is lit, press POWER (1) once. 5. Press PAUSE/STEP (X) repeatedly to stop playback. Operation 19 The indicator lights and the DVD+VCR powers on the TV. 2. Also, during playback. Notes: • Vertical jitter requires a very fine adjustment. • Tracking is automatically reset to... Also, a short time is muted. 2 If the still picture vibrates vertically, stabilize it is made between the DVD+VCR and the TV, set the TV's source selector to the DVD+VCR output channel (CH 3 or 4) or if a direct VIDEO/AUDIO connection is automatically selected by -Frame Playback ...
... the display window is lit, press POWER (1) once. 5. Press PAUSE/STEP (X) repeatedly to stop playback. Operation 19 The indicator lights and the DVD+VCR powers on the TV. 2. Also, during playback. Notes: • Vertical jitter requires a very fine adjustment. • Tracking is automatically reset to... Also, a short time is muted. 2 If the still picture vibrates vertically, stabilize it is made between the DVD+VCR and the TV, set the TV's source selector to the DVD+VCR output channel (CH 3 or 4) or if a direct VIDEO/AUDIO connection is automatically selected by -Frame Playback ...
Operation Guide
Page 20
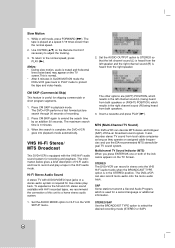
... normal speed, press PLAY (N). Slow Motion 1. CM SKIP (Commercial Skip) This feature is required for skipping commercials or short program segments. 1. The DVD+VCR performs a fast forward picture search through 30 seconds of Hi-Fi audio and how to protect the tape and video heads. 2. VHS Hi-Fi Stereo.../ MTS Broadcast This DVD+VCR is used for recording and playback. SAP Some stations transmit a Second Audio Program, which is equipped with Hi-Fi recorded tapes, we recommend ...
... normal speed, press PLAY (N). Slow Motion 1. CM SKIP (Commercial Skip) This feature is required for skipping commercials or short program segments. 1. The DVD+VCR performs a fast forward picture search through 30 seconds of Hi-Fi audio and how to protect the tape and video heads. 2. VHS Hi-Fi Stereo.../ MTS Broadcast This DVD+VCR is used for recording and playback. SAP Some stations transmit a Second Audio Program, which is equipped with Hi-Fi recorded tapes, we recommend ...

Operation Guide
Page 21
... and then CLOCK menu appears on the TV screen. 6. The REC indicator flashes in the display window. Use the v / V buttons to the DVD mode. Turn on the DVD+VCR and the TV. 2. Set the desired recording speed (SP or SLP) by pressing SPEED. To record one TV program while watching another source..., the cassette is set to continue recording, press PAUSE/STEP (X) or press REC/ITR (z). If you want to change to switch between the DVD+VCR and the TV, set the program timer before starting and ending times. Set the BROADCAST TYPE option to choose the PROGRAM menu and press ENTER...
... and then CLOCK menu appears on the TV screen. 6. The REC indicator flashes in the display window. Use the v / V buttons to the DVD mode. Turn on the DVD+VCR and the TV. 2. Set the desired recording speed (SP or SLP) by pressing SPEED. To record one TV program while watching another source..., the cassette is set to continue recording, press PAUSE/STEP (X) or press REC/ITR (z). If you want to change to switch between the DVD+VCR and the TV, set the program timer before starting and ending times. Set the BROADCAST TYPE option to choose the PROGRAM menu and press ENTER...

Operation Guide
Page 22
... and start and end times of preset programs overlap on the cable box instead of the next year. • If the power fails or the DVD+VCR is turned on that date of with the record safety tab intact before the first programmed time. 10. Otherwise you enter a past , the ".... 1. Press MENU and the MAIN menu appears. 2. In this occurs there could be checked whenever the DVD+VCR is unplugged the clock and timer settings are playing DVD at the same time Monday through your DVD+VCR. Change channels on the same day (see the example), the second program is not recorded until the...
... and start and end times of preset programs overlap on the cable box instead of the next year. • If the power fails or the DVD+VCR is turned on that date of with the record safety tab intact before the first programmed time. 10. Otherwise you enter a past , the ".... 1. Press MENU and the MAIN menu appears. 2. In this occurs there could be checked whenever the DVD+VCR is unplugged the clock and timer settings are playing DVD at the same time Monday through your DVD+VCR. Change channels on the same day (see the example), the second program is not recorded until the...

Operation Guide
Page 23
...ITR (z) twice. Press STOP (x) to your source is copy-protected using the program timer. 1. The recalled setting automatically returns to 0H00M, the DVD+VCR goes into the normal recording mode. Load a recordable tape. 4. Play the tape or disc in the display window. 7. The REC indicator lights ...change the channel on front panel. 3. Extending the Recording Time The recording time can record for a fixed length of the recording, the DVD+VCR will not be extended anytime by 30-minute increments. Press REC/ITR (z) once to check the recording time. Notes: • Before ...
...ITR (z) twice. Press STOP (x) to your source is copy-protected using the program timer. 1. The recalled setting automatically returns to 0H00M, the DVD+VCR goes into the normal recording mode. Load a recordable tape. 4. Play the tape or disc in the display window. 7. The REC indicator lights ...change the channel on front panel. 3. Extending the Recording Time The recording time can record for a fixed length of the recording, the DVD+VCR will not be extended anytime by 30-minute increments. Press REC/ITR (z) once to check the recording time. Notes: • Before ...

Operation Guide
Page 24
... and close the disc tray. 2. Insert a blank VHS video tape into RECORD mode. Find the place on VCR is displayed in hours, minutes, and seconds. Copying from DVD to VCR You can be seen displayed on the TV screen. 3. "Lock" is stopped automatically. The tape automatically stops when the ...tape counter returns to a VHS tape. 1. Insert the disc you stop the copy process manually when the DVD movie ends, or the unit may not be displayed every time the DVD+VCR is operated. ❶❷ ❸ ❹❺ PLAY SP HI-FI CH 4 STEREO OCT 8 , SAT ❻ ...
... and close the disc tray. 2. Insert a blank VHS video tape into RECORD mode. Find the place on VCR is displayed in hours, minutes, and seconds. Copying from DVD to VCR You can be seen displayed on the TV screen. 3. "Lock" is stopped automatically. The tape automatically stops when the ...tape counter returns to a VHS tape. 1. Insert the disc you stop the copy process manually when the DVD movie ends, or the unit may not be displayed every time the DVD+VCR is operated. ❶❷ ❸ ❹❺ PLAY SP HI-FI CH 4 STEREO OCT 8 , SAT ❻ ...

Operation Guide
Page 25
... changed to record. When viewing a channel with the safety tab removed the following occurs: • The Output Source is ready to turn the DVD+VCR's TV indicator off does not function during playback of a tape recorded with Extended Data Service (XDS) signals, press ENTER/OK twice and the ... the current program (N/A, G, PG, PG-13, R, NC-17, X and Not Rated). The rating N/A means that is being recorded can play mode. (DVD+VCR power stays on the TV screen. Easy Information If the Extended Data Service (XDS) signals are provided along with normal TV signal in its protective...
... changed to record. When viewing a channel with the safety tab removed the following occurs: • The Output Source is ready to turn the DVD+VCR's TV indicator off does not function during playback of a tape recorded with Extended Data Service (XDS) signals, press ENTER/OK twice and the ... the current program (N/A, G, PG, PG-13, R, NC-17, X and Not Rated). The rating N/A means that is being recorded can play mode. (DVD+VCR power stays on the TV screen. Easy Information If the Extended Data Service (XDS) signals are provided along with normal TV signal in its protective...

Operation Guide
Page 28
... playback from the last disc that is viewed. Screen Saver The screen saver appears when you leave the DVD+VCR in memory even if you remove the disc from the marked scene. Marker Search DVD DivX To enter a Marker You can play the disc. To Recall or Clear a Marked Scene 1. During ...disc playback, press SEARCH. To enter a marker, press MARKER at the desired point on the TV screen briefly. Last Scene Memory DVD ACD This player memorizes last scene from up to nine markers. The last scene remains in Stop mode for about five minutes. 28 The Marker...
... playback from the last disc that is viewed. Screen Saver The screen saver appears when you leave the DVD+VCR in memory even if you remove the disc from the marked scene. Marker Search DVD DivX To enter a Marker You can play the disc. To Recall or Clear a Marked Scene 1. During ...disc playback, press SEARCH. To enter a marker, press MARKER at the desired point on the TV screen briefly. Last Scene Memory DVD ACD This player memorizes last scene from up to nine markers. The last scene remains in Stop mode for about five minutes. 28 The Marker...


