
Operation Guide
Page 4
...Tracks 33 Erasing a Track from Program List 33 Erasing the Complete Program List 33 Reference Controlling Your TV with the Supplied Remote . . 34 Troubleshooting 35-36 Language Code List 37 Country Code List 38 Specifications 39 Warranty Back Cover About the ...4 Before Use 5-6 Playable Discs 5 Precautions 6 Notes on Discs 6 About Symbols 6 Selecting the Viewing Source 6 Front Panel Controls 7 Display Window 8 Remote Control 9 Connections Panel 10 Preparation Connections 11-13 Connecting Antenna/Cable TV to DVD+VCR . . . 11 Basic TV Connections 12 Optional, Preferred TV ...
...Tracks 33 Erasing a Track from Program List 33 Erasing the Complete Program List 33 Reference Controlling Your TV with the Supplied Remote . . 34 Troubleshooting 35-36 Language Code List 37 Country Code List 38 Specifications 39 Warranty Back Cover About the ...4 Before Use 5-6 Playable Discs 5 Precautions 6 Notes on Discs 6 About Symbols 6 Selecting the Viewing Source 6 Front Panel Controls 7 Display Window 8 Remote Control 9 Connections Panel 10 Preparation Connections 11-13 Connecting Antenna/Cable TV to DVD+VCR . . . 11 Basic TV Connections 12 Optional, Preferred TV ...

Operation Guide
Page 5
...assigned a title reference number enabling you want . Depending on DVDs Some playback operations of DVDs may be intentionally fixed by software manufacturers. Remote Control Battery Installation Detach the battery cover on the unit. otes on the disc, the DVD may not be heard from the analog... not be available or other functions may be played on the rear of a musical piece on the unit. Remote Control Operating Range Point the remote control at the remote sensor and press the buttons. FOR DETAILED INFORMATION, CONTACT YOUR LOCAL COUNTY SOLID WASTE AUTHORITY. Each chapter is ...
...assigned a title reference number enabling you want . Depending on DVDs Some playback operations of DVDs may be intentionally fixed by software manufacturers. Remote Control Battery Installation Detach the battery cover on the unit. otes on the disc, the DVD may not be heard from the analog... not be available or other functions may be played on the rear of a musical piece on the unit. Remote Control Operating Range Point the remote control at the remote sensor and press the buttons. FOR DETAILED INFORMATION, CONTACT YOUR LOCAL COUNTY SOLID WASTE AUTHORITY. Each chapter is ...

Operation Guide
Page 6
... output sources (DVD or VCR) to view on the TV screen. • If you want to view VCR deck output source: Press VCR on the remote or DVD/VCR on the surface. JPEG JPEG Files. In this owner's manual is in the VCR mode, the DVD+VCR will be distorted during... operation. If you want to view DVD deck output source: Press DVD on the remote or DVD/VCR on the front panel until DVD indicator in the display window lights and output source of use strong solvents such as alcohol...
... output sources (DVD or VCR) to view on the TV screen. • If you want to view VCR deck output source: Press VCR on the remote or DVD/VCR on the surface. JPEG JPEG Files. In this owner's manual is in the VCR mode, the DVD+VCR will be distorted during... operation. If you want to view DVD deck output source: Press DVD on the remote or DVD/VCR on the front panel until DVD indicator in the display window lights and output source of use strong solvents such as alcohol...

Operation Guide
Page 7
... while in the DVD or VCR deck temporarily/press repeatedly for frame-by-frame playback. OPEN/CLOSE (Z) Opens or closes the disc tray. Remote Sensor Point the DVD+VCR remote control here. VCR: Rewinds the tape while in the VCR deck. DVD/VCR (output select) Select the DVD or VCR output source...
... while in the DVD or VCR deck temporarily/press repeatedly for frame-by-frame playback. OPEN/CLOSE (Z) Opens or closes the disc tray. Remote Sensor Point the DVD+VCR remote control here. VCR: Rewinds the tape while in the VCR deck. DVD/VCR (output select) Select the DVD or VCR output source...
Operation Guide
Page 9
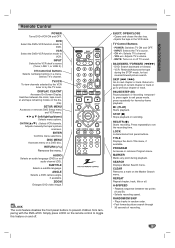
...Adjusts manually the tape's picture onscreen. ENTER Confirms menu selections. RETURN (O) Removes the menu. Press repeatedly to toggle this feature on the remote control to set the recording time. Switches between two points (A and B). - CH/TRK(v+/V-) : Selects VCR channels. DISC MENU Accesses ... to DVD. A-B/SPEED - play. Ejects the tape in the VCR deck. SUBTITLE Selects a subtitle language. REC/ITR (z) Starts recording. Remote Control POWER Turns DVD+VCR ON and OFF. DVD Select the DVD+VCR function mode to exit pause mode. VOL +/-: Adjusts TV's volume...
...Adjusts manually the tape's picture onscreen. ENTER Confirms menu selections. RETURN (O) Removes the menu. Press repeatedly to toggle this feature on the remote control to set the recording time. Switches between two points (A and B). - CH/TRK(v+/V-) : Selects VCR channels. DISC MENU Accesses ... to DVD. A-B/SPEED - play. Ejects the tape in the VCR deck. SUBTITLE Selects a subtitle language. REC/ITR (z) Starts recording. Remote Control POWER Turns DVD+VCR ON and OFF. DVD Select the DVD+VCR function mode to exit pause mode. VOL +/-: Adjusts TV's volume...
Operation Guide
Page 12
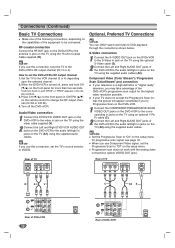
... Progressive Scan on the DVD+VCR. 1 Connect the COMPONENT/PROGRESSIVE SCAN VIDEO OUT jacks on the DVD+VCR to the antenna in jacks on the remote control to the DVD+VCR's RF output channel (CH 3 or 4). Press CH (V/v) on the front panel or CH/TRK (v/V) on the TV using the supplied...
... Progressive Scan on the DVD+VCR. 1 Connect the COMPONENT/PROGRESSIVE SCAN VIDEO OUT jacks on the DVD+VCR to the antenna in jacks on the remote control to the DVD+VCR's RF output channel (CH 3 or 4). Press CH (V/v) on the front panel or CH/TRK (v/V) on the TV using the supplied...

Operation Guide
Page 14
... back tape recorded with the on-screen menus, that the motion picture ratings are shown on the TV screen. Menu Selection Your DVD+VCR allows remote control adjustment of several features. 1 Press MENU and the MAIN menu will appear on the TV screen. ote Menus remain on -screen displays in your...
... back tape recorded with the on-screen menus, that the motion picture ratings are shown on the TV screen. Menu Selection Your DVD+VCR allows remote control adjustment of several features. 1 Press MENU and the MAIN menu will appear on the TV screen. ote Menus remain on -screen displays in your...
Operation Guide
Page 15
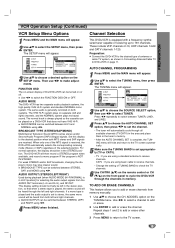
.... 5 Make sure the TUNING BAND is equipped with a frequency synthesized tuner capable of TUNING BAND to check the TV channels. 6 Use CH/TRK (v/V) on the remote control or CH (V/v) on separate (left in HI-FI position] for selecting the audio output signals from the AUDIO OUT terminals (L ch and R ch), and...
.... 5 Make sure the TUNING BAND is equipped with a frequency synthesized tuner capable of TUNING BAND to check the TV channels. 6 Use CH/TRK (v/V) on the remote control or CH (V/v) on separate (left in HI-FI position] for selecting the audio output signals from the AUDIO OUT terminals (L ch and R ch), and...

Operation Guide
Page 21
... stop , rewind and eject the tape, and it using v/V on the TV screen. Streaks or snow appear because of scratches on the Remote Control to advance the video picture one frame at a speed 1/19 times slower than 3 minutes, the DVD+VCR will be extended by ...During slow playback, use v/V on the tape. During high-speed picture search mode, a short period is inserted, the unit will appear on the remote control. Still picture will start playback automatically. 2 Press N (PLAY) once. Tracking is automatically reset to normal when the tape is ejected or the...
... stop , rewind and eject the tape, and it using v/V on the TV screen. Streaks or snow appear because of scratches on the Remote Control to advance the video picture one frame at a speed 1/19 times slower than 3 minutes, the DVD+VCR will be extended by ...During slow playback, use v/V on the tape. During high-speed picture search mode, a short period is inserted, the unit will appear on the remote control. Still picture will start playback automatically. 2 Press N (PLAY) once. Tracking is automatically reset to normal when the tape is ejected or the...

Operation Guide
Page 24
... press PAUSE/STEP (X) during copying, the VCR recording mode stops automatically. "REC" indicator will go into the VCR deck. 3 Press the COPY button on the remote control and then press STOP (x) to VIDEO. 1 Insert a video cassette with the safety tab intact. 2 Select the desired channel with SPEED.
... press PAUSE/STEP (X) during copying, the VCR recording mode stops automatically. "REC" indicator will go into the VCR deck. 3 Press the COPY button on the remote control and then press STOP (x) to VIDEO. 1 Insert a video cassette with the safety tab intact. 2 Select the desired channel with SPEED.

Operation Guide
Page 27
... input source connected to the DVD+VCR. In some cases, the disc menu might appear instead. ote Unless stated otherwise, all operations described use the remote control. or > briefly during playback, press DISPLAY. ote For two-digit numbers, press the numbered buttons (0-9) in "Selecting the Viewing Source" on the Setup menu...
... input source connected to the DVD+VCR. In some cases, the disc menu might appear instead. ote Unless stated otherwise, all operations described use the remote control. or > briefly during playback, press DISPLAY. ote For two-digit numbers, press the numbered buttons (0-9) in "Selecting the Viewing Source" on the Setup menu...

Operation Guide
Page 28
... 1 To repeat the currently playing chapter, press REPEAT. DVD Operation (Continued) General Features (Continued) Still Picture and Frame-by pressing PAUSE/STEP (X) repeatedly on the remote control. 3 To return to playback, press N (PLAY).
... 1 To repeat the currently playing chapter, press REPEAT. DVD Operation (Continued) General Features (Continued) Still Picture and Frame-by pressing PAUSE/STEP (X) repeatedly on the remote control. 3 To return to playback, press N (PLAY).

Operation Guide
Page 32
... the disc's contents. Tip If you are in windows explorer. Press DISC MENU to move to the MP3/WMA-JPEG selection menu. Notes on the remote to highlight " " and press ENTER to return to select the speed you are three viewing Slide Speed options: Fast, Normal, Slow, and Off. File names...
... the disc's contents. Tip If you are in windows explorer. Press DISC MENU to move to the MP3/WMA-JPEG selection menu. Notes on the remote to highlight " " and press ENTER to return to select the speed you are three viewing Slide Speed options: Fast, Normal, Slow, and Off. File names...
Operation Guide
Page 34
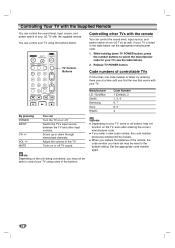
...2. VOL +/- Scans up or down TV POWER button, press the number buttons to control your LG TV with the supplied remote. ote Depending on your TV using some or all buttons may be erased. TV Control Buttons ... the TV on or off . By pressing POWER INPUT CH +/- When you replace the batteries of the remote, the code number you enter a new code number, the code number previously entered will be reset to ...volume of the TV. Controlling Your TV with the Supplied Remote You can control the sound level, input source, and power switch of non-LG TVs as well. Release TV POWER button.
...2. VOL +/- Scans up or down TV POWER button, press the number buttons to control your LG TV with the supplied remote. ote Depending on your TV using some or all buttons may be erased. TV Control Buttons ... the TV on or off . By pressing POWER INPUT CH +/- When you replace the batteries of the remote, the code number you enter a new code number, the code number previously entered will be reset to ...volume of the TV. Controlling Your TV with the Supplied Remote You can control the sound level, input source, and power switch of non-LG TVs as well. Release TV POWER button.
Operation Guide
Page 35
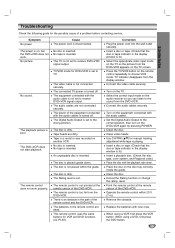
...TV so the picture from the DVD+VCR. Set the Digital Audio Output to receive DVD+VCR signal output. Clean video heads. Point the remote control at the remote sensor of the DVD+VCR. Remove the obstacle. No sound. The connected TV power is lit.) Insert a playable disc. (Check the ...type, color system, and Regional code.) Place the disc with the audio cables is not placed within 23 ft (7 m). Tape heads are dirty. This remote control uses the same buttons for the possible cause of the equipment connected with the playback side down . Insert a disc or tape. (Check that ...
...TV so the picture from the DVD+VCR. Set the Digital Audio Output to receive DVD+VCR signal output. Clean video heads. Point the remote control at the remote sensor of the DVD+VCR. Remove the obstacle. No sound. The connected TV power is lit.) Insert a playable disc. (Check the ...type, color system, and Regional code.) Place the disc with the audio cables is not placed within 23 ft (7 m). Tape heads are dirty. This remote control uses the same buttons for the possible cause of the equipment connected with the playback side down . Insert a disc or tape. (Check that ...
Operation Guide
Page 39
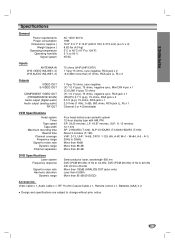
.../CATV) 1 Vp-p 75 ohms, sync negative, RCA jack x 2 -6.0 dBm more than 95 dB (DVD/CD) Accessories: Video cable x 1, Audio cable x 1, RF 75-ohm Coaxial Cable x 1, Remote control x 1, Batteries (AAA) x 2 Design and specifications are subject to -noise ratio Dynamic range Channel separation Four head helical scan azimuth system 12-hour display type...
.../CATV) 1 Vp-p 75 ohms, sync negative, RCA jack x 2 -6.0 dBm more than 95 dB (DVD/CD) Accessories: Video cable x 1, Audio cable x 1, RF 75-ohm Coaxial Cable x 1, Remote control x 1, Batteries (AAA) x 2 Design and specifications are subject to -noise ratio Dynamic range Channel separation Four head helical scan azimuth system 12-hour display type...


