Owner's Manual (English)
Page 3
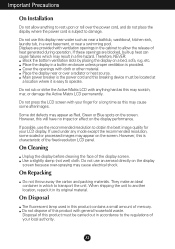
... household waste. On Cleaning Unplug the display before cleaning the face of the fixed-resolution LCD panel. Disposal of this product must be carried out in accordance to operate. Do not press the LCD screen with anything to rest upon or roll over the power cord, and do not... Do not throw away the carton and packing materials. Some dot defects may result in its original material. Do not dispose of your LCD display. Cover the openings with ventilation openings in this display near or over -spraying may appear on the display screen because over a radiator...
... household waste. On Cleaning Unplug the display before cleaning the face of the fixed-resolution LCD panel. Disposal of this product must be carried out in accordance to operate. Do not press the LCD screen with anything to rest upon or roll over the power cord, and do not... Do not throw away the carton and packing materials. Some dot defects may result in its original material. Do not dispose of your LCD display. Cover the openings with ventilation openings in this display near or over -spraying may appear on the display screen because over a radiator...
Owner's Manual (English)
Page 6
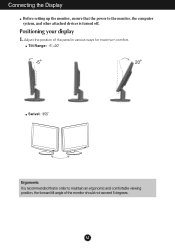
A5 Connecting the Display Before setting up the monitor, ensure that in order to the monitor, the computer system, and other attached devices is turned off. Positioning your display 1. Adjust the position of the monitor should not exceed 5 degrees. Tilt Range: -5˚~20˚ Swivel: 355˚ Ergonomic It is recommended that the power to maintain an ergonomic and comfortable viewing position, the forward tilt angle of the panel in various ways for maximum comfort.
A5 Connecting the Display Before setting up the monitor, ensure that in order to the monitor, the computer system, and other attached devices is turned off. Positioning your display 1. Adjust the position of the monitor should not exceed 5 degrees. Tilt Range: -5˚~20˚ Swivel: 355˚ Ergonomic It is recommended that the power to maintain an ergonomic and comfortable viewing position, the forward tilt angle of the panel in various ways for maximum comfort.

Owner's Manual (English)
Page 7
...Cable Analog signal Digital signal D-sub DVI Wall-outlet type Fix the power cord & signal cable as below sketch map form 1 to 2 . When monitor power is turned on the supplied cable to change the 15 pin high density (3 row) D-sub VGA connector on , the 'Self Image Setting Function... use, a separate plug adapter is executed automatically. (Only Analog Mode) NOTE ' Self Image Setting Function'? Press button on the front switch panel to turn the power on. When you encounter problems such as blurry screen, blurred letters, screen flicker or tilted screen while using the device ...
...Cable Analog signal Digital signal D-sub DVI Wall-outlet type Fix the power cord & signal cable as below sketch map form 1 to 2 . When monitor power is turned on the supplied cable to change the 15 pin high density (3 row) D-sub VGA connector on , the 'Self Image Setting Function... use, a separate plug adapter is executed automatically. (Only Analog Mode) NOTE ' Self Image Setting Function'? Press button on the front switch panel to turn the power on. When you encounter problems such as blurry screen, blurred letters, screen flicker or tilted screen while using the device ...

Owner's Manual (English)
Page 8
Control Panel Functions Front Panel Controls 123 4 5 67 Control FUN Button Function Use this button to enter EZ ZOOMING, 4:3 IN WIDE, PHOTO EFFECT, SOUND items, for more information, refer to ...
Control Panel Functions Front Panel Controls 123 4 5 67 Control FUN Button Function Use this button to enter EZ ZOOMING, 4:3 IN WIDE, PHOTO EFFECT, SOUND items, for more information, refer to ...

Owner's Manual (English)
Page 9
The best display mode is: W2452T : 1920 x 1200 Power Button Use this button to make either D-Sub or DVI connector active. Power Indicator This Indicator lights up as blue when the ... for the current screen resolution size (display mode). This will automatically adjust your display settings, always press the AUTO/SET button prior to amber. Control Panel Functions Control Buttons Button ( ) Function Use these buttons to the display. Use this indicator color changes to entering the On Screen Display(OSD). This feature...
The best display mode is: W2452T : 1920 x 1200 Power Button Use this button to make either D-Sub or DVI connector active. Power Indicator This Indicator lights up as blue when the ... for the current screen resolution size (display mode). This will automatically adjust your display settings, always press the AUTO/SET button prior to amber. Control Panel Functions Control Buttons Button ( ) Function Use these buttons to the display. Use this indicator color changes to entering the On Screen Display(OSD). This feature...

Owner's Manual (English)
Page 20
...clearly portrayed. • Press the AUTO/SET button to automatically adjust your display image to the ideal setting. Set the color setting higher than 24 bits (true color). In this case, please ask to the recommend resolution. The setting method can differ by computer and O/S (Operation System),... If the results are unsatisfactory, adjust the image position using the PHASE icon in the on screen display. • Check Control Panel --> Display --> Settings and adjust the display to the recommended resolution or adjust the display image to the ideal setting. Important Check Control...
...clearly portrayed. • Press the AUTO/SET button to automatically adjust your display image to the ideal setting. Set the color setting higher than 24 bits (true color). In this case, please ask to the recommend resolution. The setting method can differ by computer and O/S (Operation System),... If the results are unsatisfactory, adjust the image position using the PHASE icon in the on screen display. • Check Control Panel --> Display --> Settings and adjust the display to the recommended resolution or adjust the display image to the ideal setting. Important Check Control...

Owner's Manual (English)
Page 21
... is properly connected and use a screwdriver to the recommend resolution. A20 Have you installed the display driver? ● Have you see an "Unrecognized monitor, Plug&Play (VESA DDC) monitor found" message? • Make sure to install the display driver from our web site: http://www.lge.com. ● Do you installed the... screen color is mono or abnormal. • Check if the signal cable is properly inserted in the slot. • Set the color setting higher than 24 bits (true color) at Control Panel -
... is properly connected and use a screwdriver to the recommend resolution. A20 Have you installed the display driver? ● Have you see an "Unrecognized monitor, Plug&Play (VESA DDC) monitor found" message? • Make sure to install the display driver from our web site: http://www.lge.com. ● Do you installed the... screen color is mono or abnormal. • Check if the signal cable is properly inserted in the slot. • Set the color setting higher than 24 bits (true color) at Control Panel -

Owner's Manual (English)
Page 22
....36 cm / 22.58 inches 57.36 cm / 22.58 inches Height 46.29 cm / 18.22 inches 40.55 cm / 15.96 inches Depth 24.26 cm / 9.55 inches 8.70 cm / 3.43 inches Net 6.1 kg (13.45 lbs) Tilt Swivel -5˚~20˚ 355˚ AC 100-240V~ 50/60Hz... Sync Input Video Input Resolution Plug&Play Power Consumption Dimensions &Weight Tilt Range Swivel Range Power Input Environmental Conditions Stand Base Signal cable Power cord 24 inches (61.132 cm) Flat Panel Active matrix-TFT LCD Anti-Glare coating 24 inches viewable 0.270*0.270 mm pixel pitch Horizontal Freq.
....36 cm / 22.58 inches 57.36 cm / 22.58 inches Height 46.29 cm / 18.22 inches 40.55 cm / 15.96 inches Depth 24.26 cm / 9.55 inches 8.70 cm / 3.43 inches Net 6.1 kg (13.45 lbs) Tilt Swivel -5˚~20˚ 355˚ AC 100-240V~ 50/60Hz... Sync Input Video Input Resolution Plug&Play Power Consumption Dimensions &Weight Tilt Range Swivel Range Power Input Environmental Conditions Stand Base Signal cable Power cord 24 inches (61.132 cm) Flat Panel Active matrix-TFT LCD Anti-Glare coating 24 inches viewable 0.270*0.270 mm pixel pitch Horizontal Freq.
