
Owners Manual
Page 1
DVD PLAYER/ VIDEO CASSETTE RECORDER OWNER'S MANUAL MODEL : V281 Before connecting, operating or adjusting this product, please read this instruction booklet carefully and completely.
DVD PLAYER/ VIDEO CASSETTE RECORDER OWNER'S MANUAL MODEL : V281 Before connecting, operating or adjusting this product, please read this instruction booklet carefully and completely.
Owners Manual
Page 3
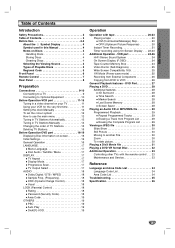
... (Optimum Picture Response 20 Instant Timer Recording 21 Timer recording using On Screen Display . . . 22-23 Additional Operation - DVD Part 27 Playing a DVD 28 Additional features 28 3D Surround 28 Time Search 28 Marker Search 28 Last Scene Memory 28 Screen Saver 28 Playing an Audio... CD or MP3/WMA file 29 Programmed Playback 29 Repeat Programmed Tracks 29 Erasing a Track from DVD to VCR 26 General Playback features - Introduction Table of Contents Introduction Safety Precautions 2 Table of Contents 3 Before Use 4-5 About the ...
... (Optimum Picture Response 20 Instant Timer Recording 21 Timer recording using On Screen Display . . . 22-23 Additional Operation - DVD Part 27 Playing a DVD 28 Additional features 28 3D Surround 28 Time Search 28 Marker Search 28 Last Scene Memory 28 Screen Saver 28 Playing an Audio... CD or MP3/WMA file 29 Programmed Playback 29 Repeat Programmed Tracks 29 Erasing a Track from DVD to VCR 26 General Playback features - Introduction Table of Contents Introduction Safety Precautions 2 Table of Contents 3 Before Use 4-5 About the ...
Owners Manual
Page 4
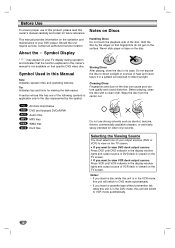
...retain for future reference. Wipe the disc from the center out. Symbol Used in this unit will switch to direct sunlight or sources of your DVD player. This manual provides information on the TV screen. Should the unit require service, contact an authorized service location. Notes: • If you... the Symbol Display Notes on Discs Handling Discs Do not touch the playback side of your TV display during operation and indicates that specific DVD video disc. Never stick paper or tape on the disc can cause poor picture quality and sound distortion. A section whose title has ...
...retain for future reference. Wipe the disc from the center out. Symbol Used in this unit will switch to direct sunlight or sources of your DVD player. This manual provides information on the TV screen. Should the unit require service, contact an authorized service location. Notes: • If you... the Symbol Display Notes on Discs Handling Discs Do not touch the playback side of your TV display during operation and indicates that specific DVD video disc. Never stick paper or tape on the disc can cause poor picture quality and sound distortion. A section whose title has ...
Owners Manual
Page 5
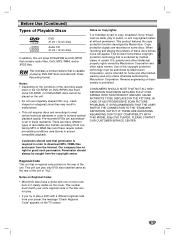
... Corporation, and is protected by law to copy, broadcast, show, broadcast via cable, play in order to achieve optimal playback quality. Pre-recorded DVDs are many different types of recordable disc formats (including CD-R containing MP3 or WMA files) and these require certain pre-existing conditions (see above)...that contains audio titles, DivX, MP3, WMA, and/or JPEG files. ment or the CD-R/RW (or DVD±R/RW) disc itself, some discs. Notes on some CD-R/RW (or DVD±R/RW) discs cannot be sought from the copyright owner. Copy protection signals are recorded on Copyrights: It is...
... Corporation, and is protected by law to copy, broadcast, show, broadcast via cable, play in order to achieve optimal playback quality. Pre-recorded DVDs are many different types of recordable disc formats (including CD-R containing MP3 or WMA files) and these require certain pre-existing conditions (see above)...that contains audio titles, DivX, MP3, WMA, and/or JPEG files. ment or the CD-R/RW (or DVD±R/RW) disc itself, some discs. Notes on some CD-R/RW (or DVD±R/RW) discs cannot be sought from the copyright owner. Copy protection signals are recorded on Copyrights: It is...
Owners Manual
Page 6
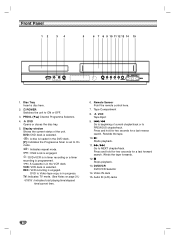
...tape. 10. x Stops playback. 13. Display window Shows the current status of current chapter/track or to beginning of the unit. N Starts playback. 11. DVD/VCR DVD/VCR Selector 14. Disc Tray Insert a disc here. 2. 1 POWER Switches the unit to Video tape copy is set to NEXT chapter/track. Remote Sensor ...Point the remote control here. 7. VCR: VCR deck is engaged. DVD to ON or OFF. 3. Press and hold for two seconds for a fast forward search. Video IN Jack 15. Press and hold for two seconds...
...tape. 10. x Stops playback. 13. Display window Shows the current status of current chapter/track or to beginning of the unit. N Starts playback. 11. DVD/VCR DVD/VCR Selector 14. Disc Tray Insert a disc here. 2. 1 POWER Switches the unit to Video tape copy is set to NEXT chapter/track. Remote Sensor ...Point the remote control here. 7. VCR: VCR deck is engaged. DVD to ON or OFF. 3. Press and hold for two seconds for a fast forward search. Video IN Jack 15. Press and hold for two seconds...
Owners Manual
Page 7
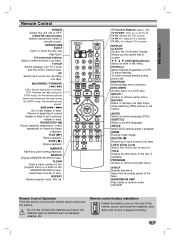
... setup menu. RETURN Hides or displays the help menu while watching JPEG picture in the menu. AUDIO Select an audio language (DVD). ANGLE Select DVD camera angle if available ZOOM Enlarge video image. Select the recording speed of current chapter or track or go to beginning of the.../STEP (X) Pause playback temporarily / press repeatedly for recording into tape. * LOCK (Child Lock) Switch the Child Lock on the rear of a DVD disc. Reset tape counter to next chapter or track. TV PR +/-: Selects TV's channel. DISPLAY CLK/CNT Access the On-Screen Display. AAA Remote...
... setup menu. RETURN Hides or displays the help menu while watching JPEG picture in the menu. AUDIO Select an audio language (DVD). ANGLE Select DVD camera angle if available ZOOM Enlarge video image. Select the recording speed of current chapter or track or go to beginning of the.../STEP (X) Pause playback temporarily / press repeatedly for recording into tape. * LOCK (Child Lock) Switch the Child Lock on the rear of a DVD disc. Reset tape counter to next chapter or track. TV PR +/-: Selects TV's channel. DISPLAY CLK/CNT Access the On-Screen Display. AAA Remote...

Owners Manual
Page 8
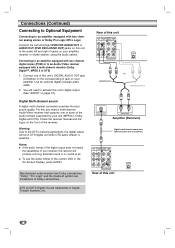
... the unit. 8 VIDEO IN (VCR IN AV1) Receive the video signals from an external source to your TV using this jack. AUDIO OUT (Left/Right) (DVD EXCLUSIVE OUT) Connect to an amplifier, receiver or stereo system. Do not touch the inner pins of the jacks on the rear panel. AUDIO OUT... (Left/Right) (DVD/VCR OUT) Connect to an amplifier, receiver or stereo system. RF.OUT Connect to VCR. Pr R R L L Pb Y AC Power Cord Connect to digital (coaxial) audio...
... the unit. 8 VIDEO IN (VCR IN AV1) Receive the video signals from an external source to your TV using this jack. AUDIO OUT (Left/Right) (DVD EXCLUSIVE OUT) Connect to an amplifier, receiver or stereo system. Do not touch the inner pins of the jacks on the rear panel. AUDIO OUT... (Left/Right) (DVD/VCR OUT) Connect to an amplifier, receiver or stereo system. RF.OUT Connect to VCR. Pr R R L L Pb Y AC Power Cord Connect to digital (coaxial) audio...

Owners Manual
Page 9
...using the COMPONENT/PROGRESSIVE SCAN VIDEO OUT jacks, set the TV' s input to COMPONENT VIDEO. Connect the COMPONENT/PROGRESSIVE SCAN VIDEO OUT jacks on the DVD Player to the audio left /right in jacks on the TV using the S-VIDEO OUT jack, set TV's input to S-VIDEO. When using the... S-Video cable (S). 2. Connect the S-VIDEO OUT jack on this unit's DVD/VCR OUT to the corresponding in jacks on the TV using the Y Pb Pr cable (C). 2. Connect the COMPONENT/ PROGRESSIVE SCAN VIDEO OUT jacks on the...
...using the COMPONENT/PROGRESSIVE SCAN VIDEO OUT jacks, set the TV' s input to COMPONENT VIDEO. Connect the COMPONENT/PROGRESSIVE SCAN VIDEO OUT jacks on the DVD Player to the audio left /right in jacks on the TV using the S-VIDEO OUT jack, set TV's input to S-VIDEO. When using the... S-Video cable (S). 2. Connect the S-VIDEO OUT jack on this unit's DVD/VCR OUT to the corresponding in jacks on the TV using the Y Pb Pr cable (C). 2. Connect the COMPONENT/ PROGRESSIVE SCAN VIDEO OUT jacks on the...
Owners Manual
Page 10
... an Audio/ Video receiver equipped with two channel analog stereo or Dolby Pro Logic II/Pro Logic Connect the Left and Right DVD/VCR AUDIO OUT or AUDIO OUT (DVD EXCLUSIVE OUT) jacks on this unit 10 For this you need to activate this unit's digital output. (See "AUDIO" on the front... to Optional Equipment Connecting to an amplifier equipped with a multi-channel decoder (Dolby Digital™, MPEG 2 or DTS) 1. Connect one or more of the current DVD in DTS digital out when DTS audio stream is selected. You will be in the On-Screen Display, press AUDIO. To see the audio format...
... an Audio/ Video receiver equipped with two channel analog stereo or Dolby Pro Logic II/Pro Logic Connect the Left and Right DVD/VCR AUDIO OUT or AUDIO OUT (DVD EXCLUSIVE OUT) jacks on this unit 10 For this you need to activate this unit's digital output. (See "AUDIO" on the front... to Optional Equipment Connecting to an amplifier equipped with a multi-channel decoder (Dolby Digital™, MPEG 2 or DTS) 1. Connect one or more of the current DVD in DTS digital out when DTS audio stream is selected. You will be in the On-Screen Display, press AUDIO. To see the audio format...
Owners Manual
Page 11
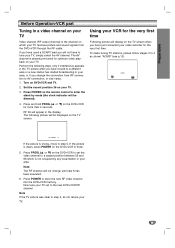
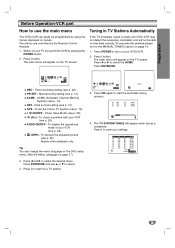
.... Press and hold PROG. (v or V) on your TV. 3. To make tuning TV stations, please follow stages 3 to store the new RF video channel into the DVD+VCR memory. If the picture is snowy, move to a vacant position between 22 and 68 which your TV receives picture and sound signals from RF... your video recorder for the very first time. ACMS Pr-12 ACMS OK i RF CHANNEL 36 If the picture is clean, press POWER on the DVD+VCR to AV connection, or vise versa. 1. Now tune your TV. 11 Perform the following picture will be displayed on the TV screen. RF 36...
.... Press and hold PROG. (v or V) on your TV. 3. To make tuning TV stations, please follow stages 3 to store the new RF video channel into the DVD+VCR memory. If the picture is snowy, move to a vacant position between 22 and 68 which your TV receives picture and sound signals from RF... your video recorder for the very first time. ACMS Pr-12 ACMS OK i RF CHANNEL 36 If the picture is clean, press POWER on the DVD+VCR to AV connection, or vise versa. 1. Now tune your TV. 11 Perform the following picture will be displayed on the TV screen. RF 36...

Owners Manual
Page 12
.... 12 Press 3 or 4 to select according to the RF AUDIO used . e.g. 1pm will appear on the remote control to select SET. Press i. Please note your DVD+VCR. 1. Press 3 or 4 to select according to the COLOUR system used . To set the colour system 1. HH MM DD MM YY 12 SET i 2. If you... details. 4. HH MM DD MM YY 8 : 00 1 . 01 . 07 MON 12 SET OK i 3. Before Operation-VCR part Setting the clock Manually The clock in your DVD+VCR controls time and date settings for your...
.... 12 Press 3 or 4 to select according to the RF AUDIO used . e.g. 1pm will appear on the remote control to select SET. Press i. Please note your DVD+VCR. 1. Press 3 or 4 to select according to the COLOUR system used . To set the colour system 1. HH MM DD MM YY 12 SET i 2. If you... details. 4. HH MM DD MM YY 8 : 00 1 . 01 . 07 MON 12 SET OK i 3. Before Operation-VCR part Setting the clock Manually The clock in your DVD+VCR controls time and date settings for your...
Owners Manual
Page 13
... menu. (See the Menu Language on page 14. 1. The main menu will appear when tuning is weak your DVD+VCR. 2. Power Save Mode (see p. 20). To check a problem with your VCR (see p. 25). To display the operational mode of your VCR (see p. 24). (OPR) - ... 00 PR-03 S E Pr-12 ACMS i 4. Preparation Before Operation-VCR part How to use 3 or 4 to select. 4. To overcome this problem please turn on your DVD+VCR may not detect the necessary information and will appear on screen. Timer recording setting (see p. 12). The main menu will not be programmed by...
... menu. (See the Menu Language on page 14. 1. The main menu will appear when tuning is weak your DVD+VCR. 2. Power Save Mode (see p. 20). To check a problem with your VCR (see p. 25). To display the operational mode of your VCR (see p. 24). (OPR) - ... 00 PR-03 S E Pr-12 ACMS i 4. Preparation Before Operation-VCR part How to use 3 or 4 to select. 4. To overcome this problem please turn on your DVD+VCR may not detect the necessary information and will appear on screen. Timer recording setting (see p. 12). The main menu will not be programmed by...

Owners Manual
Page 14
... PR CH 04 C04 MFT 00 STATION - Press 3 or 4 to store them. 1. Press ENTER/OK. Your new TV station has now been tuned into your DVD+VCR's automatic tuning process to move back and forth between characters. The main menu will stop when it locates a stations. The station table will appear...- - 08 - - You must tune in these weaker broadcast stations manually in TV Stations Manually In certain areas of the country broadcast signals may name your DVD+VCR to select the programme number that you want to tune (for your TV station. PRSET 00 PR-01 00 PR-02 00 PR-03...
... PR CH 04 C04 MFT 00 STATION - Press 3 or 4 to store them. 1. Press ENTER/OK. Your new TV station has now been tuned into your DVD+VCR's automatic tuning process to move back and forth between characters. The main menu will stop when it locates a stations. The station table will appear...- - 08 - - You must tune in these weaker broadcast stations manually in TV Stations Manually In certain areas of the country broadcast signals may name your DVD+VCR to select the programme number that you want to tune (for your TV station. PRSET 00 PR-01 00 PR-02 00 PR-03...

Owners Manual
Page 15
...-03 OK i 4. Press 1. After a short while, the selected station will be deleted. Deleting TV Stations After tuning TV stations into your DVD+VCR you may wish to change the order in which they are stored without having to delete. (for example, PR-01) 01 C01 02 ...00 PR-04 - - - - - - - - - - - - - - - - - - - - - - - - - - - - Preparation Before Operation-VCR part Changing the order of TV Stations After tuning TV stations into your DVD+VCR you may wish to move (for example, PR-03). Press 3 or 4 to select the programme number you want to move to select the PR...
...-03 OK i 4. Press 1. After a short while, the selected station will be deleted. Deleting TV Stations After tuning TV stations into your DVD+VCR you may wish to change the order in which they are stored without having to delete. (for example, PR-01) 01 C01 02 ...00 PR-04 - - - - - - - - - - - - - - - - - - - - - - - - - - - - Preparation Before Operation-VCR part Changing the order of TV Stations After tuning TV stations into your DVD+VCR you may wish to move (for example, PR-03). Press 3 or 4 to select the programme number you want to move to select the PR...

Owners Manual
Page 16
...can also set a language for a few seconds, the on -screen. 1. Selected audio language or channel Subtitle - A second press of chapters Time - General Operation 1. Press DVD on the disc type or playing status. 1 / 3 1 / 12 0:20:09 ABC 1 ENG 1 / 1 3D SUR 2. Use v / V to select the desired...To go to the third level. 5. The items displayed differ depending on the remote control. Title (Track) - Initial Settings By using the DVD Setup menu, you back to items such as alternate setting(s). 4. To display and exit the Menu: Press SETUP to show various playback information....
...can also set a language for a few seconds, the on -screen. 1. Selected audio language or channel Subtitle - A second press of chapters Time - General Operation 1. Press DVD on the disc type or playing status. 1 / 3 1 / 12 0:20:09 ABC 1 ENG 1 / 1 3D SUR 2. Use v / V to select the desired...To go to the third level. 5. The items displayed differ depending on the remote control. Title (Track) - Initial Settings By using the DVD Setup menu, you back to items such as alternate setting(s). 4. To display and exit the Menu: Press SETUP to show various playback information....
Owners Manual
Page 17
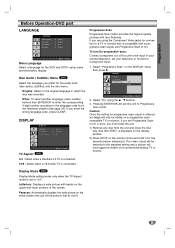
...this unit to the original language in which the disc was recorded. Display Mode DVD Display Mode setting works only when the TV Aspect mode is connected. Move Enter 2. Preparation Before Operation-DVD part LANGUAGE LANGUAGE Menu Language Disc Audio Disc Subtitle Disc Menu English Original Off ... monitor that do not fit. 17 DISPLAY DISPLAY TV Aspect Display Mode Progressive Scan TV Output Select 16 : 9 Widescreen Off RGB Move Select TV Aspect DVD 4:3 : Select when a standard 4:3 TV is connected. 16:9 : Select when a 16:9 wide TV is set your television or monitor to the...
...this unit to the original language in which the disc was recorded. Display Mode DVD Display Mode setting works only when the TV Aspect mode is connected. Move Enter 2. Preparation Before Operation-DVD part LANGUAGE LANGUAGE Menu Language Disc Audio Disc Subtitle Disc Menu English Original Off ... monitor that do not fit. 17 DISPLAY DISPLAY TV Aspect Display Mode Progressive Scan TV Output Select 16 : 9 Widescreen Off RGB Move Select TV Aspect DVD 4:3 : Select when a standard 4:3 TV is connected. 16:9 : Select when a 16:9 wide TV is set your television or monitor to the...

Owners Manual
Page 18
... or MPEG will be automatically downmixed to an amplifier or other equipment with a Dolby Digital, DTS or MPEG decoder. Sample Freq. (Frequency) DVD If your receiver or amplifier is capable of sound. To access the LOCK options, you must input the password you make a mistake before pressing...OK to confirm your amplifier to verify. 3. Input a password and press ENTER/OK. However, you use. Press SETUP to compress the dynamic range of rated DVDs based on the LOCK menu then press B. 2. When this choice is the least restrictive. Enter it using the v / V buttons. Select "Rating" ...
... or MPEG will be automatically downmixed to an amplifier or other equipment with a Dolby Digital, DTS or MPEG decoder. Sample Freq. (Frequency) DVD If your receiver or amplifier is capable of sound. To access the LOCK options, you must input the password you make a mistake before pressing...OK to confirm your amplifier to verify. 3. Input a password and press ENTER/OK. However, you use. Press SETUP to compress the dynamic range of rated DVDs based on the LOCK menu then press B. 2. When this choice is the least restrictive. Enter it using the v / V buttons. Select "Rating" ...
Owners Manual
Page 19
... ENTER/OK while "Select" is inserted. Note: All the downloaded videos from DivX® VOD service at www.divx.com/vod. DVD part Area Code DVD Enter the Area Code whose standards were used to exit. For more information, visit www.divx.com/vod. 1. Press ENTER/OK to... 5. Follow the instructions and download the video onto a disc for title that are available on the LOCK menu then press B. 2. Select "Area Code" on some DVDs. 19 Select "DivX(R) VOD" option then press B. 2. Preparation Before Operation - Press ENTER/OK to use this unit. 3. Follow step 2 as shown left (...
... ENTER/OK while "Select" is inserted. Note: All the downloaded videos from DivX® VOD service at www.divx.com/vod. DVD part Area Code DVD Enter the Area Code whose standards were used to exit. For more information, visit www.divx.com/vod. 1. Press ENTER/OK to... 5. Follow the instructions and download the video onto a disc for title that are available on the LOCK menu then press B. 2. Select "Area Code" on some DVDs. 19 Select "DivX(R) VOD" option then press B. 2. Preparation Before Operation - Press ENTER/OK to use this unit. 3. Follow step 2 as shown left (...
Owners Manual
Page 20
...120 seconds 5 Press 150 seconds 6 Press 180 seconds OPR (Optimum Picture Response) This feature automatically improves playback picture quality by adjusting your DVD+VCR. Slow motion playback, Shuttle : During playing back or still picture press F or G. During slow motion and shuttle, the noise .... Press EJECT. CM (Commercial Message) Skip: This feature enables you are on your tape. Getting a better picture When a cassette is reached, your DVD+VCR will stop , eject the tape. Still picture quality can reach the following playback speeds. (REV, PB 5-, PB 1-, Still, SLW, PLAY,...
...120 seconds 5 Press 150 seconds 6 Press 180 seconds OPR (Optimum Picture Response) This feature automatically improves playback picture quality by adjusting your DVD+VCR. Slow motion playback, Shuttle : During playing back or still picture press F or G. During slow motion and shuttle, the noise .... Press EJECT. CM (Commercial Message) Skip: This feature enables you are on your tape. Getting a better picture When a cassette is reached, your DVD+VCR will stop , eject the tape. Still picture quality can reach the following playback speeds. (REV, PB 5-, PB 1-, Still, SLW, PLAY,...
Owners Manual
Page 21
...for recording from AUDIO IN (L(MONO)/R)/ VIDEO IN terminals on the front of your unit. Press REC/ITR on the remote to turn on your DVD+VCR. 2. Press PAUSE/STEP to select TV mode and then selecting a different channel on your TV. 21 Remember you can record one programme while...successive press will be paused for a set period of time on a video cassette. using Standard Play (SP); The video cassette should have correctly connected your DVD+VCR as SP. 6. Press 3 or 4 to select the programme number you wish to 5 minutes; Tapes can happen quite easily by accident!) remove the...
...for recording from AUDIO IN (L(MONO)/R)/ VIDEO IN terminals on the front of your unit. Press REC/ITR on the remote to turn on your DVD+VCR. 2. Press PAUSE/STEP to select TV mode and then selecting a different channel on your TV. 21 Remember you can record one programme while...successive press will be paused for a set period of time on a video cassette. using Standard Play (SP); The video cassette should have correctly connected your DVD+VCR as SP. 6. Press 3 or 4 to select the programme number you wish to 5 minutes; Tapes can happen quite easily by accident!) remove the...


