

Owners Manual
Page 5
...at the remote sensor and press the buttons. Angle: About 30° in this unit or the disc. Moisture Condensation Never operate the DVD+VCR immediately after moving it . Symbol Used in each direction of the front of the remote sensor. Do not expose the disc to direct ... indicates that the function is applicable only to a warm location. Should the unit require service, contact an authorized service location. If you use the DVD+VCR in such a situation, it in its case. Do not use strong solvents such as standard, alkaline, etc. 5 AAA Introduction Introduction To ensure ...
...at the remote sensor and press the buttons. Angle: About 30° in this unit or the disc. Moisture Condensation Never operate the DVD+VCR immediately after moving it . Symbol Used in each direction of the front of the remote sensor. Do not expose the disc to direct ... indicates that the function is applicable only to a warm location. Should the unit require service, contact an authorized service location. If you use the DVD+VCR in such a situation, it in its case. Do not use strong solvents such as standard, alkaline, etc. 5 AAA Introduction Introduction To ensure ...
Owners Manual
Page 6
... insert a disc while the DVD+VCR is in the VCR mode, the DVD+VCR will switch to DVD mode automatically. • If you want to view DVD deck output source: Press DVD until VCR indicator in the DVD mode, the DVD+VCR will appear. Notes on Regional Codes • Most DVD discs have a globe with one of your DVD+VCR's regional code or the disc...
... insert a disc while the DVD+VCR is in the VCR mode, the DVD+VCR will switch to DVD mode automatically. • If you want to view DVD deck output source: Press DVD until VCR indicator in the DVD mode, the DVD+VCR will appear. Notes on Regional Codes • Most DVD discs have a globe with one of your DVD+VCR's regional code or the disc...
Owners Manual
Page 8
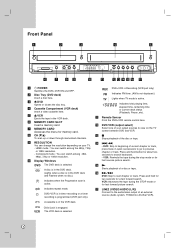
... in timer recording or a timer recording is in the VCR deck. VCR: Advances the tape during the stop mode or for fast forward picture search. Front Panel a b c d e DVD VCR REC PM TV f g hi j k lmnop q a 1 POWER Switches the DVD+VCR ON and OFF. e Z VCR Ejects the tape in the DVD deck and Flashes when no disc.) [P] Indicates when the...
... in timer recording or a timer recording is in the VCR deck. VCR: Advances the tape during the stop mode or for fast forward picture search. Front Panel a b c d e DVD VCR REC PM TV f g hi j k lmnop q a 1 POWER Switches the DVD+VCR ON and OFF. e Z VCR Ejects the tape in the DVD deck and Flashes when no disc.) [P] Indicates when the...

Owners Manual
Page 9
... a subtitle language. ZOOM Enlarges DVD video image. Press repeatedly to DVD. LOCK Locks/unlocks front panel buttons. PROGRAM Places a track on your TV. * This button is not used. 9 Introduction Remote Control POWER Switches DVD+VCR ON and OFF. DVD Select the DVD+VCR function mode to set the recording... time. INPUT Selects the VCR deck's source (Tuner, LINE 1, or LINE 2). SKIP (. / >) Go to previous chapter or ...
... a subtitle language. ZOOM Enlarges DVD video image. Press repeatedly to DVD. LOCK Locks/unlocks front panel buttons. PROGRAM Places a track on your TV. * This button is not used. 9 Introduction Remote Control POWER Switches DVD+VCR ON and OFF. DVD Select the DVD+VCR function mode to set the recording... time. INPUT Selects the VCR deck's source (Tuner, LINE 1, or LINE 2). SKIP (. / >) Go to previous chapter or ...

Owners Manual
Page 10
...equipment. Please refer to the manuals of an external source (Audio system, TV/Monitor, VCR, Camcorder). c DVD/VCR OUT (VIDEO/AUDIO (Left/Right)) Connect to a TV with RF coaxial inputs. h COAXIAL (DIGITAL AUDIO OUT jack) (DVD OUT) Connect to a S-Video Input on TV. Preparation Depending on the rear panel.... Do not connect the DVD+VCR via another VCR. Rear Panel Caution Do not touch the inner pins of a nearby TV, VCR, or radio may cause permanent damage to the unit. k HDMI OUT HDMI output providing a ...
...equipment. Please refer to the manuals of an external source (Audio system, TV/Monitor, VCR, Camcorder). c DVD/VCR OUT (VIDEO/AUDIO (Left/Right)) Connect to a TV with RF coaxial inputs. h COAXIAL (DIGITAL AUDIO OUT jack) (DVD OUT) Connect to a S-Video Input on TV. Preparation Depending on the rear panel.... Do not connect the DVD+VCR via another VCR. Rear Panel Caution Do not touch the inner pins of a nearby TV, VCR, or radio may cause permanent damage to the unit. k HDMI OUT HDMI output providing a ...

Owners Manual
Page 11
...you use this connection, set the TV's source selector to VIDEO. • For DVD/VCR VIDEO OUT jack connection, resolution must be set the DVD+VCR's RF output channel 1. Connect the DVD/VCR VIDEO OUT jack on the DVD+VCR to the video in jack on the TV using a cable box to tune channels,...(V/v) to the cable output channel. (Example: CH3) 3 Select a channel using the supplied audio cables. Connect the Left and Right DVD/VCR AUDIO OUT jacks on the DVD+VCR to the audio left/right in the display window. 2. Preparation Connecting an Antenna or Cable TV a Antenna: Disconnect the antenna from...
...you use this connection, set the TV's source selector to VIDEO. • For DVD/VCR VIDEO OUT jack connection, resolution must be set the DVD+VCR's RF output channel 1. Connect the DVD/VCR VIDEO OUT jack on the DVD+VCR to the video in jack on the TV using a cable box to tune channels,...(V/v) to the cable output channel. (Example: CH3) 3 Select a channel using the supplied audio cables. Connect the Left and Right DVD/VCR AUDIO OUT jacks on the DVD+VCR to the audio left/right in the display window. 2. Preparation Connecting an Antenna or Cable TV a Antenna: Disconnect the antenna from...

Owners Manual
Page 12
... only non-copy protected discs can accept. 12 Rear of TV ANTENNA INPUT VIDEO INPUT AUDIO INPUT L R R V A1 Rear of DVD+VCR Connect the COMPONENT/PROGRESSIVE SCAN VIDEO OUT jacks on the DVD+VCR to the corresponding in jack on the TV using the optional S-Video cable (S). The tuner and...; The 480p and 720p resolutions are as shown below. C A2 S Pr Pb Y COMPONENT/PROGRESSIVE SCAN VIDEO INPUT R L AUDIO INPUT Rear of the DVD+VCR to the audio left/right in the display window. 3. Audio connection Connect the Left and Right AUDIO OUT jacks of TV S-VIDEO INPUT Optional TV...
... only non-copy protected discs can accept. 12 Rear of TV ANTENNA INPUT VIDEO INPUT AUDIO INPUT L R R V A1 Rear of DVD+VCR Connect the COMPONENT/PROGRESSIVE SCAN VIDEO OUT jacks on the DVD+VCR to the corresponding in jack on the TV using the optional S-Video cable (S). The tuner and...; The 480p and 720p resolutions are as shown below. C A2 S Pr Pb Y COMPONENT/PROGRESSIVE SCAN VIDEO INPUT R L AUDIO INPUT Rear of the DVD+VCR to the audio left/right in the display window. 3. Audio connection Connect the Left and Right AUDIO OUT jacks of TV S-VIDEO INPUT Optional TV...

Owners Manual
Page 13
.... • If your TV does not support Bitstream Audio out in HDMI connection, turn off the unit and then turn the unit on the DVD+VCR. Set the TV's source to HDMI (refer to select the desired resolution. Press RESOLUTION repeatedly to TV's Owner's manual). 2. Rear of...HDCP-compatible DVI devices will out at 480p resolution, even if you can change the resolution (480i, 480p, 720p, 1080i) for correct alignment with this DVD+VCR using a HDMI cable. 1. Preparation HDMI Connection If you have a HDMI TV or monitor, you set the resolution to 480i on the HDMI connection.
.... • If your TV does not support Bitstream Audio out in HDMI connection, turn off the unit and then turn the unit on the DVD+VCR. Set the TV's source to HDMI (refer to select the desired resolution. Press RESOLUTION repeatedly to TV's Owner's manual). 2. Rear of...HDCP-compatible DVI devices will out at 480p resolution, even if you can change the resolution (480i, 480p, 720p, 1080i) for correct alignment with this DVD+VCR using a HDMI cable. 1. Preparation HDMI Connection If you have a HDMI TV or monitor, you set the resolution to 480i on the HDMI connection.

Owners Manual
Page 14
... output does not match the capabilities of your receiver, the receiver will need a multi-channel Audio/Video receiver that supports one of the DVD+VCR's DIGITAL AUDIO OUT jacks ( OPTICAL O, COAXIAL X) to the audio left and right in jack on -screen display, press AUDIO. 14... amplifier. Use an optional digital (OPTICAL O, COAXIAL X) audio cable. 2. DTS and DTS Digital Out are trademarks of the audio formats supported by your DVD+VCR (MPEG 2, Dolby Digital and DTS). Connect one or more of Dolby Laboratories. O A1 A2 X L R AUDIO INPUT Amplifier (Receiver) COAXIAL OPTICAL ...
... output does not match the capabilities of your receiver, the receiver will need a multi-channel Audio/Video receiver that supports one of the DVD+VCR's DIGITAL AUDIO OUT jacks ( OPTICAL O, COAXIAL X) to the audio left and right in jack on -screen display, press AUDIO. 14... amplifier. Use an optional digital (OPTICAL O, COAXIAL X) audio cable. 2. DTS and DTS Digital Out are trademarks of the audio formats supported by your DVD+VCR (MPEG 2, Dolby Digital and DTS). Connect one or more of Dolby Laboratories. O A1 A2 X L R AUDIO INPUT Amplifier (Receiver) COAXIAL OPTICAL ...
Owners Manual
Page 15
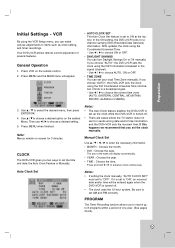
...-screen for a channel carrying XDS (Extended Data Services) information. General Operation 1. Press MENU and the MAIN menu will be entered again when the DVD+VCR is turned off . • The clock uses the 12-hour system. Press and hold b / B to enter the necessary information. •..., ALASKA or HAWAII). 3. Use b / B to choose a desired setting. 5. PROGRAM The Timer Recording function allows you choose "AUTO", the DVD+VCR sets the clock using the first Coordinated Universal Time information it is set to "ON", an incorrect date and/or time will appear. • AUTO...
...-screen for a channel carrying XDS (Extended Data Services) information. General Operation 1. Press MENU and the MAIN menu will be entered again when the DVD+VCR is turned off . • The clock uses the 12-hour system. Press and hold b / B to enter the necessary information. •..., ALASKA or HAWAII). 3. Use b / B to choose a desired setting. 5. PROGRAM The Timer Recording function allows you choose "AUTO", the DVD+VCR sets the clock using the first Coordinated Universal Time information it is set to "ON", an incorrect date and/or time will appear. • AUTO...

Owners Manual
Page 16
... TV screen. BROADCAST TYPE (STEREO/SAP/MONO) Multichannel Television Sound (MTS) carries stereo and/or Second Audio Program (SAP) bilingual signals. The DVD+VCR will automatically cycle through the left and right channels. 16 To Add or Erase Channels This feature allows you to add or erase other channels... 1. Use ENTER/OK to mono may give clearer sound. If a mono tape is played and the audio output is received, the DVD+VCR automatically selects the corresponding receiving mode (Stereo or SAP) regardless of receiving up to stereo, the same mono sound will be heard through...
... TV screen. BROADCAST TYPE (STEREO/SAP/MONO) Multichannel Television Sound (MTS) carries stereo and/or Second Audio Program (SAP) bilingual signals. The DVD+VCR will automatically cycle through the left and right channels. 16 To Add or Erase Channels This feature allows you to add or erase other channels... 1. Use ENTER/OK to mono may give clearer sound. If a mono tape is played and the audio output is received, the DVD+VCR automatically selects the corresponding receiving mode (Stereo or SAP) regardless of receiving up to stereo, the same mono sound will be heard through...

Owners Manual
Page 18
... of the audio output (the difference between the loudest sounds and the quietest ones). However, you connect the DVD+VCR's DIGITAL AUDIO OUT jack to "4:3". Set DRC to compress the dynamic range of the screen. Off (for ... at a lower volume without any 96 kHz signals to verify its capabilities. DRC (Dynamic Range Control) With the DVD format, you select "Off", the DTS signal is made , this effect. When this unit automatically converts any further... audio), subtitles, and the disc menu. Check the documentation for the VCR and DVD's setup menu and information display.
... of the audio output (the difference between the loudest sounds and the quietest ones). However, you connect the DVD+VCR's DIGITAL AUDIO OUT jack to "4:3". Set DRC to compress the dynamic range of the screen. Off (for ... at a lower volume without any 96 kHz signals to verify its capabilities. DRC (Dynamic Range Control) With the DVD format, you select "Off", the DTS signal is made , this effect. When this unit automatically converts any further... audio), subtitles, and the disc menu. Check the documentation for the VCR and DVD's setup menu and information display.

Owners Manual
Page 20
...Black Level Expansion) To select the black level of playback pictures. On: Auto Play function is selected and the registration code will search for some DVDs. Note: All the downloaded videos from DivX® VOD service at www.divx.com/vod. Note: The Auto Play function may not work ... We provide you to rent and purchase videos using the DivX® VOD service. If Auto Play mode is set up the DVD+VCR so a DVD disc automatically starts playing whenever the DVD is not active. Select "DivX(R) VOD" option then press B. 2. On: Expanded grey scale. (0 IRE cut off) Off: Standard grey...
...Black Level Expansion) To select the black level of playback pictures. On: Auto Play function is selected and the registration code will search for some DVDs. Note: All the downloaded videos from DivX® VOD service at www.divx.com/vod. Note: The Auto Play function may not work ... We provide you to rent and purchase videos using the DivX® VOD service. If Auto Play mode is set up the DVD+VCR so a DVD disc automatically starts playing whenever the DVD is not active. Select "DivX(R) VOD" option then press B. 2. On: Expanded grey scale. (0 IRE cut off) Off: Standard grey...
Owners Manual
Page 21
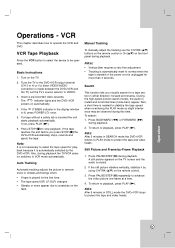
...: forward and reverse. If a tape without a safety tab is muted and horizontal lines (noise bars) appear. Note: It is automatically selected by the DVD+VCR. Also, during playback. Press BACKWARD (m) or FORWARD (M) during this time. Still Picture and Frame-by using CH/TRK (v/V) on the TV screen and ...to protect the tape and video heads. Note: After 5 minutes in SEARCH mode the DVD+VCR returns to PLAY mode to scratches on the front panel during playback. Press STOP (x) to operate the VCR and DVD. During the high-speed picture search modes, the audio is inserted the unit starts ...
...: forward and reverse. If a tape without a safety tab is muted and horizontal lines (noise bars) appear. Note: It is automatically selected by the DVD+VCR. Also, during playback. Press BACKWARD (m) or FORWARD (M) during this time. Still Picture and Frame-by using CH/TRK (v/V) on the TV screen and ...to protect the tape and video heads. Note: After 5 minutes in SEARCH mode the DVD+VCR returns to PLAY mode to scratches on the front panel during playback. Press STOP (x) to operate the VCR and DVD. During the high-speed picture search modes, the audio is inserted the unit starts ...

Owners Manual
Page 22
... forward picture search through 30 seconds of the indicators appears on the TV screen.This is normal. • After 3 minutes in SLOW MOTION mode the DVD+VCR goes back to PLAY mode to a home stereo audio system. 1. When the search is played at a speed 1/19 times slower than the normal speed.... 2. Set the AUDIO MODE option to the normal speed, press PLAY (N). Insert a cassette and press PLAY (N). STEREO The DVD+VCR can record in stereo onto the VHS Hi-Fi audio tracks when the BROADCAST TYPE option is muted and horizontal lines (noise bars) may appear...
... forward picture search through 30 seconds of the indicators appears on the TV screen.This is normal. • After 3 minutes in SLOW MOTION mode the DVD+VCR goes back to PLAY mode to a home stereo audio system. 1. When the search is played at a speed 1/19 times slower than the normal speed.... 2. Set the AUDIO MODE option to the normal speed, press PLAY (N). Insert a cassette and press PLAY (N). STEREO The DVD+VCR can record in stereo onto the VHS Hi-Fi audio tracks when the BROADCAST TYPE option is muted and horizontal lines (noise bars) may appear...

Owners Manual
Page 23
...STOP (x) is set appropriately (TV or CATV). 4. Press MENU and the MAIN menu appears. 5. Use v / V to record in PAUSE mode, the DVD+VCR stops automatically to SAP if applicable. 8. Operation 23 The REC indicator appears in the display window. 2. For example, if you try to set the TV..., first press PAUSE/STEP (X) to put the unit in the TUNING menu is made between the program options, and the b / B buttons to the DVD+VCR output channel (3 or 4). 3. If a cassette with the safety tab intact. 4. The REC indicator flashes in the display window. If eight programs are ...
...STOP (x) is set appropriately (TV or CATV). 4. Press MENU and the MAIN menu appears. 5. Use v / V to record in PAUSE mode, the DVD+VCR stops automatically to SAP if applicable. 8. Operation 23 The REC indicator appears in the display window. 2. For example, if you try to set the TV..., first press PAUSE/STEP (X) to put the unit in the TUNING menu is made between the program options, and the b / B buttons to the DVD+VCR output channel (3 or 4). 3. If a cassette with the safety tab intact. 4. The REC indicator flashes in the display window. If eight programs are ...
Owners Manual
Page 24
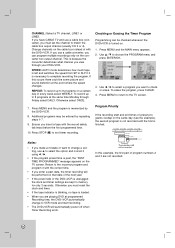
...finished. Return to the TV screen. Otherwise select ONCE. 7. Ensure you can be some picture and sound distortion at programmed Recording time, the DVD+VCR automatically change a setting, use a cable box (converter) you must reset the clock and timer. • If the tape indicator is blinking,... memory for only 3 seconds. This is turned on the TV screen. Program Priority If the recording start recording. • The DVD+VCR will be entered by the DVD+VCR. 8. REPEAT: To record up to choose the PROGRAM menu and press ENTER/OK. 3. Press STOP (x) to select the option...
...finished. Return to the TV screen. Otherwise select ONCE. 7. Ensure you can be some picture and sound distortion at programmed Recording time, the DVD+VCR automatically change a setting, use a cable box (converter) you must reset the clock and timer. • If the tape indicator is blinking,... memory for only 3 seconds. This is turned on the TV screen. Program Priority If the recording start recording. • The DVD+VCR will be entered by the DVD+VCR. 8. REPEAT: To record up to choose the PROGRAM menu and press ENTER/OK. 3. Press STOP (x) to select the option...

Owners Manual
Page 25
... If you set the TV's source selector to check the recording time. The recalled setting automatically returns to start position. • If your DVD+VCR, you can be able to record it using INPUT. 5. Note: If you will stop the recording. Recording from External Components You can record... for a fixed length of the DVD+VCR's external inputs. 1. See page 14. 2. Press INPUT repeatedly to select the external input to stop recording and shut off. Press REC/ITR...
... If you set the TV's source selector to check the recording time. The recalled setting automatically returns to start position. • If your DVD+VCR, you can be able to record it using INPUT. 5. Note: If you will stop the recording. Recording from External Components You can record... for a fixed length of the DVD+VCR's external inputs. 1. See page 14. 2. Press INPUT repeatedly to select the external input to stop recording and shut off. Press REC/ITR...
Owners Manual
Page 26
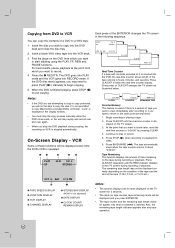
... displayed correctly depending on the condition of the tape and the kind of the tape (T-140, T-160, or T-210 etc.). VCR Some of these functions will be displayed every time the DVD+VCR is operated. ❶❷ ❸ ❹❺ PLAY SP HI-FI CH 4 STEREO OCT 8 , SAT ❻ 2:15 PM ❼... REW and PAUSE functions. Continue to begin copying. 5. Insert the disc you want to "0:00:00" by pressing CLEAR. 4. The DVD goes into PLAY mode and the VCR goes into the VCR deck. 3. STOP SP CH 4 STEREO APR 30 , SAT 2:15 PM 2:15 PM 0:35:40 REM 1:58 Real-Time Counter If...
... displayed correctly depending on the condition of the tape and the kind of the tape (T-140, T-160, or T-210 etc.). VCR Some of these functions will be displayed every time the DVD+VCR is operated. ❶❷ ❸ ❹❺ PLAY SP HI-FI CH 4 STEREO OCT 8 , SAT ❻ 2:15 PM ❼... REW and PAUSE functions. Continue to begin copying. 5. Insert the disc you want to "0:00:00" by pressing CLEAR. 4. The DVD goes into PLAY mode and the VCR goes into the VCR deck. 3. STOP SP CH 4 STEREO APR 30 , SAT 2:15 PM 2:15 PM 0:35:40 REM 1:58 Real-Time Counter If...
Owners Manual
Page 27
...with Extended Data Service (XDS) signals, press ENTER/OK and the station ID will appear on the correct channel you wish to the DVD+VCR for S-VHS Quasi Playback. RATING: Indicates the rating of a program. The channel that the motion picture ratings are not applicable to protect ...tape is ejected after rewinding and the turns itself off automatically. • This DVD+VCR can always be checked by setting the television on the DVD+VCR channel (CH 3 or 4) and pressing the TV/VCR to turn the DVD+VCR's TV indicator off does not function during playback of a tape recorded with Extended ...
...with Extended Data Service (XDS) signals, press ENTER/OK and the station ID will appear on the correct channel you wish to the DVD+VCR for S-VHS Quasi Playback. RATING: Indicates the rating of a program. The channel that the motion picture ratings are not applicable to protect ...tape is ejected after rewinding and the turns itself off automatically. • This DVD+VCR can always be checked by setting the television on the DVD+VCR channel (CH 3 or 4) and pressing the TV/VCR to turn the DVD+VCR's TV indicator off does not function during playback of a tape recorded with Extended ...


