Owners Manual
Page 5
... Picture Format 28 Screen Position 28 Manual Configure 29 Setting VGA Mode 29 Screen Adjustments 29 Cinema Mode Setup 29 Luminance Noise Reduction 30 Initializing (Reset to your personal preference or as required by source.
... Picture Format 28 Screen Position 28 Manual Configure 29 Setting VGA Mode 29 Screen Adjustments 29 Cinema Mode Setup 29 Luminance Noise Reduction 30 Initializing (Reset to your personal preference or as required by source.
Owners Manual
Page 19
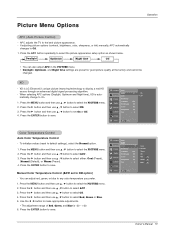
... and then use D / E button to save . Press the G button and then use D / E button to select ACC . 3. XD is LG Electronic's unique picture improving technology to make appropriate adjustments. • The adjustment range of Red, Green, and Blue is automatically change to Off. 1. To... initialize values (reset to select the picture appearance setup option as shown below. Press the APC button repeatedly to default settings), select the Normal option. 1....
... and then use D / E button to save . Press the G button and then use D / E button to select ACC . 3. XD is LG Electronic's unique picture improving technology to make appropriate adjustments. • The adjustment range of Red, Green, and Blue is automatically change to Off. 1. To... initialize values (reset to select the picture appearance setup option as shown below. Press the APC button repeatedly to default settings), select the Normal option. 1....
Owners Manual
Page 23
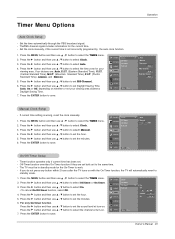
... On timer function Press the G button and then use D / E button to select the TIMER menu. 2. Set the clock manually, if the current time is wrong, reset the clock manually. 1. Press the G button and then use D / E button to select Auto. 4. Press the G button and then use D / E button to selectt Manual. 4. Press the...
... On timer function Press the G button and then use D / E button to select the TIMER menu. 2. Set the clock manually, if the current time is wrong, reset the clock manually. 1. Press the G button and then use D / E button to select Auto. 4. Press the G button and then use D / E button to selectt Manual. 4. Press the...
Owners Manual
Page 28
... a spectacular view. • Zoom - are not active in the following modes: CHANNEL Auto config. G PICTURE ARC Position SOUND Manual config TIMER Reset SPECIAL SCREEN PIP/DW LOCK Menu Prev. Use 4:3, or 16:9 for RGB-DTV mode. - SPECIAL 3. has finished, OK will be shown on... the screen for TV, Video, Component 480i sources. - TIMER Reset 2. and Manual config. Set every aspect ratio for a long time, it may remain visible. - RGB (PC) mode only; Press the G button and...
... a spectacular view. • Zoom - are not active in the following modes: CHANNEL Auto config. G PICTURE ARC Position SOUND Manual config TIMER Reset SPECIAL SCREEN PIP/DW LOCK Menu Prev. Use 4:3, or 16:9 for RGB-DTV mode. - SPECIAL 3. has finished, OK will be shown on... the screen for TV, Video, Component 480i sources. - TIMER Reset 2. and Manual config. Set every aspect ratio for a long time, it may remain visible. - RGB (PC) mode only; Press the G button and...

Owners Manual
Page 29
... VGA resolu- Press the G button and then use D / E button to select Screen adj.. 3. Press the ENTER button to select On or Off. 4. ARC Cinema YNR Reset SPECIAL SCREEN PIP/DW LOCK Menu Prev. G TV VCR Cinema Mode Setup (TV, Video1-2 and Component 480i mode only) - ARC Cinema YNR... Reset SPECIAL SCREEN PIP/DW LOCK Menu Prev. To correct the screen size, adjust Clock. 1. Press the G button and then use D / E button to save . Press the ...
... VGA resolu- Press the G button and then use D / E button to select Screen adj.. 3. Press the ENTER button to select On or Off. 4. ARC Cinema YNR Reset SPECIAL SCREEN PIP/DW LOCK Menu Prev. G TV VCR Cinema Mode Setup (TV, Video1-2 and Component 480i mode only) - ARC Cinema YNR... Reset SPECIAL SCREEN PIP/DW LOCK Menu Prev. To correct the screen size, adjust Clock. 1. Press the G button and then use D / E button to save . Press the ...
Owners Manual
Page 30
...Zoom - Split Zoom can move the image up or down. - You can be viewed without using the D / E / F / G button. Reset is unique to fill the screen. 30 Plasma TV Section 5 is enlarged, a section can initialize Position, Split zoom, PIP Transparency, PIP position, PIP ... button repeatedly to initialize the adjusted settings. 1. Operation Screen Menu Options continued Luminance Noise Reduction (TV, Video 1-2 and Component 480i modes only) - Use the Reset option to select either 2, 4, or 9 Split Zoom. 2-Split zoom 1 4 4-Split zoom 1 2 4 5 9-Split zoom 1 23 4 56 7 ...
...Zoom - Split Zoom can move the image up or down. - You can be viewed without using the D / E / F / G button. Reset is unique to fill the screen. 30 Plasma TV Section 5 is enlarged, a section can initialize Position, Split zoom, PIP Transparency, PIP position, PIP ... button repeatedly to initialize the adjusted settings. 1. Operation Screen Menu Options continued Luminance Noise Reduction (TV, Video 1-2 and Component 480i modes only) - Use the Reset option to select either 2, 4, or 9 Split Zoom. 2-Split zoom 1 4 4-Split zoom 1 2 4 5 9-Split zoom 1 23 4 56 7 ...
Owners Manual
Page 36
... Min: 0 ~ Max: 64 • Refer to 'Real data mapping 1'. Transmission [k][m][ ][Set ID][ ][Data][Cr] Data 0: Lock off . Acknowledgement [p][ ][Set ID][ ][OK][Data][x] * Real data mapping 2 0 : Reset split zoom 21: Selection 1 of 2 split zoom 24: Selection 4 of 2 split zoom 41: Selection 1 of 4 split zoom 42: Selection 2 of 4 split zoom 44: Selection 4 of...
... Min: 0 ~ Max: 64 • Refer to 'Real data mapping 1'. Transmission [k][m][ ][Set ID][ ][Data][Cr] Data 0: Lock off . Acknowledgement [p][ ][Set ID][ ][OK][Data][x] * Real data mapping 2 0 : Reset split zoom 21: Selection 1 of 2 split zoom 24: Selection 4 of 2 split zoom 41: Selection 1 of 4 split zoom 42: Selection 2 of 4 split zoom 44: Selection 4 of...


