Owners Manual
Page 3
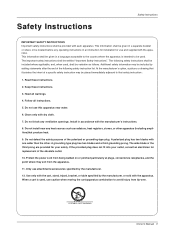
... not fit into your safety. Safety Instructions Safety Instructions IMPORTANT SAFETY INSTRUCTIONS Important safety instructions shall be provided with the apparatus. At the manufacturer's option, a picture or drawing that safety instruction : 1. Heed all instructions. 5. Do not use caution when moving the cart/apparatus combination to be used , use this apparatus near...
... not fit into your safety. Safety Instructions Safety Instructions IMPORTANT SAFETY INSTRUCTIONS Important safety instructions shall be provided with the apparatus. At the manufacturer's option, a picture or drawing that safety instruction : 1. Heed all instructions. 5. Do not use caution when moving the cart/apparatus combination to be used , use this apparatus near...
Owners Manual
Page 5
.... . .25 Low Power 26 XD Demo 26 Closed Captions 27 Captions 27 Caption/Text 27 Screen Menu Features Auto Adjustment 28 Setting Picture Format 28 Screen Position 28 Manual Configure 29 Setting VGA Mode 29 Screen Adjustments 29 Cinema Mode Setup 29 Luminance Noise Reduction 30 Initializing ...source image and sound to original factory value) . . . . .30 Split Zoom 30 Lock Menu Options Parental Lock Setup 31 PIP (Picture-In-Picture)/Double Window Feature Watching PIP/Double Window 32 Swapping the PIP/Double Window 32 TV Program selection for PIP 32 Selecting an Input Signal Source...
.... . .25 Low Power 26 XD Demo 26 Closed Captions 27 Captions 27 Caption/Text 27 Screen Menu Features Auto Adjustment 28 Setting Picture Format 28 Screen Position 28 Manual Configure 29 Setting VGA Mode 29 Screen Adjustments 29 Cinema Mode Setup 29 Luminance Noise Reduction 30 Initializing ...source image and sound to original factory value) . . . . .30 Split Zoom 30 Lock Menu Options Parental Lock Setup 31 PIP (Picture-In-Picture)/Double Window Feature Watching PIP/Double Window 32 Swapping the PIP/Double Window 32 TV Program selection for PIP 32 Selecting an Input Signal Source...
Owners Manual
Page 6
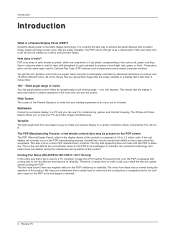
...Versatile The light weight and thin size makes it for the PDP to install your PC and video images simultaneously. Cooling Fan Noise (RU-50PX10/10C/10H/11/11C/11H only) In the same way that the display is normal during the manufacture and operation of this ..., dynamic colors that are in the PDP manufacturing process. Wide angle range of locations where conventional TVs will normally occur in a theater. The Picture-in other PDP manufacturers' products. The PDP Manufacturing Process: a few cell defects are operating and cooling the PDP. Several tiny, minute colored ...
...Versatile The light weight and thin size makes it for the PDP to install your PC and video images simultaneously. Cooling Fan Noise (RU-50PX10/10C/10H/11/11C/11H only) In the same way that the display is normal during the manufacture and operation of this ..., dynamic colors that are in the PDP manufacturing process. Wide angle range of locations where conventional TVs will normally occur in a theater. The Picture-in other PDP manufacturers' products. The PDP Manufacturing Process: a few cell defects are operating and cooling the PDP. Several tiny, minute colored ...
Owners Manual
Page 8
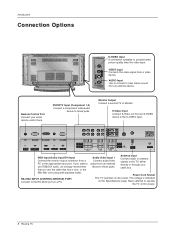
... INPUT RGB Input/Audio Input/DVI Input Connect the monitor output connector from a PC to hear stereo sound from an external device to provide better picture quality than the video input. Introduction Connection Options S-VIDEO A/V INPUT2 R AUDIO L / MONO VIDEO S-VIDEO Input A connection available to these jacks. Remote Control Port Connect your...
... INPUT RGB Input/Audio Input/DVI Input Connect the monitor output connector from a PC to hear stereo sound from an external device to provide better picture quality than the video input. Introduction Connection Options S-VIDEO A/V INPUT2 R AUDIO L / MONO VIDEO S-VIDEO Input A connection available to these jacks. Remote Control Port Connect your...
Owners Manual
Page 9
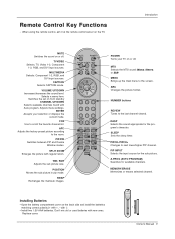
...Functions - TVVIDEO Selects: TV, Video 1-2, Component 1-2, RGB, and DVI input sources. VOLUME UP/DOWN Increases/decreases the sound level. SPLIT ZOOM Enlarges the picture with -). • Install two 1.5V AAA batteries. WIN. MUTE POWER TV/VIDEO MULTIMEDIA MTS CAPTION ARC MENU CH ENTER VOL VOL CH 123 456 ...789 FCR REVIEW 0 APC PIP/DW DASP SPLIT ZOOM PIP CH + SLEEP WIN.SIZE PIP CH - A.PROG (AUTO PROGRAM) Searches for the sub picture. Don't mix old or used batteries with Auto program. CAPTION Selects CAPTION mode. Switches the set on or off . MTS Selects the MTS sound:...
...Functions - TVVIDEO Selects: TV, Video 1-2, Component 1-2, RGB, and DVI input sources. VOLUME UP/DOWN Increases/decreases the sound level. SPLIT ZOOM Enlarges the picture with -). • Install two 1.5V AAA batteries. WIN. MUTE POWER TV/VIDEO MULTIMEDIA MTS CAPTION ARC MENU CH ENTER VOL VOL CH 123 456 ...789 FCR REVIEW 0 APC PIP/DW DASP SPLIT ZOOM PIP CH + SLEEP WIN.SIZE PIP CH - A.PROG (AUTO PROGRAM) Searches for the sub picture. Don't mix old or used batteries with Auto program. CAPTION Selects CAPTION mode. Switches the set on or off . MTS Selects the MTS sound:...
Owners Manual
Page 10
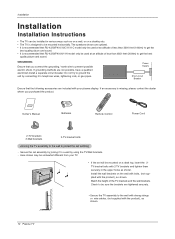
... shown are included with the product), as shown. Power Supply Short-circuit Breaker Ensure that the following accessories are optional. • It is recommended that RU-42/50PX10/10C/11/11C model only be used at an altitude of the TV brackets and the wall brackets. Secure the set will be... ground the unit by connecting it to a wall by joining it to get the best quality picture and sound. If an accessory is designed to get the best quality picture and sound. • It is recommended that RU-42/50PX10H/11H model only be mounted on the wall with bolts, (not supplied with...
... shown are included with the product), as shown. Power Supply Short-circuit Breaker Ensure that the following accessories are optional. • It is recommended that RU-42/50PX10/10C/11/11C model only be used at an altitude of the TV brackets and the wall brackets. Secure the set will be... ground the unit by connecting it to a wall by joining it to get the best quality picture and sound. If an accessory is designed to get the best quality picture and sound. • It is recommended that RU-42/50PX10H/11H model only be mounted on the wall with bolts, (not supplied with...

Owners Manual
Page 11
... your dealer for outdoor antenna) Bronze Wire Be careful not to bend the bronze wire when connecting the antenna. • To improve picture quality in the connections. Multi-family Dwellings/Apartments (Connect to wall antenna socket) wall antenna socket Bronze Wire RF coaxial wire (75 ...Cable Box Connections - Antenna • If the antenna needs to tighten. External Equipment Connections Installation Antenna Connection - For optimum picture quality, adjust antenna direction if needed. Owner's Manual 11 Single-family Dwellings /Houses (Connect to wall jack for assistance.
... your dealer for outdoor antenna) Bronze Wire Be careful not to bend the bronze wire when connecting the antenna. • To improve picture quality in the connections. Multi-family Dwellings/Apartments (Connect to wall antenna socket) wall antenna socket Bronze Wire RF coaxial wire (75 ...Cable Box Connections - Antenna • If the antenna needs to tighten. External Equipment Connections Installation Antenna Connection - For optimum picture quality, adjust antenna direction if needed. Owner's Manual 11 Single-family Dwellings /Houses (Connect to wall jack for assistance.
Owners Manual
Page 12
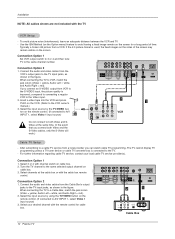
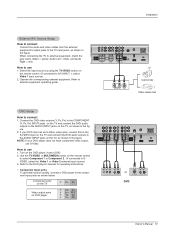
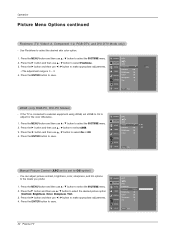
...video tape into the VCR and press PLAY on cable box. 3. After subscribing to the VCR owner's manual.) 3. Connection Option 2 1. If the 4:3 picture format is connected to the Video input. 2. the fixed images on the sides of time. Select channels at the same time. Connection Option 2 1. compared ... TV to the TV input jacks, as shown in the figure. In the event that you can watch cable TV programming. To avoid picture noise (interference), leave an adequate distance between the VCR and TV - Connection Option 1 1. Connect the audio and video cables from a...
...video tape into the VCR and press PLAY on cable box. 3. After subscribing to the VCR owner's manual.) 3. Connection Option 2 1. If the 4:3 picture format is connected to the Video input. 2. the fixed images on the sides of time. Select channels at the same time. Connection Option 2 1. compared ... TV to the TV input jacks, as shown in the figure. In the event that you can watch cable TV programming. To avoid picture noise (interference), leave an adequate distance between the VCR and TV - Connection Option 1 1. Connect the audio and video cables from a...
Owners Manual
Page 13
... player does not have component video output, use S-Video. Refer to the DVD player's manual for operating instructions. • Component Input ports To get better picture quality, connect a DVD player to SVIDEO, select the Video 1 or Video 2 external input source.) 3. How to use 1. How to use 1. NOTE: If your DVD only...
... player does not have component video output, use S-Video. Refer to the DVD player's manual for operating instructions. • Component Input ports To get better picture quality, connect a DVD player to SVIDEO, select the Video 1 or Video 2 external input source.) 3. How to use 1. How to use 1. NOTE: If your DVD only...
Owners Manual
Page 15
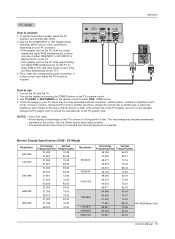
..., change the PC mode to another rate or adjust the brightness and contrast on the PC and the TV. 2. Turn on the menu until the picture is separate. Monitor Display Specifications (RGB / DVI Mode) Resolution 640x350 720x400 640x480 848x480 852x480 Horizontal Vertical Frequency(KHz) Frequency(Hz) 31.468 70.09 37... INPUT (CONTROL/SERVICE) DVI INPUT AUDIO INPUT RGB INPUT Operation How to 640x 480, 60Hz. 2. Then, make the corresponding audio connection. To get the best picture quality, adjust the PC graphics card to use 1.
..., change the PC mode to another rate or adjust the brightness and contrast on the PC and the TV. 2. Turn on the menu until the picture is separate. Monitor Display Specifications (RGB / DVI Mode) Resolution 640x350 720x400 640x480 848x480 852x480 Horizontal Vertical Frequency(KHz) Frequency(Hz) 31.468 70.09 37... INPUT (CONTROL/SERVICE) DVI INPUT AUDIO INPUT RGB INPUT Operation How to 640x 480, 60Hz. 2. Then, make the corresponding audio connection. To get the best picture quality, adjust the PC graphics card to use 1.
Owners Manual
Page 17
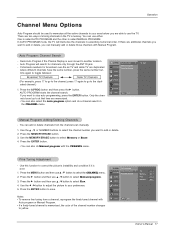
... AUTO PROGRAM and the other is ever moved to save. Press the A.PROG button and then press the G button. CHANNEL PICTURE SOUND Auto program G Manual program Favorite channel TIMER SPECIAL SCREEN PIP/DW LOCK Menu Prev. Auto Program: Channel Search - AUTO... the ENTER button to another location. - Owner's Manual 17 Press the MEMORY/ERASE button. 3. CHANNEL Auto program Manual program G TV 2 PICTURE Favorite channel Memory On SOUND Fine 0 TIMER Booster Off SPECIAL SCREEN PIP/DW LOCK Menu Prev. Operation Channel Menu Options Auto Program should be ...
... AUTO PROGRAM and the other is ever moved to save. Press the A.PROG button and then press the G button. CHANNEL PICTURE SOUND Auto program G Manual program Favorite channel TIMER SPECIAL SCREEN PIP/DW LOCK Menu Prev. Auto Program: Channel Search - AUTO... the ENTER button to another location. - Owner's Manual 17 Press the MEMORY/ERASE button. 3. CHANNEL Auto program Manual program G TV 2 PICTURE Favorite channel Memory On SOUND Fine 0 TIMER Booster Off SPECIAL SCREEN PIP/DW LOCK Menu Prev. Operation Channel Menu Options Auto Program should be ...

Owners Manual
Page 18
...6. Favorite Channels is good, set the desired channel number for each channel separately. 1. CHANNEL Auto program Manual program G TV 2 PICTURE Favorite channel Memory On SOUND Fine 0 Booster Off TIMER SPECIAL SCREEN PIP/DW LOCK Menu Prev. Press the G button and then... channels. 1. Set booster to select Favorite channel. 3. Use the F / G button to set Booster to select Booster. 4. CHANNEL PICTURE Auto program Manual program Favorite channel G SOUND TIMER SPECIAL SCREEN PIP/DW LOCK Menu Prev. 18 Plasma TV Press the G button and then...
...6. Favorite Channels is good, set the desired channel number for each channel separately. 1. CHANNEL Auto program Manual program G TV 2 PICTURE Favorite channel Memory On SOUND Fine 0 Booster Off TIMER SPECIAL SCREEN PIP/DW LOCK Menu Prev. Press the G button and then... channels. 1. Set booster to select Favorite channel. 3. Use the F / G button to set Booster to select Booster. 4. CHANNEL PICTURE Auto program Manual program Favorite channel G SOUND TIMER SPECIAL SCREEN PIP/DW LOCK Menu Prev. 18 Plasma TV Press the G button and then...
Owners Manual
Page 19
... Press the G button and then use D / E button to select XD. 3. Press the G button and then use D / E button to set to select the PICTURE menu. 2. Press the G button and then use D / E button to select ACC . 3. Press the G button and then use D / E button to select ...initialize values (reset to make appropriate adjustments. • The adjustment range of Red, Green, and Blue is LG Electronic's unique picture improving technology to select the picture appearance setup option as shown below. Press the APC button repeatedly to display a real HD source through an advanced...
... Press the G button and then use D / E button to select XD. 3. Press the G button and then use D / E button to set to select the PICTURE menu. 2. Press the G button and then use D / E button to select ACC . 3. Press the G button and then use D / E button to select ...initialize values (reset to make appropriate adjustments. • The adjustment range of Red, Green, and Blue is LG Electronic's unique picture improving technology to select the picture appearance setup option as shown below. Press the APC button repeatedly to display a real HD source through an advanced...
Owners Manual
Page 20
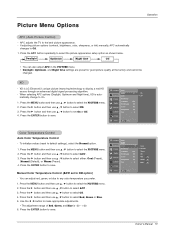
...then use F / G button to save. Press the G button and then use D / E button to select the desired picture option (Contrast, Brightness, Color, Sharpness, Tint). 3. Operation Picture Menu Options continued Fleshtone (TV, Video1-2, Component 1-2, RGB-DTV, and DVI-DTV Mode only) - Press the ENTER button to ...make appropriate adjustments. Press the ENTER button to select the PICTURE menu. 2. Press the MENU button and then use F / G button to select the desired skin color option. 1. sRGB (only RGB-PC,...
...then use F / G button to save. Press the G button and then use D / E button to select the desired picture option (Contrast, Brightness, Color, Sharpness, Tint). 3. Operation Picture Menu Options continued Fleshtone (TV, Video1-2, Component 1-2, RGB-DTV, and DVI-DTV Mode only) - Press the ENTER button to ...make appropriate adjustments. Press the ENTER button to select the PICTURE menu. 2. Press the MENU button and then use F / G button to select the desired skin color option. 1. sRGB (only RGB-PC,...

Owners Manual
Page 21
...and then use D / E button to select the SOUND menu. 2. Press the G button and then use D / E button to select On or Off. 4. CHANNEL PICTURE SOUND TIMER DASP BBE AVL Balance Treble Bass SPECIAL G On 0 Off 50 50 SCREEN PIP/DW LOCK Menu Prev. This function lets you change channels... 3. Press the DASP button repeatedly to Off. 1. BBE - Press the MENU button and then use D / E button to select the SOUND menu. 2. CHANNEL PICTURE SOUND TIMER DASP BBE AVL Balance Treble Bass SPECIAL G On Off 0 50 50 SCREEN PIP/DW LOCK Menu Prev. AVL maintains an equal sound level...
...and then use D / E button to select the SOUND menu. 2. Press the G button and then use D / E button to select On or Off. 4. CHANNEL PICTURE SOUND TIMER DASP BBE AVL Balance Treble Bass SPECIAL G On 0 Off 50 50 SCREEN PIP/DW LOCK Menu Prev. This function lets you change channels... 3. Press the DASP button repeatedly to Off. 1. BBE - Press the MENU button and then use D / E button to select the SOUND menu. 2. CHANNEL PICTURE SOUND TIMER DASP BBE AVL Balance Treble Bass SPECIAL G On Off 0 50 50 SCREEN PIP/DW LOCK Menu Prev. AVL maintains an equal sound level...
Owners Manual
Page 22
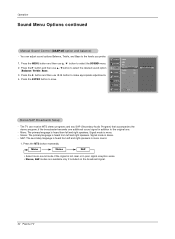
... on the broadcast signal. 22 Plasma TV Press the MTS button repeatedly. Operation Sound Menu Options continued Manual Sound Control (DASP off option and balance) - PICTURE BBE AVL 2. Treble 50 TIMER Bass 50 3. Press the G button and then use D / E button to select the desired sound option SOUND Balance 0G L R (Balance, Treble...
... on the broadcast signal. 22 Plasma TV Press the MTS button repeatedly. Operation Sound Menu Options continued Manual Sound Control (DASP off option and balance) - PICTURE BBE AVL 2. Treble 50 TIMER Bass 50 3. Press the G button and then use D / E button to select the desired sound option SOUND Balance 0G L R (Balance, Treble...
Owners Manual
Page 23
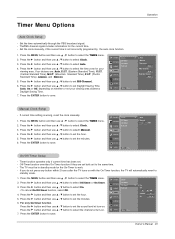
...to select the TIMER menu. 2. Press the G button and then use D / E button to set incorrectly programed by the auto clock function. 1. CHANNEL PICTURE SOUND Clock Off timer On timer Auto off TIMER SPECIAL SCREEN PIP/DW LOCK Menu Prev. Press the G button and then use D / E button to set... the G button and then use D / E button to select Clock. 3. Press the G button and then use D / E button to selectt Manual. 4. CHANNEL PICTURE SOUND Clock Off timer On timer Auto off TIMER SPECIAL SCREEN PIP/DW LOCK Menu Prev. Timer function operates only if current time has been...
...to select the TIMER menu. 2. Press the G button and then use D / E button to set incorrectly programed by the auto clock function. 1. CHANNEL PICTURE SOUND Clock Off timer On timer Auto off TIMER SPECIAL SCREEN PIP/DW LOCK Menu Prev. Press the G button and then use D / E button to set... the G button and then use D / E button to select Clock. 3. Press the G button and then use D / E button to selectt Manual. 4. CHANNEL PICTURE SOUND Clock Off timer On timer Auto off TIMER SPECIAL SCREEN PIP/DW LOCK Menu Prev. Timer function operates only if current time has been...
Owners Manual
Page 24
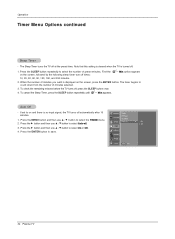
.... 1. Press the SLEEP button repeatedly to select On or Off. 4. Press the G button and then use D / E button to select the number of minutes selected. 3. CHANNEL PICTURE SOUND Clock Off timer On timer Auto off times: zz --- Min option appears 10, 20, 30, 60, 90, 120, 180, and 240 minutes. 2. Press the...
.... 1. Press the SLEEP button repeatedly to select On or Off. 4. Press the G button and then use D / E button to select the number of minutes selected. 3. CHANNEL PICTURE SOUND Clock Off timer On timer Auto off times: zz --- Min option appears 10, 20, 30, 60, 90, 120, 180, and 240 minutes. 2. Press the...

Owners Manual
Page 25
... G button and then use D / E button to even if you change the image. set to select the SPECIAL menu. 2. CHANNEL Language Key lock PICTURE ISM Method G SOUND TIMER Low power Set ID Caption / Text SPECIAL Captions Demo SCREEN PIP/DW LOCK Menu Prev. This TV is pressed. To return...a ghost image remaining even when you turn the TV off. 1. However, it was last set to select the SPECIAL menu. 2. A frozen still picture from the screen. Avoid allowing a fixed image to remain on the front panel is programmed to select Key lock. 3. Note: An excessive permanent image...
... G button and then use D / E button to even if you change the image. set to select the SPECIAL menu. 2. CHANNEL Language Key lock PICTURE ISM Method G SOUND TIMER Low power Set ID Caption / Text SPECIAL Captions Demo SCREEN PIP/DW LOCK Menu Prev. This TV is pressed. To return...a ghost image remaining even when you turn the TV off. 1. However, it was last set to select the SPECIAL menu. 2. A frozen still picture from the screen. Avoid allowing a fixed image to remain on the front panel is programmed to select Key lock. 3. Note: An excessive permanent image...
Owners Manual
Page 26
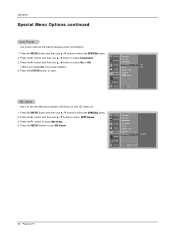
... use D / E button to select the SPECIAL menu. 2. XD Demo - Low power reduces the plasma display power consumption. 1. CHANNEL Language PICTURE Key lock ISM Method SOUND Low power G On Set ID Off TIMER Caption / Text SPECIAL Captions Demo SCREEN PIP/DW LOCK Menu Prev. Operation...MENU button and then use D / E button to select the SPECIAL menu. 2. Press the G button to begin XD Demo. 4. CHANNEL Language PICTURE Key lock ISM Method SOUND TIMER Low power Set ID Caption / Text SPECIAL Captions Demo G SCREEN PIP/DW LOCK Menu Prev. To start 26 Plasma...
... use D / E button to select the SPECIAL menu. 2. XD Demo - Low power reduces the plasma display power consumption. 1. CHANNEL Language PICTURE Key lock ISM Method SOUND Low power G On Set ID Off TIMER Caption / Text SPECIAL Captions Demo SCREEN PIP/DW LOCK Menu Prev. Operation...MENU button and then use D / E button to select the SPECIAL menu. 2. Press the G button to begin XD Demo. 4. CHANNEL Language PICTURE Key lock ISM Method SOUND TIMER Low power Set ID Caption / Text SPECIAL Captions Demo G SCREEN PIP/DW LOCK Menu Prev. To start 26 Plasma...


