
Operation Guide
Page 2
...serial number here: MODEL NO. COMPLIANCE: The responsible party for a Class B digital device, pursuant to Part 15 of the FCC Rules. RU-27FB30C/RU-27FB31C SERIAL NO WARNING: TO REDUCE THE RISK OF ELECTRIC SHOCK DO NOT REMOVE COVER (OR BACK). NOTE TO CABLE... are designed to provide reasonable protection against harmful interference when the equipment is located on a circuit different from LG Electronics Corporation. For Customer Support/Service please call the cable TV system installer's attention to Article 820-40 of the National Electric Code (U.S.A.). For future reference, we suggest ...
...serial number here: MODEL NO. COMPLIANCE: The responsible party for a Class B digital device, pursuant to Part 15 of the FCC Rules. RU-27FB30C/RU-27FB31C SERIAL NO WARNING: TO REDUCE THE RISK OF ELECTRIC SHOCK DO NOT REMOVE COVER (OR BACK). NOTE TO CABLE... are designed to provide reasonable protection against harmful interference when the equipment is located on a circuit different from LG Electronics Corporation. For Customer Support/Service please call the cable TV system installer's attention to Article 820-40 of the National Electric Code (U.S.A.). For future reference, we suggest ...
Operation Guide
Page 5
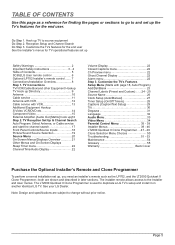
The installer remote allows access to duplicate a LG TV's setup and install it on another identical LG TV. Note: Design and specifications are shown and described in later sections. Do Step 1. Customize the TV's Features Setup Menu (Starts with VCR 13 Additional Equipment Hookup S-Video VCR/DVD etc 14 ...Component Video 15 External Amplifier (Audio Out [Matrix] hook up the Tv's features for finding the pages or sections to go to source equipment Do Step 2. See your LG Dealer. The LT2000 Quickset II Clone Programmer is used to the Installer and User ...
The installer remote allows access to duplicate a LG TV's setup and install it on another identical LG TV. Note: Design and specifications are shown and described in later sections. Do Step 1. Customize the TV's Features Setup Menu (Starts with VCR 13 Additional Equipment Hookup S-Video VCR/DVD etc 14 ...Component Video 15 External Amplifier (Audio Out [Matrix] hook up the Tv's features for finding the pages or sections to go to source equipment Do Step 2. See your LG Dealer. The LT2000 Quickset II Clone Programmer is used to the Installer and User ...

Operation Guide
Page 6
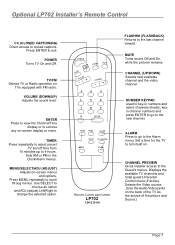
...ALARM Press to display menu, follow onscreen instructions to set AM/PM on -screen display or menu. Use to set a time for the TV to 4-hours. MUTE Turns sound Off and On, while the picture remains. ENTER Press to view the Channel/Time/Audio display or to ...access closed options. CHANNEL PREVIEW Displays the available TV channels, gives the hotel guest access to the last channel viewed. CHANNEL -+ 1 2 3 4 5 6 7 8 9 0 ENTER TIMER ALARM CH PREVIEW Remote Control part number ...
...ALARM Press to display menu, follow onscreen instructions to set AM/PM on -screen display or menu. Use to set a time for the TV to 4-hours. MUTE Turns sound Off and On, while the picture remains. ENTER Press to view the Channel/Time/Audio display or to ...access closed options. CHANNEL PREVIEW Displays the available TV channels, gives the hotel guest access to the last channel viewed. CHANNEL -+ 1 2 3 4 5 6 7 8 9 0 ENTER TIMER ALARM CH PREVIEW Remote Control part number ...
Operation Guide
Page 7
... remains. keyin channel numbers and press ENTER to go to the last channel viewed. CHANNEL PREVIEW Gives installer access to 4-hours. TV/FM Selects TV or Radio operation on the back of the TV as the source of the picture and Sound.) Page 7 TIMER Press repeatedly to select preset...to turn itself on -screen menus and options. Press MENU repeatedly to exit. Selects the Video source. (Use the Audio/Video jacks on TVs equipped with FM radio. Sets AM or PM in numbers and select channels directly; Press ENTER to scroll throug menus. Optional LP702 Installer's ...
... remains. keyin channel numbers and press ENTER to go to the last channel viewed. CHANNEL PREVIEW Gives installer access to 4-hours. TV/FM Selects TV or Radio operation on the back of the TV as the source of the picture and Sound.) Page 7 TIMER Press repeatedly to select preset...to turn itself on -screen menus and options. Press MENU repeatedly to exit. Selects the Video source. (Use the Audio/Video jacks on TVs equipped with FM radio. Sets AM or PM in numbers and select channels directly; Press ENTER to scroll throug menus. Optional LP702 Installer's ...

Operation Guide
Page 8
... R Audio In L S-VIDEO IN R-L AUDIO IN Connect S-Video equipment to these input jacks to connect external audio/video equipment.. PORT Use with Clone Programmer Typical TV Back Matrix Out Antenna Cable Component Video Input Pr Pb R Audio L Y Video In R Audio In L M.P.I . Page 8 MATRIX Use to hookup your antenna or cable system...
... R Audio In L S-VIDEO IN R-L AUDIO IN Connect S-Video equipment to these input jacks to connect external audio/video equipment.. PORT Use with Clone Programmer Typical TV Back Matrix Out Antenna Cable Component Video Input Pr Pb R Audio L Y Video In R Audio In L M.P.I . Page 8 MATRIX Use to hookup your antenna or cable system...

Operation Guide
Page 9
...this page to decide where you want to hook up a component video device page 15 Send the TV sound to an external audio system or monaural speaker page 16 Page 9 Antenna Only If you are..., go to page 10 Cable Only If you have cable service and no other equipment, go to page 11 Cable TV Wall Jack In Cable Box Out Antenna with VCR If you are using an antenna and have a VCR, go to... page 12 Cable and VCR If you have cable service and a VCR, go to page 13 Cable TV Wall Jack In Cable Box Out S-Video/Speaker If you want to do, then go to begin your setup. Hookup Directory ...
...this page to decide where you want to hook up a component video device page 15 Send the TV sound to an external audio system or monaural speaker page 16 Page 9 Antenna Only If you are..., go to page 10 Cable Only If you have cable service and no other equipment, go to page 11 Cable TV Wall Jack In Cable Box Out Antenna with VCR If you are using an antenna and have a VCR, go to... page 12 Cable and VCR If you have cable service and a VCR, go to page 13 Cable TV Wall Jack In Cable Box Out S-Video/Speaker If you want to do, then go to begin your setup. Hookup Directory ...

Operation Guide
Page 10
... according to one end and a round opening with a wire sticking through the middle, and it on the back of the remote 3 and put in your TV. Each end looks like a hex shaped nut with a wire sticking out on standard current, 120-volt 60 Hertz AC. Antenna Flat wire (300 ohm) ... you don't need any adapters! They are usually about an inch long with the LG TV. 300/75 ohm Adapter Typical TV Back Matrix Out Antenna Cable Component Video Input Pr Pb R Audio L Y Video In R Audio In L M.P.I . This TV is 4 designed to 75 ohm adapter is not included with two screws on one ...
... according to one end and a round opening with a wire sticking through the middle, and it on the back of the remote 3 and put in your TV. Each end looks like a hex shaped nut with a wire sticking out on standard current, 120-volt 60 Hertz AC. Antenna Flat wire (300 ohm) ... you don't need any adapters! They are usually about an inch long with the LG TV. 300/75 ohm Adapter Typical TV Back Matrix Out Antenna Cable Component Video Input Pr Pb R Audio L Y Video In R Audio In L M.P.I . This TV is 4 designed to 75 ohm adapter is not included with two screws on one ...

Operation Guide
Page 11
.... S-Video In R Audio In L Page 11 Hook Up Cable Service (CATV) Connect cable service to the TV. 1 Locate the Antenna/Cable in the TV. The TV is on DC Current. 120 Volt 60 Hz AC Cable TV Wall Jack In Cable Box Out output switch 3 4 If you need! If you're using a cable box... a cable box, Auto Program might only find the channel your cable box to change channels. Back of the remote and install two AA batteries. Cable TV Wall Jack Remove the back of the Remote RF Coaxial Wire (75 ohm) Plug in jack on standard current, 120-volt 60 Hertz AC. RF...
.... S-Video In R Audio In L Page 11 Hook Up Cable Service (CATV) Connect cable service to the TV. 1 Locate the Antenna/Cable in the TV. The TV is on DC Current. 120 Volt 60 Hz AC Cable TV Wall Jack In Cable Box Out output switch 3 4 If you need! If you're using a cable box... a cable box, Auto Program might only find the channel your cable box to change channels. Back of the remote and install two AA batteries. Cable TV Wall Jack Remove the back of the Remote RF Coaxial Wire (75 ohm) Plug in jack on standard current, 120-volt 60 Hertz AC. RF...

Operation Guide
Page 12
... ohm) VCR Back 300/75 ohm Adapter In output switch 3 4 Out Video Audio VCR Back AV Panel Typical TV Back 120 Volt 60 Hz AC No A/V cables are included with the LG TV. The TV is designed to the right.. 3 Remove the back of the remote and put in stereo sound. Matrix Out Antenna... directly to this jack, according to one of the connection diagrams shown to operate on 1 the back of the Remote Plug in the TV. Do not attempt to the TV. Without A/V cables, most VCRs will not play videocassettes in two AA batteries. Back of the VCR. Hook Up Over-The-Air Antenna...
... ohm) VCR Back 300/75 ohm Adapter In output switch 3 4 Out Video Audio VCR Back AV Panel Typical TV Back 120 Volt 60 Hz AC No A/V cables are included with the LG TV. The TV is designed to the right.. 3 Remove the back of the remote and put in stereo sound. Matrix Out Antenna... directly to this jack, according to one of the connection diagrams shown to operate on 1 the back of the Remote Plug in the TV. Do not attempt to the TV. Without A/V cables, most VCRs will not play videocassettes in two AA batteries. Back of the VCR. Hook Up Over-The-Air Antenna...

Operation Guide
Page 13
... to operate on the back of the Remote Plug in stereo sound. S-Video In R Audio In L A/V cables Not inlcuded with your TV. Cable TV Wall Jack RF Coaxial Wire (75 ohm) Typical TV Back VCR Back In output switch 3 4 Out Video Audio Antenna Cable Matrix Out Component Video Input Pr Pb R Audio L Y Video... 3 and install two AA batteries. Hook Up Cable Service (CATV) and VCR Connect a VCR and Cable service to operate it on DC Current. Cable TV Wall Jack 1 Locate the Antenna/Cable (In) jack on standard current, 120-volt 60 Hertz AC. Remove the back of the connection diagrams shown at...
... to operate on the back of the Remote Plug in stereo sound. S-Video In R Audio In L A/V cables Not inlcuded with your TV. Cable TV Wall Jack RF Coaxial Wire (75 ohm) Typical TV Back VCR Back In output switch 3 4 Out Video Audio Antenna Cable Matrix Out Component Video Input Pr Pb R Audio L Y Video... 3 and install two AA batteries. Hook Up Cable Service (CATV) and VCR Connect a VCR and Cable service to operate it on DC Current. Cable TV Wall Jack 1 Locate the Antenna/Cable (In) jack on standard current, 120-volt 60 Hertz AC. Remove the back of the connection diagrams shown at...

Operation Guide
Page 14
... must use the optional LP702 remote control, go to the Source menu on standard current. 120 Volt 60 Hz AC S-Video cables not included with TV Typical TV Back Antenna Cable Matrix Out Component Video Input Pr Pb R Audio L M.P.I. Hook up your S-Video 1 type VCR or DVD player to the... In R Audio In L Page 14 Back of the remote and put in your TV. Use the TV's S-Video In jack to a Super-VHS VCR or DVD player through the S-Video Input located on the TV's connection panel. Hook Up S-Video VCR/DVD Player Your LG TV may be connected to connect other S-Video type equipment.
... must use the optional LP702 remote control, go to the Source menu on standard current. 120 Volt 60 Hz AC S-Video cables not included with TV Typical TV Back Antenna Cable Matrix Out Component Video Input Pr Pb R Audio L M.P.I. Hook up your S-Video 1 type VCR or DVD player to the... In R Audio In L Page 14 Back of the remote and put in your TV. Use the TV's S-Video In jack to a Super-VHS VCR or DVD player through the S-Video Input located on the TV's connection panel. Hook Up S-Video VCR/DVD Player Your LG TV may be connected to connect other S-Video type equipment.

Operation Guide
Page 15
To use this equipment you must use the optional LP702 remote control, refer to operate on standard current, 120-volt 60 Hertz AC. The TV is 3 designed to the Source menu on DC power. 120 Volt 60 Hz AC DVD Player with Component Video S-VIDEO OUT VIDEO R-AUDIO L-/MONO COMPONENT ... In L S-Video In R Audio In L Page 15 quality alkaline AA batteries. Do not attempt to the diagram at the right. Hook Up Component Video The LG TV may be connected to a Component Video device like a DVD player or other component video source. Back of the 2 remote and install two high-
To use this equipment you must use the optional LP702 remote control, refer to operate on standard current, 120-volt 60 Hertz AC. The TV is 3 designed to the Source menu on DC power. 120 Volt 60 Hz AC DVD Player with Component Video S-VIDEO OUT VIDEO R-AUDIO L-/MONO COMPONENT ... In L S-Video In R Audio In L Page 15 quality alkaline AA batteries. Do not attempt to the diagram at the right. Hook Up Component Video The LG TV may be connected to a Component Video device like a DVD player or other component video source. Back of the 2 remote and install two high-

Operation Guide
Page 16
Speaker Back Typical TV Back Audio In Antenna Cable Matrix Out Component Video Input Pr Pb R Audio L A/V cables not included with TV M.P.I. To use this hook up, see your external amplifier instruction manual. Y Video In R Audio In L S-Video In R Audio In L Page 16 External Monoaural Speaker Hook Up Send the sound from the TV to the TV. Audio Output: Use the Matrix Out jack to 1 connect an external monoaural speaker or amplifier to an external speaker.
Speaker Back Typical TV Back Audio In Antenna Cable Matrix Out Component Video Input Pr Pb R Audio L A/V cables not included with TV M.P.I. To use this hook up, see your external amplifier instruction manual. Y Video In R Audio In L S-Video In R Audio In L Page 16 External Monoaural Speaker Hook Up Send the sound from the TV to the TV. Audio Output: Use the Matrix Out jack to 1 connect an external monoaural speaker or amplifier to an external speaker.

Operation Guide
Page 17
... received by the channel search in non-volatile memory. 1 With the optional LP702 Installer's remote control in hand, press POWER to turn the TV on. 2 Press MENU repeatedly until the Setup menu appears. 3 Using SELECT on the remote control, highlight Auto Program on the channel/time/audio... display. LABELS SOURCE NAME CLOCK SET TIMER CAPTIONS TILT DEGAUSS LANGUAGE TO PROGRAM POWER CC TV/FM VOLUME + - Auto Program (Channel Search) Use Auto Program to specify over -the-air channels are available, select Off-Air Antenna....
... received by the channel search in non-volatile memory. 1 With the optional LP702 Installer's remote control in hand, press POWER to turn the TV on. 2 Press MENU repeatedly until the Setup menu appears. 3 Using SELECT on the remote control, highlight Auto Program on the channel/time/audio... display. LABELS SOURCE NAME CLOCK SET TIMER CAPTIONS TILT DEGAUSS LANGUAGE TO PROGRAM POWER CC TV/FM VOLUME + - Auto Program (Channel Search) Use Auto Program to specify over -the-air channels are available, select Off-Air Antenna....
Operation Guide
Page 18
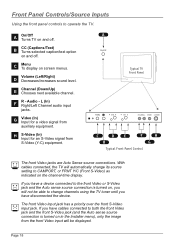
... audio input jacks. Menu C To display on the channel-time display. Page 18 Volume (Left/Right) D Decreases/increases sound level. A ON/OFF Typical TV Front Panel MENU CC VOL CH R-AUDIO-L VIDEO S-VIDEO C DE F B Typical Front Panel Control H H G The front Video jacks are Auto Sense ... the front Video jack and the front S-Video jack (and the Auto sense source connection is turned on, you will automatically change channels using the TV tuner until you have disconnected the device. Channel (Down/Up) E Chooses next available channel. R - Video (In) G Input for an ...
... audio input jacks. Menu C To display on the channel-time display. Page 18 Volume (Left/Right) D Decreases/increases sound level. A ON/OFF Typical TV Front Panel MENU CC VOL CH R-AUDIO-L VIDEO S-VIDEO C DE F B Typical Front Panel Control H H G The front Video jacks are Auto Sense ... the front Video jack and the front S-Video jack (and the Auto sense source connection is turned on, you will automatically change channels using the TV tuner until you have disconnected the device. Channel (Down/Up) E Chooses next available channel. R - Video (In) G Input for an ...

Operation Guide
Page 19
... the default setup and determine what picture and sound sources are Auto Sense source connections. L Video In S-Video Front/Rear Connection Panels Typical TV Back Antenna Cable Matrix Out Component Video Input Pr Pb R Audio L Y Video In R Audio In L M.P.I. The front Video and ...SVideo In jacks are available. Note: The rear Video/Audio In jacks can change channels using the TV tuner until you have devices connected to be on the remote number keypad. R-Audio - Component Video R -AUDCIOOM-LPONEYNT Pr VIDEO Pb Typical Accessory...
... the default setup and determine what picture and sound sources are Auto Sense source connections. L Video In S-Video Front/Rear Connection Panels Typical TV Back Antenna Cable Matrix Out Component Video Input Pr Pb R Audio L Y Video In R Audio In L M.P.I. The front Video and ...SVideo In jacks are available. Note: The rear Video/Audio In jacks can change channels using the TV tuner until you have devices connected to be on the remote number keypad. R-Audio - Component Video R -AUDCIOOM-LPONEYNT Pr VIDEO Pb Typical Accessory...

Operation Guide
Page 20
...message indicating this is a displayed. 1 3 SOURCE MENU ANTENNA/CABLE CAMPORT F S-VIDEO R S-VIDEO COMP (YPrPb) REAR AUX. AUTO SENSE SOURCE: Input(s) that the TV automatically switches to the TV. FLSHBK MUTE CHANNEL -+ 1 2 3 4 5 6 7 8 9 0 ENTER 3 TIMER MENU ALARM SELECT CH PREVIEW ADJ ADJ 2 Mini Glossary SOURCE: Input(s) providing...remote until the Source menu appears. 2 Choose the input source using SELECT. PRESS TO CHANGE PRESS ENTER OR TO ACTIVATE POWER CC TV/FM VOLUME + - Press ENTER, or the Left/Right ADJ 3 arrow to go to the selected source and to remove the menu...
...message indicating this is a displayed. 1 3 SOURCE MENU ANTENNA/CABLE CAMPORT F S-VIDEO R S-VIDEO COMP (YPrPb) REAR AUX. AUTO SENSE SOURCE: Input(s) that the TV automatically switches to the TV. FLSHBK MUTE CHANNEL -+ 1 2 3 4 5 6 7 8 9 0 ENTER 3 TIMER MENU ALARM SELECT CH PREVIEW ADJ ADJ 2 Mini Glossary SOURCE: Input(s) providing...remote until the Source menu appears. 2 Choose the input source using SELECT. PRESS TO CHANGE PRESS ENTER OR TO ACTIVATE POWER CC TV/FM VOLUME + - Press ENTER, or the Left/Right ADJ 3 arrow to go to the selected source and to remove the menu...

Operation Guide
Page 21
...below. press CC to turn off . Refer to Installer menu to activate. Channel Labels 24 Labels the channels with the use of the TV Auto Program 17 Automatically finds and stores active channels to activate. Custom Ch Labels 25 Creates custom channel labels. Captions 29 Selects Caption/...status displays. Video Menu 34 Customizes the picture. Parental 35 Control Menu Allows user to block program content or the A/V sources for the TV to see and hear on . Other Menus and On-Screen Displays Volume 22 Shows current sound level setting; Channel/Time 22 Shows the ...
...below. press CC to turn off . Refer to Installer menu to activate. Channel Labels 24 Labels the channels with the use of the TV Auto Program 17 Automatically finds and stores active channels to activate. Custom Ch Labels 25 Creates custom channel labels. Captions 29 Selects Caption/...status displays. Video Menu 34 Customizes the picture. Parental 35 Control Menu Allows user to block program content or the A/V sources for the TV to see and hear on . Other Menus and On-Screen Displays Volume 22 Shows current sound level setting; Channel/Time 22 Shows the ...

Operation Guide
Page 22
...Press VOLUME. Displays list of the picture and slowly scrolls downward. SLEEP TIMER OFF PRESS TIMER Sleep Timer Menu Press TIMER. Sets a time for the TV to automatically turn -off time from 10 minutes up to the Parental Control menu. 21 CC CAPTION 1 IS ON Closed Captions Menu Press CC. Shows... or source, current time if the clock has been set, incoming audio signal, and XDS info if available on the right side of the available TV Channels, AUX source, and provides access to 4 hours. Ghost Channel Display Channel number appears in red on program. Page 22 ALARM MENU TIME NOW ...
...Press VOLUME. Displays list of the picture and slowly scrolls downward. SLEEP TIMER OFF PRESS TIMER Sleep Timer Menu Press TIMER. Sets a time for the TV to automatically turn -off time from 10 minutes up to the Parental Control menu. 21 CC CAPTION 1 IS ON Closed Captions Menu Press CC. Shows... or source, current time if the clock has been set, incoming audio signal, and XDS info if available on the right side of the available TV Channels, AUX source, and provides access to 4 hours. Ghost Channel Display Channel number appears in red on program. Page 22 ALARM MENU TIME NOW ...

Operation Guide
Page 23
... the option was turned off in the Channel Preview list. LABELS SOURCE NAME CLOCK SET TIMER CAPTIONS TILT DEGAUSS LANGUAGE CH 44 ADDED POWER CC TV/FM VOLUME + - Just select it can appear as an option in the Service menu, you are finished, press ENTER to the list that channel is...
... the option was turned off in the Channel Preview list. LABELS SOURCE NAME CLOCK SET TIMER CAPTIONS TILT DEGAUSS LANGUAGE CH 44 ADDED POWER CC TV/FM VOLUME + - Just select it can appear as an option in the Service menu, you are finished, press ENTER to the list that channel is...


