Owners Manual
Page 1
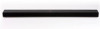
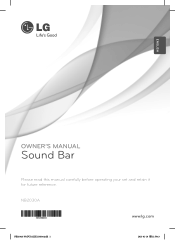
ENGLISH OWNER'S MANUAL Sound Bar Please read this manual carefully before operating your set and retain it for future reference. NB2030A www.lg.com NB2030A-N0.DUSALLK.130108.indd 1 2013-01-10 11:59:43
ENGLISH OWNER'S MANUAL Sound Bar Please read this manual carefully before operating your set and retain it for future reference. NB2030A www.lg.com NB2030A-N0.DUSALLK.130108.indd 1 2013-01-10 11:59:43
Owners Manual
Page 2
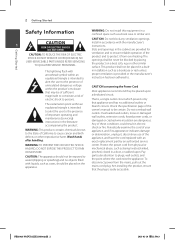
... MOISTURE. DO NOT OPEN Slots and openings in electric shock or fire. Overloaded wall outlets, loose or damaged wall outlets, extension cords, frayed power cords, or damaged or cracked wire insulation are provided for CAUTION: TO REDUCE THE RISK OF ELECTRIC SHOCK DO NOT REMOVE COVER (OR BACK) NO USER-SERVICEABLE PARTS INSIDE REFER SERVICING TO QUALIFIED SERVICE PERSONNEL. Check the specification page of your...
... MOISTURE. DO NOT OPEN Slots and openings in electric shock or fire. Overloaded wall outlets, loose or damaged wall outlets, extension cords, frayed power cords, or damaged or cracked wire insulation are provided for CAUTION: TO REDUCE THE RISK OF ELECTRIC SHOCK DO NOT REMOVE COVER (OR BACK) NO USER-SERVICEABLE PARTS INSIDE REFER SERVICING TO QUALIFIED SERVICE PERSONNEL. Check the specification page of your...
Owners Manual
Page 3
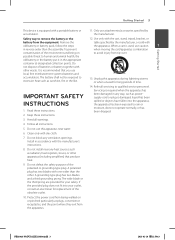
... all warnings. 4. Protect the power cord from being walked on possible threat to qualified service personnel. Getting Started Getting Started 3 This device is equipped with dry cloth. 7. Follow all instructions. 5. Install in any way, such as powersupply cord or plug is used, use this apparatus during lightning storms or when unused for your outlet, consult an electrician for replacement of the...
... all warnings. 4. Protect the power cord from being walked on possible threat to qualified service personnel. Getting Started Getting Started 3 This device is equipped with dry cloth. 7. Follow all instructions. 5. Install in any way, such as powersupply cord or plug is used, use this apparatus during lightning storms or when unused for your outlet, consult an electrician for replacement of the...
Owners Manual
Page 4
... designed to conditions: operate this equipment if an unauthorized change or modification is connected. However, there is no guarantee that to which can radiate radio frequency energy and, if not installed and used in a residential installation. yy Connect the equipment into an outlet on , the user is subject to radio or television reception, which the receiver is made. NB2030A-N0.DUSALLK.130108.indd...
... designed to conditions: operate this equipment if an unauthorized change or modification is connected. However, there is no guarantee that to which can radiate radio frequency energy and, if not installed and used in a residential installation. yy Connect the equipment into an outlet on , the user is subject to radio or television reception, which the receiver is made. NB2030A-N0.DUSALLK.130108.indd...
Owners Manual
Page 5
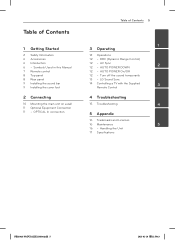
...:59:43 OPTICAL In connection Table of Contents 1 Getting Started 2 Safety Information 6 Accessories 6 Introduction 6 - LG Sound Sync 14 Controlling a TV with the Supplied 3 Remote Control 4 Troubleshooting 15 Troubleshooting 4 5 Appendix 16 Trademarks and Licenses 16 Maintenance 5 16 - AUTO POWER On/Off 12 - DRC (Dynamic Range Control) 12 - AV Sync 12 - Turn off the sound temporarily 13 - Symbols Used in this Manual 7 Remote control 8 Top panel 8 Rear panel 9 Installing the sound bar 9 Installing the cover foot 2 Connecting 10 Mounting...
...:59:43 OPTICAL In connection Table of Contents 1 Getting Started 2 Safety Information 6 Accessories 6 Introduction 6 - LG Sound Sync 14 Controlling a TV with the Supplied 3 Remote Control 4 Troubleshooting 15 Troubleshooting 4 5 Appendix 16 Trademarks and Licenses 16 Maintenance 5 16 - AUTO POWER On/Off 12 - DRC (Dynamic Range Control) 12 - AV Sync 12 - Turn off the sound temporarily 13 - Symbols Used in this Manual 7 Remote control 8 Top panel 8 Rear panel 9 Installing the sound bar 9 Installing the cover foot 2 Connecting 10 Mounting...
Owners Manual
Page 6
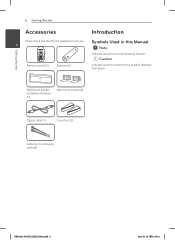
Wall Mount Bracket Installation Template (1) Wall mount bracket (2) Optical cable (1) Cover foot (2) Cable ties for preventing possible damages from abuse. Getting Started 6 Getting Started Accessories Introduction Please check and identify the supplied accessories. Symbols Used in this Manual 1 ,,Note Indicates special notes and operating features. >>Caution Remote control (1) Batteries (1) Indicates cautions for arranging cables(2) NB2030A-N0.DUSALLK.130108.indd 6 2013-01-10 11:59:44
Wall Mount Bracket Installation Template (1) Wall mount bracket (2) Optical cable (1) Cover foot (2) Cable ties for preventing possible damages from abuse. Getting Started 6 Getting Started Accessories Introduction Please check and identify the supplied accessories. Symbols Used in this Manual 1 ,,Note Indicates special notes and operating features. >>Caution Remote control (1) Batteries (1) Indicates cautions for arranging cables(2) NB2030A-N0.DUSALLK.130108.indd 6 2013-01-10 11:59:44
Owners Manual
Page 7
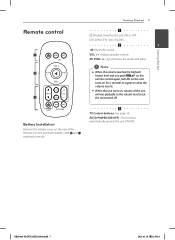
.... VOL -/+ : Adjusts speaker volume. c TV Control buttons: See page 14. Getting Started 7 a 1 (Power): Switches the unit ON or OFF. AV SYNC -/+ : Synchronizes the audio and video. ,,Note yy When the volume reaches the highest/ lowest level and you push VOL+/- AUTO POWER (ON/OFF) : This function automatically powers the unit ON/OFF. b 1 : Mutes the sound. yy When the unit turns on what the volume level is. on the remote control again, red LED...
.... VOL -/+ : Adjusts speaker volume. c TV Control buttons: See page 14. Getting Started 7 a 1 (Power): Switches the unit ON or OFF. AV SYNC -/+ : Synchronizes the audio and video. ,,Note yy When the volume reaches the highest/ lowest level and you push VOL+/- AUTO POWER (ON/OFF) : This function automatically powers the unit ON/OFF. b 1 : Mutes the sound. yy When the unit turns on what the volume level is. on the remote control again, red LED...
Owners Manual
Page 8
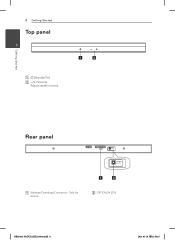
Only for service. B OPTICAL IN (TV) NB2030A-N0.DUSALLK.130108.indd 8 2013-01-10 11:59:45 Rear panel A Software Download Connector - Getting Started 8 Getting Started Top panel 1 A 1 (Standby/On) B - / + (Volume) Adjusts speaker volume.
Only for service. B OPTICAL IN (TV) NB2030A-N0.DUSALLK.130108.indd 8 2013-01-10 11:59:45 Rear panel A Software Download Connector - Getting Started 8 Getting Started Top panel 1 A 1 (Standby/On) B - / + (Volume) Adjusts speaker volume.
Owners Manual
Page 9
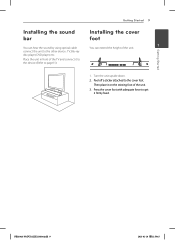
... Peel off a sticker attached to the other device : TV, Blu-ray disc player, DVD player, etc. Turn the unit upside down. 2. NB2030A-N0.DUSALLK.130108.indd 9 2013-01-10 11:59:45 Then place it firmly fixed. Getting Started Installing the sound bar You can extend the height of the unit. 1. Place ...the unit in front of the TV and connect it to the device. (Refer to page11) Getting Started 9 Installing the cover foot 1 You can hear the sound by using optical cable connect the...
... Peel off a sticker attached to the other device : TV, Blu-ray disc player, DVD player, etc. Turn the unit upside down. 2. NB2030A-N0.DUSALLK.130108.indd 9 2013-01-10 11:59:45 Then place it firmly fixed. Getting Started Installing the sound bar You can extend the height of the unit. 1. Place ...the unit in front of the TV and connect it to the device. (Refer to page11) Getting Started 9 Installing the cover foot 1 You can hear the sound by using optical cable connect the...

Owners Manual
Page 10
... of TV and attach to drill. NB2030A-N0.DUSALLK.130108.indd 10 2013-01-10 11:59:45 Unit 2. A guide sheet (Wall Mount Bracket Installation Template) is supplied to drill. Getting Started 10 Getting Started Mounting the main unit on a wall 1 You can mount the main unit on a wall (concrete), use the wall plugs (Not supplied). Prepare screws and...
... of TV and attach to drill. NB2030A-N0.DUSALLK.130108.indd 10 2013-01-10 11:59:45 Unit 2. A guide sheet (Wall Mount Bracket Installation Template) is supplied to drill. Getting Started 10 Getting Started Mounting the main unit on a wall 1 You can mount the main unit on a wall (concrete), use the wall plugs (Not supplied). Prepare screws and...

Owners Manual
Page 11
... . If the unit falls off . To the digital optical output jack of external devices to the unit. Connecting Optional Equipment 2 Connection 5. OPTICAL In connection Connect an optical output of external device NB2030A-N0.DUSALLK.130108.indd 11 2013-01-10 11:59:46 2 Connecting 3. It can damage the parts of personal injury. Remove the Wall Mount Bracket Installation Template. 4. Fix the brackets with screws (not supplied) as it...
... . If the unit falls off . To the digital optical output jack of external devices to the unit. Connecting Optional Equipment 2 Connection 5. OPTICAL In connection Connect an optical output of external device NB2030A-N0.DUSALLK.130108.indd 11 2013-01-10 11:59:46 2 Connecting 3. It can damage the parts of personal injury. Remove the Wall Mount Bracket Installation Template. 4. Fix the brackets with screws (not supplied) as it...
Owners Manual
Page 12
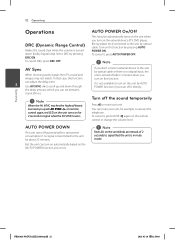
... pressing AUTO POWER ON. Turn on the remote control or change the volume level. Turn off automatically to save power consumption if no digital input, the unit is . 12 Operating Operations DRC (Dynamic Range Control) Makes the sound clear when the volume is turned down through the delay amount, which you can set . ,,Note Red LED on the unit blinks at intervals of 2 seconds to signal that case, this function can adjust the delay time. 3 Use AV SYNC -/+ to...
... pressing AUTO POWER ON. Turn on the remote control or change the volume level. Turn off automatically to save power consumption if no digital input, the unit is . 12 Operating Operations DRC (Dynamic Range Control) Makes the sound clear when the volume is turned down through the delay amount, which you can set . ,,Note Red LED on the unit blinks at intervals of 2 seconds to signal that case, this function can adjust the delay time. 3 Use AV SYNC -/+ to...
Owners Manual
Page 13
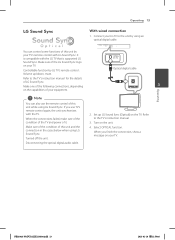
... of LG Sound Sync. Make sure of the condition of this unit and the connection in the cases below when using LG Sound Sync. Disconnecting the optical digital audio cable. 2. It is compatible with LG Sound Sync. If you finish the connection, show a message on your TV's remote control with the LG TV that is supported LG Sound Sync. Set up /down, mute. When you use the remote control of this unit while using an optical digital cable. Refer to the unit by using LG Sound Sync. Turned...
... of LG Sound Sync. Make sure of the condition of this unit and the connection in the cases below when using LG Sound Sync. Disconnecting the optical digital audio cable. 2. It is compatible with LG Sound Sync. If you finish the connection, show a message on your TV's remote control with the LG TV that is supported LG Sound Sync. Set up /down, mute. When you use the remote control of this unit while using an optical digital cable. Refer to the unit by using LG Sound Sync. Turned...
Owners Manual
Page 14
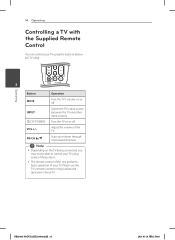
... Depending on or off. Operating 14 Operating Controlling a TV with the Supplied Remote Control You can control your TV using some of the buttons. Please use the TV's remote control to control your TV using the buttons below. (LG TV only.) 3 Button Operation MUTE Turn the TV's volume on or off INPUT Switch the TV's input source between the TV and other input sources. 1 (TV POWER) Turn the TV on the TV being connected, you may not be...
... Depending on or off. Operating 14 Operating Controlling a TV with the Supplied Remote Control You can control your TV using some of the buttons. Please use the TV's remote control to control your TV using the buttons below. (LG TV only.) 3 Button Operation MUTE Turn the TV's volume on or off INPUT Switch the TV's input source between the TV and other input sources. 1 (TV POWER) Turn the TV on the TV being connected, you may not be...
Owners Manual
Page 15
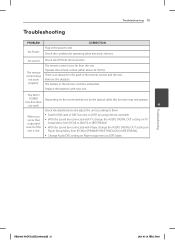
... unit. Troubleshooting 15 Troubleshooting PROBLEM No Power Plug in the remote control is exhausted. Operate the remote control within about 23 ft (7m). The battery in the power cord. The AUTO POWER Depending on Player Setup Menu from [PCM] to [OFF] by using remote controller. CORRECTION Check the condition by the optical cable, this function may not operate. yy With the sound bar connected with TV, change the AUDIO DIGITAL OUT setting on the connected device by operating other electronic devices. yy Switch [ON...
... unit. Troubleshooting 15 Troubleshooting PROBLEM No Power Plug in the remote control is exhausted. Operate the remote control within about 23 ft (7m). The battery in the power cord. The AUTO POWER Depending on Player Setup Menu from [PCM] to [OFF] by using remote controller. CORRECTION Check the condition by the optical cable, this function may not operate. yy With the sound bar connected with TV, change the AUDIO DIGITAL OUT setting on the connected device by operating other electronic devices. yy Switch [ON...

Owners Manual
Page 16
... To clean the player, use a soft, dry cloth. All rights reserved. All Rights Reserved. If the surfaces are registered trademarks & DTS 2.0 Channel is a trademark of Sontia Logic Limited. yy Do not use volatile liquids such as it was originally packed at the factory. Sontia® and the Sontia wave logo are trademarks of Dolby Laboratories. and...
... To clean the player, use a soft, dry cloth. All rights reserved. All Rights Reserved. If the surfaces are registered trademarks & DTS 2.0 Channel is a trademark of Sontia Logic Limited. yy Do not use volatile liquids such as it was originally packed at the factory. Sontia® and the Sontia wave logo are trademarks of Dolby Laboratories. and...
Owners Manual
Page 17
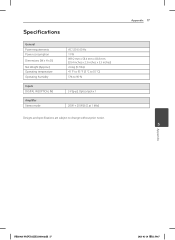
Appendix 17 5 Appendix NB2030A-N0.DUSALLK.130108.indd 17 2013-01-10 11:59:47 Specifications General Power requirements Power consumption Dimensions (W x H x D) Net Weight (Approx.) Operating temperature Operating humidity Inputs DIGITAL IN (OPTICAL IN) Amplifier Stereo mode AC 120 V, 60 Hz 11 W 899.2 mm x 58.4 mm x 83.8 mm (35.4 inches x 2.3 inches x 3.3 inches) 2.6 kg (5.7 lbs) 41 °F to 95 °F (5 °C to 35 °C) 5 % to 90 % 3 V (p-p), Optical jack x 1 20 W + 20 W (6 Ω at 1 kHz) Designs and specifications are subject to change without prior notice.
Appendix 17 5 Appendix NB2030A-N0.DUSALLK.130108.indd 17 2013-01-10 11:59:47 Specifications General Power requirements Power consumption Dimensions (W x H x D) Net Weight (Approx.) Operating temperature Operating humidity Inputs DIGITAL IN (OPTICAL IN) Amplifier Stereo mode AC 120 V, 60 Hz 11 W 899.2 mm x 58.4 mm x 83.8 mm (35.4 inches x 2.3 inches x 3.3 inches) 2.6 kg (5.7 lbs) 41 °F to 95 °F (5 °C to 35 °C) 5 % to 90 % 3 V (p-p), Optical jack x 1 20 W + 20 W (6 Ω at 1 kHz) Designs and specifications are subject to change without prior notice.
Owners Manual
Page 18
LG Customer Information Center 1-800-243-0000 USA, Consumer 1-888-865-3026 USA, Commercial Register your product Online! www.lg.com Printed in China NB2030A-N0.DUSALLK.130108.indd 18 2013-01-10 11:59:47
LG Customer Information Center 1-800-243-0000 USA, Consumer 1-888-865-3026 USA, Commercial Register your product Online! www.lg.com Printed in China NB2030A-N0.DUSALLK.130108.indd 18 2013-01-10 11:59:47


