
User Manual
Page 1
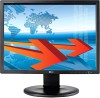
English OWNER'S MANUAL NETWORK MONITOR Please read the safety information carefully before using the product. Network Monitor Model N1910LZ www.lg.com
English OWNER'S MANUAL NETWORK MONITOR Please read the safety information carefully before using the product. Network Monitor Model N1910LZ www.lg.com
User Manual
Page 3
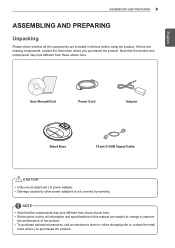
... by warranty. NOTE yyNote that the product and components may look different from those shown here. User Manual/Card Power Cord Adaptor Stand Base 15-pin D-SUB Signal Cable CAUTION yyOnly use an approved LG power adapter. yyTo purchase optional accessories, visit an electronics store or online shopping site or contact the... before using the product. Note that the components may look different from those shown here. yyWithout prior notice, all the components are included in this manual are missing components, contact the retail store where you purchased the product.
... by warranty. NOTE yyNote that the product and components may look different from those shown here. User Manual/Card Power Cord Adaptor Stand Base 15-pin D-SUB Signal Cable CAUTION yyOnly use an approved LG power adapter. yyTo purchase optional accessories, visit an electronics store or online shopping site or contact the... before using the product. Note that the components may look different from those shown here. yyWithout prior notice, all the components are included in this manual are missing components, contact the retail store where you purchased the product.

User Manual
Page 8
... the monitor. EEngNliGsh 8 ASSEMBLING AND PREPARING Mounting on a table 1 Lift the monitor and place it on installation and usage, refer to the Kensington lock user manual or visit the website at http://www.kensington.com.
... the monitor. EEngNliGsh 8 ASSEMBLING AND PREPARING Mounting on a table 1 Lift the monitor and place it on installation and usage, refer to the Kensington lock user manual or visit the website at http://www.kensington.com.
User Manual
Page 10
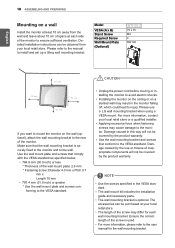
...store or a qualified installer. Model VESA (A x B) Stand Screw Required Screw Wall Mount Plate (Optional) N1910LZ 75 x 75 M4 4 RW120 EEngNliGsh 10 cm 10 cm 10 cm 10 cm If you want to... mounting bracket and screws that the wall mounting bracket is optional. Please refer to the manual to avoid electric shocks. Make sure that conform to the monitor. Detailed installation instructions can... bracket. yyFor more information, contact your local retail store. Damage caused by the use a LG wall mounting bracket when using a VESA mount. Use the wall mount plate and screws that ...
...store or a qualified installer. Model VESA (A x B) Stand Screw Required Screw Wall Mount Plate (Optional) N1910LZ 75 x 75 M4 4 RW120 EEngNliGsh 10 cm 10 cm 10 cm 10 cm If you want to... mounting bracket and screws that the wall mounting bracket is optional. Please refer to the manual to avoid electric shocks. Make sure that conform to the monitor. Detailed installation instructions can... bracket. yyFor more information, contact your local retail store. Damage caused by the use a LG wall mounting bracket when using a VESA mount. Use the wall mount plate and screws that ...
User Manual
Page 11
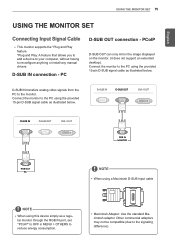
...-pin D-SUB signal cable as a regular monitor through the RGB IN port, set "PCoIP" to OFF in MENU > OTHERS to reconfigure anything or install any manual drivers. EEngNliGsh USING THE MONITOR SET 11 USING THE MONITOR SET Connecting Input Signal Cable yyThis monitor supports the *Plug and Play feature. *Plug and...
...-pin D-SUB signal cable as a regular monitor through the RGB IN port, set "PCoIP" to OFF in MENU > OTHERS to reconfigure anything or install any manual drivers. EEngNliGsh USING THE MONITOR SET 11 USING THE MONITOR SET Connecting Input Signal Cable yyThis monitor supports the *Plug and Play feature. *Plug and...
User Manual
Page 16
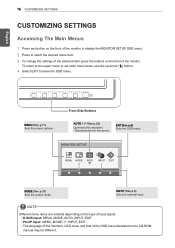
.... INPUT (See p.5) Sets the external input. NOTE Different menu items are enabled depending on the type of the OSD menu illustrated in the CD-ROM manual may be different. Front Side Buttons AUTO / (See p.23) Optimizes the resolution. / Disconnects from the server. EEngNliGsh 16 CUSTOMIZING SETTINGS CUSTOMIZING SETTINGS Accessing The Main...
.... INPUT (See p.5) Sets the external input. NOTE Different menu items are enabled depending on the type of the OSD menu illustrated in the CD-ROM manual may be different. Front Side Buttons AUTO / (See p.23) Optimizes the resolution. / Disconnects from the server. EEngNliGsh 16 CUSTOMIZING SETTINGS CUSTOMIZING SETTINGS Accessing The Main...
User Manual
Page 23
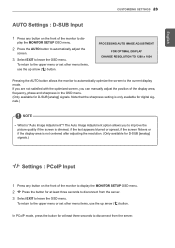
The Auto Image Adjustment option allows you can manually adjust the position of the display area, frequency, phase and sharpness in the OSD menu. (Only available for at least three seconds to disconnect from ...
The Auto Image Adjustment option allows you can manually adjust the position of the display area, frequency, phase and sharpness in the OSD menu. (Only available for at least three seconds to disconnect from ...

User Manual
Page 24
... disconnected. The "OSD LOCKED" message is turned off? NOTE yyVertical Frequency: In order to display an image, the screen must be refreshed dozens of this manual to switch the display on . The number of the monitor. EEngNliGsh 24 Troubleshooting TROUBLESHOOTING Nothing is displayed on ? Is the power indicator blinking? yy This...
... disconnected. The "OSD LOCKED" message is turned off? NOTE yyVertical Frequency: In order to display an image, the screen must be refreshed dozens of this manual to switch the display on . The number of the monitor. EEngNliGsh 24 Troubleshooting TROUBLESHOOTING Nothing is displayed on ? Is the power indicator blinking? yy This...
User Manual
Page 25
...Display > Settings > Color Quality. Does the display area appear uncentered? If you are not satisfied with the optimized screen, you can manually adjust the PHASE option in Control Panel > Display > Settings. Does the screen display horizontal Pressing the AUTO button will automatically optimize the...go to the monitor's performance. Does the screen exhibit vertical lines? If you are not satisfied with the optimized screen, you can manually adjust the POSITION option in blurred text, a dimmed screen, a truncated display area or misalignment of the display. Pressing the AUTO ...
...Display > Settings > Color Quality. Does the display area appear uncentered? If you are not satisfied with the optimized screen, you can manually adjust the PHASE option in Control Panel > Display > Settings. Does the screen display horizontal Pressing the AUTO button will automatically optimize the...go to the monitor's performance. Does the screen exhibit vertical lines? If you are not satisfied with the optimized screen, you can manually adjust the POSITION option in blurred text, a dimmed screen, a truncated display area or misalignment of the display. Pressing the AUTO ...

User Manual
Page 30
... Tab The Network tab allows the administrator to configure and manage the portal environment. If this field is disabled, the above parameters must be configured manually. yy IP Address The IP Address field contains the IP address of the device. If DHCP is disabled, this option is required. This field must...
... Tab The Network tab allows the administrator to configure and manage the portal environment. If this field is disabled, the above parameters must be configured manually. yy IP Address The IP Address field contains the IP address of the device. If DHCP is disabled, this option is required. This field must...

User Manual
Page 42
Make sure to read the Safety Precautions before using the product. MODEL SERIAL Keep the Owner's Manual(CD) in an accessible place for future reference. The model and serial number of the SET is located on the back and one side of the SET. Record it below should you ever need service.
Make sure to read the Safety Precautions before using the product. MODEL SERIAL Keep the Owner's Manual(CD) in an accessible place for future reference. The model and serial number of the SET is located on the back and one side of the SET. Record it below should you ever need service.


