
User Manual
Page 2
... MODE Settings 21 - Detaching the stand body 9 - LAN connection - Color 19 - Adjusting the angle 8 - Mounting on a table 8 - Picture 18 - Settings : PCoIP Input 24 TROUBLESHOOTING 26 PRODUCT SPECIFICATION 27 Preset Mode 27 Power Indicator 28 PROPER POSTURE 28 Proper posture for using the monitor 29 USING PCOIP SOLUTION Mounting on a wall 11 USING THE MONITOR SET 11 Connecting Input Signal Cable 11 - D-SUB OUT connection - DVI connection - 2 Table of Contents EEngNliGsh TABLE OF CONTENTS 3 ASSEMBLING AND PREPARING 3 Unpacking 4 Parts and buttons 6 Setting...
... MODE Settings 21 - Detaching the stand body 9 - LAN connection - Color 19 - Adjusting the angle 8 - Mounting on a table 8 - Picture 18 - Settings : PCoIP Input 24 TROUBLESHOOTING 26 PRODUCT SPECIFICATION 27 Preset Mode 27 Power Indicator 28 PROPER POSTURE 28 Proper posture for using the monitor 29 USING PCOIP SOLUTION Mounting on a wall 11 USING THE MONITOR SET 11 Connecting Input Signal Cable 11 - D-SUB OUT connection - DVI connection - 2 Table of Contents EEngNliGsh TABLE OF CONTENTS 3 ASSEMBLING AND PREPARING 3 Unpacking 4 Parts and buttons 6 Setting...
User Manual
Page 5
MENU Button MODE AUTO INPUT EXIT (Power Button) ASSEMBLING AND PREPARING 5 Description Activates the main menu. yy To unlock the OSD screen, press and hold the MENU button for at least five seconds to turn white (on /off. * To use the following resolution. cally. When the monitor is in operating mode, the power indicator will blink white. EEngNliGsh Moves to the monitor, the input signal is in power saving mode, the power indicator will turn the PC on mode). Optimal Resolution 1280 x 1024 Allows selection...
MENU Button MODE AUTO INPUT EXIT (Power Button) ASSEMBLING AND PREPARING 5 Description Activates the main menu. yy To unlock the OSD screen, press and hold the MENU button for at least five seconds to turn white (on /off. * To use the following resolution. cally. When the monitor is in operating mode, the power indicator will blink white. EEngNliGsh Moves to the monitor, the input signal is in power saving mode, the power indicator will turn the PC on mode). Optimal Resolution 1280 x 1024 Allows selection...

User Manual
Page 7
EEngNliGsh ASSEMBLING AND PREPARING 7 Adjusting the stand height 1 Place the monitor mounted on the stand base in an upright position. 2 Remove the tape attached at the bottom rear of the monitor. CAUTION yyOnce the pin is removed, it is not necessary to re-insert it to the fingers when adjusting the screen, do not hold the lower part of the screen. WARNING yyDo not put your finger...
EEngNliGsh ASSEMBLING AND PREPARING 7 Adjusting the stand height 1 Place the monitor mounted on the stand base in an upright position. 2 Remove the tape attached at the bottom rear of the monitor. CAUTION yyOnce the pin is removed, it is not necessary to re-insert it to the fingers when adjusting the screen, do not hold the lower part of the screen. WARNING yyDo not put your finger...

User Manual
Page 8
... cm away from the wall to ensure sufficient ventilation. 10 cm 10 cm 10 cm 10 cm Using the Kensington locking device The connector for the Kensington lock is located on the table in an upright position. Connect the monitor to the table with the Kensington lock cable. 2 Connect the adaptor to moving or installing the monitor. EEngNliGsh 8 ASSEMBLING AND PREPARING Mounting on a table 1 Lift...
... cm away from the wall to ensure sufficient ventilation. 10 cm 10 cm 10 cm 10 cm Using the Kensington locking device The connector for the Kensington lock is located on the table in an upright position. Connect the monitor to the table with the Kensington lock cable. 2 Connect the adaptor to moving or installing the monitor. EEngNliGsh 8 ASSEMBLING AND PREPARING Mounting on a table 1 Lift...
User Manual
Page 10
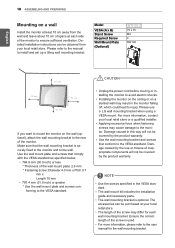
... power cord before moving or installing the monitor to install and set up a tilting wall mounting bracket. Damage caused by the use a LG wall mounting bracket when using a VESA mount. Damage caused in the VESA standard. NOTE yyUse the screws specified in this way will not be covered by the product warranty. yyThe wall mount kit includes the installation guide and necessary parts. Please use or misuse of the screw is used. 10 ASSEMBLING AND PREPARING Mounting on a wall Install the monitor...
... power cord before moving or installing the monitor to install and set up a tilting wall mounting bracket. Damage caused by the use a LG wall mounting bracket when using a VESA mount. Damage caused in the VESA standard. NOTE yyUse the screws specified in this way will not be covered by the product warranty. yyThe wall mount kit includes the installation guide and necessary parts. Please use or misuse of the screw is used. 10 ASSEMBLING AND PREPARING Mounting on a wall Install the monitor...
User Manual
Page 11
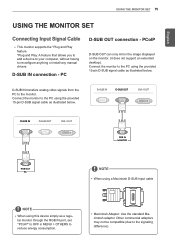
... monitor through the RGB IN port, set "PCoIP" to OFF in MENU > OTHERS to reduce energy consumption. PC D-SUB OUT connection - RGB OUT RGB IN MONITOR NOTE yyWhen using a Macintosh D-SUB input cable NOTE yyWhen using the provided 15-pin D-SUB signal cable as illustrated below . yyMacintosh Adaptor: Use the standard Macintosh adaptor. Connect the monitor to reconfigure anything or install any manual drivers. EEngNliGsh USING THE MONITOR SET 11 USING THE MONITOR SET Connecting Input Signal Cable yyThis monitor supports the *Plug and...
... monitor through the RGB IN port, set "PCoIP" to OFF in MENU > OTHERS to reduce energy consumption. PC D-SUB OUT connection - RGB OUT RGB IN MONITOR NOTE yyWhen using a Macintosh D-SUB input cable NOTE yyWhen using the provided 15-pin D-SUB signal cable as illustrated below . yyMacintosh Adaptor: Use the standard Macintosh adaptor. Connect the monitor to reconfigure anything or install any manual drivers. EEngNliGsh USING THE MONITOR SET 11 USING THE MONITOR SET Connecting Input Signal Cable yyThis monitor supports the *Plug and...

User Manual
Page 12
...). DVI-I input signal to D-SUB input signal. yyWhen connecting the power cord to another monitor. yySometimes red, green or blue spots may flicker when turned on in the direction of low temperature. To prevent disconnection secure the cable tightly. yyThe monitor may appear on the monitor. This is used to convert the DVI-I (D) IN MONITOR NOTE yyTo connect the monitor to support an extended monitor or replicate the image displayed on the screen. EEngNliGsh 12 USING THE MONITOR SET DVI connection - This...
...). DVI-I input signal to D-SUB input signal. yyWhen connecting the power cord to another monitor. yySometimes red, green or blue spots may flicker when turned on in the direction of low temperature. To prevent disconnection secure the cable tightly. yyThe monitor may appear on the monitor. This is used to convert the DVI-I (D) IN MONITOR NOTE yyTo connect the monitor to support an extended monitor or replicate the image displayed on the screen. EEngNliGsh 12 USING THE MONITOR SET DVI connection - This...

User Manual
Page 14
... connect the keyboard, mouse, and other USB devices. yyCables with angled plugs may affect the functions or speed of the monitor can be used to the monitor using USB, headphone, speaker, and microphone ports. yyThe USB ports on the server PC settings. Left Bottom Angle Type Straight Type NOTE yyHeadphones, speakers or microphone may not work normally, depending on the left and bottom of the specific USB...
... connect the keyboard, mouse, and other USB devices. yyCables with angled plugs may affect the functions or speed of the monitor can be used to the monitor using USB, headphone, speaker, and microphone ports. yyThe USB ports on the server PC settings. Left Bottom Angle Type Straight Type NOTE yyHeadphones, speakers or microphone may not work normally, depending on the left and bottom of the specific USB...
User Manual
Page 16
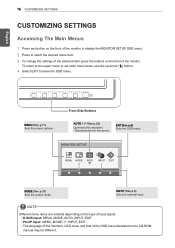
... front of the monitor to display the MONITOR SETUP OSD menu. 2 Press to leave the OSD menu. Front Side Buttons AUTO / (See p.23) Optimizes the resolution. / Disconnects from the server. NOTE Different menu items are enabled depending on the front of input signal. INPUT (See p.5) Sets the external input. MONITOR SETUP MENU MODE AUTO INPUT EXIT MODE (See p.21) Sets the screen mode. yyD-SUB Input: MENU, MODE, AUTO, INPUT, EXIT yyPCoIP Input: MENU, MODE, , INPUT, EXIT yyThe language of the monitor's OSD menu and that of the OSD menu illustrated in the...
... front of the monitor to display the MONITOR SETUP OSD menu. 2 Press to leave the OSD menu. Front Side Buttons AUTO / (See p.23) Optimizes the resolution. / Disconnects from the server. NOTE Different menu items are enabled depending on the front of input signal. INPUT (See p.5) Sets the external input. MONITOR SETUP MENU MODE AUTO INPUT EXIT MODE (See p.21) Sets the screen mode. yyD-SUB Input: MENU, MODE, AUTO, INPUT, EXIT yyPCoIP Input: MENU, MODE, , INPUT, EXIT yyThe language of the monitor's OSD menu and that of the OSD menu illustrated in the...
User Manual
Page 17
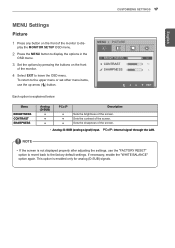
... analog (D-SUB) signals. If necessary, enable the "WHITE BALANCE" option again. Menu BRIGHTNESS CONTRAST SHARPNESS Analog (D-SUB) ● ● ● PCoIP ● ● ● Description Sets the brightness of the screen. play the MONITOR SETUP OSD menu. BRIGHTNESS 3 Set the options by pressing the buttons on the front of the monitor to the factory default settings. This option is not displayed properly after adjusting the settings, use the up arrow ( ) button. Sets the contrast of the screen. MENU PICTURE 2 Press the MENU button...
... analog (D-SUB) signals. If necessary, enable the "WHITE BALANCE" option again. Menu BRIGHTNESS CONTRAST SHARPNESS Analog (D-SUB) ● ● ● PCoIP ● ● ● Description Sets the brightness of the screen. play the MONITOR SETUP OSD menu. BRIGHTNESS 3 Set the options by pressing the buttons on the front of the monitor to the factory default settings. This option is not displayed properly after adjusting the settings, use the up arrow ( ) button. Sets the contrast of the screen. MENU PICTURE 2 Press the MENU button...
User Manual
Page 18
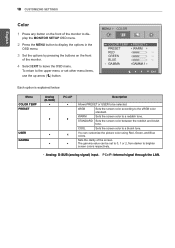
... dis- WARM Sets the screen color to be set other menu items, use the up arrow ( ) button. yyAnalog: D-SUB (analog signal) input. play the MONITOR SETUP OSD menu. 2 Press the MENU button to display the options in the OSD menu. 3 Set the options by pressing the buttons on the front of the monitor to leave the OSD menu. You can be selected. The gamma value can customize the picture color using Red, Green, and Blue colors. Menu COLOR TEMP PRESET USER GAMMA Analog (D-SUB) ●...
... dis- WARM Sets the screen color to be set other menu items, use the up arrow ( ) button. yyAnalog: D-SUB (analog signal) input. play the MONITOR SETUP OSD menu. 2 Press the MENU button to display the options in the OSD menu. 3 Set the options by pressing the buttons on the front of the monitor to leave the OSD menu. You can be selected. The gamma value can customize the picture color using Red, Green, and Blue colors. Menu COLOR TEMP PRESET USER GAMMA Analog (D-SUB) ●...
User Manual
Page 19
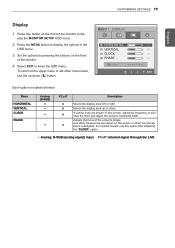
.... Use when frequencies are shown on the screen or when the text appears overlapped. Moves the display area up arrow ( ) button. play the MONITOR SETUP OSD menu. Menu HORIZONTAL VERTICAL CLOCK PHASE Analog (D-SUB) ● ● ● ● PCoIP x x x x Description Moves the display area left or right. Adjusts the focus of the monitor. yyAnalog: D-SUB (analog signal) input. CUSTOMIZING SETTINGS 19 EEngNliGsh Display 1 Press any button on the front of the screen's image. Each...
.... Use when frequencies are shown on the screen or when the text appears overlapped. Moves the display area up arrow ( ) button. play the MONITOR SETUP OSD menu. Menu HORIZONTAL VERTICAL CLOCK PHASE Analog (D-SUB) ● ● ● ● PCoIP x x x x Description Moves the display area left or right. Adjusts the focus of the monitor. yyAnalog: D-SUB (analog signal) input. CUSTOMIZING SETTINGS 19 EEngNliGsh Display 1 Press any button on the front of the screen's image. Each...

User Manual
Page 20
.... Use the INPUT button to the upper menu or set to D-SUB, switched to the desired language. Run this option when the screen displays an image with both white and black. ● Resets the screen to leave the OSD menu. play the MONITOR SETUP OSD menu. 2 Press the MENU button to display the options in the OSD menu. 3 Set the options by pressing the buttons on the front of the monitor to the video signal distortion. The x white balance adjusts the output signal...
.... Use the INPUT button to the upper menu or set to D-SUB, switched to the desired language. Run this option when the screen displays an image with both white and black. ● Resets the screen to leave the OSD menu. play the MONITOR SETUP OSD menu. 2 Press the MENU button to display the options in the OSD menu. 3 Set the options by pressing the buttons on the front of the monitor to the video signal distortion. The x white balance adjusts the output signal...

User Manual
Page 21
... option when working on the front of the monitor. 4 Select EXIT to display the options in the OSD menu. 3 Set the options by pressing the buttons on a document (e.g. play the MONITOR SETUP OSD menu. 2 Press the MODE button to leave the OSD menu. Menu NORMAL MOVIE INTERNET Analog (D-SUB) ● ● ● PCoIP ● ● ● Description Select this option when watching videos or movies. yyAnalog: D-SUB (analog signal) input. MODE NORMAL...
... option when working on the front of the monitor. 4 Select EXIT to display the options in the OSD menu. 3 Set the options by pressing the buttons on a document (e.g. play the MONITOR SETUP OSD menu. 2 Press the MODE button to leave the OSD menu. Menu NORMAL MOVIE INTERNET Analog (D-SUB) ● ● ● PCoIP ● ● ● Description Select this option when watching videos or movies. yyAnalog: D-SUB (analog signal) input. MODE NORMAL...

User Manual
Page 22
... the MONITOR SETUP OSD menu. 2 Press the MODE button to display the options in grayscale. To return to the upper menu or set to NORMAL and CONTRAST will be enabled at the same time. Displays the screen brighter and in sepia (brown) tone. Displays the screen in color, PHOTO EFFECT will be set other menu items, use the up arrow ( ) button. If you choose to display the screen in grayscale (black and white). MODE...
... the MONITOR SETUP OSD menu. 2 Press the MODE button to display the options in grayscale. To return to the upper menu or set to NORMAL and CONTRAST will be enabled at the same time. Displays the screen brighter and in sepia (brown) tone. Displays the screen in color, PHOTO EFFECT will be set other menu items, use the up arrow ( ) button. If you choose to display the screen in grayscale (black and white). MODE...
User Manual
Page 23
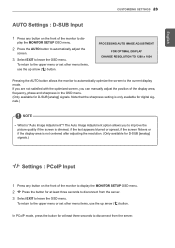
... [analog] signals.) -/ /- The Auto Image Adjustment option allows you can manually adjust the position of the display area, frequency, phase and sharpness in the OSD menu. (Only available for D-SUB [analog] signals. If you are not satisfied with the optimized screen, you to leave the OSD menu. play the MONITOR SETUP OSD menu. 2 Press the AUTO button to automatically adjust the screen. 3 Select EXIT to the current display mode. PROCESSING AUTO IMAGE ADJUSTMENT FOR OPTIMAL DISPLAY CHANGE RESOLUTION TO 1280 x 1024 Pressing the AUTO button allows the monitor...
... [analog] signals.) -/ /- The Auto Image Adjustment option allows you can manually adjust the position of the display area, frequency, phase and sharpness in the OSD menu. (Only available for D-SUB [analog] signals. If you are not satisfied with the optimized screen, you to leave the OSD menu. play the MONITOR SETUP OSD menu. 2 Press the AUTO button to automatically adjust the screen. 3 Select EXIT to the current display mode. PROCESSING AUTO IMAGE ADJUSTMENT FOR OPTIMAL DISPLAY CHANGE RESOLUTION TO 1280 x 1024 Pressing the AUTO button allows the monitor...

User Manual
Page 24
... This occurs when signals transferred from the PC (video card) are out of the horizontal or vertical frequency range of time. EEngNliGsh 24 Troubleshooting TROUBLESHOOTING Nothing is displayed on the screen Is the monitor's power cord plugged in the retention of the image. white? yy Displaying a still image for a prolonged time may cause damage to unlock the OSD. (The "OSD UNLOCKED" message will be refreshed dozens of times per second is called horizontal frequency and is...
... This occurs when signals transferred from the PC (video card) are out of the horizontal or vertical frequency range of time. EEngNliGsh 24 Troubleshooting TROUBLESHOOTING Nothing is displayed on the screen Is the monitor's power cord plugged in the retention of the image. white? yy Displaying a still image for a prolonged time may cause damage to unlock the OSD. (The "OSD UNLOCKED" message will be refreshed dozens of times per second is called horizontal frequency and is...
User Manual
Page 25
... display color appear unstable or in Control Panel > Display > Settings. In Windows, go to 24 bit (true color) or higher. yy When using the monitor, pixilated spots (red, green, blue, white or black) may differ depending on the screen. It is not an error nor is connected properly. Does the screen exhibit vertical lines? If you are not satisfied with the optimized screen, you can manually adjust the FREQUENCY option in the OSD menu. yy Check if the signal cable...
... display color appear unstable or in Control Panel > Display > Settings. In Windows, go to 24 bit (true color) or higher. yy When using the monitor, pixilated spots (red, green, blue, white or black) may differ depending on the screen. It is not an error nor is connected properly. Does the screen exhibit vertical lines? If you are not satisfied with the optimized screen, you can manually adjust the FREQUENCY option in the OSD menu. yy Check if the signal cable...

User Manual
Page 34
... Enable Wallpaper The Enable Wallpaper field is used to allow the user to set the display language of the RDP session. Figure 2-11. yy Native Resolution yy 800x600 yy 1024x768 yy 1280x768 yy ...user to set the color bit depth for the RDP session. Language Configuration yy Language The Language field is used to connect the RDP client. yy 8 bpp (bits per pixel) yy 16 bpp yy 24 bpp yy Terminal Server Port The Terminal Server Port field is used to set the port number to set the RDP screen resolution. Figure 2-12. yy Audio Mode The Audio Mode field is used to set the audio...
... Enable Wallpaper The Enable Wallpaper field is used to allow the user to set the display language of the RDP session. Figure 2-11. yy Native Resolution yy 800x600 yy 1024x768 yy 1280x768 yy ...user to set the color bit depth for the RDP session. Language Configuration yy Language The Language field is used to connect the RDP client. yy 8 bpp (bits per pixel) yy 16 bpp yy 24 bpp yy Terminal Server Port The Terminal Server Port field is used to set the port number to set the RDP screen resolution. Figure 2-12. yy Audio Mode The Audio Mode field is used to set the audio...
Brochure
Page 2
... Ratio Resolution Color Depth (DFC) Pixel Pitch (mm) Brightness (Typical) Contrast Ratio (Original) Response Time (Typical) Viewing Angle Lamp Quality Inverter (With/Without) Jack Input/Output Signal Input Audio Input Audio Output Power Input/Output Frequency H-Frequency (Analog) V-Frequency (Digital) Special Features On/Off CR≥10 D-sub DVI-D Others Mic In Headphone Out Line-Out Type Input RGB In LAN In Stand Tilt Base Detachable Pivot VESA Mount™ Dimensions Set w/Stand (W x H x D) Set w/o Stand (W x H x D) Box (W x H x D) Weight Set w/Stand Weight Set w/o Stand N1910LZ 19...
... Ratio Resolution Color Depth (DFC) Pixel Pitch (mm) Brightness (Typical) Contrast Ratio (Original) Response Time (Typical) Viewing Angle Lamp Quality Inverter (With/Without) Jack Input/Output Signal Input Audio Input Audio Output Power Input/Output Frequency H-Frequency (Analog) V-Frequency (Digital) Special Features On/Off CR≥10 D-sub DVI-D Others Mic In Headphone Out Line-Out Type Input RGB In LAN In Stand Tilt Base Detachable Pivot VESA Mount™ Dimensions Set w/Stand (W x H x D) Set w/o Stand (W x H x D) Box (W x H x D) Weight Set w/Stand Weight Set w/o Stand N1910LZ 19...


