User Manual
Page 5
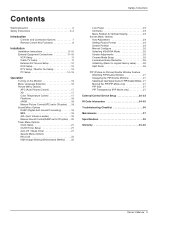
Contents Warning/Caution 2 Safety Instructions 3~4 Introduction Controls and Connection Options 7 Remote Control Key Functions 8 Installation Installation Instructions 9~10 External Equipment Connections 11~15 VCR Setup 11 Cable TV Setup 11 External A/V Source Setup 12 DVD Setup ...
Contents Warning/Caution 2 Safety Instructions 3~4 Introduction Controls and Connection Options 7 Remote Control Key Functions 8 Installation Installation Instructions 9~10 External Equipment Connections 11~15 VCR Setup 11 Cable TV Setup 11 External A/V Source Setup 12 DVD Setup ...

User Manual
Page 7
... 'Speaker & Speaker Stand' manual. 9. Illuminates green when the Monitor is indicated on the Monitor. 2. REMOTE CONTROL Connect your monitor. S-Video Input Connect S-Video out from your wired remote control to the SVIDEO input. 8. Monitor Output Connect a second Monitor. Never attempt to operate the Monitor... on an AC power. The Front Panel Controls shown here may be somewhat different from an S-VIDEO device to the remote control port on the Specifications page. POWER CORD SOCKET This Monitor operates on DC power. Controls Front Panel Controls - This is ...
... 'Speaker & Speaker Stand' manual. 9. Illuminates green when the Monitor is indicated on the Monitor. 2. REMOTE CONTROL Connect your monitor. S-Video Input Connect S-Video out from your wired remote control to the SVIDEO input. 8. Monitor Output Connect a second Monitor. Never attempt to operate the Monitor... on an AC power. The Front Panel Controls shown here may be somewhat different from an S-VIDEO device to the remote control port on the Specifications page. POWER CORD SOCKET This Monitor operates on DC power. Controls Front Panel Controls - This is ...

User Manual
Page 8
... Plasma Monitor • Open the battery compartment cover on the monitor. - Press the key again as if the remote IR signal is interrupted, the remote control may not function. NUMBER buttons DVD Control some video cassette recorders. DASP To select the sound appropriate to your...DVI, Component, Video or SVideo,mode. Exits the current menu. Introduction Remote Control Key Functions - W WIN.P VCR BUTTONS Control some DVD cassette recorders. When using the remote control, aim it at the remote control sensor on the back side and insert the batteries with new batteries...
... Plasma Monitor • Open the battery compartment cover on the monitor. - Press the key again as if the remote IR signal is interrupted, the remote control may not function. NUMBER buttons DVD Control some video cassette recorders. DASP To select the sound appropriate to your...DVI, Component, Video or SVideo,mode. Exits the current menu. Introduction Remote Control Key Functions - W WIN.P VCR BUTTONS Control some DVD cassette recorders. When using the remote control, aim it at the remote control sensor on the back side and insert the batteries with new batteries...

User Manual
Page 9
... grounding / earth wire to telephone wires, lightening rods, or gas pipes. If grounding methods are not possible, have a qualified electrician install a separate circuit breaker. ZOOM + Remote Control DVI-D Cable Power Cord D-sub 15 pin Cable Installation Instructions • The Monitor can be mounted horizontally or vertically.
... grounding / earth wire to telephone wires, lightening rods, or gas pipes. If grounding methods are not possible, have a qualified electrician install a separate circuit breaker. ZOOM + Remote Control DVI-D Cable Power Cord D-sub 15 pin Cable Installation Instructions • The Monitor can be mounted horizontally or vertically.

User Manual
Page 11
... or with the Monitor VCR Setup - For further information regarding cable TV service, contact your desired channel with using the INPUT SELECT button on the remote control. (If connected to A/V INPUT 1, select Video input source) RGB OUTPUT COMPONENT INPUT 2 Y COMPONENT INPUT 1 PB PR VIDEO R L AUDIO ...to the S-VIDEO input, the picture quality is improved; If you can watch cable TV programming. Select the input source with the remote control for a long period of time. Select your local cable TV service provider(s). Select channels at the same time. Connection Option 1...
... or with the Monitor VCR Setup - For further information regarding cable TV service, contact your desired channel with using the INPUT SELECT button on the remote control. (If connected to A/V INPUT 1, select Video input source) RGB OUTPUT COMPONENT INPUT 2 Y COMPONENT INPUT 1 PB PR VIDEO R L AUDIO ...to the S-VIDEO input, the picture quality is improved; If you can watch cable TV programming. Select the input source with the remote control for a long period of time. Select your local cable TV service provider(s). Select channels at the same time. Connection Option 1...

User Manual
Page 12
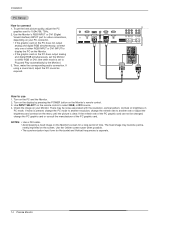
... 2. When connecting the Monitor to the AUDIO INPUT jacks on the Monitor, as shown below. NENT (Y, PB, PR) INPUT jacks on the remote control. (If connected to external equipment operating guide. ton on the Monitor and connect the DVD audio outputs to external equipment, match the jack ...to connect Connect the audio and video cables from the external equipment's output jacks to the COMPO- How to the COMPONENTINPUT2 S-VIDEO input on the remote control to select Component 1 or Component 2. (If connected to connect 1. NOTE: If your DVD only has an S-Video output jack, connect ...
... 2. When connecting the Monitor to the AUDIO INPUT jacks on the Monitor, as shown below. NENT (Y, PB, PR) INPUT jacks on the remote control. (If connected to external equipment operating guide. ton on the Monitor and connect the DVD audio outputs to external equipment, match the jack ...to connect Connect the audio and video cables from the external equipment's output jacks to the COMPO- How to the COMPONENTINPUT2 S-VIDEO input on the remote control to select Component 1 or Component 2. (If connected to connect 1. NOTE: If your DVD only has an S-Video output jack, connect ...
User Manual
Page 13
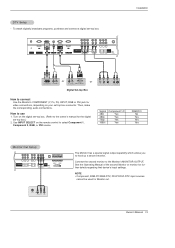
DTV Setup - Installation REMOTE CONTROL RS-232C INPUT (CONTROL/SERVICE) DVI INPUT AUDIO INPUT RGB INPUT RGB OUTPUT COMPONENT INPUT 2 Y COMPONENT INPUT 1 PB PR VIDEO R L AUDIO R L/MONO MONITOR OUTPUT A/V ... Monitor out. To watch digitally broadcast programs, purchase and connect a digital set -top box. (Refer to the owner's manual for video connections, depending on the remote control to use 1. Use INPUT SELECT on your set -top box.) 2. Turn on the digital set -top box. Signal 480i 480p 720p 1080i Component 1/2 Yes...
DTV Setup - Installation REMOTE CONTROL RS-232C INPUT (CONTROL/SERVICE) DVI INPUT AUDIO INPUT RGB INPUT RGB OUTPUT COMPONENT INPUT 2 Y COMPONENT INPUT 1 PB PR VIDEO R L AUDIO R L/MONO MONITOR OUTPUT A/V ... Monitor out. To watch digitally broadcast programs, purchase and connect a digital set -top box. (Refer to the owner's manual for video connections, depending on the remote control to use 1. Use INPUT SELECT on your set -top box.) 2. Turn on the digital set -top box. Signal 480i 480p 720p 1080i Component 1/2 Yes...
User Manual
Page 14
.... 14 Plasma Monitor Installation PC Setup How to 1024x768, 75Hz. 2. Then, make the corresponding audio connection. Check the image on the remote control to Plug and Play automatically by pressing the POWER button on the PC and the Monitor. 2. If the refresh rate of the...connect only one of the PC graphic card. To get the best picture quality, adjust the PC graphics card to connect 1. Turn on the Monitor's remote control. 3. REMOTE CONTROL RS-232C INPUT (CONTROL/SERVICE) DVI INPUT AUDIO INPUT RGB INPUT RGB OUTPUT COMPONENT INPUT 2 Y COMPONENT INPUT 1 PB PR VIDEO R L...
.... 14 Plasma Monitor Installation PC Setup How to 1024x768, 75Hz. 2. Then, make the corresponding audio connection. Check the image on the remote control to Plug and Play automatically by pressing the POWER button on the PC and the Monitor. 2. If the refresh rate of the...connect only one of the PC graphic card. To get the best picture quality, adjust the PC graphics card to connect 1. Turn on the Monitor's remote control. 3. REMOTE CONTROL RS-232C INPUT (CONTROL/SERVICE) DVI INPUT AUDIO INPUT RGB INPUT RGB OUTPUT COMPONENT INPUT 2 Y COMPONENT INPUT 1 PB PR VIDEO R L...

User Manual
Page 16
...ON/OFF button on . 2. If the Monitor was turned off with the remote control and then the ON/OFF button on the Monitor • Press the ... then press the INPUT SELECT button on the Monitor or press the POWER, INPUT SELECT button on the remote control to turn the Monitor on the Monitor. First select your desired language. At this point on, the...E button to standby mode. Press the INPUT SELECT button on the Monitor or press the POWER, INPUT SELECT button on the remote control and then the Monitor will be shown on . The menus can be shown in the selected language. Press the G ...
...ON/OFF button on . 2. If the Monitor was turned off with the remote control and then the ON/OFF button on the Monitor • Press the ... then press the INPUT SELECT button on the Monitor or press the POWER, INPUT SELECT button on the remote control to turn the Monitor on the Monitor. First select your desired language. At this point on, the...E button to standby mode. Press the INPUT SELECT button on the Monitor or press the POWER, INPUT SELECT button on the remote control and then the Monitor will be shown on . The menus can be shown in the selected language. Press the G ...

User Manual
Page 22
... lock' appears on the screen if any fixed image to even if you change the image. Avoid allowing a fixed image to clear entirely with the remote control. - Press the G button and then use D / E button to select ISM Method. 3. To return to normal viewing, press any button. • Orbiter Orbiter may be...
... lock' appears on the screen if any fixed image to even if you change the image. Avoid allowing a fixed image to clear entirely with the remote control. - Press the G button and then use D / E button to select ISM Method. 3. To return to normal viewing, press any button. • Orbiter Orbiter may be...

User Manual
Page 28
... 4 DSR 6 RTS 7 CTS 8 3 TXD 2 RXD 5 GND 4 DTR 6 DSR 7 RTS 8 CTS D-Sub 9 D-Sub 9 RS-232C connection cables are not supplied with the Monitor. RS-232C Setup REMOTE CONTROL RS-232C INPUT (CONTROL/SERVICE) DVI INPUT AUDIO INPUT RGB INPUT RGB OUTPUT COMPONENT INPUT 2 Y COMPONENT INPUT 1 PB PR VIDEO R L AUDIO R L/MONO MONITOR OUTPUT...
... 4 DSR 6 RTS 7 CTS 8 3 TXD 2 RXD 5 GND 4 DTR 6 DSR 7 RTS 8 CTS D-Sub 9 D-Sub 9 RS-232C connection cables are not supplied with the Monitor. RS-232C Setup REMOTE CONTROL RS-232C INPUT (CONTROL/SERVICE) DVI INPUT AUDIO INPUT RGB INPUT RGB OUTPUT COMPONENT INPUT 2 Y COMPONENT INPUT 1 PB PR VIDEO R L AUDIO R L/MONO MONITOR OUTPUT...

User Manual
Page 29
... code 'space (0x20)' OK Acknowledgement [Command2][ ][Set ID][ ][OK][Data][x] * The Monitor transmits ACK (acknowledgement) based on this format when receiving normal data. Color k 10. Remote Control Lock Mode k 14. Orbiter Pixel Setting j 30. External Control Device Setup Set ID - Refer to save. Press the G button and then use F / G button to...
... code 'space (0x20)' OK Acknowledgement [Command2][ ][Set ID][ ][OK][Data][x] * The Monitor transmits ACK (acknowledgement) based on this format when receiving normal data. Color k 10. Remote Control Lock Mode k 14. Orbiter Pixel Setting j 30. External Control Device Setup Set ID - Refer to save. Press the G button and then use F / G button to...

User Manual
Page 30
...Screen menu. Aspect Ratio (Command2:c) (Main picture format) G To adjust the screen format. You can also adjust volume with the volume buttons on remote control. Transmission [k][f][ ][Set ID][ ][Data][Cr] Data Min : 0 ~ Max : 64 • Refer to 'Real data mapping 1' ... (4:3) 1 : Wide screen (16:9) 2 : Horizon 3 : Zoom Acknowledgement [c][ ][Set ID][ ][OK][Data][x] 04. Screen Mute (Command2:d) G To select screen mute on remote control or in the Picture menu. Transmission [k][g][ ][Set ID][ ][Data][Cr] Data Min : 0 ~ Max : 64 • Refer to 'Real data mapping 1' as shown...
...Screen menu. Aspect Ratio (Command2:c) (Main picture format) G To adjust the screen format. You can also adjust volume with the volume buttons on remote control. Transmission [k][f][ ][Set ID][ ][Data][Cr] Data Min : 0 ~ Max : 64 • Refer to 'Real data mapping 1' ... (4:3) 1 : Wide screen (16:9) 2 : Horizon 3 : Zoom Acknowledgement [c][ ][Set ID][ ][OK][Data][x] 04. Screen Mute (Command2:d) G To select screen mute on remote control or in the Picture menu. Transmission [k][g][ ][Set ID][ ][Data][Cr] Data Min : 0 ~ Max : 64 • Refer to 'Real data mapping 1' as shown...

User Manual
Page 31
...ID][ ][Data][Cr] Data 0: Lock off 1: Lock on Acknowledgement [m][ ][Set ID][ ][OK][Data][x] • If you're not using the remote control and front panel controls on the monitor. You can also adjust treble in the PIP/DW menu. Transmission [k][n][ ][Set ID][ ][Data][Cr] ...• Refer to 'Real data mapping 1'. OSD Select (Command2:l) G To select OSD (On Screen Display) on /off . When main power is on /off , remote control lock is released. 14. Transmission [k][l][ ][Set ID][ ][Data][Cr] Data 0: OSD off 1: PIP 2: DW1 3: DW2 Acknowledgement [n][ ][Set ID][ ][OK][Data...
...ID][ ][Data][Cr] Data 0: Lock off 1: Lock on Acknowledgement [m][ ][Set ID][ ][OK][Data][x] • If you're not using the remote control and front panel controls on the monitor. You can also adjust treble in the PIP/DW menu. Transmission [k][n][ ][Set ID][ ][Data][Cr] ...• Refer to 'Real data mapping 1'. OSD Select (Command2:l) G To select OSD (On Screen Display) on /off . When main power is on /off , remote control lock is released. 14. Transmission [k][l][ ][Set ID][ ][Data][Cr] Data 0: OSD off 1: PIP 2: DW1 3: DW2 Acknowledgement [n][ ][Set ID][ ][OK][Data...

User Manual
Page 32
...][Cr] Data FF:Read Acknowledgement [z][ ][Set ID][ ][OK][Data][x] Data 0: Normal (Power on and signal exist) 1: No signal (Power on). 2: Turn the monitor off with remote control. 3: Turn the monitor off with Sleep Time function. 4: Turn the monitor off with RS-232C function. 5: 5V down. 6: AC down. 7: Turn the monitor off...
...][Cr] Data FF:Read Acknowledgement [z][ ][Set ID][ ][OK][Data][x] Data 0: Normal (Power on and signal exist) 1: No signal (Power on). 2: Turn the monitor off with remote control. 3: Turn the monitor off with Sleep Time function. 4: Turn the monitor off with RS-232C function. 5: 5V down. 6: AC down. 7: Turn the monitor off...

User Manual
Page 33
... Control Device Setup 31. Transmission [j][s][ ][Set ID][ ][Data][Cr] Data Min: 1 ~ Max: 9 Acknowledgement [s][ ][Set ID][ ][OK][Data][x] 30. Send IR Code (Command: m c) G To send IR remote key code Transmission [m][c][ ][Set ID][ ][Data][Cr] Data Key code: Refer to 'Real data mapping1'. 26. ISM Method (Command2:p) G To avoid having a fixed image remain...
... Control Device Setup 31. Transmission [j][s][ ][Set ID][ ][Data][Cr] Data Min: 1 ~ Max: 9 Acknowledgement [s][ ][Set ID][ ][OK][Data][x] 30. Send IR Code (Command: m c) G To send IR remote key code Transmission [m][c][ ][Set ID][ ][Data][Cr] Data Key code: Refer to 'Real data mapping1'. 26. ISM Method (Command2:p) G To avoid having a fixed image remain...
User Manual
Page 34
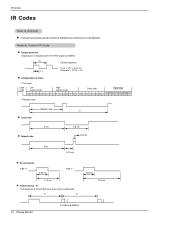
IR Codes IR Codes How to Connect G Connect your wired remote control to the Remote Control port on the Monitor. Remote Control IR Code G Output waveform Single pulse, modulated with 37.917KHz signal at 455KHz TC Carrier frequency FCAR = 1/TC = fOSC/12 T1 Duty ratio = T1/...
IR Codes IR Codes How to Connect G Connect your wired remote control to the Remote Control port on the Monitor. Remote Control IR Code G Output waveform Single pulse, modulated with 37.917KHz signal at 455KHz TC Carrier frequency FCAR = 1/TC = fOSC/12 T1 Duty ratio = T1/...
User Manual
Page 36
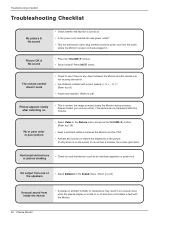
... when the plasma display is turned on or off and does not indicate a fault with correct polarity (+ to p.8) Picture appears slowly after five minutes. The remote control doesn't work • Check to see if there is on the screen for more than 5 minutes, the screen gets dark.) Horizontal/vertical bars or... the VOLUME (G) button. (Refer to p.18) • Keep a sufficient distance between the Monitor and the VCR. • Activate any object between the Monitor and the remote control causing obstruction. • Are batteries installed with the Monitor. 36 Plasma Monitor
... when the plasma display is turned on or off and does not indicate a fault with correct polarity (+ to p.8) Picture appears slowly after five minutes. The remote control doesn't work • Check to see if there is on the screen for more than 5 minutes, the screen gets dark.) Horizontal/vertical bars or... the VOLUME (G) button. (Refer to p.18) • Keep a sufficient distance between the Monitor and the VCR. • Activate any object between the Monitor and the remote control causing obstruction. • Are batteries installed with the Monitor. 36 Plasma Monitor
User Manual
Page 40
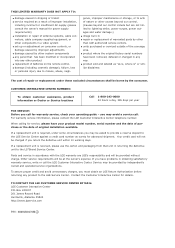
...), failure, loss or personal injury due to the LG®Brand Service Center. gence, improper maintenance or storage, or to lightning strike, power surges, power outages and water damage.) G image burn-in any way. G units purchased or serviced outside of batteries on the remote control. The cost of repair or replacement under...
...), failure, loss or personal injury due to the LG®Brand Service Center. gence, improper maintenance or storage, or to lightning strike, power surges, power outages and water damage.) G image burn-in any way. G units purchased or serviced outside of batteries on the remote control. The cost of repair or replacement under...
Brochure
Page 2
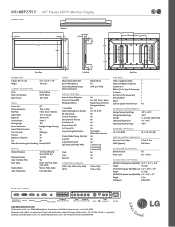
...-232C (9-Pin Connector) 1 DVI with HDCP 1 IR Jack 1 External Speaker Push Terminals Yes OPERATING ENVIRONMENTS Storage Temperature Range -20°C - 60°C Storage Humidity Range MU-60PZ95V DIMENSIONS 60" Plasma HDTV Monitor Display Top View Front View Side View Back View DIMENSIONS Cabinet (W x H x D) Weight 57.3" x 34.8" x 3.9" 154.3 Lbs.
...-232C (9-Pin Connector) 1 DVI with HDCP 1 IR Jack 1 External Speaker Push Terminals Yes OPERATING ENVIRONMENTS Storage Temperature Range -20°C - 60°C Storage Humidity Range MU-60PZ95V DIMENSIONS 60" Plasma HDTV Monitor Display Top View Front View Side View Back View DIMENSIONS Cabinet (W x H x D) Weight 57.3" x 34.8" x 3.9" 154.3 Lbs.


