

Owners Manual
Page 1
See the label attached on the back of the Monitor. Model Number : Serial Number : LG Electronics U.S.A., Inc. Retain it for future reference. Record model number and serial number of the Monitor and relate this owner's manual thoroughly before operating the Monitor. PLASMA MONITOR OWNER'S MANUAL MODELS : MU-42PM11/12X/20 MU-50PM10/11/20 Please read this information to your dealer if you ever require service.
See the label attached on the back of the Monitor. Model Number : Serial Number : LG Electronics U.S.A., Inc. Retain it for future reference. Record model number and serial number of the Monitor and relate this owner's manual thoroughly before operating the Monitor. PLASMA MONITOR OWNER'S MANUAL MODELS : MU-42PM11/12X/20 MU-50PM10/11/20 Please read this information to your dealer if you ever require service.
Owners Manual
Page 3
... Warning/Caution Important safeguards for your safety. Install in this apparatus near any ventilation openings. A polarized plug has two blades with the manufacturer's instructions. 8. Owner's Manual 3 This product complies with dry cloth. 7. Observing the simple precautions discussed in accordance with one wider than the other apparatus (including amplifiers)that produce heat...
... Warning/Caution Important safeguards for your safety. Install in this apparatus near any ventilation openings. A polarized plug has two blades with the manufacturer's instructions. 8. Owner's Manual 3 This product complies with dry cloth. 7. Observing the simple precautions discussed in accordance with one wider than the other apparatus (including amplifiers)that produce heat...
Owners Manual
Page 5
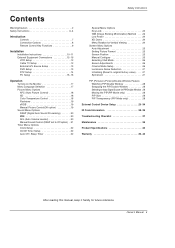
... Menu Language Selection 17 Picture Menu Options APC (Auto Picture Control 18 XD 18 Color Temperature Control 18 Fleshtone 19 sRGB 19 Manual Picture Control(Off option 19 Sound Menu Options DASP (Digital Auto Sound Processing 20 BBE 20 AVL (Auto Volume Leveler 20... Low Power 24 XD Demo 24 Menu Rotation for Vertical Viewing 24 Screen Menu Options Auto Adjustment 25 Setting Picture Format 25 Screen Position 25 Manual Configure 26 Selecting VGA Mode 26 Screen Adjustments 26 Cinema Mode Setup 26 Luminance Noise Reduction 27 Initializing (Reset to original factory value) . . . ....
... Menu Language Selection 17 Picture Menu Options APC (Auto Picture Control 18 XD 18 Color Temperature Control 18 Fleshtone 19 sRGB 19 Manual Picture Control(Off option 19 Sound Menu Options DASP (Digital Auto Sound Processing 20 BBE 20 AVL (Auto Volume Leveler 20... Low Power 24 XD Demo 24 Menu Rotation for Vertical Viewing 24 Screen Menu Options Auto Adjustment 25 Setting Picture Format 25 Screen Position 25 Manual Configure 26 Selecting VGA Mode 26 Screen Adjustments 26 Cinema Mode Setup 26 Luminance Noise Reduction 27 Initializing (Reset to original factory value) . . . ....
Owners Manual
Page 7
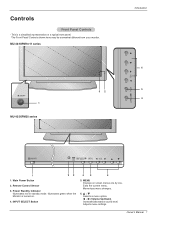
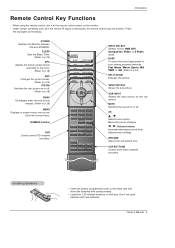
...is a simplified representation of a typical front panel. Memorizes menu changes. 6. F / G (Volume Up/Down) Increases/decreases sound level. Owner's Manual 7 The Front Panel Controls shown here may be somewhat different from your monitor. Remote Control Sensor 3. INPUT SELECT Button 4 5 6 5. Adjusts ...menu settings. Main Power Button 2. This is turned on screen menus one by one. MU-42/50PM10/11 series ON/OFF 1 MU-42/50PM20 series 32 Introduction 6 5 4 ON/OFF 1 23 1. Exits the current menu. Power Standby Indicator Illuminates red...
...is a simplified representation of a typical front panel. Memorizes menu changes. 6. F / G (Volume Up/Down) Increases/decreases sound level. Owner's Manual 7 The Front Panel Controls shown here may be somewhat different from your monitor. Remote Control Sensor 3. INPUT SELECT Button 4 5 6 5. Adjusts ...menu settings. Main Power Button 2. This is turned on screen menus one by one. MU-42/50PM10/11 series ON/OFF 1 MU-42/50PM20 series 32 Introduction 6 5 4 ON/OFF 1 23 1. Exits the current menu. Power Standby Indicator Illuminates red...

Owners Manual
Page 8
... SVIDEO input. DVI (Digital Visual Interface) INPUT/ AUDIO INPUT/ RGB INPUT JACKS Connect the monitor output connector from an S-VIDEO device to 'Speaker & Speaker Stand' manual. 9. NOTE: AUDIO INPUT of S-VIDEO is indicated on an AC power. Connection panels shown may be somewhat different from an external device to the appropriate...
... SVIDEO input. DVI (Digital Visual Interface) INPUT/ AUDIO INPUT/ RGB INPUT JACKS Connect the monitor output connector from an S-VIDEO device to 'Speaker & Speaker Stand' manual. 9. NOTE: AUDIO INPUT of S-VIDEO is indicated on an AC power. Connection panels shown may be somewhat different from an external device to the appropriate...
Owners Manual
Page 9
... input source for the sub picture. POWER Switches the Monitor between ON and STANDBY. Exits the current menu. WIN.POSITION Moves the sub picture. Owner's Manual 9 NUMBER buttons DVD Control some video cassette recorders. Installing Batteries • Open the battery compartment cover on screen menus one by one. SLEEP Sets the...
... input source for the sub picture. POWER Switches the Monitor between ON and STANDBY. Exits the current menu. WIN.POSITION Moves the sub picture. Owner's Manual 9 NUMBER buttons DVD Control some video cassette recorders. Installing Batteries • Open the battery compartment cover on screen menus one by one. SLEEP Sets the...

Owners Manual
Page 10
... electrician install a separate circuit breaker. ZOOM + Remote Control Power Cord BNC-RCA Adapter Installation Instructions • The Monitor can be mounted horizontally or vertically. Owner's Manual 1.5V 1.5V Alkaline Batteries POWER SLEEP APC ARC PIP SWAP MENU INPUT SELECT DASP PIP ARC TWIN PICTURE SUB INPUT MUTE VOL OK VOL 1 2 3 4 5 6 7 8 9 0 POWER...
... electrician install a separate circuit breaker. ZOOM + Remote Control Power Cord BNC-RCA Adapter Installation Instructions • The Monitor can be mounted horizontally or vertically. Owner's Manual 1.5V 1.5V Alkaline Batteries POWER SLEEP APC ARC PIP SWAP MENU INPUT SELECT DASP PIP ARC TWIN PICTURE SUB INPUT MUTE VOL OK VOL 1 2 3 4 5 6 7 8 9 0 POWER...

Owners Manual
Page 11
Detailed installation instructions are available from your dealer. 4 inches 2 inches 4 inches 4 inches 2.36 inches Owner's Manual 11 Detailed installation instructions are included in the optional Desktop Stand Installation and Setup Guide available from your dealer, see the optional Wall Mounting Bracket ...
Detailed installation instructions are available from your dealer. 4 inches 2 inches 4 inches 4 inches 2.36 inches Owner's Manual 11 Detailed installation instructions are included in the optional Desktop Stand Installation and Setup Guide available from your dealer, see the optional Wall Mounting Bracket ...

Owners Manual
Page 12
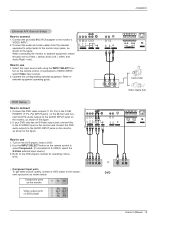
.... - Installation External Equipment Connections NOTE: All cables shown are not included with using the INPUT SELECT button on the VCR. (Refer to the VCR owner's manual.) 4.
.... - Installation External Equipment Connections NOTE: All cables shown are not included with using the INPUT SELECT button on the VCR. (Refer to the VCR owner's manual.) 4.
Owners Manual
Page 13
...the S-Video external input source.) 3. ton on DVD player Y Pb Pr Y B-Y R-Y Y Cb Cr Y PB PR B R (R) AUDIO (L) or S-VIDEO (R) AUDIO (L) DVD Owner's Manual 13 Y PB PR COMPONENT INPUT R L AUDIO INPUT S-VIDEO R L (MONO) AUDIO INPUT VIDEO INPUT R AUDIO L VIDEO ( )R( ) ( )L( ) EXTERNAL SPEAKER AC INPUT Camcorder Video... shown in the figure. Use the INPUT SELECT button on the DVD player, insert a DVD. 2. Refer to the DVD player's manual for operating instructions. • Component Input ports To get better picture quality, connect a DVD player to use 1. Refer to the ...
...the S-Video external input source.) 3. ton on DVD player Y Pb Pr Y B-Y R-Y Y Cb Cr Y PB PR B R (R) AUDIO (L) or S-VIDEO (R) AUDIO (L) DVD Owner's Manual 13 Y PB PR COMPONENT INPUT R L AUDIO INPUT S-VIDEO R L (MONO) AUDIO INPUT VIDEO INPUT R AUDIO L VIDEO ( )R( ) ( )L( ) EXTERNAL SPEAKER AC INPUT Camcorder Video... shown in the figure. Use the INPUT SELECT button on the DVD player, insert a DVD. 2. Refer to the DVD player's manual for operating instructions. • Component Input ports To get better picture quality, connect a DVD player to use 1. Refer to the ...

Owners Manual
Page 14
To watch digitally broadcast programs, purchase and connect a digital set -top box. (Refer to the owner's manual for video connections, depending on the remote control to select Component , RGB, or DVI source. REMOTE RS-232C INPUT CONTROL (CONTROL/SERVICE) DVI INPUT AUDIO ...
To watch digitally broadcast programs, purchase and connect a digital set -top box. (Refer to the owner's manual for video connections, depending on the remote control to select Component , RGB, or DVI source. REMOTE RS-232C INPUT CONTROL (CONTROL/SERVICE) DVI INPUT AUDIO ...

Owners Manual
Page 15
... the PC sound as required. REMOTE CONTROL RS-232C INPUT (CONTROL/SERVICE) DVI INPUT AUDIO INPUT RGB INPUT RGB OUTPUT Installation How to connect 1. Owner's Manual 15 Use INPUT SELECT on the screen. Turn on the monitor's remote control. 3. Turn on the display by the monitor.) 3. To get the best picture...
... the PC sound as required. REMOTE CONTROL RS-232C INPUT (CONTROL/SERVICE) DVI INPUT AUDIO INPUT RGB INPUT RGB OUTPUT Installation How to connect 1. Owner's Manual 15 Use INPUT SELECT on the screen. Turn on the monitor's remote control. 3. Turn on the display by the monitor.) 3. To get the best picture...
Owners Manual
Page 17
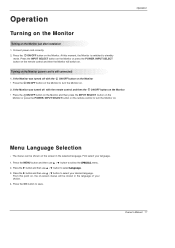
... the ON/OFF button on the Monitor just after installation 1. Turning on . Press the G button and then use D / E button to turn the Monitor on . 2. Owner's Manual 17 Connect power cord correctly. 2. If the Monitor was turned off with the remote control and then the ON/OFF button on the Monitor •...
... the ON/OFF button on the Monitor just after installation 1. Turning on . Press the G button and then use D / E button to turn the Monitor on . 2. Owner's Manual 17 Connect power cord correctly. 2. If the Monitor was turned off with the remote control and then the ON/OFF button on the Monitor •...
Owners Manual
Page 18
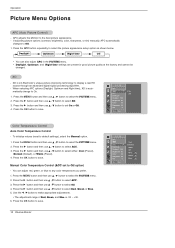
Press the APC button repeatedly to display a real HD source through an advanced digital signal processing algorithm. - XD is LG Electronic's unique picture improving technology to select the picture appearance setup option as shown below. Press the G button and then use D... any color temperature you prefer. 1. Color Temperature Control Auto Color Temperature Control - Press the G button and then use D / E button to select ACC . 3. Manual Color Temperature Control (ACC set On or Off. 4. Use the F / G button to Off option) - Operation Picture Menu Options APC (Auto Picture Control) -...
Press the APC button repeatedly to display a real HD source through an advanced digital signal processing algorithm. - XD is LG Electronic's unique picture improving technology to select the picture appearance setup option as shown below. Press the G button and then use D... any color temperature you prefer. 1. Color Temperature Control Auto Color Temperature Control - Press the G button and then use D / E button to select ACC . 3. Manual Color Temperature Control (ACC set On or Off. 4. Use the F / G button to Off option) - Operation Picture Menu Options APC (Auto Picture Control) -...

Owners Manual
Page 19
...and then use D / E button to select the PICTURE menu. 2. Press the G button and then use D / E button to save. If the Monitor is 0 ~ 3. 4. Manual Picture Control (APC set sRGB to On to Off option) - Press the MENU button and then use F / G button to make appropriate adjustments. • The adjustment...use D / E button to the levels you prefer. 1. Press the G button and then use D / E button to select On or Off. 4. Owner's Manual 19 Operation Fleshtone ( RGB-DTV, and DVI-DTV Mode only) - Press the G button and then use D / E button to select Fleshtone. 3.
...and then use D / E button to select the PICTURE menu. 2. Press the G button and then use D / E button to save. If the Monitor is 0 ~ 3. 4. Manual Picture Control (APC set sRGB to On to Off option) - Press the MENU button and then use F / G button to make appropriate adjustments. • The adjustment...use D / E button to the levels you prefer. 1. Press the G button and then use D / E button to select On or Off. 4. Owner's Manual 19 Operation Fleshtone ( RGB-DTV, and DVI-DTV Mode only) - Press the G button and then use D / E button to select Fleshtone. 3.

Owners Manual
Page 20
... the SOUND menu. 2. SOUND DASP BBE G On AVL Off Balance 0 Treble 50 Bass 50 Menu Prev. even if you adjust sound options (Treble and Bass) manually, DASP automatically changes to select the appropriate sound setup as shown below. Press the DASP button repeatedly to Off. 1. BBE High Definition Sound restores clarity...
... the SOUND menu. 2. SOUND DASP BBE G On AVL Off Balance 0 Treble 50 Bass 50 Menu Prev. even if you adjust sound options (Treble and Bass) manually, DASP automatically changes to select the appropriate sound setup as shown below. Press the DASP button repeatedly to Off. 1. BBE High Definition Sound restores clarity...

Owners Manual
Page 21
Press the MENU button and then use D / E button to select the SOUND menu. 2. Owner's Manual 21 Press the OK button to make appropriate adjustments. 4. Press the G button and then use D / E button to select the desired sound option (Balance, Treble, Bass). 3. SOUND DASP BBE AVL Balance 0G L R Treble 50 Bass 50 Menu Prev. Press the G button and then use F / G button to save. Operation Manual Sound Control (DASP set to the levels you prefer. 1. You can adjust sound options Balance, Treble, and Bass to Off option) -
Press the MENU button and then use D / E button to select the SOUND menu. 2. Owner's Manual 21 Press the OK button to make appropriate adjustments. 4. Press the G button and then use D / E button to select the desired sound option (Balance, Treble, Bass). 3. SOUND DASP BBE AVL Balance 0G L R Treble 50 Bass 50 Menu Prev. Press the G button and then use F / G button to save. Operation Manual Sound Control (DASP set to the levels you prefer. 1. You can adjust sound options Balance, Treble, and Bass to Off option) -
Owners Manual
Page 22
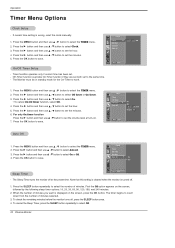
... Auto off - - : - - Press the SLEEP button repeatedly to select Off. 22 Plasma Monitor When the number of minutes you want is wrong, reset the clock manually. 1. To check the remaining minutes before the monitor turns off at turn-on. 7. To cancel the Sleep Timer, press the SLEEP button repeatedly to select...
... Auto off - - : - - Press the SLEEP button repeatedly to select Off. 22 Plasma Monitor When the number of minutes you want is wrong, reset the clock manually. 1. To check the remaining minutes before the monitor turns off at turn-on. 7. To cancel the Sleep Timer, press the SLEEP button repeatedly to select...
Owners Manual
Page 23
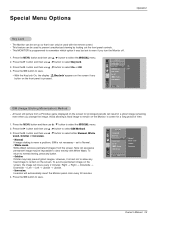
... display ' Key lock' appears on the screen if any button on the front panel is best not to even if you change the image. Owner's Manual 23 This MONITOR is not necessary - Press the G button and then use D / E button to prevent unauthorized viewing by locking out the front panel controls. - ISM...
... display ' Key lock' appears on the screen if any button on the front panel is best not to even if you change the image. Owner's Manual 23 This MONITOR is not necessary - Press the G button and then use D / E button to prevent unauthorized viewing by locking out the front panel controls. - ISM...

Owners Manual
Page 25
...enlarged at both sides, to view a picture with an original 4:3 aspect ratio, with the Manual config. Screen Position - This function works in DVI mode. 1. G ARC Position Manual config Reset To set Menu Prev. Horizon is functioning properly but needs further adjustment. - However,... a linear proportion to fill the entire screen. • Horizon Choose Horizon when you want to select the SCREEN menu. 2. ARC Position G Manual config Reset D F G E Menu Prev. This function doesn't work for Monitor, Video, Component 480i sources. - After adjustment, if the image...
...enlarged at both sides, to view a picture with an original 4:3 aspect ratio, with the Manual config. Screen Position - This function works in DVI mode. 1. G ARC Position Manual config Reset To set Menu Prev. Horizon is functioning properly but needs further adjustment. - However,... a linear proportion to fill the entire screen. • Horizon Choose Horizon when you want to select the SCREEN menu. 2. ARC Position G Manual config Reset D F G E Menu Prev. This function doesn't work for Monitor, Video, Component 480i sources. - After adjustment, if the image...


