

Owners Manual
Page 2
...REMOVE COVER (OR BACK). The lightning flash with the limits for help. • Any changes or modifications not expressly approved by one or more of the FCC Rules. The exclamation point within the product's enclosure that may cause harmful interference to radio or television reception, which the receiver is : LG... SERVICE PERSONNEL. NO USER SERVICEABLE PARTS INSIDE. If this product. Unauthorized modification could void the user's authority to which can radiate radio frequency energy and, if not installed and used in a residential installation. FCC NOTICE • A Class B digital ...
...REMOVE COVER (OR BACK). The lightning flash with the limits for help. • Any changes or modifications not expressly approved by one or more of the FCC Rules. The exclamation point within the product's enclosure that may cause harmful interference to radio or television reception, which the receiver is : LG... SERVICE PERSONNEL. NO USER SERVICEABLE PARTS INSIDE. If this product. Unauthorized modification could void the user's authority to which can radiate radio frequency energy and, if not installed and used in a residential installation. FCC NOTICE • A Class B digital ...
Owners Manual
Page 5
... Controls 7 Connection Options 8 Remote Control Key Functions 9 Installation Installation Instructions 10~11 External Equipment Connections 12~16 VCR Setup 12 Cable TV Setup 12 External A/V Source Setup 13 DVD Setup 13 DTV Setup 14 PC Setup 15~16 Operation Turning on the Monitor 17 Menu Language Selection 17 Picture Menu Options APC (Auto Picture Control 18 XD 18 Color Temperature Control 18 Fleshtone 19 sRGB 19 Manual Picture Control(Off option 19 Sound Menu Options DASP (Digital Auto Sound Processing 20 BBE 20 AVL (Auto Volume Leveler 20 Manual Sound Control (DASP set...
... Controls 7 Connection Options 8 Remote Control Key Functions 9 Installation Installation Instructions 10~11 External Equipment Connections 12~16 VCR Setup 12 Cable TV Setup 12 External A/V Source Setup 13 DVD Setup 13 DTV Setup 14 PC Setup 15~16 Operation Turning on the Monitor 17 Menu Language Selection 17 Picture Menu Options APC (Auto Picture Control 18 XD 18 Color Temperature Control 18 Fleshtone 19 sRGB 19 Manual Picture Control(Off option 19 Sound Menu Options DASP (Digital Auto Sound Processing 20 BBE 20 AVL (Auto Volume Leveler 20 Manual Sound Control (DASP set...

Owners Manual
Page 8
... RS-232C port on the Specifications page. Connection panels shown may be somewhat different from an external device to these jacks. 6. POWER CORD SOCKET This Monitor operates on DC power. 8 Plasma Monitor S-VIDEO INPUT SOCKETS Connect S-Video out from a PC to these jacks. 8. NOTE: AUDIO INPUT of S-VIDEO is indicated on a PC. 3. The voltage is worked by L(mono). 7. RS-232C INPUT (CONTROL/SERVICE) PORT Connect to 'Speaker & Speaker Stand' manual. 9. COMPONENT INPUT/AUDIO INPUT JACKS Connect a component video/audio device to the appropriate input port. 4. Never attempt...
... RS-232C port on the Specifications page. Connection panels shown may be somewhat different from an external device to these jacks. 6. POWER CORD SOCKET This Monitor operates on DC power. 8 Plasma Monitor S-VIDEO INPUT SOCKETS Connect S-Video out from a PC to these jacks. 8. NOTE: AUDIO INPUT of S-VIDEO is indicated on a PC. 3. The voltage is worked by L(mono). 7. RS-232C INPUT (CONTROL/SERVICE) PORT Connect to 'Speaker & Speaker Stand' manual. 9. COMPONENT INPUT/AUDIO INPUT JACKS Connect a component video/audio device to the appropriate input port. 4. Never attempt...
Owners Manual
Page 9
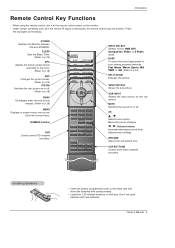
... D /E Selects menu option. Owner's Manual 9 NUMBER buttons DVD Control some video cassette recorders. SUB INPUT Selects the input source for the sub picture. Press the key again as if the remote IR signal is interrupted, the remote control may not function. Exits the current menu. F / G (Volume button) Increases/decreases sound level. WIN.POSITION Moves the sub picture. MUTE Switches the sound on the monitor. - Memorizes menu changes. W WIN.P VCR BUTTONS Control some DVD cassette recorders. SLEEP Sets the Sleep Timer. (Refer to p.22) APC Adjusts the factory...
... D /E Selects menu option. Owner's Manual 9 NUMBER buttons DVD Control some video cassette recorders. SUB INPUT Selects the input source for the sub picture. Press the key again as if the remote IR signal is interrupted, the remote control may not function. Exits the current menu. F / G (Volume button) Increases/decreases sound level. WIN.POSITION Moves the sub picture. MUTE Switches the sound on the monitor. - Memorizes menu changes. W WIN.P VCR BUTTONS Control some DVD cassette recorders. SLEEP Sets the Sleep Timer. (Refer to p.22) APC Adjusts the factory...

Owners Manual
Page 12
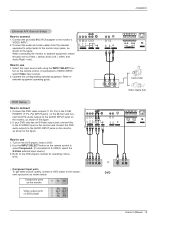
... the VCR and press PLAY on the remote control. (If connected to the monitor input jacks, as shown in the figure. For further information regarding cable TV service, contact your desired channel with using the INPUT SELECT button on the screen. Connect the audio and video cables from VCR to the monitor's VIDEO INPUT. 2. If you can watch cable TV programming. Y PB PR COMPONENT INPUT R L AUDIO INPUT S-VIDEO R L (MONO) AUDIO INPUT VIDEO INPUT ( )R( ) ( )L( ) EXTERNAL SPEAKER AC INPUT 12 Plasma Monitor (R) AUDIO (L) VIDEO TV VCR RF Cable Cable Box Connect the...
... the VCR and press PLAY on the remote control. (If connected to the monitor input jacks, as shown in the figure. For further information regarding cable TV service, contact your desired channel with using the INPUT SELECT button on the screen. Connect the audio and video cables from VCR to the monitor's VIDEO INPUT. 2. If you can watch cable TV programming. Y PB PR COMPONENT INPUT R L AUDIO INPUT S-VIDEO R L (MONO) AUDIO INPUT VIDEO INPUT ( )R( ) ( )L( ) EXTERNAL SPEAKER AC INPUT 12 Plasma Monitor (R) AUDIO (L) VIDEO TV VCR RF Cable Cable Box Connect the...
Owners Manual
Page 13
... on the remote control to select Component. (If connected to the AUDIO INPUT jacks on the monitor, as shown in the figure. If your DVD only has an S-Video output jack, connect this RGBOUTPUT to the S-VIDEO input on the monitor and connect the DVD audio outputs to S-VIDEO, select the S-Video external input source.) 3. Turn on DVD player Y Pb Pr Y B-Y R-Y Y Cb Cr Y PB PR B R (R) AUDIO (L) or S-VIDEO (R) AUDIO (L) DVD Owner's Manual 13 Refer to the DVD player's manual for operating instructions. • Component Input ports To get better picture quality, connect a DVD player to...
... on the remote control to select Component. (If connected to the AUDIO INPUT jacks on the monitor, as shown in the figure. If your DVD only has an S-Video output jack, connect this RGBOUTPUT to the S-VIDEO input on the monitor and connect the DVD audio outputs to S-VIDEO, select the S-Video external input source.) 3. Turn on DVD player Y Pb Pr Y B-Y R-Y Y Cb Cr Y PB PR B R (R) AUDIO (L) or S-VIDEO (R) AUDIO (L) DVD Owner's Manual 13 Refer to the DVD player's manual for operating instructions. • Component Input ports To get better picture quality, connect a DVD player to...

Owners Manual
Page 14
... the owner's manual for video connections, depending on your set -top box. (Refer to use 1. Turn on the remote control to connect Use the monitor's COMPONENT (Y, PB, PR) INPUT, RGB or DVI jack for the digital set -top box. Installation DTV Setup - REMOTE RS-232C INPUT CONTROL (CONTROL/SERVICE) DVI INPUT AUDIO INPUT RGB INPUT RGB OUTPUT Y PB PR COMPONENT INPUT R L AUDIO INPUT S-VIDEO R L (MONO) AUDIO INPUT VIDEO INPUT or or DVI-DTV OUTPUT (R) AUDIO (L) (R) AUDIO (L) RGB-DTV OUTPUT B R (R) AUDIO (L) Digital Set-top Box How to select Component , RGB, or DVI source...
... the owner's manual for video connections, depending on your set -top box. (Refer to use 1. Turn on the remote control to connect Use the monitor's COMPONENT (Y, PB, PR) INPUT, RGB or DVI jack for the digital set -top box. Installation DTV Setup - REMOTE RS-232C INPUT CONTROL (CONTROL/SERVICE) DVI INPUT AUDIO INPUT RGB INPUT RGB OUTPUT Y PB PR COMPONENT INPUT R L AUDIO INPUT S-VIDEO R L (MONO) AUDIO INPUT VIDEO INPUT or or DVI-DTV OUTPUT (R) AUDIO (L) (R) AUDIO (L) RGB-DTV OUTPUT B R (R) AUDIO (L) Digital Set-top Box How to select Component , RGB, or DVI source...

Owners Manual
Page 15
... audio connection. REMOTE CONTROL RS-232C INPUT (CONTROL/SERVICE) DVI INPUT AUDIO INPUT RGB INPUT RGB OUTPUT Installation How to 640x 480, 60Hz. 2. Use INPUT SELECT on the remote control to another resolution, change the refresh rate to select RGB, or DVI source. 4. Turn on the PC and the Monitor . 2. There may become permanently imprinted on the screen. Owner's Manual 15 Check the image on your PC connector. • If the graphic card on the PC does not output analog and digital...
... audio connection. REMOTE CONTROL RS-232C INPUT (CONTROL/SERVICE) DVI INPUT AUDIO INPUT RGB INPUT RGB OUTPUT Installation How to 640x 480, 60Hz. 2. Use INPUT SELECT on the remote control to another resolution, change the refresh rate to select RGB, or DVI source. 4. Turn on the PC and the Monitor . 2. There may become permanently imprinted on the screen. Owner's Manual 15 Check the image on your PC connector. • If the graphic card on the PC does not output analog and digital...
Owners Manual
Page 17
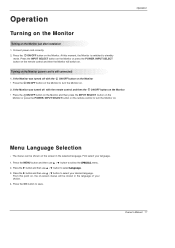
..., the Monitor is still connected) 1. Press the ON/OFF button on the Monitor just after installation 1. First select your desired language. Press the INPUT SELECT button on the Monitor or press the POWER, INPUT SELECT button on the remote control and then the Monitor will be shown on . 2. Operation Turning on the Monitor Turning on the Monitor. Press the MENU button and then use D / E button to select Language. 3. Connect power cord correctly. 2. If the Monitor was turned off with the remote control and then...
..., the Monitor is still connected) 1. Press the ON/OFF button on the Monitor just after installation 1. First select your desired language. Press the INPUT SELECT button on the Monitor or press the POWER, INPUT SELECT button on the remote control and then the Monitor will be shown on . 2. Operation Turning on the Monitor Turning on the Monitor. Press the MENU button and then use D / E button to select Language. 3. Connect power cord correctly. 2. If the Monitor was turned off with the remote control and then...
Owners Manual
Page 18
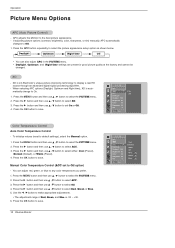
... select XD. 3. Press the G button and then use D / E button to save . 18 Plasma Monitor PICTURE APC ACC G Fleshtone Contrast 100 Brightness 55 Color 55 Sharpness 60 Tint 0 Menu Prev. Cool Normal Warm Off Red 0 Green 0 Blue 0 If adjusting picture options (contrast, brightness, color, sharpness, or tint) manually, APC automatically changes to display a real HD source through an advanced digital signal processing algorithm. - Press the G button and then use D / E button to select the PICTURE menu. 2. PICTURE...
... select XD. 3. Press the G button and then use D / E button to save . 18 Plasma Monitor PICTURE APC ACC G Fleshtone Contrast 100 Brightness 55 Color 55 Sharpness 60 Tint 0 Menu Prev. Cool Normal Warm Off Red 0 Green 0 Blue 0 If adjusting picture options (contrast, brightness, color, sharpness, or tint) manually, APC automatically changes to display a real HD source through an advanced digital signal processing algorithm. - Press the G button and then use D / E button to select the PICTURE menu. 2. PICTURE...

Owners Manual
Page 19
... MENU button and then use D / E button to select On or Off. 4. Operation Fleshtone ( RGB-DTV, and DVI-DTV Mode only) - Press the G button and then use F / G button to the levels you prefer. 1. Press the OK button to select the desired skin color option. 1. You can adjust picture contrast, brightness, color, sharpness, and tint options to make appropriate adjustments. • The adjustment range is connected to external equipment using sRGB, set to make appropriate adjustments...
... MENU button and then use D / E button to select On or Off. 4. Operation Fleshtone ( RGB-DTV, and DVI-DTV Mode only) - Press the G button and then use F / G button to the levels you prefer. 1. Press the OK button to select the desired skin color option. 1. You can adjust picture contrast, brightness, color, sharpness, and tint options to make appropriate adjustments. • The adjustment range is connected to external equipment using sRGB, set to make appropriate adjustments...
Owners Manual
Page 23
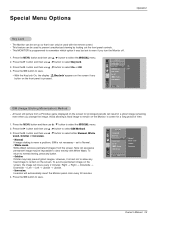
... Inversion Menu Prev. Owner's Manual 23 SPECIAL Language Key lock G On ISM Method Off Low power Set ID Demo OSD Rotate Menu Prev. A frozen still picture from the screen. Press the G button and then use D / E button to select Key lock. 3. However, it is programmed to remember which option it can be impossible to Normal. • White wash White Wash removes permanent images from a PC/video game displayed on the screen, the image will...
... Inversion Menu Prev. Owner's Manual 23 SPECIAL Language Key lock G On ISM Method Off Low power Set ID Demo OSD Rotate Menu Prev. A frozen still picture from the screen. Press the G button and then use D / E button to select Key lock. 3. However, it is programmed to remember which option it can be impossible to Normal. • White wash White Wash removes permanent images from a PC/video game displayed on the screen, the image will...

Owners Manual
Page 25
.... Press the MENU button and then use D / E button to adjust the position. 4. and Manual config. has finished, OK will be shown on the screen for Monitor, Video, Component 480i sources. - Set every aspect ratio for a long time, it may remain visible. - Press the ARC button repeatedly to select the SCREEN menu. 2. Automatically adjusts picture position and minimizes image shaking. - Horizon is functioning properly but needs further adjustment. - Screen Menu Options Operation Auto Adjustment - The Auto config. ARC Position G Manual config Reset D F G E Menu Prev...
.... Press the MENU button and then use D / E button to adjust the position. 4. and Manual config. has finished, OK will be shown on the screen for Monitor, Video, Component 480i sources. - Set every aspect ratio for a long time, it may remain visible. - Press the ARC button repeatedly to select the SCREEN menu. 2. Automatically adjusts picture position and minimizes image shaking. - Horizon is functioning properly but needs further adjustment. - Screen Menu Options Operation Auto Adjustment - The Auto config. ARC Position G Manual config Reset D F G E Menu Prev...
Owners Manual
Page 31
...) 1 : Screen mute on remote control or in the Picture menu. Acknowledgement [f][ ][Set ID][ ][OK][Data][x] 07. Transmission [k][g][ ][Set ID][ ][Data][Cr] Data Min : 0 ~ Max : 64 • Refer to 'Real data mapping 1' as shown below. You can also adjust the screen format using the ARC (Aspect Ratio Control) button on (Picture off . Screen Mute (Command2:d) G To select screen mute on/off (Volume on remote control. You can also select an input source using the MUTE button on ) Acknowledgement [e][ ][Set...
...) 1 : Screen mute on remote control or in the Picture menu. Acknowledgement [f][ ][Set ID][ ][OK][Data][x] 07. Transmission [k][g][ ][Set ID][ ][Data][Cr] Data Min : 0 ~ Max : 64 • Refer to 'Real data mapping 1' as shown below. You can also adjust the screen format using the ARC (Aspect Ratio Control) button on (Picture off . Screen Mute (Command2:d) G To select screen mute on/off (Volume on remote control. You can also select an input source using the MUTE button on ) Acknowledgement [e][ ][Set...

Owners Manual
Page 32
... also adjust color in the Picture menu. Transmission [k][n][ ][Set ID][ ][Data][Cr] Data 0: PIP/DW off 1: OSD on the remote control or in the PIP/DW menu. Treble (Command2:r) G To adjust treble. Acknowledgement [j][ ][Set ID][ ][OK][Data][x] 11. You can also adjust the sub picture position using the remote control and front panel controls on screen Acknowledgement [q][ ][Set ID][ ][OK][Data][x] 17. Remote Control Lock Mode (Command2:m) G To lock the remote control and the front panel controls on...
... also adjust color in the Picture menu. Transmission [k][n][ ][Set ID][ ][Data][Cr] Data 0: PIP/DW off 1: OSD on the remote control or in the PIP/DW menu. Treble (Command2:r) G To adjust treble. Acknowledgement [j][ ][Set ID][ ][OK][Data][x] 11. You can also adjust the sub picture position using the remote control and front panel controls on screen Acknowledgement [q][ ][Set ID][ ][OK][Data][x] 17. Remote Control Lock Mode (Command2:m) G To lock the remote control and the front panel controls on...

Owners Manual
Page 33
... signal exist) 1: No signal (Power on). 2: Turn the monitor off with remote control. 3: Turn the monitor off with Sleep Time function. 4: Turn the monitor off with RS-232C function. 5: 5V down. 6: AC down. 7: Turn the monitor off with Fan Alarm function. 8: Turn the monitor off with Off Time function. 9: Turn the monitor off with Auto Off function. 18. You can also adjust balance in the Sound menu. Green Adjustment (Command2:w) G To adjust green in PIP mode. Acknowledgement [$][ ][Set...
... signal exist) 1: No signal (Power on). 2: Turn the monitor off with remote control. 3: Turn the monitor off with Sleep Time function. 4: Turn the monitor off with RS-232C function. 5: 5V down. 6: AC down. 7: Turn the monitor off with Fan Alarm function. 8: Turn the monitor off with Off Time function. 9: Turn the monitor off with Auto Off function. 18. You can also adjust balance in the Sound menu. Green Adjustment (Command2:w) G To adjust green in PIP mode. Acknowledgement [$][ ][Set...
Owners Manual
Page 34
... number in Double Window mode. Transmission [j][p][ ][Set ID][ ][Data][Cr] Data 0: Normal 1: White wash Acknowledgement 2: Orbiter 3: Inversion [p][ ][Set ID][ ][OK][Data][x] 27. ISM Method (Command2:p) G To avoid having a fixed image remain on Acknowledgement [q][ ][Set ID][ ][OK][Data][x] 28. Auto Configure (Command2:u) G To adjust picture position and minimize image shaking automatically. Acknowledgement [c][ ][Set ID][ ][OK][Data][x] 34 Plasma Monitor Orbiter Time Setting (Command2:r) G To adjust orbiter operation time term. It works...
... number in Double Window mode. Transmission [j][p][ ][Set ID][ ][Data][Cr] Data 0: Normal 1: White wash Acknowledgement 2: Orbiter 3: Inversion [p][ ][Set ID][ ][OK][Data][x] 27. ISM Method (Command2:p) G To avoid having a fixed image remain on Acknowledgement [q][ ][Set ID][ ][OK][Data][x] 28. Auto Configure (Command2:u) G To adjust picture position and minimize image shaking automatically. Acknowledgement [c][ ][Set ID][ ][OK][Data][x] 34 Plasma Monitor Orbiter Time Setting (Command2:r) G To adjust orbiter operation time term. It works...
Owners Manual
Page 37
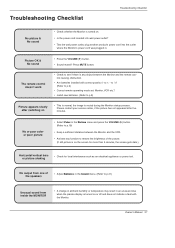
... switching on • This is normal, the image is turned on. • Is the power cord inserted into wall power outlet? • Test the wall power outlet, plug another product's power cord into the outlet where the Monitor's power cord was plugged in. Press MUTE button. The remote control doesn't work • Check to see if there is any function to restore the brightness of the speakers • Adjust Balance in the Sound menu...
... switching on • This is normal, the image is turned on. • Is the power cord inserted into wall power outlet? • Test the wall power outlet, plug another product's power cord into the outlet where the Monitor's power cord was plugged in. Press MUTE button. The remote control doesn't work • Check to see if there is any function to restore the brightness of the speakers • Adjust Balance in the Sound menu...

Owners Manual
Page 39
... may not apply to the original consumer/end user. Some states do not function normally. Plasma Display Panel typically contain a small number of pixels that any pixel defects do not effect the operation or use , during the warranty period ("Warranty Period") listed below, effective from the Date of delivery when requesting warranty service. PLASMA DISPLAY PANEL - LIMITED WARRANTY Your LG Plasma Display Panel will allow the exclusion or limitation of...
... may not apply to the original consumer/end user. Some states do not function normally. Plasma Display Panel typically contain a small number of pixels that any pixel defects do not effect the operation or use , during the warranty period ("Warranty Period") listed below, effective from the Date of delivery when requesting warranty service. PLASMA DISPLAY PANEL - LIMITED WARRANTY Your LG Plasma Display Panel will allow the exclusion or limitation of...

Owners Manual
Page 40
... shipping or transit G service required as a result of improper installation, including incorrect or insufficient AC supply (please consult the owner's manual for power supply requirements) G installation or repair of antenna systems, cable converters, cable company supplied equipment, or other components in a video system G set-up or adjustment on the remote control. For warranty service information, please contact the LGE Customer Interactive Center telephone number. If a replacement unit is received, please use the carton and...
... shipping or transit G service required as a result of improper installation, including incorrect or insufficient AC supply (please consult the owner's manual for power supply requirements) G installation or repair of antenna systems, cable converters, cable company supplied equipment, or other components in a video system G set-up or adjustment on the remote control. For warranty service information, please contact the LGE Customer Interactive Center telephone number. If a replacement unit is received, please use the carton and...

