Owner's Manual
Page 2
... 5 STAND INSTALLATION M2080D/M2280D/M2380D/M2780D.........6 M2380DF/M2780DF 7 DETACHING THE STAND M2080D/M2280D/M2380D/M2780D...... 8 M2380DF/M2780DF 9 DETACHING THE STAND BODY (Only M2080D/ M2280D/M2380D/M2780D 10 WALL MOUNT: HORIZONTAL INSTALLATION.......11 SWIVEL STAND(Only M2780D / M2780DF)....12 DESKTOP PEDESTAL INSTALLATION... SETUP 26 PC SETUP Connecting with a D-sub 15-pin Cable .....27 Connecting with an HDMI to DVI Cable.........28 Connecting with an HDMI to HDMI Cable......... 29 BACK COVER WIRE ARRANGEMENT 30 SUPPORTED DISPLAY RESOLUTIONS 31 ASPECT RATIO SELECTION 46 PICTURE...
... 5 STAND INSTALLATION M2080D/M2280D/M2380D/M2780D.........6 M2380DF/M2780DF 7 DETACHING THE STAND M2080D/M2280D/M2380D/M2780D...... 8 M2380DF/M2780DF 9 DETACHING THE STAND BODY (Only M2080D/ M2280D/M2380D/M2780D 10 WALL MOUNT: HORIZONTAL INSTALLATION.......11 SWIVEL STAND(Only M2780D / M2780DF)....12 DESKTOP PEDESTAL INSTALLATION... SETUP 26 PC SETUP Connecting with a D-sub 15-pin Cable .....27 Connecting with an HDMI to DVI Cable.........28 Connecting with an HDMI to HDMI Cable......... 29 BACK COVER WIRE ARRANGEMENT 30 SUPPORTED DISPLAY RESOLUTIONS 31 ASPECT RATIO SELECTION 46 PICTURE...

Owner's Manual
Page 5
M2080D / M2280D M2380D / M2780D M2380DF / M2780DF 1 2 3 45 6 78 9 10 11 1 DC ADAPTER PORT Connect to the power jack. 2 HDMI INPUT Connect an HDMI signal to HDMI IN or a DVI (VIDEO) signal to HDMI IN with an optical audio cable. 4 RGB/DVI AUDIO INPUT Connect the audio from an external ...(CONTROL & SERVICE) PORT Connect to the RS-232C port on a PC. This port is a simplified representation of equipment with a DVI to HDMI cable. 3 OPTICAL DIGITAL AUDIO OUT Connect digital audio to various types of the front panel. PREPARATION BACK PANEL INFORMATION ■■ This is used...
M2080D / M2280D M2380D / M2780D M2380DF / M2780DF 1 2 3 45 6 78 9 10 11 1 DC ADAPTER PORT Connect to the power jack. 2 HDMI INPUT Connect an HDMI signal to HDMI IN or a DVI (VIDEO) signal to HDMI IN with an optical audio cable. 4 RGB/DVI AUDIO INPUT Connect the audio from an external ...(CONTROL & SERVICE) PORT Connect to the RS-232C port on a PC. This port is a simplified representation of equipment with a DVI to HDMI cable. 3 OPTICAL DIGITAL AUDIO OUT Connect digital audio to various types of the front panel. PREPARATION BACK PANEL INFORMATION ■■ This is used...
Owner's Manual
Page 16
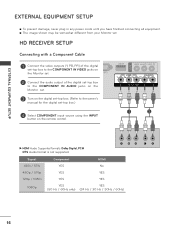
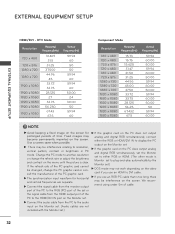
Signal 480i / 576i 480p / 576p 720p / 1080i 1080p Component HDMI YES No YES YES YES YES YES YES (50 Hz / 60Hz only) (24 Hz / 30 Hz / 50Hz / 60Hz) 16 EXTERNAL EQUIPMENT SETUP EXTERNAL EQUIPMENT SETUP &#... audio output of the digital set-top box to the COMPONENT IN AUDIO jacks on the Monitor set. 3 Turn on the remote control. 1 2 ►►HDMI Audio Supported formats: Dolby Digital, PCM DTS Audio format is not supported.
Signal 480i / 576i 480p / 576p 720p / 1080i 1080p Component HDMI YES No YES YES YES YES YES YES (50 Hz / 60Hz only) (24 Hz / 30 Hz / 50Hz / 60Hz) 16 EXTERNAL EQUIPMENT SETUP EXTERNAL EQUIPMENT SETUP &#... audio output of the digital set-top box to the COMPONENT IN AUDIO jacks on the Monitor set. 3 Turn on the remote control. 1 2 ►►HDMI Audio Supported formats: Dolby Digital, PCM DTS Audio format is not supported.
Owner's Manual
Page 17
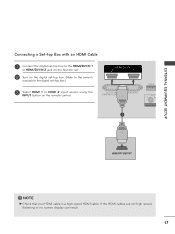
EXTERNAL EQUIPMENT SETUP Connecting a Set-top Box with an HDMI Cable 1 Connect the digital set-top box to the HDMI/DVI IN 1 or HDMI/DVI IN 2 jack on the Monitor set. 2 Turn on the digital set-top box. (Refer to the owner's manual for the digital set-top box.) 3 Select HDMI 1 or HDMI 2 input source using the INPUT button on the remote control. 1 ! If the HDMI cables are not high speed, flickering or no screen display can result. 17 NOTE ►►Check that your HDMI cable is a high speed HDMI cable.
EXTERNAL EQUIPMENT SETUP Connecting a Set-top Box with an HDMI Cable 1 Connect the digital set-top box to the HDMI/DVI IN 1 or HDMI/DVI IN 2 jack on the Monitor set. 2 Turn on the digital set-top box. (Refer to the owner's manual for the digital set-top box.) 3 Select HDMI 1 or HDMI 2 input source using the INPUT button on the remote control. 1 ! If the HDMI cables are not high speed, flickering or no screen display can result. 17 NOTE ►►Check that your HDMI cable is a high speed HDMI cable.
Owner's Manual
Page 18
EXTERNAL EQUIPMENT SETUP EXTERNAL EQUIPMENT SETUP Connecting with an HDMI to DVI Cable 1 Connect the digital set-top box to the HDMI/DVI IN 1 or HDMI/DVI IN 2 jack on the Monitor set. 2 Connect the audio output of the digital set-top box to the AUDIO IN (RGB/DVI) jack on the Monitor set. 3 Turn on the digital set-top box. (Refer to the owner's manual for the digital set-top box.) 4 Select HDMI 1 or HDMI 2 using the INPUT on the remote control. 1 2 18
EXTERNAL EQUIPMENT SETUP EXTERNAL EQUIPMENT SETUP Connecting with an HDMI to DVI Cable 1 Connect the digital set-top box to the HDMI/DVI IN 1 or HDMI/DVI IN 2 jack on the Monitor set. 2 Connect the audio output of the digital set-top box to the AUDIO IN (RGB/DVI) jack on the Monitor set. 3 Turn on the digital set-top box. (Refer to the owner's manual for the digital set-top box.) 4 Select HDMI 1 or HDMI 2 using the INPUT on the remote control. 1 2 18

Owner's Manual
Page 20
If the HDMI cables are not high speed, flickering or no screen display can result. 20 NOTE ►►Check that your HDMI cable is a high speed HDMI cable. EXTERNAL EQUIPMENT SETUP EXTERNAL EQUIPMENT SETUP Connecting with an HDMI Cable 1 Connect the HDMI output of the DVD to the HDMI/ DVI IN 1 or HDMI/DVI IN 2 jack on the Monitor set. 2 Select HDMI 1 or HDMI 2 using the INPUT on the remote control. 3 Refer to the DVD player's manual for operating instructions. 1 !
If the HDMI cables are not high speed, flickering or no screen display can result. 20 NOTE ►►Check that your HDMI cable is a high speed HDMI cable. EXTERNAL EQUIPMENT SETUP EXTERNAL EQUIPMENT SETUP Connecting with an HDMI Cable 1 Connect the HDMI output of the DVD to the HDMI/ DVI IN 1 or HDMI/DVI IN 2 jack on the Monitor set. 2 Select HDMI 1 or HDMI 2 using the INPUT on the remote control. 3 Refer to the DVD player's manual for operating instructions. 1 !

Owner's Manual
Page 28
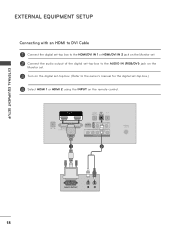
EXTERNAL EQUIPMENT SETUP ! NOTE ►►If you want to use HDMI-PC mode, you must set the input label to the AUDIO IN (RGB/DVI) jack on the Monitor set. 3 Turn on the PC and the set. 1 2 4 Select HDMI 1 or HDMI 2 input source using the INPUT on the Monitor set. 2 Connect the PC audio output to PC mode. ►►Connect the signal input cable and tighten it by turning the screws clockwise. 28 EXTERNAL EQUIPMENT SETUP Connecting with an HDMI to DVI Cable 1 Connect the DVI output of the PC to the HDMI/DVI IN1 or HDMI/DVI IN2 jack on the remote control.
EXTERNAL EQUIPMENT SETUP ! NOTE ►►If you want to use HDMI-PC mode, you must set the input label to the AUDIO IN (RGB/DVI) jack on the Monitor set. 3 Turn on the PC and the set. 1 2 4 Select HDMI 1 or HDMI 2 input source using the INPUT on the Monitor set. 2 Connect the PC audio output to PC mode. ►►Connect the signal input cable and tighten it by turning the screws clockwise. 28 EXTERNAL EQUIPMENT SETUP Connecting with an HDMI to DVI Cable 1 Connect the DVI output of the PC to the HDMI/DVI IN1 or HDMI/DVI IN2 jack on the remote control.
Owner's Manual
Page 29
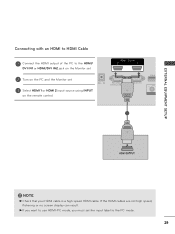
NOTE ►►Check that your HDMI cable is a high speed HDMI cable. If the HDMI cables are not high speed, flickering or no screen display can result. ►►If you want to use HDMI-PC mode, you must set the input label to the HDMI/ DVI IN1 or HDMI/DVI IN2 jack on the Monitor set. 2 Turn on the PC and the Monitor set. 3 Select HDMI 1 or HDMI 2 input source using INPUT on the remote control. 1 ! EXTERNAL EQUIPMENT SETUP Connecting with an HDMI to HDMI Cable 1 Connect the HDMI output of the PC to the PC mode. 29
NOTE ►►Check that your HDMI cable is a high speed HDMI cable. If the HDMI cables are not high speed, flickering or no screen display can result. ►►If you want to use HDMI-PC mode, you must set the input label to the HDMI/ DVI IN1 or HDMI/DVI IN2 jack on the Monitor set. 2 Turn on the PC and the Monitor set. 3 Select HDMI 1 or HDMI 2 input source using INPUT on the remote control. 1 ! EXTERNAL EQUIPMENT SETUP Connecting with an HDMI to HDMI Cable 1 Connect the HDMI output of the PC to the PC mode. 29
Owner's Manual
Page 32
... the PC output on the video sult the manufacturer of the PC graphic card. We recom- ►►Connect the signal cable from the HDMI output port of time. Fixed images may be interference relating to DVI cable. ►►The synchronization input waveform for ►►If the...9658;If the graphic card on the Monitor set. (Audio cables are separate. If the refresh rate of cable. EXTERNAL EQUIPMENT SETUP EXTERNAL EQUIPMENT SETUP HDMI/DVI - NOTE ►►Avoid keeping a fixed image on the screen for horizontal ►►If you use an RGB-PC cable that ...
... the PC output on the video sult the manufacturer of the PC graphic card. We recom- ►►Connect the signal cable from the HDMI output port of time. Fixed images may be interference relating to DVI cable. ►►The synchronization input waveform for ►►If the...9658;If the graphic card on the Monitor set. (Audio cables are separate. If the refresh rate of cable. EXTERNAL EQUIPMENT SETUP EXTERNAL EQUIPMENT SETUP HDMI/DVI - NOTE ►►Avoid keeping a fixed image on the screen for horizontal ►►If you use an RGB-PC cable that ...

Owner's Manual
Page 44
D Dolby Digital: The program contains a Dolby Digital audio signal in TV, HDMI input source and DivX. Use the Q.MENU menu to select wanted Audio. Use the Q.MENU menu to select the desired Closed caption. 4 : 3 The original aspect ...
D Dolby Digital: The program contains a Dolby Digital audio signal in TV, HDMI input source and DivX. Use the Q.MENU menu to select wanted Audio. Use the Q.MENU menu to select the desired Closed caption. 4 : 3 The original aspect ...

Owner's Manual
Page 45
... by a detect pin and thus enabled only when an external device receives the approved voltage.. TV HDMI 2 AV HDMI 1 Component RGB-PC 1 INPUT Enter Select the desired input source. WATCHING TV/CHANNEL CONTROL INPUT LIST TV, HDMI, AV, Component and RGB-PC can also select the desired input source in the INPUT menu... broadcasts. • AV: Watch a VCR or external equipment. • Component: Watch a DVD player or a digital set-top box. • RGB-PC: View PC input. • HDMI 1, HDMI 2: Watch high definition devices. 45
... by a detect pin and thus enabled only when an external device receives the approved voltage.. TV HDMI 2 AV HDMI 1 Component RGB-PC 1 INPUT Enter Select the desired input source. WATCHING TV/CHANNEL CONTROL INPUT LIST TV, HDMI, AV, Component and RGB-PC can also select the desired input source in the INPUT menu... broadcasts. • AV: Watch a VCR or external equipment. • Component: Watch a DVD player or a digital set-top box. • RGB-PC: View PC input. • HDMI 1, HDMI 2: Watch high definition devices. 45

Owner's Manual
Page 46
... RATIO repeatedly to fill the entire screen. • Just Scan Normally, the edges of the original signal, it will be displayed in DTV/CADTV/ Component/HDMI-DTV(720p/1080i/1080p) input source. Note: if there is noise on the screen and remain visible. 1 Select Aspect Ratio. • You can also adjust...
... RATIO repeatedly to fill the entire screen. • Just Scan Normally, the edges of the original signal, it will be displayed in DTV/CADTV/ Component/HDMI-DTV(720p/1080i/1080p) input source. Note: if there is noise on the screen and remain visible. 1 Select Aspect Ratio. • You can also adjust...

Owner's Manual
Page 51
... menu window. • Press BACK to move to the previous menu screaen. ! NOTE ►►You cannot adjust color and tint in the RGB-PC/HDMI-PC mode. ►►When the Expert 1/2 is selected, you can select Backlight, Contrast, Brightness, H Sharpness, V Sharpness, Color or Tint . 51 Select Picture Mode. Adjusts...
... menu window. • Press BACK to move to the previous menu screaen. ! NOTE ►►You cannot adjust color and tint in the RGB-PC/HDMI-PC mode. ►►When the Expert 1/2 is selected, you can select Backlight, Contrast, Brightness, H Sharpness, V Sharpness, Color or Tint . 51 Select Picture Mode. Adjusts...

Owner's Manual
Page 54
... a proper level. ■■ This function enables you watch DTV. 54 Expert" when you to select 'Low' or 'High' in the following mode: AV (NTSC-M), HDMI or Component. You can adjust the brightness of dark areas and middle gray level areas of the picture. • Low: The reflection of the screen...
... a proper level. ■■ This function enables you watch DTV. 54 Expert" when you to select 'Low' or 'High' in the following mode: AV (NTSC-M), HDMI or Component. You can adjust the brightness of dark areas and middle gray level areas of the picture. • Low: The reflection of the screen...

Owner's Manual
Page 55
... each setting. - PICTURE CONTROL 55 Pattern: Inner, Outer - Red/Green/Blue Contrast, Red/Green/Blue Brightness: The adjustment range is disabled in RGB-PC and HDMI-PC mode. You can input luminance value you make adjustments by using the test patterns, this does not affect other colors but can adjust Red...
... each setting. - PICTURE CONTROL 55 Pattern: Inner, Outer - Red/Green/Blue Contrast, Red/Green/Blue Brightness: The adjustment range is disabled in RGB-PC and HDMI-PC mode. You can input luminance value you make adjustments by using the test patterns, this does not affect other colors but can adjust Red...

Owner's Manual
Page 67
... SET's internal speakers. Select On or Off. Select TV Speaker. If you wish to the previous menu screaen. 67 In AV, COMPONENT, RGB and HDMI 1/2 with HDMI to DVI cable, the TV speaker can adjust the SET internal speaker status. TV SPEAKERS ON/OFF SETUP You can be operational even when there...
... SET's internal speakers. Select On or Off. Select TV Speaker. If you wish to the previous menu screaen. 67 In AV, COMPONENT, RGB and HDMI 1/2 with HDMI to DVI cable, the TV speaker can adjust the SET internal speaker status. TV SPEAKERS ON/OFF SETUP You can be operational even when there...

Owner's Manual
Page 75
PC Set ID : OfHf DMI1 Power Indicator Demo Mode : OnHDMI2 : Off v Close If you want to use HDMI-PC mode, you must set a label for each input source when it's not in use. Select Input Label. 3 Enter Select the source. 4 Select the label. 5 ...
PC Set ID : OfHf DMI1 Power Indicator Demo Mode : OnHDMI2 : Off v Close If you want to use HDMI-PC mode, you must set a label for each input source when it's not in use. Select Input Label. 3 Enter Select the source. 4 Select the label. 5 ...
Owner's Manual
Page 109
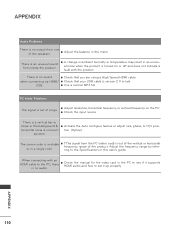
work. ■■ Ensure that support High Speed HDMI. Power may have been interrupted. ■■ If there is no signal, the set turns off automatically in your service center if the picture has ... electrical appliance or power tool. after switching on. Ensure that the correct remote operating mode is no picture when connecting via HDMI. ■■ If an HDMI cable doesn't support High Speed HDMI, it can cause flickers or no picture, poor color or poor picture. ■■ Adjust the color in . ■■...
work. ■■ Ensure that support High Speed HDMI. Power may have been interrupted. ■■ If there is no signal, the set turns off automatically in your service center if the picture has ... electrical appliance or power tool. after switching on. Ensure that the correct remote operating mode is no picture when connecting via HDMI. ■■ If an HDMI cable doesn't support High Speed HDMI, it can cause flickers or no picture, poor color or poor picture. ■■ Adjust the color in . ■■...
Owner's Manual
Page 110
...menu. There is turned on the PC. ■■ Check the input source. when connecting via HDMI/ ■■ Check that you are using a High Speed HDMI cable. ring to the Specifications in the HDMI audio and how to set it supports is a vertical bar or stripe in a single color. ...the product. of range. ■■ Adjust resolution, horizontal frequency, or vertical frequency on or off and does not indicate a fault with an HDMI cable to see if it up properly. There is no output from the PC (video card) is out of the speakers. or in the background...
...menu. There is turned on the PC. ■■ Check the input source. when connecting via HDMI/ ■■ Check that you are using a High Speed HDMI cable. ring to the Specifications in the HDMI audio and how to set it supports is a vertical bar or stripe in a single color. ...the product. of range. ■■ Adjust resolution, horizontal frequency, or vertical frequency on or off and does not indicate a fault with an HDMI cable to see if it up properly. There is no output from the PC (video card) is out of the speakers. or in the background...
Owner's Manual
Page 113
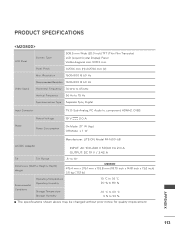
... Frequency 56 Hz to 75 Hz Synchronization Type Separate Sync, Digital Input Connector Power Rated Voltage Power Consumption TV, D-Sub Analog, PC Audio In, component, HDMI*2, CVBS 19 V 2.0 A On Mode 27 W (typ.) Off Mode ≤ 1 W Manufacturer: LITE-ON, Model PA-1650-68 AC/DC Adapter INPUT: AC 100-240 V 50/60...
... Frequency 56 Hz to 75 Hz Synchronization Type Separate Sync, Digital Input Connector Power Rated Voltage Power Consumption TV, D-Sub Analog, PC Audio In, component, HDMI*2, CVBS 19 V 2.0 A On Mode 27 W (typ.) Off Mode ≤ 1 W Manufacturer: LITE-ON, Model PA-1650-68 AC/DC Adapter INPUT: AC 100-240 V 50/60...


