
Owner's Manual
Page 1
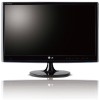
LED LCD MONITOR TV MODELS M2080D M2380DF M2280D M2780DF M2380D M2780D www.lg.com ENGLISH OWNER'S MANUAL LED LCD MONITOR TV Please read this manual carefully before operating your set and retain it for future reference.
LED LCD MONITOR TV MODELS M2080D M2380DF M2280D M2780DF M2380D M2780D www.lg.com ENGLISH OWNER'S MANUAL LED LCD MONITOR TV Please read this manual carefully before operating your set and retain it for future reference.
Owner's Manual
Page 2
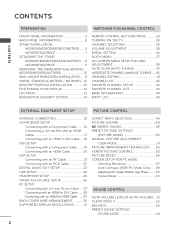
CONTENTS CONTENTS PREPARATION WATCHING TV/CHANNEL CONTROL FRONT PANEL INFORMATION 4 BACK PANEL INFORMATION 5 STAND INSTALLATION M2080D/M2280D/M2380D/M2780D.........6 M2380DF/M2780DF 7 DETACHING THE STAND M2080D/M2280D/M2380D/M2780D...... 8 M2380DF/M2780DF 9 DETACHING THE STAND BODY (Only M2080D/ M2280D/M2380D/M2780D 10 WALL MOUNT: HORIZONTAL INSTALLATION.......11 SWIVEL STAND(Only M2780D / M2780DF)....12 DESKTOP PEDESTAL INSTALLATION 12 POSITIONING...
CONTENTS CONTENTS PREPARATION WATCHING TV/CHANNEL CONTROL FRONT PANEL INFORMATION 4 BACK PANEL INFORMATION 5 STAND INSTALLATION M2080D/M2280D/M2380D/M2780D.........6 M2380DF/M2780DF 7 DETACHING THE STAND M2080D/M2280D/M2380D/M2780D...... 8 M2380DF/M2780DF 9 DETACHING THE STAND BODY (Only M2080D/ M2280D/M2380D/M2780D 10 WALL MOUNT: HORIZONTAL INSTALLATION.......11 SWIVEL STAND(Only M2780D / M2780DF)....12 DESKTOP PEDESTAL INSTALLATION 12 POSITIONING...

Owner's Manual
Page 3
CONTENTS PRESET SOUND SETTINGS -USER MODE 65 Surround X 65 AUDIO RESET 66 TV SPEAKERS ON/OFF SETUP 67 STEREO/SAP BROADCAST SETUP 68 TIME SETTING USING USB DEVICES ENTRY MODES 93 PHOTO LIST 95 MUSIC LIST 99 MOVIE ...
CONTENTS PRESET SOUND SETTINGS -USER MODE 65 Surround X 65 AUDIO RESET 66 TV SPEAKERS ON/OFF SETUP 67 STEREO/SAP BROADCAST SETUP 68 TIME SETTING USING USB DEVICES ENTRY MODES 93 PHOTO LIST 95 MUSIC LIST 99 MOVIE ...

Owner's Manual
Page 23
... OPTICAL DIGITAL AUDIO OUT port. 2 Connect the other end of the optical cable to the digital audio (Optical) input on the audio equipment. 3 Set the "TV Speaker option -
... OPTICAL DIGITAL AUDIO OUT port. 2 Connect the other end of the optical cable to the digital audio (Optical) input on the audio equipment. 3 Set the "TV Speaker option -

Owner's Manual
Page 33
... Timer, Del/ Add/Fav, Caption, USB Device). (► P.37) THUMBSTICK Allows you to navigate the on -screen displays and returns to TV viewing from any menu Colored Accesses special functions in an interactive application or other user interaction function. BACK Allows the user to move return one...Up/Down/Left/Right) the system settings to your selection or displays the current mode. Auto Config. MENU Selects a menu. WATCHING TV/CHANNEL CONTROL WATCHING TV/CHANNEL CONTROL REMOTE CONTROL KEY FUNCTIONS When using the remote control, aim it at the remote control sensor on the set. ꔰ...
... Timer, Del/ Add/Fav, Caption, USB Device). (► P.37) THUMBSTICK Allows you to navigate the on -screen displays and returns to TV viewing from any menu Colored Accesses special functions in an interactive application or other user interaction function. BACK Allows the user to move return one...Up/Down/Left/Right) the system settings to your selection or displays the current mode. Auto Config. MENU Selects a menu. WATCHING TV/CHANNEL CONTROL WATCHING TV/CHANNEL CONTROL REMOTE CONTROL KEY FUNCTIONS When using the remote control, aim it at the remote control sensor on the set. ꔰ...

Owner's Manual
Page 34
USB Menu Controls USB menu. WATCHING TV/CHANNEL CONTROL WATCHING TV/CHANNEL CONTROL VOLUME Adjusts the volume. Control (Photo List, Music List and Movie List). MUTE Switches the sound on the back side of screen information ...
USB Menu Controls USB menu. WATCHING TV/CHANNEL CONTROL WATCHING TV/CHANNEL CONTROL VOLUME Adjusts the volume. Control (Photo List, Music List and Movie List). MUTE Switches the sound on the back side of screen information ...
Owner's Manual
Page 35
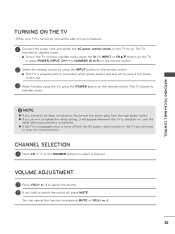
.... 2 If you will be away on vacation, disconnect the power plug from standby mode, press the ꔰ / I, INPUT or CH▲▼ button on the TV or press POWER, INPUT, CHꕭꕮor NUMBER (0 to 9) on the remote control. 2 Select the viewing source by pressing MUTE or VOL(+ or -). 35... The TV switches to standby mode. ■■ To turn the TV on from the wall power outlet. ►►If you do not complete the initial setting, it will appear whenever the...
.... 2 If you will be away on vacation, disconnect the power plug from standby mode, press the ꔰ / I, INPUT or CH▲▼ button on the TV or press POWER, INPUT, CHꕭꕮor NUMBER (0 to 9) on the remote control. 2 Select the viewing source by pressing MUTE or VOL(+ or -). 35... The TV switches to standby mode. ■■ To turn the TV on from the wall power outlet. ►►If you do not complete the initial setting, it will appear whenever the...

Owner's Manual
Page 36
Choose the setting mode you for choosing LG Next 1 Enter Step2. It can also be sure that the TV antenna is connected. We recommend keeping the TV set to the "Home Use" mode for the best picture in your antenna connection and start Auto Tuning. 36 Step1....you want. Step3. Previsous Next 1 Enter Check your home environment. ■■ "Store Demo" mode is only intended for use this TV at home. Customers can also adjust Initial Setting in retail environments. Setting the Time WELCOME WELCOME! Setting the Mode Mode Setting Selecting the environment....
Choose the setting mode you for choosing LG Next 1 Enter Step2. It can also be sure that the TV antenna is connected. We recommend keeping the TV set to the "Home Use" mode for the best picture in your antenna connection and start Auto Tuning. 36 Step1....you want. Step3. Previsous Next 1 Enter Check your home environment. ■■ "Store Demo" mode is only intended for use this TV at home. Customers can also adjust Initial Setting in retail environments. Setting the Time WELCOME WELCOME! Setting the Mode Mode Setting Selecting the environment....

Owner's Manual
Page 37
...On-Screen Display) may differ slightly from what is a menu of features users might use frequently. ◄ Aspect Ratio ► 16:9 WATCHING TV/CHANNEL CONTROL ꔬ Aspect Ratio: Selects your desired picture format. ꕧ Picture Mode: Selects your desired Picture Mode. ꕩ Sound Mode::...37 Q.Menu (Quick Menu) is shown in order to eject a USB device. 1 Display each menu. 2 Make appropriate adjustments. 3 Enter or Return to TV viewing. • Press BACK to move to the Favorite List. ꕢ Caption: Selects on or off. ꔧ USB Device: Selects "Eject" in this manual...
...On-Screen Display) may differ slightly from what is a menu of features users might use frequently. ◄ Aspect Ratio ► 16:9 WATCHING TV/CHANNEL CONTROL ꔬ Aspect Ratio: Selects your desired picture format. ꕧ Picture Mode: Selects your desired Picture Mode. ꕩ Sound Mode::...37 Q.Menu (Quick Menu) is shown in order to eject a USB device. 1 Display each menu. 2 Make appropriate adjustments. 3 Enter or Return to TV viewing. • Press BACK to move to the Favorite List. ꕢ Caption: Selects on or off. ꔧ USB Device: Selects "Eject" in this manual...

Owner's Manual
Page 38
... PICTURE AUDIO TIME OPTION LOCK INPUT USB LOCK Move Enter Lock System : Off Set Password Block Channel Movie Rating TV Rating-Children TV Rating-General Downloadable Rating Input Block INPUT TV AV Component RGB-PC HDMI1 HDMI2 Move Enter 1 MENU 2 Enter 3 Enter Display each menu. Accept the current... close the menu window. • Press BACK to move to the previous menu screen. 38 Select a menu item. WATCHING TV/CHANNEL CONTROL WATCHING TV/CHANNEL CONTROL ON-SCREEN MENU SELECTION AND ADJUSTMENT Your set's OSD (On-Screen Display) may differ slightly from what is shown ...
... PICTURE AUDIO TIME OPTION LOCK INPUT USB LOCK Move Enter Lock System : Off Set Password Block Channel Movie Rating TV Rating-Children TV Rating-General Downloadable Rating Input Block INPUT TV AV Component RGB-PC HDMI1 HDMI2 Move Enter 1 MENU 2 Enter 3 Enter Display each menu. Accept the current... close the menu window. • Press BACK to move to the previous menu screen. 38 Select a menu item. WATCHING TV/CHANNEL CONTROL WATCHING TV/CHANNEL CONTROL ON-SCREEN MENU SELECTION AND ADJUSTMENT Your set's OSD (On-Screen Display) may differ slightly from what is shown ...
Owner's Manual
Page 39
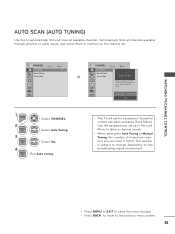
Select Auto Tuning. Automatically finds all available channels. Select Yes. 4 Enter Run Auto tuning. • The TV will be updated during Auto Tuning. Yes No 1 MENU 2 Enter 3 Enter Select CHANNEL. This number is 1,000. The previous channel information will ask for ...Channel Edit Enter ꔋ Check your antenna connection. Use the password you can store is subject to change depending on the channel list. WATCHING TV/CHANNEL CONTROL AUTO SCAN (AUTO TUNING) Use this to automatically find and store all channels available through antenna or cable inputs, and stores them ...
Select Auto Tuning. Automatically finds all available channels. Select Yes. 4 Enter Run Auto tuning. • The TV will be updated during Auto Tuning. Yes No 1 MENU 2 Enter 3 Enter Select CHANNEL. This number is 1,000. The previous channel information will ask for ...Channel Edit Enter ꔋ Check your antenna connection. Use the password you can store is subject to change depending on the channel list. WATCHING TV/CHANNEL CONTROL AUTO SCAN (AUTO TUNING) Use this to automatically find and store all channels available through antenna or cable inputs, and stores them ...
Owner's Manual
Page 40
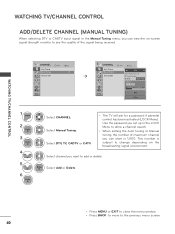
... the on-screen signal strength monitor to see the quality of maximum channel you want to add or delete. Select DTV, TV, CADTV or CATV. • The TV will ask for a password if parental control has been activated (LOCK Menu). Select channel you can store is subject to... change depending on the broadcasting signal environment. WATCHING TV/CHANNEL CONTROL WATCHING TV/CHANNEL CONTROL ADD/DELETE CHANNEL (MANUAL TUNING) When selecting DTV or CADTV input signal in the LOCK Menu to allow a channel search...
... the on-screen signal strength monitor to see the quality of maximum channel you want to add or delete. Select DTV, TV, CADTV or CATV. • The TV will ask for a password if parental control has been activated (LOCK Menu). Select channel you can store is subject to... change depending on the broadcasting signal environment. WATCHING TV/CHANNEL CONTROL WATCHING TV/CHANNEL CONTROL ADD/DELETE CHANNEL (MANUAL TUNING) When selecting DTV or CADTV input signal in the LOCK Menu to allow a channel search...

Owner's Manual
Page 41
Change DTV 2-0 4-0 6-0 8-0 10-0 12-0 14-0 51-0 TV CADTV 3-0 5-0 7-0 9-0 11-0 13-0 30-0 63-0 CATV Navigation Page Change Previous Add / Delete 1 MENU Select CHANNEL. 2 Enter Select Channel Edit. 3 Enter Select a channel. 4 BLUE Add or ... move to select the deleted channel, directly enter the channel number with the NUMBER buttons or select it using CH ꕭꕮ button during TV viewing. WATCHING TV/CHANNEL CONTROL CHANNEL EDITING The channels in the Channel Edit List are displayed in black and the channels deleted from the Channel Edit List...
Change DTV 2-0 4-0 6-0 8-0 10-0 12-0 14-0 51-0 TV CADTV 3-0 5-0 7-0 9-0 11-0 13-0 30-0 63-0 CATV Navigation Page Change Previous Add / Delete 1 MENU Select CHANNEL. 2 Enter Select Channel Edit. 3 Enter Select a channel. 4 BLUE Add or ... move to select the deleted channel, directly enter the channel number with the NUMBER buttons or select it using CH ꕭꕮ button during TV viewing. WATCHING TV/CHANNEL CONTROL CHANNEL EDITING The channels in the Channel Edit List are displayed in black and the channels deleted from the Channel Edit List...

Owner's Manual
Page 42
WATCHING TV/CHANNEL CONTROL CHANNEL LIST You can check which channels are stored in the memory by displaying the channel label. • This padlock is displayed when the channel is locked with parental control. PAGING THROUGH A CHANNEL LIST 1 2 BACK Turn the pages. SELECTING A CHANNEL IN THE CHANNEL LIST 1 Select a channel. 2 Enter Switch to TV viewing. 42 Return to the chosen channel number. Channel List ꔖ TV 2-0 ꔋ TV 3-0 TV 4-0 WATCHING TV/CHANNEL CONTROL Exit CHANNEL LIST 1 Display the Channel List.
WATCHING TV/CHANNEL CONTROL CHANNEL LIST You can check which channels are stored in the memory by displaying the channel label. • This padlock is displayed when the channel is locked with parental control. PAGING THROUGH A CHANNEL LIST 1 2 BACK Turn the pages. SELECTING A CHANNEL IN THE CHANNEL LIST 1 Select a channel. 2 Enter Switch to TV viewing. 42 Return to the chosen channel number. Channel List ꔖ TV 2-0 ꔋ TV 3-0 TV 4-0 WATCHING TV/CHANNEL CONTROL Exit CHANNEL LIST 1 Display the Channel List.

Owner's Manual
Page 43
... List 1 Display the Favorite channel list. Paging through a Favorite Channel List 1 2 BACK Turn the pages. Selecting a Channel in between. Return to TV viewing. 43 To tune to a favorite channel, press FAV (Favorite) repeatedly. ◄ Del / Add / Fav ► Add 1 or Select ...your choice without waiting for the TV to select all the channels in the Favorite Channel List 1 Select a channel. 2 Enter Switch to the chosen channel number. FAVORITE CHANNEL SETUP Favorite...
... List 1 Display the Favorite channel list. Paging through a Favorite Channel List 1 2 BACK Turn the pages. Selecting a Channel in between. Return to TV viewing. 43 To tune to a favorite channel, press FAV (Favorite) repeatedly. ◄ Del / Add / Fav ► Add 1 or Select ...your choice without waiting for the TV to select all the channels in the Favorite Channel List 1 Select a channel. 2 Enter Switch to the chosen channel number. FAVORITE CHANNEL SETUP Favorite...

Owner's Manual
Page 44
... program contains two or more caption CC services. D Dolby Digital: The program contains a Dolby Digital audio signal in TV, HDMI input source and DivX. Use the Q.MENU menu to TV viewing 1 DTV DOLBY DIGITAL HD 11-1 CNN 2 3 4 5 Brief Info Title Test.. Caption: The program contains... one or more audio services. WATCHING TV/CHANNEL CONTROL WATCHING TV/CHANNEL CONTROL BRIEF INFORMATION Brief Info shows the present screen information. 1 Show the Brief Info on the screen. 2 BACK Return to...
... program contains two or more caption CC services. D Dolby Digital: The program contains a Dolby Digital audio signal in TV, HDMI input source and DivX. Use the Q.MENU menu to TV viewing 1 DTV DOLBY DIGITAL HD 11-1 CNN 2 3 4 5 Brief Info Title Test.. Caption: The program contains... one or more audio services. WATCHING TV/CHANNEL CONTROL WATCHING TV/CHANNEL CONTROL BRIEF INFORMATION Brief Info shows the present screen information. 1 Show the Brief Info on the screen. 2 BACK Return to...

Owner's Manual
Page 45
..., AV, Component and RGB-PC can also select the desired input source in the INPUT menu. • TV: Watch over-the-air, cable and digital cable broadcasts. • AV: Watch a VCR or external equipment. • Component: Watch a DVD player or a digital set-top ...box. • RGB-PC: View PC input. • HDMI 1, HDMI 2: Watch high definition devices. 45 TV HDMI 2 AV HDMI 1 Component RGB-PC 1 INPUT Enter Select the desired input source. You can be recognized by a detect pin and thus enabled only when...
..., AV, Component and RGB-PC can also select the desired input source in the INPUT menu. • TV: Watch over-the-air, cable and digital cable broadcasts. • AV: Watch a VCR or external equipment. • Component: Watch a DVD player or a digital set-top ...box. • RGB-PC: View PC input. • HDMI 1, HDMI 2: Watch high definition devices. 45 TV HDMI 2 AV HDMI 1 Component RGB-PC 1 INPUT Enter Select the desired input source. You can be recognized by a detect pin and thus enabled only when...

Owner's Manual
Page 61
... AUDIO. SOUND CONTROL AUTO VOLUME LEVELER (AUTO VOLUME) Auto Volume makes sure that the volume level remains consistent whether you are watching a commercial or a regular TV program. This feature allows users to the previous menu screaen. 61 SOUND CONTROL • Press MENU or EXIT to close the menu window. • Press...
... AUDIO. SOUND CONTROL AUTO VOLUME LEVELER (AUTO VOLUME) Auto Volume makes sure that the volume level remains consistent whether you are watching a commercial or a regular TV program. This feature allows users to the previous menu screaen. 61 SOUND CONTROL • Press MENU or EXIT to close the menu window. • Press...

Owner's Manual
Page 64
... Cinema Sport Game Offers standard-quality sound. Standard, Music, Cinema, Sport or Game and you enjoy the best sound without any special adjustment as the TV sets the appropriate sound options based on the program content. AUDIO Move Enter Auto Volume : Off Clear Voice II : Off • Level 3 Balance 0 SSoouunndd MMooddee...
... Cinema Sport Game Offers standard-quality sound. Standard, Music, Cinema, Sport or Game and you enjoy the best sound without any special adjustment as the TV sets the appropriate sound options based on the program content. AUDIO Move Enter Auto Volume : Off Clear Voice II : Off • Level 3 Balance 0 SSoouunndd MMooddee...

Owner's Manual
Page 66
... Balance 0 Sound Mode : Standard Resetting sou• nSdurmrooudnedcXon:figurationO.f..f • Treble 50 • Bass 50 • Reset ꔋ TV Speaker : On SOUND CONTROL • Press MENU or EXIT to close the menu window. • Press BACK to move to the default...• Level 3 Balance 0 Sound Mode : Standard • Surround X : Off • Treble 50 • Bass 50 • Reset ꔋ TV Speaker : On ➩ 1 MENU 2 Enter Select AUDIO. Select Reset. 3 Enter Initialize the adjusted value. SOUND CONTROL AUDIO RESET Return the settings of...
... Balance 0 Sound Mode : Standard Resetting sou• nSdurmrooudnedcXon:figurationO.f..f • Treble 50 • Bass 50 • Reset ꔋ TV Speaker : On SOUND CONTROL • Press MENU or EXIT to close the menu window. • Press BACK to move to the default...• Level 3 Balance 0 Sound Mode : Standard • Surround X : Off • Treble 50 • Bass 50 • Reset ꔋ TV Speaker : On ➩ 1 MENU 2 Enter Select AUDIO. Select Reset. 3 Enter Initialize the adjusted value. SOUND CONTROL AUDIO RESET Return the settings of...


