Owner's Manual
Page 1
LED LCD MONITOR TV MODELS M2080D M2380DF M2280D M2780DF M2380D M2780D www.lg.com ENGLISH OWNER'S MANUAL LED LCD MONITOR TV Please read this manual carefully before operating your set and retain it for future reference.
LED LCD MONITOR TV MODELS M2080D M2380DF M2280D M2780DF M2380D M2780D www.lg.com ENGLISH OWNER'S MANUAL LED LCD MONITOR TV Please read this manual carefully before operating your set and retain it for future reference.
Owner's Manual
Page 2
... CONTROL FRONT PANEL INFORMATION 4 BACK PANEL INFORMATION 5 STAND INSTALLATION M2080D/M2280D/M2380D/M2780D.........6 M2380DF/M2780DF 7 DETACHING THE STAND M2080D/M2280D/M2380D/M2780D...... 8 M2380DF/M2780DF 9 DETACHING THE STAND BODY (Only M2080D/ M2280D/M2380D/M2780D 10 WALL MOUNT: HORIZONTAL INSTALLATION.......11 SWIVEL STAND(Only M2780D / M2780DF)....12 DESKTOP PEDESTAL INSTALLATION 12 POSITIONING YOUR DISPLAY 13 LOCATION 13 KENSINGTON SECURITY...
... CONTROL FRONT PANEL INFORMATION 4 BACK PANEL INFORMATION 5 STAND INSTALLATION M2080D/M2280D/M2380D/M2780D.........6 M2380DF/M2780DF 7 DETACHING THE STAND M2080D/M2280D/M2380D/M2780D...... 8 M2380DF/M2780DF 9 DETACHING THE STAND BODY (Only M2080D/ M2280D/M2380D/M2780D 10 WALL MOUNT: HORIZONTAL INSTALLATION.......11 SWIVEL STAND(Only M2780D / M2780DF)....12 DESKTOP PEDESTAL INSTALLATION 12 POSITIONING YOUR DISPLAY 13 LOCATION 13 KENSINGTON SECURITY...

Owner's Manual
Page 3
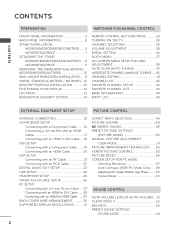
CONTENTS PRESET SOUND SETTINGS -USER MODE 65 Surround X 65 AUDIO RESET 66 TV SPEAKERS ON/OFF SETUP 67 STEREO/SAP BROADCAST SETUP 68 TIME SETTING USING USB DEVICES ENTRY MODES 93 PHOTO LIST 95 MUSIC LIST 99 MOVIE LIST 102 DIVX REGISTRATION CODE 107 DEACTIVATION 108 CLOCK SETUP Auto Clock Setup 69 Manual Clock Setup 70 AUTO ON/OFF TIME SETTING 71 SLEEP TIMER SETTING 72 OPTIONAL SETTINGS ON-SCREEN MENUS LANGUAGE SELECTION.........73 AUDIO LANGUAGE 74 INPUT LABEL 75 KEY LOCK 76 CAPTION MODE Analog Broadcasting System Captions........ 77 Digital Broadcasting System Captions...
CONTENTS PRESET SOUND SETTINGS -USER MODE 65 Surround X 65 AUDIO RESET 66 TV SPEAKERS ON/OFF SETUP 67 STEREO/SAP BROADCAST SETUP 68 TIME SETTING USING USB DEVICES ENTRY MODES 93 PHOTO LIST 95 MUSIC LIST 99 MOVIE LIST 102 DIVX REGISTRATION CODE 107 DEACTIVATION 108 CLOCK SETUP Auto Clock Setup 69 Manual Clock Setup 70 AUTO ON/OFF TIME SETTING 71 SLEEP TIMER SETTING 72 OPTIONAL SETTINGS ON-SCREEN MENUS LANGUAGE SELECTION.........73 AUDIO LANGUAGE 74 INPUT LABEL 75 KEY LOCK 76 CAPTION MODE Analog Broadcasting System Captions........ 77 Digital Broadcasting System Captions...

Owner's Manual
Page 4
The image shown may be somewhat different from your Monitor set is a simplified representation of the front panel. M2080D / M2280D M2380D / M2780D M2380DF / M2780DF PREPARATION 1 1 2 3 45 6 7 89 1 IR RECEIVER (remote control signal receiver) 2 SPEAKER (WOOFER) 3 INPUT BUTTON 4 MENU BUTTON 5 ENTER BUTTON 6 VOLUME BUTTON 7 CHANNEL BUTTON 8 POWER BUTTON 9 POWER INDICATOR Illuminates blue when the set . Note: You can adjust the power indicator in the OPTION menu. 4 PREPARATION FRONT PANEL INFORMATION ■■ This is switched on.
The image shown may be somewhat different from your Monitor set is a simplified representation of the front panel. M2080D / M2280D M2380D / M2780D M2380DF / M2780DF PREPARATION 1 1 2 3 45 6 7 89 1 IR RECEIVER (remote control signal receiver) 2 SPEAKER (WOOFER) 3 INPUT BUTTON 4 MENU BUTTON 5 ENTER BUTTON 6 VOLUME BUTTON 7 CHANNEL BUTTON 8 POWER BUTTON 9 POWER INDICATOR Illuminates blue when the set . Note: You can adjust the power indicator in the OPTION menu. 4 PREPARATION FRONT PANEL INFORMATION ■■ This is switched on.

Owner's Manual
Page 5
... 9 COMPONENT INPUT Connect a component video/audio device to these jacks. 11 ANTENNA / CABLE INPUT Connect over-the-air signals to this jack. 5 M2080D / M2280D M2380D / M2780D M2380DF / M2780DF 1 2 3 45 6 78 9 10 11 1 DC ADAPTER PORT Connect to the power jack. 2 HDMI INPUT Connect an HDMI signal to HDMI IN or a DVI (VIDEO...
... 9 COMPONENT INPUT Connect a component video/audio device to these jacks. 11 ANTENNA / CABLE INPUT Connect over-the-air signals to this jack. 5 M2080D / M2280D M2380D / M2780D M2380DF / M2780DF 1 2 3 45 6 78 9 10 11 1 DC ADAPTER PORT Connect to the power jack. 2 HDMI INPUT Connect an HDMI signal to HDMI IN or a DVI (VIDEO...

Owner's Manual
Page 7
M2380DF/M2780DF 1 Carefully place the product screen side down on the bottom of the stand base and turn the screw clockwise to tighten. PREPARATION STAND INSTALLATION ■■ The image shown may be somewhat different from damage. 2 Insert the Stand Base into the product. Coin 7 Stand Base 3 Use a Coin on a cushioned surface that will protect the Monitor set and its screen from your Monitor set.
M2380DF/M2780DF 1 Carefully place the product screen side down on the bottom of the stand base and turn the screw clockwise to tighten. PREPARATION STAND INSTALLATION ■■ The image shown may be somewhat different from damage. 2 Insert the Stand Base into the product. Coin 7 Stand Base 3 Use a Coin on a cushioned surface that will protect the Monitor set and its screen from your Monitor set.

Owner's Manual
Page 9
Coin 3 Pull the stand base. M2380DF/M2780DF 1 Place the Monitor set screen side down on a cushion or soft cloth. 2 Detach the Stand Base from your Monitor set by turning the screw to the left with a Coin. Stand Base 9 PREPARATION DETACHING THE STAND ■■ The image shown may be somewhat different from the set .
Coin 3 Pull the stand base. M2380DF/M2780DF 1 Place the Monitor set screen side down on a cushion or soft cloth. 2 Detach the Stand Base from your Monitor set by turning the screw to the left with a Coin. Stand Base 9 PREPARATION DETACHING THE STAND ■■ The image shown may be somewhat different from the set .

Owner's Manual
Page 11
Using screws that meet VESA standards might damage the Monitor set or result in it will not drop. 1. LG is not responsible for any damage resulting from failure to the screw mounting interface dimensions and mounting screw specifications. 5. Be sure to the back of ... interface (optional) to use a VESA standard wall mount pad and screws. < Screw Mounting Interface Dimensions > r M2080D / M2280D / M2380D / M2380DF : 75 mm x 75 mm hole spacing r M2780D / M2780DF : 100 mm x 200 mm hole spacing Wall Mount Pad 11 Detailed installation instructions are available from the wall.
Using screws that meet VESA standards might damage the Monitor set or result in it will not drop. 1. LG is not responsible for any damage resulting from failure to the screw mounting interface dimensions and mounting screw specifications. 5. Be sure to the back of ... interface (optional) to use a VESA standard wall mount pad and screws. < Screw Mounting Interface Dimensions > r M2080D / M2280D / M2380D / M2380DF : 75 mm x 75 mm hole spacing r M2780D / M2780DF : 100 mm x 200 mm hole spacing Wall Mount Pad 11 Detailed installation instructions are available from the wall.

Owner's Manual
Page 12
... cm 10 cm 10 cm 10 cm M2380DF / M2780DF 12 10 cm 10 cm 10 cm 10 cm M2780D M2780DF PREPARATION DESKTOP PEDESTAL INSTALLATION ■■ The image shown may be somewhat different from your Monitor set. For proper ventilation, allow a clearance of 10 cm ... set, you can adjust the set manually to the left or right direction by 179 degrees to suit your viewing position. PREPARATION SWIVEL STAND(Only M2780D / M2780DF) ■■ The image shown may be somewhat different from your Monitor set.
... cm 10 cm 10 cm 10 cm M2380DF / M2780DF 12 10 cm 10 cm 10 cm 10 cm M2780D M2780DF PREPARATION DESKTOP PEDESTAL INSTALLATION ■■ The image shown may be somewhat different from your Monitor set. For proper ventilation, allow a clearance of 10 cm ... set, you can adjust the set manually to the left or right direction by 179 degrees to suit your viewing position. PREPARATION SWIVEL STAND(Only M2780D / M2780DF) ■■ The image shown may be somewhat different from your Monitor set.

Owner's Manual
Page 13
... your finger(s) in various ways for maximum comfort. * Tilt Range -5° 10° -5° 10° PREPARATION M2080D / M2280D / M2380D / M2780D M2380DF / M2780DF LOCATION Position your set . Care should be somewhat different from your set so that the set to allow a free flow of the monitor and the... no bright light or sunlight falls directly onto the screen. Adjust the position of the panel in between the head of air. M2380DF / M2780DF 13 POSITIONING YOUR DISPLAY ■ The image shown may be taken not to expose the set is placed in a position to any unnecessary ...
... your finger(s) in various ways for maximum comfort. * Tilt Range -5° 10° -5° 10° PREPARATION M2080D / M2280D / M2380D / M2780D M2380DF / M2780DF LOCATION Position your set . Care should be somewhat different from your set so that the set to allow a free flow of the monitor and the... no bright light or sunlight falls directly onto the screen. Adjust the position of the panel in between the head of air. M2380DF / M2780DF 13 POSITIONING YOUR DISPLAY ■ The image shown may be taken not to expose the set is placed in a position to any unnecessary ...

Owner's Manual
Page 14
... time. NOTES a. Avoid touching the LCD screen or holding your finger(s) against it is nothing wrong with the Kensington Security System. - M2080D / M2280D M2380D / M2780D M2380DF / M2780DF 14 The product is an optional accessory. PREPARATION PREPARATION KENSINGTON SECURITY SYSTEM - For further information, visit http://www.kensington.com. Kensington sells security systems for...
... time. NOTES a. Avoid touching the LCD screen or holding your finger(s) against it is nothing wrong with the Kensington Security System. - M2080D / M2280D M2380D / M2780D M2380DF / M2780DF 14 The product is an optional accessory. PREPARATION PREPARATION KENSINGTON SECURITY SYSTEM - For further information, visit http://www.kensington.com. Kensington sells security systems for...
Owner's Manual
Page 30
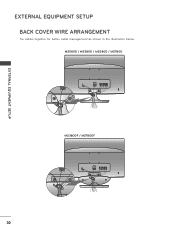
EXTERNAL EQUIPMENT SETUP EXTERNAL EQUIPMENT SETUP BACK COVER WIRE ARRANGEMENT Tie cables together for better cable management as shown in the illustration below. M2080D / M2280D / M2380D / M2780D M2380DF / M2780DF 30
EXTERNAL EQUIPMENT SETUP EXTERNAL EQUIPMENT SETUP BACK COVER WIRE ARRANGEMENT Tie cables together for better cable management as shown in the illustration below. M2080D / M2280D / M2380D / M2780D M2380DF / M2780DF 30

Owner's Manual
Page 58
After adjustment, if the image is still not correct, your set is available for a few seconds while the auto configuration is still not correct, try Auto adjustment again. • If picture needs to the previous menu screaen. 2. Auto Configure This function is for automatic adjustment of the image is in progress 58 ! Using Auto Config. (Remocon) This function is functioning properly but needs further adjustment. Auto in progress. 1. s Position Size Phase Reset Move Prev. Auto in progress For optimal display change resolution 1920 x 1080 Auto in progress ...
After adjustment, if the image is still not correct, your set is available for a few seconds while the auto configuration is still not correct, try Auto adjustment again. • If picture needs to the previous menu screaen. 2. Auto Configure This function is for automatic adjustment of the image is in progress 58 ! Using Auto Config. (Remocon) This function is functioning properly but needs further adjustment. Auto in progress. 1. s Position Size Phase Reset Move Prev. Auto in progress For optimal display change resolution 1920 x 1080 Auto in progress ...

Owner's Manual
Page 116
...) Weight INPUT: AC 100-240 V 50/60 Hz 2.0 A OUTPUT: DC 19 V / 3.42 A -5° to 10° M2780D 644 mm x 480.6 mm x 222.8 mm (23.53 inch x 18.92 inch x 8.77 inch) 5.8 kg ( 12.79 lb) M2780DF 644 mm x 493.6 mm x 221.7 mm (23.53 inch x 19.43 inch x 8.72 inch) 6.1 kg ( 13...
...) Weight INPUT: AC 100-240 V 50/60 Hz 2.0 A OUTPUT: DC 19 V / 3.42 A -5° to 10° M2780D 644 mm x 480.6 mm x 222.8 mm (23.53 inch x 18.92 inch x 8.77 inch) 5.8 kg ( 12.79 lb) M2780DF 644 mm x 493.6 mm x 221.7 mm (23.53 inch x 19.43 inch x 8.72 inch) 6.1 kg ( 13...