Owners Manual
Page 2
... ensure that they do not p|ay wRh the ai_ ,_nditioner, • if the power cord r_uires repl,a_ment, have an Author_z_ Servicer instal| _n exa_ rep|ace_nt pa_. ., installation wo_ must be performed in the chart of troub[esho@ing t#s Ill you review ,our chart of your .air conditio,r_r pro_dy. Just...
... ensure that they do not p|ay wRh the ai_ ,_nditioner, • if the power cord r_uires repl,a_ment, have an Author_z_ Servicer instal| _n exa_ rep|ace_nt pa_. ., installation wo_ must be performed in the chart of troub[esho@ing t#s Ill you review ,our chart of your .air conditio,r_r pro_dy. Just...
Owners Manual
Page 3
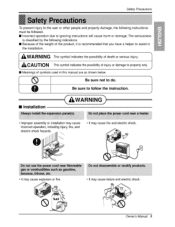
...and property damage, the following indications. [] Because of the weight of the product, it is re_mmended that you have a helper to assist in the installation. [] Meanings of symbols us_ in this manual are as shown below. "/ q Be sure to do. Be sure not to follow... t [] Installation . It may cause fire and electric shock. , It may cause explosion or fire. • It may cause incorrect o_ration, inclluding injury,fire, and electric shock hazards. . improper assemNy or installation may cause failure and ,ele_ric sho_.
...and property damage, the following indications. [] Because of the weight of the product, it is re_mmended that you have a helper to assist in the installation. [] Meanings of symbols us_ in this manual are as shown below. "/ q Be sure to do. Be sure not to follow... t [] Installation . It may cause fire and electric shock. , It may cause explosion or fire. • It may cause incorrect o_ration, inclluding injury,fire, and electric shock hazards. . improper assemNy or installation may cause failure and ,ele_ric sho_.
Owners Manual
Page 5
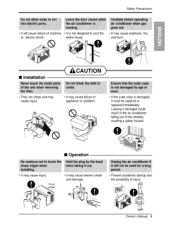
... failure of injury_ Owner_ Manual 5 They are sharp and may cause injury, . _ may cause iniury. . enfire house. • It may _use explosion, fire, and burn. [] Installation CAUTION .
... failure of injury_ Owner_ Manual 5 They are sharp and may cause injury, . _ may cause iniury. . enfire house. • It may _use explosion, fire, and burn. [] Installation CAUTION .
Owners Manual
Page 7
... rotates at a very high speed during operation. i' 2. Such usage could damage the, items. 43The air conditioner is damaged and requires, replacement, have an Authorized Servicer install an exact replacement part. 1 Being exposed to possible electric s hock. 3. They should be written on while cleaning inner parts of the unit when removing the...
... rotates at a very high speed during operation. i' 2. Such usage could damage the, items. 43The air conditioner is damaged and requires, replacement, have an Authorized Servicer install an exact replacement part. 1 Being exposed to possible electric s hock. 3. They should be written on while cleaning inner parts of the unit when removing the...
Owners Manual
Page 11
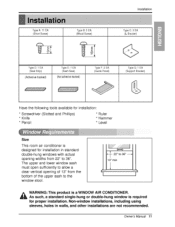
... from the bottom of the upper sash to 36" ---,, 13" mini WARNING: This product is required for installation in walls, and other installations are not recommended, Owne, s Manua/ 11 As such, a standard single-hung or double-hung window is a WINDOW... AIR CONDITIONER. Installation "I"yF_A: 11 EA (Short Screw) Type B: 5 EA Type C: 3 EA .l.y.._ D: 1 EA (Seal Strip} (Adhesive backed} [ype E: 1 EA (Sash Sei_} (No,at dhesivebacked) L Type F: 2 EA lype G: 1 EA Have the following tools available for installation: * Screwdriver (,Slotted and Philips) * ...
... from the bottom of the upper sash to 36" ---,, 13" mini WARNING: This product is required for installation in walls, and other installations are not recommended, Owne, s Manua/ 11 As such, a standard single-hung or double-hung window is a WINDOW... AIR CONDITIONER. Installation "I"yF_A: 11 EA (Short Screw) Type B: 5 EA Type C: 3 EA .l.y.._ D: 1 EA (Seal Strip} (Adhesive backed} [ype E: 1 EA (Sash Sei_} (No,at dhesivebacked) L Type F: 2 EA lype G: 1 EA Have the following tools available for installation: * Screwdriver (,Slotted and Philips) * ...
Owners Manual
Page 12
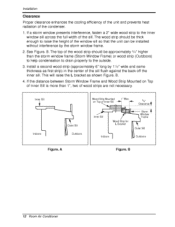
... , approximately 3/4" higher than 1", two of the window sill so that the unit can b,e installed without interference by 11/2" wide and same thickness as shown Figure. B. 4. See Figure. Install a second wood strip (approximately 6" long by the storm window frame. 2. B. Installation Proper clearance enhances the cooling! Inner Si_l indoors Figure, A Figure, B 12 Room Air Conditioner...
... , approximately 3/4" higher than 1", two of the window sill so that the unit can b,e installed without interference by 11/2" wide and same thickness as shown Figure. B. 4. See Figure. Install a second wood strip (approximately 6" long by the storm window frame. 2. B. Installation Proper clearance enhances the cooling! Inner Si_l indoors Figure, A Figure, B 12 Room Air Conditioner...
Owners Manual
Page 13
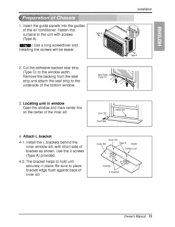
... O{_id,e ILBracket Owne, s Manual 13 Locating unit in pliace. Ins.tatli the L brackets behind the inner window sill, with screws (Type A). _: Use a long screwdriver and installing the screws will be easier. 2o Cut the adhesive-backed seal strip (Type D) to the window width, Remove the backing from the seai strip and...
... O{_id,e ILBracket Owne, s Manual 13 Locating unit in pliace. Ins.tatli the L brackets behind the inner window sill, with screws (Type A). _: Use a long screwdriver and installing the screws will be easier. 2o Cut the adhesive-backed seal strip (Type D) to the window width, Remove the backing from the seai strip and...
Owners Manual
Page 14
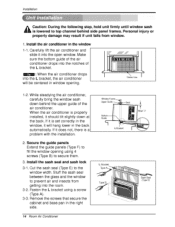
... lift the air conditioner and slide it does not, there is a probl,em with the installation. 2. If it is set correctly in the window, it wiii hang lower in window opening... the screws that secure the cabinet and base pan in the window 1ol. Install the air conditioner in the right side. 14 Room Air ConditioRec _®'1:/4 ° When the air conditioner ...is propedy installed, it should tilt slightly down behind side panel frames, Personal injury or property damage may result ...
... lift the air conditioner and slide it does not, there is a probl,em with the installation. 2. If it is set correctly in the window, it wiii hang lower in window opening... the screws that secure the cabinet and base pan in the window 1ol. Install the air conditioner in the right side. 14 Room Air ConditioRec _®'1:/4 ° When the air conditioner ...is propedy installed, it should tilt slightly down behind side panel frames, Personal injury or property damage may result ...
Owners Manual
Page 15
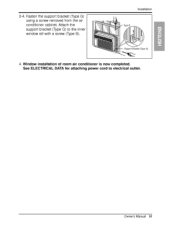
Attach the support bracket (Type G) to the inner window sili with a screw (Type B)_ Installation 4 Window installation of room air conditioner is now completed,, S_ ELEi'CTRICAL DATA for attaching power cord to electrical outlet. Fasten the support bracket (Type G) using a screw removed from the air conditioner cabinet. Owner_ Manual 15 3-4.
Attach the support bracket (Type G) to the inner window sili with a screw (Type B)_ Installation 4 Window installation of room air conditioner is now completed,, S_ ELEi'CTRICAL DATA for attaching power cord to electrical outlet. Fasten the support bracket (Type G) using a screw removed from the air conditioner cabinet. Owner_ Manual 15 3-4.

Owners Manual
Page 18
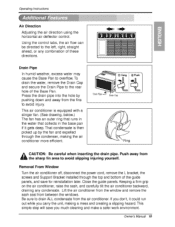
... the compressor stops cooUing. • _proximately every 3 minutes, the fan will not function properly if strong light strikes the sen_r window of the _larity when installing the batteries. ,i Be sure that both batteries are , obstacles between _°F and 86nF in 1° increments, Fan Spe_ , Pressing _e Fa_ Sp_d bu_on t_gles be_...
... the compressor stops cooUing. • _proximately every 3 minutes, the fan will not function properly if strong light strikes the sen_r window of the _larity when installing the batteries. ,i Be sure that both batteries are , obstacles between _°F and 86nF in 1° increments, Fan Spe_ , Pressing _e Fa_ Sp_d bu_on t_gles be_...
Owners Manual
Page 19
... when inserting the drain pipe. Removal From Window Turn the air conditioner df, disconnect the power cord, remove the L bracket, the screws and Support Bracket installed through the condenser, making a mess and creating a slipping hazard. Keeping a firm grip, on the air conditioner, raise the sash,, and carefully tilt the air conditioner...
... when inserting the drain pipe. Removal From Window Turn the air conditioner df, disconnect the power cord, remove the L bracket, the screws and Support Bracket installed through the condenser, making a mess and creating a slipping hazard. Keeping a firm grip, on the air conditioner, raise the sash,, and carefully tilt the air conditioner...
Owners Manual
Page 47
...of original consumer purchase of the product and effective only when used in the United States including Alaska, Hawaii, and U.S.Territories. LG WILL NOT BE LIABLEFOR ANY CONSEQUENTIAL, INDIRECT, OR INCIDENTAL DAMAGES OF ANY KIND, INCLUDING LOST REVENUESOR PROFITS,IN CONNECTION WITH THE ...consumer. Patent No. : Us 6, 412, 298 P/No.: 3828A20528B Printed in the Operating Guide, accident, vermin, fire, flood, improper installation, acts of God, unauthorized modification or alteration, incorrect electrical current or voltage, or commercial use, or use during the warranty period set forth...
...of original consumer purchase of the product and effective only when used in the United States including Alaska, Hawaii, and U.S.Territories. LG WILL NOT BE LIABLEFOR ANY CONSEQUENTIAL, INDIRECT, OR INCIDENTAL DAMAGES OF ANY KIND, INCLUDING LOST REVENUESOR PROFITS,IN CONNECTION WITH THE ...consumer. Patent No. : Us 6, 412, 298 P/No.: 3828A20528B Printed in the Operating Guide, accident, vermin, fire, flood, improper installation, acts of God, unauthorized modification or alteration, incorrect electrical current or voltage, or commercial use, or use during the warranty period set forth...


