
Owners Manual
Page 1
webstte hltp://www,lgscrAce, i _iii'iiii!i!ii:iiii!_!l!i:iiiii!iii e°_t} ht_://wv_ Jge_ep,_i_,_, LG Window-Type Air Conditioner OWNER'S MANUAL MODELS, MODELOS: LW_lD6500R, L R, L6_1
webstte hltp://www,lgscrAce, i _iii'iiii!i!ii:iiii!_!l!i:iiiii!iii e°_t} ht_://wv_ Jge_ep,_i_,_, LG Window-Type Air Conditioner OWNER'S MANUAL MODELS, MODELOS: LW_lD6500R, L R, L6_1
Owners Manual
Page 2
... IIi Staple your receipt to this un_ Call i-_,-243_00 to locate the nearest ASC .,This air cond_toner is no_ int_ded for warranty issues, READ THiS MANUAL Inside you will {ind many _lp{u{ hints oin how to ensure that they do not p|ay wRh the ai_ ,_nditioner, • if the power cord...
... IIi Staple your receipt to this un_ Call i-_,-243_00 to locate the nearest ASC .,This air cond_toner is no_ int_ded for warranty issues, READ THiS MANUAL Inside you will {ind many _lp{u{ hints oin how to ensure that they do not p|ay wRh the ai_ ,_nditioner, • if the power cord...
Owners Manual
Page 3
... following instructions must be folllowed. [] incorrect operation due to follow t [] Installation . Be sure not to assist in the installation. [] Meanings of symbols us_ in this manual are as shown below. Owner_...
... following instructions must be folllowed. [] incorrect operation due to follow t [] Installation . Be sure not to assist in the installation. [] Meanings of symbols us_ in this manual are as shown below. Owner_...
Owners Manual
Page 5
... the outer case is not: designed to _ol the or electric shock. . They are sharp and may cause injury, . _ may cause failure of injury_ Owner_ Manual 5
... the outer case is not: designed to _ol the or electric shock. . They are sharp and may cause injury, . _ may cause failure of injury_ Owner_ Manual 5
Owners Manual
Page 7
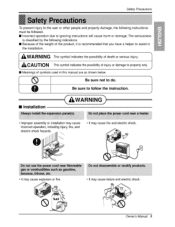
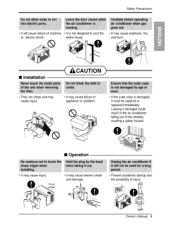
...the metal parts of oxygen deficiency, ventilate the room when used together with stoves or other heating devices, 3 Do not use this manual. Overloading the line could damage the, items. 43The air conditioner is accidentally triggered on page, 2 of injury if the unit's ... metal edges. 2. There is a possibility of this air conditioner for more detaii]s. 4. For repair and maintenance, contact an Authorized Service Center. Owner_ Manual 7 Beforeto Operation 1 Plug in the, power cord properly. Such usage could create a fire hazard. 3. i' 2. Injuries ,can destroy the insulation,...
...the metal parts of oxygen deficiency, ventilate the room when used together with stoves or other heating devices, 3 Do not use this manual. Overloading the line could damage the, items. 43The air conditioner is accidentally triggered on page, 2 of injury if the unit's ... metal edges. 2. There is a possibility of this air conditioner for more detaii]s. 4. For repair and maintenance, contact an Authorized Service Center. Owner_ Manual 7 Beforeto Operation 1 Plug in the, power cord properly. Such usage could create a fire hazard. 3. i' 2. Injuries ,can destroy the insulation,...
Owners Manual
Page 13
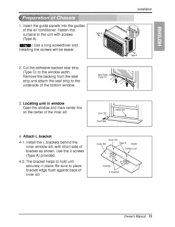
... the seai strip and attach the seal strip to place, bracket edge flush against back of the air conditioner. A Inside ,CenCeLr ime O{_id,e ILBracket Owne, s Manual 13 1. insert the guide panels into the guides of inner sill.
... the seai strip and attach the seal strip to place, bracket edge flush against back of the air conditioner. A Inside ,CenCeLr ime O{_id,e ILBracket Owne, s Manual 13 1. insert the guide panels into the guides of inner sill.
Owners Manual
Page 15
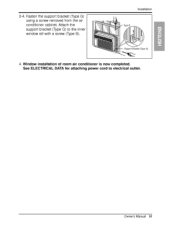
3-4. Attach the support bracket (Type G) to the inner window sili with a screw (Type B)_ Installation 4 Window installation of room air conditioner is now completed,, S_ ELEi'CTRICAL DATA for attaching power cord to electrical outlet. Owner_ Manual 15 Fasten the support bracket (Type G) using a screw removed from the air conditioner cabinet.
3-4. Attach the support bracket (Type G) to the inner window sili with a screw (Type B)_ Installation 4 Window installation of room air conditioner is now completed,, S_ ELEi'CTRICAL DATA for attaching power cord to electrical outlet. Owner_ Manual 15 Fasten the support bracket (Type G) using a screw removed from the air conditioner cabinet.
Owners Manual
Page 17
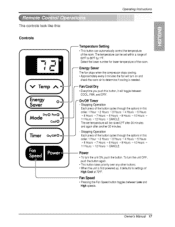
... the b_ton cycles through the options in this order: 1 Hour _, 2 Hours _, 3 Hours _ 4 Hours ....5 Hours .._..6..H..ours-_,7Hours 8Hours 9Hours lOHours .... 11 Hours ....12 Hours CANCLE - Owne, s Manual 17 This bu_on takes priority over any o_er buttons° • When the unit is needed, Fan/Cool/D * Every_me you push _is button, it defau_s...
... the b_ton cycles through the options in this order: 1 Hour _, 2 Hours _, 3 Hours _ 4 Hours ....5 Hours .._..6..H..ours-_,7Hours 8Hours 9Hours lOHours .... 11 Hours ....12 Hours CANCLE - Owne, s Manual 17 This bu_on takes priority over any o_er buttons° • When the unit is needed, Fan/Cool/D * Every_me you push _is button, it defau_s...
Owners Manual
Page 19
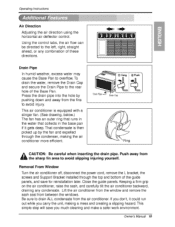
... conditioner df, disconnect the power cord, remove the L bracket, the screws and Support Bracket installed through the condenser, making a mess and creating a slipping hazard. Owne s Manual 19 Using the control tabs, the air flow can b,e directed to the left, riight, straight ahead, or any condensate. That condensate is equipped with a stinger...
... conditioner df, disconnect the power cord, remove the L bracket, the screws and Support Bracket installed through the condenser, making a mess and creating a slipping hazard. Owne s Manual 19 Using the control tabs, the air flow can b,e directed to the left, riight, straight ahead, or any condensate. That condensate is equipped with a stinger...

Owners Manual
Page 21
Remo_e the thermostat knob and the operation knob by pulling. 2. Remove the screw securing the Front Gdlle. 1,.PuIll the inliet grille forward 2 Remove the screw securing the Front Gri]lle. 3. Owner_ Manual 21 Push the gri!le up, from the bosom and pull the top, of the grille, away from the case as the top tabs I[_ out of their slots. How to Remove the Front Grille Maintenanceand Service 1.
Remo_e the thermostat knob and the operation knob by pulling. 2. Remove the screw securing the Front Gdlle. 1,.PuIll the inliet grille forward 2 Remove the screw securing the Front Gri]lle. 3. Owner_ Manual 21 Push the gri!le up, from the bosom and pull the top, of the grille, away from the case as the top tabs I[_ out of their slots. How to Remove the Front Grille Maintenanceand Service 1.


