
Service Manual
Page 2
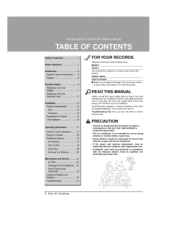
Air Conditioner Service Manual TABLE OF CONTENTS Safety Precautions...3 Dimensions ...6 Outside Dimensions ...6 Product Specifications ...7 Installation ...8 Select the Best Location ...8 Installation Check ...8 How to Secure the Drain Pipe ...8 How to Install...9 Operation ...12 Function of Controls ...12 Disassembly ...13 Mechanical Parts...13 Air handling Parts...14 Electrical Parts ...15 Refrigerating Cycle...17 Schematic Diagram...20 Electronic Control Device...
Air Conditioner Service Manual TABLE OF CONTENTS Safety Precautions...3 Dimensions ...6 Outside Dimensions ...6 Product Specifications ...7 Installation ...8 Select the Best Location ...8 Installation Check ...8 How to Secure the Drain Pipe ...8 How to Install...9 Operation ...12 Function of Controls ...12 Disassembly ...13 Mechanical Parts...13 Air handling Parts...14 Electrical Parts ...15 Refrigerating Cycle...17 Schematic Diagram...20 Electronic Control Device...

Service Manual
Page 5
...switch of the main body of the unit when removing the filter. • They are sharp and may cause injury. Do not clean the air conditioner with water. • Water may cause injury. Ensure that the outer case is not damaged by age or wear. • If the ... it damaged could result in the air conditioner falling out of appliance or performance deteriorate. Sharp edges Service Manual 5 CAUTION Never touch the metal parts of appliance. Leaving it must be repaired or replaced immediately. Be cautious not to touch the sharp edges when installing. • It may enter the...
...switch of the main body of the unit when removing the filter. • They are sharp and may cause injury. Do not clean the air conditioner with water. • Water may cause injury. Ensure that the outer case is not damaged by age or wear. • If the ... it damaged could result in the air conditioner falling out of appliance or performance deteriorate. Sharp edges Service Manual 5 CAUTION Never touch the metal parts of appliance. Leaving it must be repaired or replaced immediately. Be cautious not to touch the sharp edges when installing. • It may enter the...
Service Manual
Page 8
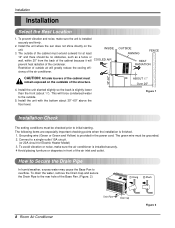
...green wire must extend outward for Electric Heater Model) 3. Connect to initial starting. Installation Installation Select the Best Location 1. The outside . 5. INSIDE 3. ciency of the Base Pan. (Figure. 2) 8 Room Air Conditioner Drain Pipe Drain Cap Figure 2 To avoid vibration or noise, make sure the ... 30"-60" CAUTION: All side louvers of the air inlet and outlet. Install the unit slanted slightly so the back is installed securely and firmly. 2. To prevent vibration and noise, make sure the air conditioner is provided in front of the cabinet must be ...
...green wire must extend outward for Electric Heater Model) 3. Connect to initial starting. Installation Installation Select the Best Location 1. The outside . 5. INSIDE 3. ciency of the Base Pan. (Figure. 2) 8 Room Air Conditioner Drain Pipe Drain Cap Figure 2 To avoid vibration or noise, make sure the ... 30"-60" CAUTION: All side louvers of the air inlet and outlet. Install the unit slanted slightly so the back is installed securely and firmly. 2. To prevent vibration and noise, make sure the air conditioner is provided in front of the cabinet must be ...
Service Manual
Page 10
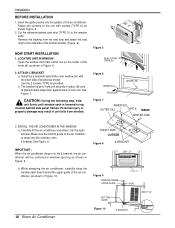
... window. See Figure. 8. Make sure the bottom guide of the air conditioner drops into the guides of the air conditioner, as shown Figure. 5. 2. While steadying the air conditioner, carefully bring the window sash down behind the inner window sill, with screws (TYPE A) as shown in Figure. 6. 2. Installation BEFORE INSTALLATION 1. Cut the adhesive-backed seal strip (TYPE D) to place...
... window. See Figure. 8. Make sure the bottom guide of the air conditioner drops into the guides of the air conditioner, as shown Figure. 5. 2. While steadying the air conditioner, carefully bring the window sash down behind the inner window sill, with screws (TYPE A) as shown in Figure. 6. 2. Installation BEFORE INSTALLATION 1. Cut the adhesive-backed seal strip (TYPE D) to place...

Service Manual
Page 11
... room, as shown in Figure. 11. L Bracket Type A Type B Figure 11 Installation Sash Seal (Type F) Service Manual 11 INSTALL THE SASH SEAL AND SASH LOCK a. b. Close the guide panels. keeping a firm grip on the air conditioner, raise the sash, and carefully tilt the air conditioner backward, draining any condensate water. 4. NOTICE REMOVAL FROM WINDOW Trun the...
... room, as shown in Figure. 11. L Bracket Type A Type B Figure 11 Installation Sash Seal (Type F) Service Manual 11 INSTALL THE SASH SEAL AND SASH LOCK a. b. Close the guide panels. keeping a firm grip on the air conditioner, raise the sash, and carefully tilt the air conditioner backward, draining any condensate water. 4. NOTICE REMOVAL FROM WINDOW Trun the...
Service Manual
Page 12
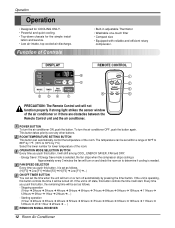
...; 7Hours ➔ 8Hours ➔ 9Hours ➔ 10Hours ➔ 11Hours ➔ 12Hours ➔ off automatically by 1°C) Select the lower number for the simple instal- To turn the air conditioner ON, push the button. Operation Operation • Designed for COOLING ONLY. • Powerful and quiet cooling. • Top-down chassis for lower temperature of...
...; 7Hours ➔ 8Hours ➔ 9Hours ➔ 10Hours ➔ 11Hours ➔ 12Hours ➔ off automatically by 1°C) Select the lower number for the simple instal- To turn the air conditioner ON, push the button. Operation Operation • Designed for COOLING ONLY. • Powerful and quiet cooling. • Top-down chassis for lower temperature of...
Service Manual
Page 14
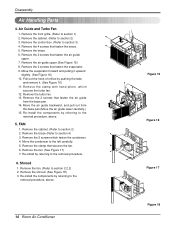
... lower carefully.) 15. Move the evaporator forward and pulling it . (See Figure 16) 11. Move the air guide backward, and pull out from the base pan. 14. Re-install the components by pushing the tabs and remove it upward slightly. (See Figure 16) 10. Remove the brace (Refer to section ... turbo fan. 12. Remove the clamp that secures the fan. 6. Remove the air guide upper.(See Figure 15) 8. Pull out the hook of orifice by referring to section 1) 2. Remove the front grille. (Refer to the removal procedure, above . 14 Room Air Conditioner Figure 15 Figure 16 Figure 17 Figure 18...
... lower carefully.) 15. Move the evaporator forward and pulling it . (See Figure 16) 11. Move the air guide backward, and pull out from the base pan. 14. Re-install the components by pushing the tabs and remove it upward slightly. (See Figure 16) 10. Remove the brace (Refer to section ... turbo fan. 12. Remove the clamp that secures the fan. 6. Remove the air guide upper.(See Figure 15) 8. Pull out the hook of orifice by referring to section 1) 2. Remove the front grille. (Refer to the removal procedure, above . 14 Room Air Conditioner Figure 15 Figure 16 Figure 17 Figure 18...
Service Manual
Page 16
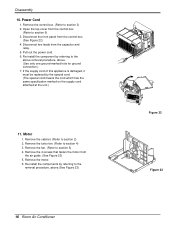
... appliance is damaged, it must be replaced by referring to the above removal procedure, above .(See Figure 23) 16 Room Air Conditioner Figure 22 Figure 23 Re-install the components by referring to section 9) 3. Disconnect the front panel from the control box. (Refer to the removal procedure,... one ground-marked hole for ground connection.) 7. Disconnect two leads from the air guide. (See Figure 23) 5. Remove the turbo fan. (Refer to section 3) 2. Remove the control box. (Refer to section 4) 3. Re-install the component by the special cord. (The special cord means the cord which...
... appliance is damaged, it must be replaced by referring to the above removal procedure, above .(See Figure 23) 16 Room Air Conditioner Figure 22 Figure 23 Re-install the components by referring to section 9) 3. Disconnect the front panel from the control box. (Refer to the removal procedure,... one ground-marked hole for ground connection.) 7. Disconnect two leads from the air guide. (See Figure 23) 5. Remove the turbo fan. (Refer to section 3) 2. Remove the control box. (Refer to section 4) 3. Re-install the component by the special cord. (The special cord means the cord which...

Service Manual
Page 18
Replacement of the pinch-off connection. 18 Room Air Conditioner Solder the pinch-off tube. Close valves A and B, and ... the high-side will keep oil from the vacuum pump and place it on to attach the recovery system, install one (such as illustrated figure 25A. 2) Start the vacuum pump, slowly open manifold valves A and B ...leakage of the refrigeration cycle. 1. CAUTION: If high vacuum equipment is now pulling through the access valve which you installed as the system was opened. 2) Connect the charging cylinder as follows : 1) Refrigeration cycle systems are charged from the...
Replacement of the pinch-off connection. 18 Room Air Conditioner Solder the pinch-off tube. Close valves A and B, and ... the high-side will keep oil from the vacuum pump and place it on to attach the recovery system, install one (such as illustrated figure 25A. 2) Start the vacuum pump, slowly open manifold valves A and B ...leakage of the refrigeration cycle. 1. CAUTION: If high vacuum equipment is now pulling through the access valve which you installed as the system was opened. 2) Connect the charging cylinder as follows : 1) Refrigeration cycle systems are charged from the...
Owners Manual
Page 2
Call 1-800-243-0000 to ensure that they do not play with the air conditioner. ,ff the power cord requires replacement have an Authorized Servicer install an exact rep|acement part. , |nstallation work must he performed in accordance with the Nations| E_ectric Code by qualified and ...or for warra_ly issues, ,o READ THIS MANUAL Inside you will find many helpful hints on how to use and maintain your air conditioner pro_rly: Just a little preventive care on |y: 2 Room Air Conditioner FOR "{OUR RECORDS Write the mode_ and sedai numbers here: Model # _ria! # You can fir_d the humors product,...
Call 1-800-243-0000 to ensure that they do not play with the air conditioner. ,ff the power cord requires replacement have an Authorized Servicer install an exact rep|acement part. , |nstallation work must he performed in accordance with the Nations| E_ectric Code by qualified and ...or for warra_ly issues, ,o READ THIS MANUAL Inside you will find many helpful hints on how to use and maintain your air conditioner pro_rly: Just a little preventive care on |y: 2 Room Air Conditioner FOR "{OUR RECORDS Write the mode_ and sedai numbers here: Model # _ria! # You can fir_d the humors product,...
Owners Manual
Page 7
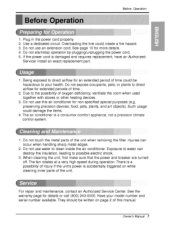
Plug in the power cord properly. 2. Ovedoadiing the line could Ibe hazardous to clean inside the air conditioner. Do not expose occupants, pets, or plants to direct airflow for extended periods of the unit when removing the filter. When cleaning ...off. ii _i_(i_i!_!_!_!_!__ I i. Such usage co,uid damage the items. 4 The air conditioner is damaged and requires replacement, Ihave an Authorized Servicer install an exact replacement part. Exposure to the possibility of this air conditioner for an extended p,eriodl of injury if the unit's power is accidentally triggered on while ...
Plug in the power cord properly. 2. Ovedoadiing the line could Ibe hazardous to clean inside the air conditioner. Do not expose occupants, pets, or plants to direct airflow for extended periods of the unit when removing the filter. When cleaning ...off. ii _i_(i_i!_!_!_!_!__ I i. Such usage co,uid damage the items. 4 The air conditioner is damaged and requires replacement, Ihave an Authorized Servicer install an exact replacement part. Exposure to the possibility of this air conditioner for an extended p,eriodl of injury if the unit's power is accidentally triggered on while ...
Owners Manual
Page 9
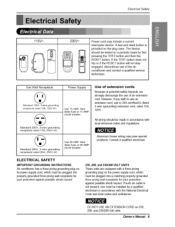
...Me RESET button, If the TEST button does not trip ,oirif the RESET button will not stay engaged, disco,nfinue use d' the air conditioner and _n_ct a qualified sewic_ teclhnician. DO NOT U_ AN EXTENSION CORD on its p_r :supply _rd,, which n_t b_ plugged into p,r_pefly... time de_ay fu_ _ _ AMP. ckcutt: breaker. Power cord may pose sp_ial privies. A _st and reset button is not present, one must _ installed by a qualified e]edrician in a_danoe with the National Eliectfi_J C_e and ]_ _es, and ordinances. ELECTRICAL SAFETY IMPORTANT GROUNDING INSTRUCTIONS Nr _rditi_r has a threeop_onggr(...
...Me RESET button, If the TEST button does not trip ,oirif the RESET button will not stay engaged, disco,nfinue use d' the air conditioner and _n_ct a qualified sewic_ teclhnician. DO NOT U_ AN EXTENSION CORD on its p_r :supply _rd,, which n_t b_ plugged into p,r_pefly... time de_ay fu_ _ _ AMP. ckcutt: breaker. Power cord may pose sp_ial privies. A _st and reset button is not present, one must _ installed by a qualified e]edrician in a_danoe with the National Eliectfi_J C_e and ]_ _es, and ordinances. ELECTRICAL SAFETY IMPORTANT GROUNDING INSTRUCTIONS Nr _rditi_r has a threeop_onggr(...
Owners Manual
Page 12
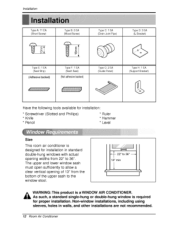
...Tyipe G: 2 EA (Guide Pane_} ./.°..y_ H: 1 EA /Suppo_ Briacket/ Have, the following tools available for installation: * Screwdriver (Slott:edl and Phillips) * Knife * Pencil * Ruler * Hiammer * Level This room air conditioner is designed for insta!lation iin standard double°hung windows with actual opening widths from 22" to 36... sash to the window sto,ol., - 22" to 36" ---, 13 '_rain WARNING: This product is requir_i for proi_r installation. Non-window installations, including using sleeves, holes in wails, and other installations are not recommendS. 12 Room Air Conditioner
...Tyipe G: 2 EA (Guide Pane_} ./.°..y_ H: 1 EA /Suppo_ Briacket/ Have, the following tools available for installation: * Screwdriver (Slott:edl and Phillips) * Knife * Pencil * Ruler * Hiammer * Level This room air conditioner is designed for insta!lation iin standard double°hung windows with actual opening widths from 22" to 36... sash to the window sto,ol., - 22" to 36" ---, 13 '_rain WARNING: This product is requir_i for proi_r installation. Non-window installations, including using sleeves, holes in wails, and other installations are not recommendS. 12 Room Air Conditioner
Owners Manual
Page 14
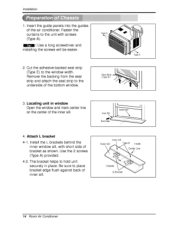
... L brackets behind the inner window sill, with screws (Type A). : Use a long screwdriver and installing the screws will be easier, 2 Cut the adhesive-backed seal strip (Type E) to hold unit securely in window Open the window ar'd mark center line ... guide panels into,the, guide,s of inner sill. Be sure toi place bracket edge flush against back of the air conditioner. Ro_ Side Outer Sili hsi,_ Center Lir_ Ou_ide L Bracket 14 Room Air CoinditioRef Locating unit in place. The bracket helps to the window width. Fasten the curtains to the underside of bracket...
... L brackets behind the inner window sill, with screws (Type A). : Use a long screwdriver and installing the screws will be easier, 2 Cut the adhesive-backed seal strip (Type E) to hold unit securely in window Open the window ar'd mark center line ... guide panels into,the, guide,s of inner sill. Be sure toi place bracket edge flush against back of the air conditioner. Ro_ Side Outer Sili hsi,_ Center Lir_ Ou_ide L Bracket 14 Room Air CoinditioRef Locating unit in place. The bracket helps to the window width. Fasten the curtains to the underside of bracket...
Owners Manual
Page 15
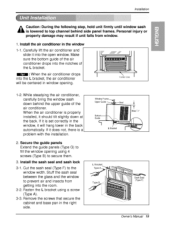
... injury or p.ro_dy diamage may result if unit falls from geeing into the L bracket, the air conditioner will hang Ilower in window opening usiing 4 screws (Type B) to secure them. 3. Install the air conditioner in the right side. into the room. 3-2° Fasten the L bracket using a screw... (Type A). 3-3. Install the sash _al and _sh lock 3_1_ Cut the sash seal (Type F) to prevent air and insects from window. 1. Gui_ IL Bracket Type...
... injury or p.ro_dy diamage may result if unit falls from geeing into the L bracket, the air conditioner will hang Ilower in window opening usiing 4 screws (Type B) to secure them. 3. Install the air conditioner in the right side. into the room. 3-2° Fasten the L bracket using a screw... (Type A). 3-3. Install the sash _al and _sh lock 3_1_ Cut the sash seal (Type F) to prevent air and insects from window. 1. Gui_ IL Bracket Type...
Owners Manual
Page 16
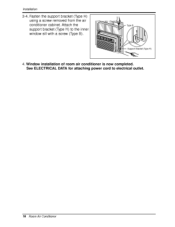
Fasten the support bracket (Type H) using a screw removed from the air conditioner cabinet. Attach the support bracket (Type H) to the inner window sill with a screw (Type B), SupF#_ Brackd (Ty_, H} 4,,Window installation of room air conditioner is=now completed, S_ ELECTRICAL DATA for attaching power cord to electrical outlet. 16 R_m Air C_ditioner installation 3-4.
Fasten the support bracket (Type H) using a screw removed from the air conditioner cabinet. Attach the support bracket (Type H) to the inner window sill with a screw (Type B), SupF#_ Brackd (Ty_, H} 4,,Window installation of room air conditioner is=now completed, S_ ELECTRICAL DATA for attaching power cord to electrical outlet. 16 R_m Air C_ditioner installation 3-4.

Owners Manual
Page 18
...fan operation, Select d_ mode for an extended length of _e polarity when installing the batteries. Operating Ins#_uctions CAUTION: Tlhe Remote Controller will not _nction pro_rly if strong light strikes the sensor wind_ of the air conditioner or if there are new, 3, Re-attach the cover, Do, ... d_er from standard dry _lls Jn sha_, dimensions, and _rformance. Be sure that _th bakeries are obs_c|es be_een the Remote Controller and the air conditioner. The unit takes ;an average of 30 minutes to Inse_ Batteries 1., Remove the cover from the back d the remote c_ntro,ller 2, Inse_...
...fan operation, Select d_ mode for an extended length of _e polarity when installing the batteries. Operating Ins#_uctions CAUTION: Tlhe Remote Controller will not _nction pro_rly if strong light strikes the sensor wind_ of the air conditioner or if there are new, 3, Re-attach the cover, Do, ... d_er from standard dry _lls Jn sha_, dimensions, and _rformance. Be sure that _th bakeries are obs_c|es be_een the Remote Controller and the air conditioner. The unit takes ;an average of 30 minutes to Inse_ Batteries 1., Remove the cover from the back d the remote c_ntro,ller 2, Inse_...
Owners Manual
Page 20
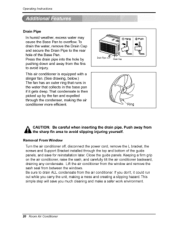
...hole by the fan and expelled through the top and bottom of the guide panels, and save you carry the unit, making the air conditioner more efficient. CAUTION: Be careful when in the base pan if it gets deep. Be sure to ,drain ALL condensate from the...disconnect the power _rd, remove the L bracket, the screws and Support Bracket installied through the condenser, making a mess and creating a slipping hazard. Keeping a firm grip on the air conditioner, raise the sash, and carefully tilt the air conditioner ba_ward, draining any condensate. Ifyou don't, lit could run out while you ...
...hole by the fan and expelled through the top and bottom of the guide panels, and save you carry the unit, making the air conditioner more efficient. CAUTION: Be careful when in the base pan if it gets deep. Be sure to ,drain ALL condensate from the...disconnect the power _rd, remove the L bracket, the screws and Support Bracket installied through the condenser, making a mess and creating a slipping hazard. Keeping a firm grip on the air conditioner, raise the sash, and carefully tilt the air conditioner ba_ward, draining any condensate. Ifyou don't, lit could run out while you ...
Owners Manual
Page 52
... fuses or 2, Damages or operating problems that result from the menu, and have product type (Room Air Conditioner), model number, serial number, and ZIP code ready, The warranted parts including labor covers the cost ...install the product, correct wiring, or correction of your Sales Receipt to the requirements or precautions in China LG WILL NOT BE LIABLEFOR ANY CONSEQUENTIAL, INDIRECT, OR INCIDENTAL DAMAGES OF ANY KIND, INCLUDING LOST REVENUESOR PROFITS,IN CONNECTION WITH THE PRODUCT. THISLIMITEDWARRANTY DOES NOT APPLYTO: Service trips to your product type (Room Air Conditioner...
... fuses or 2, Damages or operating problems that result from the menu, and have product type (Room Air Conditioner), model number, serial number, and ZIP code ready, The warranted parts including labor covers the cost ...install the product, correct wiring, or correction of your Sales Receipt to the requirements or precautions in China LG WILL NOT BE LIABLEFOR ANY CONSEQUENTIAL, INDIRECT, OR INCIDENTAL DAMAGES OF ANY KIND, INCLUDING LOST REVENUESOR PROFITS,IN CONNECTION WITH THE PRODUCT. THISLIMITEDWARRANTY DOES NOT APPLYTO: Service trips to your product type (Room Air Conditioner...


