Owners Manual
Page 2
... under license from that to which can radiate radio frequency energy and, if not installed and used in a confined space such as a bookcase or similar unit. REFER TO QUALIFIED SERVICE PERSONNEL. Reverse engineering or disassembly is protected by Macrovision. NO USER SERVICEABLE PARTS INSIDE. NOTE TO CABLE/TV INSTALLER This reminder is connected. • Consult the dealer or an experienced...
... under license from that to which can radiate radio frequency energy and, if not installed and used in a confined space such as a bookcase or similar unit. REFER TO QUALIFIED SERVICE PERSONNEL. Reverse engineering or disassembly is protected by Macrovision. NO USER SERVICEABLE PARTS INSIDE. NOTE TO CABLE/TV INSTALLER This reminder is connected. • Consult the dealer or an experienced...
Owners Manual
Page 4
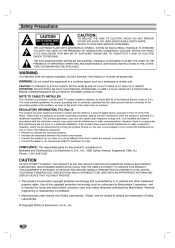
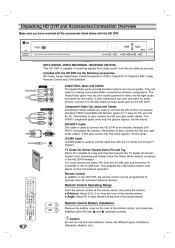
... HD DVR and all external video and audio equipment. Turn HD DVR on. See pages 26 and 29. 13. As a result, some DTV channels may not be found by source. Connect your area. Install batteries in this unit. Plug TV/Monitor and source equipment into power outlets. See page 54. See page 28. 10. Fine-tune source image and sound to antenna and...
... HD DVR and all external video and audio equipment. Turn HD DVR on. See pages 26 and 29. 13. As a result, some DTV channels may not be found by source. Connect your area. Install batteries in this unit. Plug TV/Monitor and source equipment into power outlets. See page 54. See page 28. 10. Fine-tune source image and sound to antenna and...

Owners Manual
Page 5
... DVR Menu Operation ...43-45 TV Guide On Screen™ System ...43 Program List ...44 HDD Format ...45 Recording Quality ...45 Information Displays ...46 Channel Banner Display...46 Program Information Display ...46 Recording Setup Operation ...47 Manual Recording ...47 Playback Operation ...48 Timeshift (Pause, Live TV/Playback) Setup and Operation ...49 Bookmarking ...49 Clip Edit ...50 Clip Record ...50 Smart Skip (+/-), Video Synopsis, Drag & Play...51 IEEE-1394 Devices ...52-53 List of Devices ...52 Control Panel ...52 Record contents from DVHS to the HD DVR's HDD (Hard Disk Drive...
... DVR Menu Operation ...43-45 TV Guide On Screen™ System ...43 Program List ...44 HDD Format ...45 Recording Quality ...45 Information Displays ...46 Channel Banner Display...46 Program Information Display ...46 Recording Setup Operation ...47 Manual Recording ...47 Playback Operation ...48 Timeshift (Pause, Live TV/Playback) Setup and Operation ...49 Bookmarking ...49 Clip Edit ...50 Clip Record ...50 Smart Skip (+/-), Video Synopsis, Drag & Play...51 IEEE-1394 Devices ...52-53 List of Devices ...52 Control Panel ...52 Record contents from DVHS to the HD DVR's HDD (Hard Disk Drive...

Owners Manual
Page 6
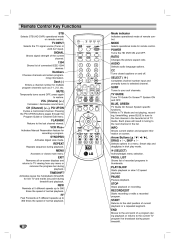
... access it. To remove the banner, press the button again. Remote Control Sensor Receives signals from any menu. 6 GUIDE Shows station and program information on and off. Use the arrow buttons to move to a menu option and then use the SELECT button to normal viewing by pressing the EXIT button. Power Turns the HD DVR on the screen. SELECT If the main menu is displayed, the 1 / 2 buttons control the volume setting and the 3 / 4 buttons select channels. Display Window DISPLAY FORMAT Sets the output...
... access it. To remove the banner, press the button again. Remote Control Sensor Receives signals from any menu. 6 GUIDE Shows station and program information on and off. Use the arrow buttons to move to a menu option and then use the SELECT button to normal viewing by pressing the EXIT button. Power Turns the HD DVR on the screen. SELECT If the main menu is displayed, the 1 / 2 buttons control the volume setting and the 3 / 4 buttons select channels. Display Window DISPLAY FORMAT Sets the output...
Owners Manual
Page 7
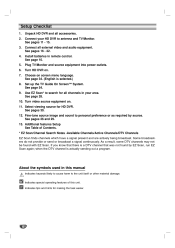
...-1394 devices are connected. 1080i 720p 480p 480i DVI RGB YP B P R Video 1394 Cable AM PM HDD Hard Disk Indicator Indicates hard disk space used . Time Shift Indicator Lights when the unit is used . Disk Full Indicator Lights when all the disk space is timeshifting. Play Indicator Lights during playback. Cable/Air Indicator Lights when the HD DVR is programmed. Reserved REC Indicator Lights when the unit is in timer recording or a timer recording is tuned to a cable channel. Display Window...
...-1394 devices are connected. 1080i 720p 480p 480i DVI RGB YP B P R Video 1394 Cable AM PM HDD Hard Disk Indicator Indicates hard disk space used . Time Shift Indicator Lights when the unit is used . Disk Full Indicator Lights when all the disk space is timeshifting. Play Indicator Lights during playback. Cable/Air Indicator Lights when the HD DVR is programmed. Reserved REC Indicator Lights when the unit is in timer recording or a timer recording is tuned to a cable channel. Display Window...
Owners Manual
Page 8
... playback. MUTE Temporarily turns sound OFF, press again to 300 times the speed of normal playback. RATIO Changes the picture aspect ratio. 1394 Shows list of the current channel. Numbers Chooses channels and enters programming information. Mode indicator Indicates operational mode of remote control. Arrow Buttons (3 / 4 / 1 / 2), DRAG + / -, SKIP + / Selects options in thumbnails. PAUSE Pauses playback. VCR Plus+ Activates Manual Reservation feature for remote control. MODE Selects operational mode for recording a program. PROG. BLUE, GREEN TV Guide On Screen...
... playback. MUTE Temporarily turns sound OFF, press again to 300 times the speed of normal playback. RATIO Changes the picture aspect ratio. 1394 Shows list of the current channel. Numbers Chooses channels and enters programming information. Mode indicator Indicates operational mode of remote control. Arrow Buttons (3 / 4 / 1 / 2), DRAG + / -, SKIP + / Selects options in thumbnails. PAUSE Pauses playback. VCR Plus+ Activates Manual Reservation feature for remote control. MODE Selects operational mode for recording a program. PROG. BLUE, GREEN TV Guide On Screen...
Owners Manual
Page 9
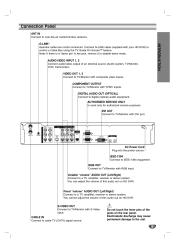
... DVR. COMPONENT OUTPUT Connect to control a Cable Box using the TV Guide On Screen™ feature. DIGITAL AUDIO OUT (OPTICAL) Connect to disable demo mode. AUTHORIZED SERVICE ONLY Is used only for authorized service purposes. CABLE IN Connect to a TV, amplifier, receiver or stereo system. DVI OUT Connect to TV/Monitor with your HD DVR) to TV/Monitor with composite video inputs. INTRODUCTION AC Power Cord Plug into the power source. Variable "volume" AUDIO OUT (Left/Right) Connect...
... DVR. COMPONENT OUTPUT Connect to control a Cable Box using the TV Guide On Screen™ feature. DIGITAL AUDIO OUT (OPTICAL) Connect to disable demo mode. AUTHORIZED SERVICE ONLY Is used only for authorized service purposes. CABLE IN Connect to a TV, amplifier, receiver or stereo system. DVI OUT Connect to TV/Monitor with your HD DVR) to TV/Monitor with composite video inputs. INTRODUCTION AC Power Cord Plug into the power source. Variable "volume" AUDIO OUT (Left/Right) Connect...
Owners Manual
Page 10
... red for audio (mono), connect it to operate other IR controlled external devices. Remote Control Operating Range Point the remote control at the remote sensor and press the buttons. Never mix different types of the remote sensor. RF Cable, Audio Cable/Video Cable/Component (YPbPr) Cable/DVI-D Cable/G-LINK® Cable Remote Control and 2 AA Batteries Audio/Video Jacks and Cables The Audio/Video jacks provide excellent picture and sound quality. Component Video Out Jacks and Cables Component Video Cables are used to connect the HD DVR to an...
... red for audio (mono), connect it to operate other IR controlled external devices. Remote Control Operating Range Point the remote control at the remote sensor and press the buttons. Never mix different types of the remote sensor. RF Cable, Audio Cable/Video Cable/Component (YPbPr) Cable/DVI-D Cable/G-LINK® Cable Remote Control and 2 AA Batteries Audio/Video Jacks and Cables The Audio/Video jacks provide excellent picture and sound quality. Component Video Out Jacks and Cables Component Video Cables are used to connect the HD DVR to an...
Owners Manual
Page 12
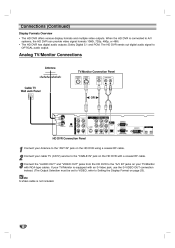
.../Monitor Connections Antenna TV/Monitor Connection Panel ANTENNA INPUT S-VIDEO INPUT VIDEO INPUT AUDIO INPUT L R Cable TV Wall Jack Panel OR HD DVR Connection Panel 1 Connect your Antenna to the "ANT IN" jack on the HD DVR with an S-Video jack, use the S-VIDEO OUT connection instead. (The Output Selection must be set to VIDEO, refer to A/V systems, the HD DVR can provide video signal formats 1080i, 720p, 480p, or 480i. • The HD DVR has digital audio outputs; Dolby Digital 5.1 and PCM. ote S-Video cable is...
.../Monitor Connections Antenna TV/Monitor Connection Panel ANTENNA INPUT S-VIDEO INPUT VIDEO INPUT AUDIO INPUT L R Cable TV Wall Jack Panel OR HD DVR Connection Panel 1 Connect your Antenna to the "ANT IN" jack on the HD DVR with an S-Video jack, use the S-VIDEO OUT connection instead. (The Output Selection must be set to VIDEO, refer to A/V systems, the HD DVR can provide video signal formats 1080i, 720p, 480p, or 480i. • The HD DVR has digital audio outputs; Dolby Digital 5.1 and PCM. ote S-Video cable is...
Owners Manual
Page 13
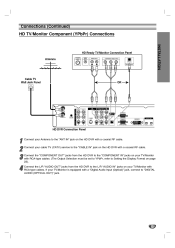
... Setting the Display Format on your TV/Monitor with 4 Connect RCA-type cables. If your TV/Monitor is equipped with a coaxial RF cable. the "COMPONENT OUT" jacks from the HD DVR to the L/R "AUDIO IN" jacks on page 23). Connections (Continued) HD TV/Monitor Component (YPbPr) Connections INSTALLATION HD Ready TV/Monitor Connection Panel Antenna ANTENNA INPUT VIDEO INPUT AUDIO INPUT COMPONENT VIDEO INPUT OPTICAL R L Y Pb Pr DIGITAL INPUT Cable TV Wall Jack Panel OR HD DVR Connection Panel 1 Connect...
... Setting the Display Format on your TV/Monitor with 4 Connect RCA-type cables. If your TV/Monitor is equipped with a coaxial RF cable. the "COMPONENT OUT" jacks from the HD DVR to the L/R "AUDIO IN" jacks on page 23). Connections (Continued) HD TV/Monitor Component (YPbPr) Connections INSTALLATION HD Ready TV/Monitor Connection Panel Antenna ANTENNA INPUT VIDEO INPUT AUDIO INPUT COMPONENT VIDEO INPUT OPTICAL R L Y Pb Pr DIGITAL INPUT Cable TV Wall Jack Panel OR HD DVR Connection Panel 1 Connect...

Owners Manual
Page 15
... Connect nector. (The Output Selection must be set to DVI, refer to Setting the Display Format on page 23.) the L/R "AUDIO OUT" jacks from the HD DVR to the L/R "AUDIO IN" jacks on your TV or monitor's user manual to the "CABLE IN" jack on the HD DVR with a coaxial RF cable. 2 Connect your cable TV (CATV) service to find out if the TV or monitor's DVI input...
... Connect nector. (The Output Selection must be set to DVI, refer to Setting the Display Format on page 23.) the L/R "AUDIO OUT" jacks from the HD DVR to the L/R "AUDIO IN" jacks on your TV or monitor's user manual to the "CABLE IN" jack on the HD DVR with a coaxial RF cable. 2 Connect your cable TV (CATV) service to find out if the TV or monitor's DVI input...

Owners Manual
Page 16
... an "S-Video" cable instead.) Cautions • To record the HD DVR's contents to VCR, the Output Selection must be set to the "A/V in" jacks on screen display onto the tape during recording if: the channel is changed with CH (+/-) the sound level is equipped with an S-Video jack, you can use the "S-VIDEO" connection with VOL (+/-) or by pressing the SELECT button, etc. 16 Connections (Continued) VCR Connections VCR Connection Panel AUDIO INPUT VIDEO INPUT R L HD DVR Connection Panel Connect the L/R "AUDIO OUT...
... an "S-Video" cable instead.) Cautions • To record the HD DVR's contents to VCR, the Output Selection must be set to the "A/V in" jacks on screen display onto the tape during recording if: the channel is changed with CH (+/-) the sound level is equipped with an S-Video jack, you can use the "S-VIDEO" connection with VOL (+/-) or by pressing the SELECT button, etc. 16 Connections (Continued) VCR Connections VCR Connection Panel AUDIO INPUT VIDEO INPUT R L HD DVR Connection Panel Connect the L/R "AUDIO OUT...
Owners Manual
Page 17
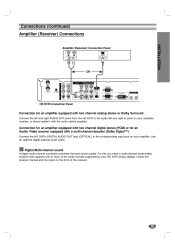
...For this you need a multi-channel Audio/Video receiver that supports one or more of the receiver. 17 Connections (Continued) Amplifier (Receiver) Connections INSTALLATION Amplifier (Receiver) Connection Panel R L OPTICAL DIGITAL INPUT AUDIO INPUT OR HD DVR Connection Panel Connection for an Audio/ Video receiver equipped with a multi-channel decoder (Dolby Digital™) Connect the HD DVR's DIGITAL AUDIO OUT jack (OPTICAL) to the corresponding input jack on the front of the audio formats supported by your amplifier, receiver, or stereo system, with two channel analog stereo or...
...For this you need a multi-channel Audio/Video receiver that supports one or more of the receiver. 17 Connections (Continued) Amplifier (Receiver) Connections INSTALLATION Amplifier (Receiver) Connection Panel R L OPTICAL DIGITAL INPUT AUDIO INPUT OR HD DVR Connection Panel Connection for an Audio/ Video receiver equipped with a multi-channel decoder (Dolby Digital™) Connect the HD DVR's DIGITAL AUDIO OUT jack (OPTICAL) to the corresponding input jack on the front of the audio formats supported by your amplifier, receiver, or stereo system, with two channel analog stereo or...

Owners Manual
Page 19
...G-LINK jack. Cable TV Wall Jack Panel Cable Box Connection Panel CABLE INPUT LOOP OUT VIDEO OUTPUT AUDIO OUTPUT INSTALLATION Antenna L R HD DVR Connection Panel Cable Box Controller Cable Box (front view) IR Sensor Cable Box (side view) 1/2" to 1" 1 Connect your cable TV (CATV) service to the "CABLE IN" jack on the HD DVR Use your Cable Box in the jack, remove it to the 4 You "CABLE IN" jack on the HD DVR. can watch unscrambled digital cable broadcasting if you connect your Antenna to control your Cable Box to watch cable programming. • Select "Digital" menu...
...G-LINK jack. Cable TV Wall Jack Panel Cable Box Connection Panel CABLE INPUT LOOP OUT VIDEO OUTPUT AUDIO OUTPUT INSTALLATION Antenna L R HD DVR Connection Panel Cable Box Controller Cable Box (front view) IR Sensor Cable Box (side view) 1/2" to 1" 1 Connect your cable TV (CATV) service to the "CABLE IN" jack on the HD DVR Use your Cable Box in the jack, remove it to the 4 You "CABLE IN" jack on the HD DVR. can watch unscrambled digital cable broadcasting if you connect your Antenna to control your Cable Box to watch cable programming. • Select "Digital" menu...
Owners Manual
Page 23
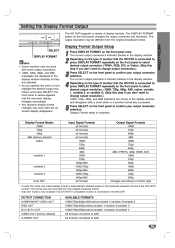
... to change output connection.) SELECT on the front panel to monitor type * In Auto DVI mode, the output display format is complete. The format may be converted from the original broadcast format. INSTALLATION Display Format Output Setup SELECT DISPLAY FORMAT otes • Some monitors may not work after a short while or if another format key is connected to 480i 23 OUTPUT CONNECTION COMPONENT VIDEO OUT RGB OUT DVI-HDTV OUT VIDEO OUT (factory default) S-VIDEO OUT AVAILABLE FORMATS...
... to change output connection.) SELECT on the front panel to monitor type * In Auto DVI mode, the output display format is complete. The format may be converted from the original broadcast format. INSTALLATION Display Format Output Setup SELECT DISPLAY FORMAT otes • Some monitors may not work after a short while or if another format key is connected to 480i 23 OUTPUT CONNECTION COMPONENT VIDEO OUT RGB OUT DVI-HDTV OUT VIDEO OUT (factory default) S-VIDEO OUT AVAILABLE FORMATS...
Owners Manual
Page 24
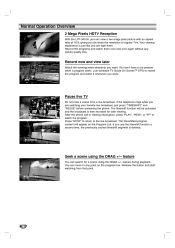
... a second time, the previously cached timeshift segment is deleted. Just schedule TV Guide On Screen™ EPG to any picture quality loss. If the telephone rings while you want . The timeshifted program content will be present when a program starts. feature during playback. Your viewing experience is then recorded for a scene using the DRAG +/- You don't have to the live broadcast. The...
... a second time, the previously cached timeshift segment is deleted. Just schedule TV Guide On Screen™ EPG to any picture quality loss. If the telephone rings while you want . The timeshifted program content will be present when a program starts. feature during playback. Your viewing experience is then recorded for a scene using the DRAG +/- You don't have to the live broadcast. The...

Owners Manual
Page 25
... your remote control. Connect the HD DVR to the next/previous scene. Normal Operation Overview (Continued) Smart Skip During playback, use SKIP (+/-) to skip to a DVHS recorder using the "IEEE-1394" Port 1 or 2 jacks. Select "DVHS OUT" on the HDD (Hard Disk Drive), then start DVHS or MV Camcorder playback. 25 Connect the HD DVR to the connected DVHS recorder. OPERATION Save your recordings to DVHS (Digital VHS) You can also record contents...
... your remote control. Connect the HD DVR to the next/previous scene. Normal Operation Overview (Continued) Smart Skip During playback, use SKIP (+/-) to skip to a DVHS recorder using the "IEEE-1394" Port 1 or 2 jacks. Select "DVHS OUT" on the HDD (Hard Disk Drive), then start DVHS or MV Camcorder playback. 25 Connect the HD DVR to the connected DVHS recorder. OPERATION Save your recordings to DVHS (Digital VHS) You can also record contents...
Owners Manual
Page 66
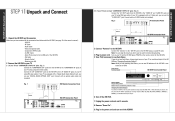
... resolution/output of your TV using a coaxial RF cable. Plug in the G-LINK port of the owner's manual.) - Connect with the HD DVR. (see HD television if the HD DVR is equipped with an optical audio cable (not included). G-LINK® Cable - If your TV using RCA-type cables. Turn off the HD DVR. 7. Unplug the power cord and wait 5 seconds. 8. If your TV using component video cables. HD DVR - RF Cable - Remote Control - Plug in power cord 5. Connect with a "Digital Audio Input...
... resolution/output of your TV using a coaxial RF cable. Plug in the G-LINK port of the owner's manual.) - Connect with the HD DVR. (see HD television if the HD DVR is equipped with an optical audio cable (not included). G-LINK® Cable - If your TV using RCA-type cables. Turn off the HD DVR. 7. Unplug the power cord and wait 5 seconds. 8. If your TV using component video cables. HD DVR - RF Cable - Remote Control - Plug in power cord 5. Connect with a "Digital Audio Input...
Owners Manual
Page 67
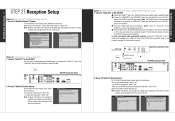
... your Cable Box to collect program data overnight while the unit is turned off . 2. "What is your cable box brand from the cable box (if available) to disable demo mode.) Place the other end of the Cable Box. "Is a cable box connected?" Antenna Remote Control Sensor HD DVR Connection Panel Antenna HD DVR Connection Panel Cable TV Wall Jack Panel 2. "Is a cable box connected?" select "A/V1". Set up TV Guide On Screen System For TV Guide On Screen System setup, follow the instructions: "Do you have cable service?", select...
... your Cable Box to collect program data overnight while the unit is turned off . 2. "What is your cable box brand from the cable box (if available) to disable demo mode.) Place the other end of the Cable Box. "Is a cable box connected?" Antenna Remote Control Sensor HD DVR Connection Panel Antenna HD DVR Connection Panel Cable TV Wall Jack Panel 2. "Is a cable box connected?" select "A/V1". Set up TV Guide On Screen System For TV Guide On Screen System setup, follow the instructions: "Do you have cable service?", select...
Owners Manual
Page 68
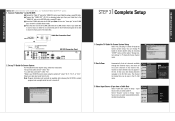
... G-LINK port (Note: If there is your Cable Box to collect program data overnight while the unit is turned off. Cable Box Connection Panel Cable TV Wall Jack Panel STEP 3 Complete Setup HD DVR Quick Setup Guide _ 7 Cable Box Front Panel Antenna Remote Control Sensor 1. Complete TV Guide On Screen System Setup HD DVR Connection Panel Select "Yes, end setup" to reach the front panel of the G-LINK cable with Cable Box, no "AUDIO/VIDEO OUTPUT" jacks HD DVR Quick Setup Guide _ 6 1. Set up TV Guide On Screen System For TV Guide On Screen System setup, follow the instructions: "Do...
... G-LINK port (Note: If there is your Cable Box to collect program data overnight while the unit is turned off. Cable Box Connection Panel Cable TV Wall Jack Panel STEP 3 Complete Setup HD DVR Quick Setup Guide _ 7 Cable Box Front Panel Antenna Remote Control Sensor 1. Complete TV Guide On Screen System Setup HD DVR Connection Panel Select "Yes, end setup" to reach the front panel of the G-LINK cable with Cable Box, no "AUDIO/VIDEO OUTPUT" jacks HD DVR Quick Setup Guide _ 6 1. Set up TV Guide On Screen System For TV Guide On Screen System setup, follow the instructions: "Do...
