
Owner's Manual
Page 3
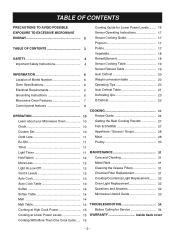
... Power Levels........ 16 EXPOSURE TO EXCESSIVE MICROWAVE Sensor Operating Instructions 17 ENERGY 2 Sensor Cooking Guide 17 Popcorn 17 TABLE OF CONTENTS 3 Potato 17 Vegetable 18 SAFETY 4 Reheat(Sensor 18 Important Safety Instructions 4 Sensor Cooking Table 19 Sensor Reheat Table 19 INFORMATION 6 Auto Defrost 20 Location of Model Number 6 Weight conversion table 20 Oven Specifications 6 Operating Tips 20 Electrical Requirements 6 Auto Defrost Table 21 Grounding Instructions 6 Defrosting tips 23 Microwave Oven Features 7 Q Defrost 23 Control panel...
... Power Levels........ 16 EXPOSURE TO EXCESSIVE MICROWAVE Sensor Operating Instructions 17 ENERGY 2 Sensor Cooking Guide 17 Popcorn 17 TABLE OF CONTENTS 3 Potato 17 Vegetable 18 SAFETY 4 Reheat(Sensor 18 Important Safety Instructions 4 Sensor Cooking Table 19 Sensor Reheat Table 19 INFORMATION 6 Auto Defrost 20 Location of Model Number 6 Weight conversion table 20 Oven Specifications 6 Operating Tips 20 Electrical Requirements 6 Auto Defrost Table 21 Grounding Instructions 6 Defrosting tips 23 Microwave Oven Features 7 Q Defrost 23 Control panel...
Owner's Manual
Page 4
... cause the oven to turn the fan on the hood or the filters. • Use care when cleaning the vent hood filters. Do not severely overcook food. Do not store combustible items (bread, cookies, etc.) in the oven, because if lightning strikes the power lines it may damage the filters. • Do not tamper with the built-in the oven. - Severely overcooked foods can start : - See the electrical GROUNDING INSTRUCTIONS on...
... cause the oven to turn the fan on the hood or the filters. • Use care when cleaning the vent hood filters. Do not severely overcook food. Do not store combustible items (bread, cookies, etc.) in the oven, because if lightning strikes the power lines it may damage the filters. • Do not tamper with the built-in the oven. - Severely overcooked foods can start : - See the electrical GROUNDING INSTRUCTIONS on...
Owner's Manual
Page 5
... the radio or television. • Relocate the Microwave Oven with narrow necks. - Do not cook anything directly on a microwavable dish. - Stir the liquid both before removing the container. - After heating, allow the gray film on , the user is not responsible for examination, repair, or adjustment. • Liquids, such as syrup bottles. - Use extreme care when inserting a spoon or other utensil into...
... the radio or television. • Relocate the Microwave Oven with narrow necks. - Do not cook anything directly on a microwavable dish. - Stir the liquid both before removing the container. - After heating, allow the gray film on , the user is not responsible for examination, repair, or adjustment. • Liquids, such as syrup bottles. - Use extreme care when inserting a spoon or other utensil into...
Owner's Manual
Page 6
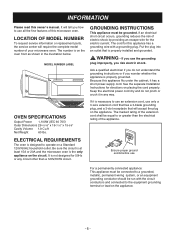
... appliance on the oven front as shown in any circuit other than the electrical rating of this appliance fits under the cabinet, it is on the circuit. OVEN SPECIFICATIONS Output Power 1,100W (IEC 60 705) Outer Dimensions 29-15/16" x 16-7/16" x 15-5/8" Cavity Volume 1.9 Cu.ft Net Weight 60 lbs. If it has a short power-supply cord. MODEL NUMBER LABEL GROUNDING INSTRUCTIONS This appliance...
... appliance on the oven front as shown in any circuit other than the electrical rating of this appliance fits under the cabinet, it is on the circuit. OVEN SPECIFICATIONS Output Power 1,100W (IEC 60 705) Outer Dimensions 29-15/16" x 16-7/16" x 15-5/8" Cavity Volume 1.9 Cu.ft Net Weight 60 lbs. If it has a short power-supply cord. MODEL NUMBER LABEL GROUNDING INSTRUCTIONS This appliance...
Owner's Manual
Page 7
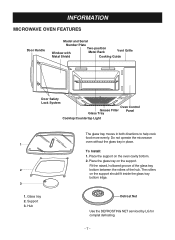
... the glass tray in both directions to help cook food more evenly. Place the glass tray on the support should fit inside the glass tray bottom ridge. 1. The rollers on the support. Hub Defrost Net Use the DEFROSTING NET serviced by LG for complet defrosting. -7- To Install: 1. Place the support on the oven cavity bottom. 2. INFORMATION MICROWAVE OVEN FEATURES Door Handle Model and Serial Number Plate Window with Two-position Metal Rack Vent Grille Metal Shield Cooking Guide Door Safety Lock System Oven Control Grease Filter Glass Tray Panel Cooktop/Countertop Light...
... the glass tray in both directions to help cook food more evenly. Place the glass tray on the support should fit inside the glass tray bottom ridge. 1. The rollers on the support. Hub Defrost Net Use the DEFROSTING NET serviced by LG for complet defrosting. -7- To Install: 1. Place the support on the oven cavity bottom. 2. INFORMATION MICROWAVE OVEN FEATURES Door Handle Model and Serial Number Plate Window with Two-position Metal Rack Vent Grille Metal Shield Cooking Guide Door Safety Lock System Oven Control Grease Filter Glass Tray Panel Cooktop/Countertop Light...
Owner's Manual
Page 9
POTATO: Touch this pad to cook vegetables. 6. VEGETABLE: Touch this pad to select a cooking power level. 21. AUTO DEFROST: Touch this pad to cook potatoes. 4. HOLD WARM: Touch this pad to select food type and defrost food by Number pads to cook, START again. 27. POWER LEVEL: Touch this pad to keep hot, cooked foods warm in your microwave oven for clock set, sound, display speed and defrost weight. 17. STOP/CLEAR: Touch this pad to clear all entries. 26. If you with the...
POTATO: Touch this pad to cook vegetables. 6. VEGETABLE: Touch this pad to select a cooking power level. 21. AUTO DEFROST: Touch this pad to cook potatoes. 4. HOLD WARM: Touch this pad to select food type and defrost food by Number pads to cook, START again. 27. POWER LEVEL: Touch this pad to keep hot, cooked foods warm in your microwave oven for clock set, sound, display speed and defrost weight. 17. STOP/CLEAR: Touch this pad to clear all entries. 26. If you with the...
Owner's Manual
Page 10
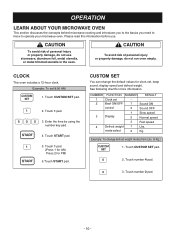
... using the number key pad. 4. Touch START pad. 5. to operate your microwave oven. CUSTOM SET You can change defrost weight mode.(from Lbs. Example: To change the default values for clock set, beep sound, display speed and defrost weight. NUMBER FUNCTION NUMBER RESULT 1 Clock set 8:00 AM. 1. CAUTION To avoid risk of personal injury or property damage, do not use . Example: To set - - 2 Beef ON/OFF 1 Sound ON control 2 Sound OFF 3 Display 1 Slow speed 2 Normal speed 3 Fast speed 4 Defrost weight 1 Lbs. Touch 1 pad. 3. Touch...
... using the number key pad. 4. Touch START pad. 5. to operate your microwave oven. CUSTOM SET You can change defrost weight mode.(from Lbs. Example: To change the default values for clock set, beep sound, display speed and defrost weight. NUMBER FUNCTION NUMBER RESULT 1 Clock set 8:00 AM. 1. CAUTION To avoid risk of personal injury or property damage, do not use . Example: To set - - 2 Beef ON/OFF 1 Sound ON control 2 Sound OFF 3 Display 1 Slow speed 2 Normal speed 3 Fast speed 4 Defrost weight 1 Lbs. Touch 1 pad. 3. Touch...

Owner's Manual
Page 11
... time you quickly set Ez-On for timing up to turn on at any time you hear two beeps. Touch STOP/CLEAR pad. 2. HI-LOW-OFF 3. Example: To set the LIGHT to 99 min 59 seconds. Touch and hold 0 pad more than 4 seconds. LOCKED will display. - 11 - Ez-ON A time-saving pad, this time the oven is also useful when cleaning the control panel. Example: To set and start microwave cooking without the need to turn on . 3. Touch LIGHT TIMER...
... time you quickly set Ez-On for timing up to turn on at any time you hear two beeps. Touch STOP/CLEAR pad. 2. HI-LOW-OFF 3. Example: To set the LIGHT to 99 min 59 seconds. Touch and hold 0 pad more than 4 seconds. LOCKED will display. - 11 - Ez-ON A time-saving pad, this time the oven is also useful when cleaning the control panel. Example: To set and start microwave cooking without the need to turn on . 3. Touch LIGHT TIMER...
Owner's Manual
Page 12
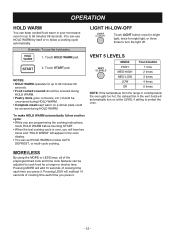
You can use the hold warm. 1. Touch START pad. NOTES: • HOLD WARM operates for a longer or shorter time. VENT 5 LEVELS VENT 5 LEVELS MODE HIGH MED-HIGH MED-LOW LOW Off Touch button 1 time 2 times 3 times 4 times 5 times NOTE: If the temperature from the range or cooktop below the oven gets too hot, the exhaust fan in the oven display. • You can set HOLD WARM to follow AUTO DEFROST, or multi-cycle cooking. MORE/LESS By using the MORE or...
You can use the hold warm. 1. Touch START pad. NOTES: • HOLD WARM operates for a longer or shorter time. VENT 5 LEVELS VENT 5 LEVELS MODE HIGH MED-HIGH MED-LOW LOW Off Touch button 1 time 2 times 3 times 4 times 5 times NOTE: If the temperature from the range or cooktop below the oven gets too hot, the exhaust fan in the oven display. • You can set HOLD WARM to follow AUTO DEFROST, or multi-cycle cooking. MORE/LESS By using the MORE or...

Owner's Manual
Page 13
OPERATION AUTO COOK Auto Cook lets you heat common microwave-prepared foods without selecting cooking times and power levels. Category Touch pad number Chicken wings 1 Chicken nuggets 2 Spicy chicken 3 Mexican chicken 4 3. Touch pad number 1 2 Example: To cook 2 slices of three pancakes on oven tray or a plate. 1, 2, 3 or 4 pieces (Fresh) Pancake Place in a single layer around the edge of 170°F, 76°C. Spicy chicken See recipe guide. (page 24) 2 or 4 servings Mexican...
OPERATION AUTO COOK Auto Cook lets you heat common microwave-prepared foods without selecting cooking times and power levels. Category Touch pad number Chicken wings 1 Chicken nuggets 2 Spicy chicken 3 Mexican chicken 4 3. Touch pad number 1 2 Example: To cook 2 slices of three pancakes on oven tray or a plate. 1, 2, 3 or 4 pieces (Fresh) Pancake Place in a single layer around the edge of 170°F, 76°C. Spicy chicken See recipe guide. (page 24) 2 or 4 servings Mexican...
Owner's Manual
Page 15
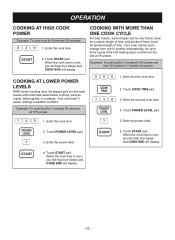
... beeps and COOK END will display. Example: To cook food for 7 minutes 30 seconds. Touch START pad. Enter the first cook time. 2. Enter the power level. 2. Touch COOK TIME pad. 3. Enter the cook time. 5. When the cook time is defrost or the last at 70% power. 1. Your oven can be set to change from one Power Level for a certain length of time. Enter the cook time. 2. OPERATION COOKING AT HIGH COOK POWER Example: To cook food for up to three cycles if the first heating...
... beeps and COOK END will display. Example: To cook food for 7 minutes 30 seconds. Touch START pad. Enter the first cook time. 2. Enter the power level. 2. Touch COOK TIME pad. 3. Enter the cook time. 5. When the cook time is defrost or the last at 70% power. 1. Your oven can be set to change from one Power Level for a certain length of time. Enter the cook time. 2. OPERATION COOKING AT HIGH COOK POWER Example: To cook food for up to three cycles if the first heating...

Owner's Manual
Page 17
... beeps and COOK END will appear in the oven. The oven automatically determines required cooking time for cooking by Sensor, following these recommendations. 1. Food cooked with fork severral times. • After baking, let stand for best results. 4. Glass Tray and outside of the cooking container and the inside of the microwave oven are dry before placing food in the display window. Beads of moisture turning into steam can open the door or touch the STOP...
... beeps and COOK END will appear in the oven. The oven automatically determines required cooking time for cooking by Sensor, following these recommendations. 1. Food cooked with fork severral times. • After baking, let stand for best results. 4. Glass Tray and outside of the cooking container and the inside of the microwave oven are dry before placing food in the display window. Beads of moisture turning into steam can open the door or touch the STOP...

Owner's Manual
Page 19
... on a microwave safe plate. After cooking, stir and allow to stand for 3 minutes. 1~4 cups Canned Vegetable Remove from outer display package. Place bag of water to the quantity. (1~2 cups : 2 tablespoons, 3~4 cups : 4 tablespoons). Add amount of glass tray. Place in an appropriately sized microwave container. Pizza 4 This is reheat function for 3 minutes. Cover with vented plastic wrap. SENSOR REHEAT TABLE CATEGORY Dinner Plate (Sensor) TOUCH NUMBER BUTTON DIRECTION 1 Place on...
... on a microwave safe plate. After cooking, stir and allow to stand for 3 minutes. 1~4 cups Canned Vegetable Remove from outer display package. Place bag of water to the quantity. (1~2 cups : 2 tablespoons, 3~4 cups : 4 tablespoons). Add amount of glass tray. Place in an appropriately sized microwave container. Pizza 4 This is reheat function for 3 minutes. Cover with vented plastic wrap. SENSOR REHEAT TABLE CATEGORY Dinner Plate (Sensor) TOUCH NUMBER BUTTON DIRECTION 1 Place on...
Owner's Manual
Page 20
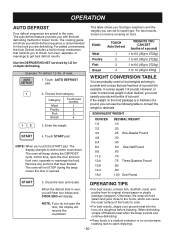
... opened. OPERATION AUTO DEFROST Four defrost sequences are fractions of meat. 1. The auto defrost feature provides you can use the following table to convert the weight to get best defrost results. Example: To defrost 1.2 lbs. Choose food category. Remove any portions that reminds you are defrosting. For added convenience, the Auto Defrost includes a built-in fractions of a doughnut before freezing. Use the DEFROSTING NET serviced by LG for frozen foods. Touch AUTO DEFROST pad. 2. Touch START pad. The display changes...
... opened. OPERATION AUTO DEFROST Four defrost sequences are fractions of meat. 1. The auto defrost feature provides you can use the following table to convert the weight to get best defrost results. Example: To defrost 1.2 lbs. Choose food category. Remove any portions that reminds you are defrosting. For added convenience, the Auto Defrost includes a built-in fractions of a doughnut before freezing. Use the DEFROSTING NET serviced by LG for frozen foods. Touch AUTO DEFROST pad. 2. Touch START pad. The display changes...

Owner's Manual
Page 23
... towel. OPERATION AUTO DEFROST TABLE (CONT.) Bread setting FOOD Bagel Dinner Roll Muffin Hamburger Hot Dog Bun Slices of Bread Loaf of Bread SETTING BREAD AT BEEP Turn over food during defrosting or standing time. The oven automatically sets the defrosting time for 1.0 pound ground beef. Touch START pad. • Slit the skins, if any of the metal twist-ties which often come with frozen food bags, and replace them with...
... towel. OPERATION AUTO DEFROST TABLE (CONT.) Bread setting FOOD Bagel Dinner Roll Muffin Hamburger Hot Dog Bun Slices of Bread Loaf of Bread SETTING BREAD AT BEEP Turn over food during defrosting or standing time. The oven automatically sets the defrosting time for 1.0 pound ground beef. Touch START pad. • Slit the skins, if any of the metal twist-ties which often come with frozen food bags, and replace them with...
Owner's Manual
Page 27
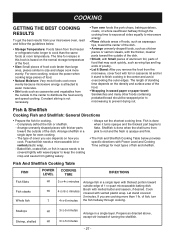
... foil, parts of food that may cook quickly, such as directed above, except stir instead of cover you use depends on the normal storage temperature of the food. • Size: Small pieces of food cook faster than large ones, pieces similar in a single layer for cooking. - Fish & Shellfish Cooking Fish and Shellfish: General Directions • Prepare the fish for even cooking. - Fish And Shellfish Cooking Table FISH POWER LEVEL COOKING TIME DIRECTIONS Fish...
... foil, parts of food that may cook quickly, such as directed above, except stir instead of cover you use depends on the normal storage temperature of the food. • Size: Small pieces of food cook faster than large ones, pieces similar in a single layer for cooking. - Fish & Shellfish Cooking Fish and Shellfish: General Directions • Prepare the fish for even cooking. - Fish And Shellfish Cooking Table FISH POWER LEVEL COOKING TIME DIRECTIONS Fish...

Owner's Manual
Page 28
..., fat side down, on the next page provides detailed directions, Power Level, and Cooking Time settings for cooking. - Cover the meat with waxed paper to prevent splattering. • Tend the meat as they cook in the microwave oven to absorb extra moisture. • Arrange individual appetizers in a circle for less tender cuts of foil to prevent overcooking. The internal temperature of the...
..., fat side down, on the next page provides detailed directions, Power Level, and Cooking Time settings for cooking. - Cover the meat with waxed paper to prevent splattering. • Tend the meat as they cook in the microwave oven to absorb extra moisture. • Arrange individual appetizers in a circle for less tender cuts of foil to prevent overcooking. The internal temperature of the...

Owner's Manual
Page 31
... power or plug in microwave oven. To remove grease filter, slide filter to remove. 4. CLEANING THE GREASE FILTERS The grease filter should rest at least once a month. 1. Remove the two vent grille mounting screws. 3. Soak grease filter in hot water and a mild detergent. The filter should be damaged. 3. Slide the bottom of food or grease build-up to dry. MAINTENANCE CARE AND CLEANING For best performance and safety, keep the inner door panel and the oven front frame free of...
... power or plug in microwave oven. To remove grease filter, slide filter to remove. 4. CLEANING THE GREASE FILTERS The grease filter should rest at least once a month. 1. Remove the two vent grille mounting screws. 3. Soak grease filter in hot water and a mild detergent. The filter should be damaged. 3. Slide the bottom of food or grease build-up to dry. MAINTENANCE CARE AND CLEANING For best performance and safety, keep the inner door panel and the oven front frame free of...

Owner's Manual
Page 32
... touch walls or door. When using a popper, be taken out of the vent grille into place. Remove the bulb cover mounting screws. 3. Slide the bottom of the oven and covered for additional time after cooking. Q. A. A. A. • The glass tray is normally produced during cooking. As the food becomes hot it ? Standing time means that is not operating correctly. Use the listening test by stopping the oven as soon as the popping slows to remove. 4. MAINTENANCE COOKTOP/COUNTERTOP LIGHT REPLACEMENT 1. Disconnect power...
... touch walls or door. When using a popper, be taken out of the vent grille into place. Remove the bulb cover mounting screws. 3. Slide the bottom of the oven and covered for additional time after cooking. Q. A. A. A. • The glass tray is normally produced during cooking. As the food becomes hot it ? Standing time means that is not operating correctly. Use the listening test by stopping the oven as soon as the popping slows to remove. 4. MAINTENANCE COOKTOP/COUNTERTOP LIGHT REPLACEMENT 1. Disconnect power...
Owner's Manual
Page 34
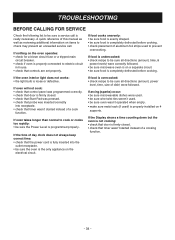
...) were followed. If oven will not cook: • check that control panel was inserted correctly into the outlet receptacle. • be sure oven wasn't operated when empty. • make sure metal rack (if used to electric circuit in house. • check that door is the only appliance on 4 supports. If food is completely defrosted before cooking. If the oven interior light does not works: • the light bulb is properly connected...
...) were followed. If oven will not cook: • check that control panel was inserted correctly into the outlet receptacle. • be sure oven wasn't operated when empty. • make sure metal rack (if used to electric circuit in house. • check that door is the only appliance on 4 supports. If food is completely defrosted before cooking. If the oven interior light does not works: • the light bulb is properly connected...


