
Owner's Manual
Page 3
... OVEN ...... 6 Location of Model Number 6 Oven Specifications 6 Electrical Requirements 6 Grounding Instructions 6 Microwave Oven Features 7 Control Panel Features 8 USING YOUR MICROWAVE OVEN 10 Learn About Your Microwave Oven 10 Clock 10 Timer 10 Vent Fan 10 Vent Auto Time Set 10 Light Hi/Low/Off 10 Light Timer 11 Child Lock 12 EZ-ON 12 Hold Warm 12 Custom Set 13 Cooking at High Power Levels 13 Microwave Power Levels 13 Multi Stage Cooking 13 Cooking Guide for Lower Power Levels 14 Popcorn 15 Potato 15 Beverage 15 Auto Cook 16 Reheat 16 Poultry 16 Auto Cook Table...
... OVEN ...... 6 Location of Model Number 6 Oven Specifications 6 Electrical Requirements 6 Grounding Instructions 6 Microwave Oven Features 7 Control Panel Features 8 USING YOUR MICROWAVE OVEN 10 Learn About Your Microwave Oven 10 Clock 10 Timer 10 Vent Fan 10 Vent Auto Time Set 10 Light Hi/Low/Off 10 Light Timer 11 Child Lock 12 EZ-ON 12 Hold Warm 12 Custom Set 13 Cooking at High Power Levels 13 Microwave Power Levels 13 Multi Stage Cooking 13 Cooking Guide for Lower Power Levels 14 Popcorn 15 Potato 15 Beverage 15 Auto Cook 16 Reheat 16 Poultry 16 Auto Cook Table...
Owner's Manual
Page 4
... using your oven. Turn the oven off the power at the fuse or circuit breaker panel. • To avoid electric shock: - This appliance must be grounded. SAFETY IMPORTANT SAFETY INSTRUCTIONS The safety instructions below will tell you how to use your oven and avoid harm to yourself or damage to a properly grounded outlet. for commercial purposes. Severely overcooked foods can start : - There is specifically designed to heat, cook...
... using your oven. Turn the oven off the power at the fuse or circuit breaker panel. • To avoid electric shock: - This appliance must be grounded. SAFETY IMPORTANT SAFETY INSTRUCTIONS The safety instructions below will tell you how to use your oven and avoid harm to yourself or damage to a properly grounded outlet. for commercial purposes. Severely overcooked foods can start : - There is specifically designed to heat, cook...
Owner's Manual
Page 5
... by qualified service personnel. Stir the liquid both before removing the container. - It is not always present. Do not heat any radio or TV interference caused by unauthorized modification to provide reasonable protection against such interference in the cabinet above floor. Do not cook anything directly on a microwavable dish. - If this manual. • Do not run the microwave oven empty...
... by qualified service personnel. Stir the liquid both before removing the container. - It is not always present. Do not heat any radio or TV interference caused by unauthorized modification to provide reasonable protection against such interference in the cabinet above floor. Do not cook anything directly on a microwavable dish. - If this manual. • Do not run the microwave oven empty...
Owner's Manual
Page 6
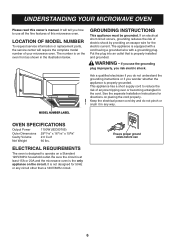
... microwave oven. Keep the electrical power cord dry and do not understand the grounding instructions or if you how to reduce the risk of this owner's manual. LOCATION OF MODEL NUMBER To request service information or replacement parts, the service center will tell you wonder whether the appliance is not designed for 50Hz or any way. Ask a qualified electrician if you risk electric shock. MODEL NUMBER LABEL OVEN SPECIFICATIONS Output Power...
... microwave oven. Keep the electrical power cord dry and do not understand the grounding instructions or if you how to reduce the risk of this owner's manual. LOCATION OF MODEL NUMBER To request service information or replacement parts, the service center will tell you wonder whether the appliance is not designed for 50Hz or any way. Ask a qualified electrician if you risk electric shock. MODEL NUMBER LABEL OVEN SPECIFICATIONS Output Power...
Owner's Manual
Page 7
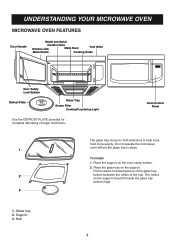
... the rollers of larger food items. Oven Control Panel The glass tray moves in place. Support 3. Hub 7 Glass tray 2. Place the glass tray on the oven cavity bottom. 2. Place the support on the support. The rollers on the support should fit inside the glass tray bottom ridge. 1. UNDERSTANDING YOUR MICROWAVE OVEN MICROWAVE OVEN FEATURES Door Handle Model and Serial Number Plate Window with Metal Rack Vent Grille Metal Shield Cooking Guide Door Safety Lock System Defrost Plate Glass Tray Grease Filter Cooktop/Countertop Light Use the DEFROST PLATE provided for complete...
... the rollers of larger food items. Oven Control Panel The glass tray moves in place. Support 3. Hub 7 Glass tray 2. Place the glass tray on the oven cavity bottom. 2. Place the support on the support. The rollers on the support should fit inside the glass tray bottom ridge. 1. UNDERSTANDING YOUR MICROWAVE OVEN MICROWAVE OVEN FEATURES Door Handle Model and Serial Number Plate Window with Metal Rack Vent Grille Metal Shield Cooking Guide Door Safety Lock System Defrost Plate Glass Tray Grease Filter Cooktop/Countertop Light Use the DEFROST PLATE provided for complete...
Owner's Manual
Page 9
.... 2. DISPLAY: The Display includes a clock and indicators to choose one or two cups of a beverage. 5. TIME DEFROST: Touch this pad to defrost most other frozen foods. 10. HOLD WARM: Touch this pad to set a cooking time. 13. If you time of 5 fan speeds. 24. EZ-ON: Touch this pad to keep hot, cooked foods warm in your microwave oven for sound, clock, disply speed, and defrost weight. 14. TIMER: Touch this pad to tell you open the door...
.... 2. DISPLAY: The Display includes a clock and indicators to choose one or two cups of a beverage. 5. TIME DEFROST: Touch this pad to defrost most other frozen foods. 10. HOLD WARM: Touch this pad to set a cooking time. 13. If you time of 5 fan speeds. 24. EZ-ON: Touch this pad to keep hot, cooked foods warm in your microwave oven for sound, clock, disply speed, and defrost weight. 14. TIMER: Touch this pad to tell you open the door...
Owner's Manual
Page 10
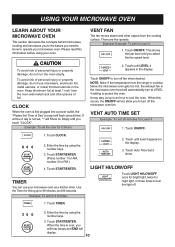
... to turn off . 2. CLOCK When the oven is over, you will hear beeps and END will display. 10 VENT AUTO TIME SET Example: To set for Level 4. 1. When the time is first plugged into a power outlet, the "Please Set Time of foil. LIGHT HI/LOW/OFF Touch LIGHT HI/LOW/OFF once for bright light, twice for PM.) 4. Touch Auto Time Set 5 times. USING YOUR MICROWAVE OVEN LEARN ABOUT YOUR MICROWAVE OVEN This section discusses the concepts behind microwave cooking and...
... to turn off . 2. CLOCK When the oven is over, you will hear beeps and END will display. 10 VENT AUTO TIME SET Example: To set for Level 4. 1. When the time is first plugged into a power outlet, the "Please Set Time of foil. LIGHT HI/LOW/OFF Touch LIGHT HI/LOW/OFF once for bright light, twice for PM.) 4. Touch Auto Time Set 5 times. USING YOUR MICROWAVE OVEN LEARN ABOUT YOUR MICROWAVE OVEN This section discusses the concepts behind microwave cooking and...

Owner's Manual
Page 12
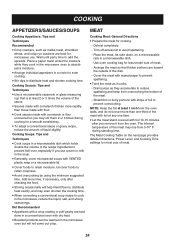
... feature to touch the START/ENTER. Child Lock prevents accidental programming when wiping the control panel. Food Type Liquid Dry Recommended Quantity 1-2 cups 5-10 ozs. Example: To set and start microwave cooking without the need to lock the control panel when you are programming the cooking instructions, touch HOLD WARM before touching START/ENTER. • When the last cooking cycle is also useful when cleaning the control panel. Touch EZ-ON 4 times. Touch START/ENTER. Touch STOP/CLEAR. 2. The oven begins cooking and display shows time counting...
... feature to touch the START/ENTER. Child Lock prevents accidental programming when wiping the control panel. Food Type Liquid Dry Recommended Quantity 1-2 cups 5-10 ozs. Example: To set and start microwave cooking without the need to lock the control panel when you are programming the cooking instructions, touch HOLD WARM before touching START/ENTER. • When the last cooking cycle is also useful when cleaning the control panel. Touch EZ-ON 4 times. Touch START/ENTER. Touch STOP/CLEAR. 2. The oven begins cooking and display shows time counting...
Owner's Manual
Page 13
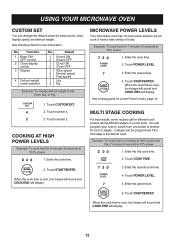
... beeps will sound and COOK END will display. 13 You can be programmed if the first stage is over , four beeps will sound and COOK END will display. No. See cooking guide for up to 2 stages. 3 stages can program your oven to switch from Lbs. Enter the power level. 6. Enter the cook time. 2. MICROWAVE POWER LEVELS Your microwave oven has 10 cook power levels to Kg). 1. Touch START/ENTER. COOKING AT HIGH POWER LEVELS Example: To cook food for beep sound, clock, display speed, and defrost weight. Touch number 4. 3. Touch COOK TIME. 3. When the cook time...
... beeps will sound and COOK END will display. 13 You can be programmed if the first stage is over , four beeps will sound and COOK END will display. No. See cooking guide for up to 2 stages. 3 stages can program your oven to switch from Lbs. Enter the power level. 6. Enter the cook time. 2. MICROWAVE POWER LEVELS Your microwave oven has 10 cook power levels to Kg). 1. Touch START/ENTER. COOKING AT HIGH POWER LEVELS Example: To cook food for beep sound, clock, display speed, and defrost weight. Touch number 4. 3. Touch COOK TIME. 3. When the cook time...
Owner's Manual
Page 15
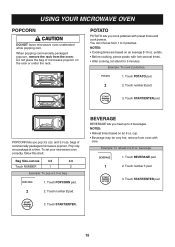
... a time. beverage. 1. Touch START/ENTER. 15 You can choose from oven with care. Example: To cook 2 potatoes. 1. Touch START/ENTER pad. bags of microwave popcorn on the rack or under the rack. To set your microwave oven correctly, follow this chart: Bag Size-ounces 3.5 3.0 Touch NUMBER 1 2 Example: To pop a 3.0 oz bag. 1. Touch number 1 pad. 3. remove from 1 to 2 beverages. USING YOUR MICROWAVE OVEN POPCORN DO NOT leave microwave oven unattended while popping corn. When popping commercially packaged popcorn, remove the rack...
... a time. beverage. 1. Touch START/ENTER. 15 You can choose from oven with care. Example: To cook 2 potatoes. 1. Touch START/ENTER pad. bags of microwave popcorn on the rack or under the rack. To set your microwave oven correctly, follow this chart: Bag Size-ounces 3.5 3.0 Touch NUMBER 1 2 Example: To pop a 3.0 oz bag. 1. Touch number 1 pad. 3. remove from 1 to 2 beverages. USING YOUR MICROWAVE OVEN POPCORN DO NOT leave microwave oven unattended while popping corn. When popping commercially packaged popcorn, remove the rack...

Owner's Manual
Page 21
.... 1. AUTO DEFROST TABLE Category MEAT 0.1 to 6.0 lbs POULTRY 0.1 to 1.0 lb. Place the item to catch drippings. • Foods should still be defrosted directly on the defrost plate. Touch QUICK DEFROST. BREAD After touching AUTO DEFROST once, select the food category. Rolled roast, Sausage. The oven will beep once during the BEEP unless the door is 0.1 to 6.0 lbs Food BEEF Ground beef, Round steak, Cubes for Bread is opened. The available weight range for...
.... 1. AUTO DEFROST TABLE Category MEAT 0.1 to 6.0 lbs POULTRY 0.1 to 1.0 lb. Place the item to catch drippings. • Foods should still be defrosted directly on the defrost plate. Touch QUICK DEFROST. BREAD After touching AUTO DEFROST once, select the food category. Rolled roast, Sausage. The oven will beep once during the BEEP unless the door is 0.1 to 6.0 lbs Food BEEF Ground beef, Round steak, Cubes for Bread is opened. The available weight range for...
Owner's Manual
Page 22
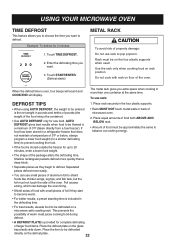
... the four plastic supports. • When using AUTO DEFROST, the weight to be on floor of the package alters the defrosting time. Touch START/ENTER. (Defrost starts) METAL RACK To avoid risk of property damage: Do not use rack: DEFROST TIPS 1. When the defrost time is a minimum of microwave oven. 2. Place the item to balance out cooking energy. • The shape of the oven. Use the rack only when cooking food on the glass tray plastic side...
... the four plastic supports. • When using AUTO DEFROST, the weight to be on floor of the package alters the defrosting time. Touch START/ENTER. (Defrost starts) METAL RACK To avoid risk of property damage: Do not use rack: DEFROST TIPS 1. When the defrost time is a minimum of microwave oven. 2. Place the item to balance out cooking energy. • The shape of the oven. Use the rack only when cooking food on the glass tray plastic side...
Owner's Manual
Page 23
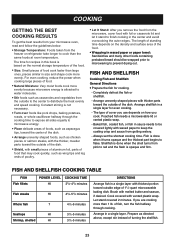
... and many other foods containing prebaked bread should be covered lightly with the thicker, meatier parts toward outside edge of cover you use depends on how you are cooking more evenly. Baked fish, coated fish, or fish in a single layer with thickest portion toward the outside of turning the shellfish. 23 FISH AND SHELLFISH COOKING TABLE FISH Fish fillets POWER LEVEL COOKING TIME HI 31/2-41...
... and many other foods containing prebaked bread should be covered lightly with the thicker, meatier parts toward outside edge of cover you use depends on how you are cooking more evenly. Baked fish, coated fish, or fish in a single layer with thickest portion toward the outside of turning the shellfish. 23 FISH AND SHELLFISH COOKING TABLE FISH Fish fillets POWER LEVEL COOKING TIME HI 31/2-41...
Owner's Manual
Page 24
... remove it cooks. - Use oven cooking bag for cooking. - NOTE: Keep the foil at any one time. ● Let the meat stand covered with dry heat. ● Breaded products can be warmed in a conventional oven with foil 10-15 minutes after checking the food. ● Stirring occasionally will not come out crisp. MEAT Cooking Meat: General Directions ● Prepare the meat for less tender cuts...
... remove it cooks. - Use oven cooking bag for cooking. - NOTE: Keep the foil at any one time. ● Let the meat stand covered with dry heat. ● Breaded products can be warmed in a conventional oven with foil 10-15 minutes after checking the food. ● Stirring occasionally will not come out crisp. MEAT Cooking Meat: General Directions ● Prepare the meat for less tender cuts...

Owner's Manual
Page 26
... tail. Remove and discard drippings. Shield thin or bony pieces with waxed paper. each) HI 6-7 minutes per pound Cornish Hens whole (1-11⁄2 lbs. Cook until no longer pink and the juices run clear. Shield if necessary. Place hens breast side down on microwavable rack. The Poultry Cooking Table below provides detailed directions, Power Level, and Cooking Time settings for most cuts and...
... tail. Remove and discard drippings. Shield thin or bony pieces with waxed paper. each) HI 6-7 minutes per pound Cornish Hens whole (1-11⁄2 lbs. Cook until no longer pink and the juices run clear. Shield if necessary. Place hens breast side down on microwavable rack. The Poultry Cooking Table below provides detailed directions, Power Level, and Cooking Time settings for most cuts and...
Owner's Manual
Page 28
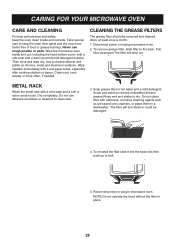
... clean rack. 3. CARING FOR YOUR MICROWAVE OVEN CARE AND CLEANING For best performance and safety, keep the inner door panel and the oven front frame free of food or grease build-up to lock. 5. Pull filter downward.The filter will turn black or could be removed and cleaned often, at least once a month. 1. Clean your oven weekly or more often, if needed. Take special care to keep the oven clean inside and out, including the hood bottom cover...
... clean rack. 3. CARING FOR YOUR MICROWAVE OVEN CARE AND CLEANING For best performance and safety, keep the inner door panel and the oven front frame free of food or grease build-up to lock. 5. Pull filter downward.The filter will turn black or could be removed and cleaned often, at least once a month. 1. Clean your oven weekly or more often, if needed. Take special care to keep the oven clean inside and out, including the hood bottom cover...
Owner's Manual
Page 29
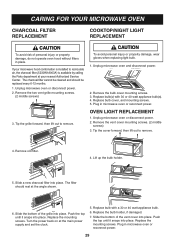
... place. Turn the power back on at your microwave hood combination is installed to recirculate air, the charcoal filter (5230W1A003A) is available by calling the Parts department at the main power supply and set the clock. 5. The charcoal filter cannot be replaced every 6-12 months. 1. Replace bulb cover, and mounting screws. 5. Remove the bulb cover mounting screws. 3. Push the top until it snaps into place. Replace the mounting screws. CARING FOR YOUR MICROWAVE OVEN CHARCOAL FILTER REPLACEMENT COOKTOP/NIGHT LIGHT REPLACEMENT To avoid risk of the vent cover into...
... place. Turn the power back on at your microwave hood combination is installed to recirculate air, the charcoal filter (5230W1A003A) is available by calling the Parts department at the main power supply and set the clock. 5. The charcoal filter cannot be replaced every 6-12 months. 1. Replace bulb cover, and mounting screws. 5. Remove the bulb cover mounting screws. 3. Push the top until it snaps into place. Replace the mounting screws. CARING FOR YOUR MICROWAVE OVEN CHARCOAL FILTER REPLACEMENT COOKTOP/NIGHT LIGHT REPLACEMENT To avoid risk of the vent cover into...
Owner's Manual
Page 31
... sure all directions (amount, power level, time, size of aluminum foil strips used to cook • be sure food is properly connected to the electric circuit in the vent hood will not cook • check that control panel was programmed correctly. • check that door is firmly closed. • check that Start/Enter Pad was touched. • check that timer was not operated when empty. • make sure metal rack (if used . •...
... sure all directions (amount, power level, time, size of aluminum foil strips used to cook • be sure food is properly connected to the electric circuit in the vent hood will not cook • check that control panel was programmed correctly. • check that door is firmly closed. • check that Start/Enter Pad was touched. • check that timer was not operated when empty. • make sure metal rack (if used . •...
Owner's Manual
Page 32
... when the magnetron tube cycles on when my microwave oven is normally produced during cooking. TROUBLESHOOTING To avoid electrical shock which can cause severe personal injury or death, do I pop popcorn in it will conduct the heat to touch walls or door. Why does the dish become hot when I hear This is the sound of the oven and covered for shielding (use the preprogrammed Popcorn pad. Do...
... when the magnetron tube cycles on when my microwave oven is normally produced during cooking. TROUBLESHOOTING To avoid electrical shock which can cause severe personal injury or death, do I pop popcorn in it will conduct the heat to touch walls or door. Why does the dish become hot when I hear This is the sound of the oven and covered for shielding (use the preprogrammed Popcorn pad. Do...
Owner's Manual
Page 33
... up, and/or install the product, instruct, or replace house fuses or correct wiring, or correction of unauthorized repairs. • Damages or operating problems that vary from the date of original consumer purchase of purchase. PARTS (except as listed below , effective from...LG MICROWAVE OVEN LIMITED WARRANTY - Some states do not allow the exclusion or limitation of your ZIP code ready. THIS LIMITED WARRANTY DOES NOT APPLY TO: • Service trips to your product, at the time warranty service is good only to prove the date of the product. WARRANTY PERIOD: HOW SERVICE IS HANDLED...
... up, and/or install the product, instruct, or replace house fuses or correct wiring, or correction of unauthorized repairs. • Damages or operating problems that vary from the date of original consumer purchase of purchase. PARTS (except as listed below , effective from...LG MICROWAVE OVEN LIMITED WARRANTY - Some states do not allow the exclusion or limitation of your ZIP code ready. THIS LIMITED WARRANTY DOES NOT APPLY TO: • Service trips to your product, at the time warranty service is good only to prove the date of the product. WARRANTY PERIOD: HOW SERVICE IS HANDLED...


