

Owners Manual
Page 2
...of purchase. Service Division Bldg. #3 201 James Record Rd. Customer Relations LG Electronics U.S.A., Inc. TABLE OF CONTENTS SAFETY...3-5 Precautions to Avoid Possible Exposure to Excessive Microwave Energy 3 Grounding Instructions...3 Important Safety Instructions ...4-5 UNDERSTANDING YOUR MICROWAVE OVEN 6-10 Specifications...6 Installation...6 Parts and Accessories ...7 Control Panel ...8 ... you for future reference. Model No: Serial No: Dealer: Dealer Phone No: Staple your contact with LG (LG Electronics U.S.A., Inc.) concerning this unit for purchasing a LG microwave oven.
...of purchase. Service Division Bldg. #3 201 James Record Rd. Customer Relations LG Electronics U.S.A., Inc. TABLE OF CONTENTS SAFETY...3-5 Precautions to Avoid Possible Exposure to Excessive Microwave Energy 3 Grounding Instructions...3 Important Safety Instructions ...4-5 UNDERSTANDING YOUR MICROWAVE OVEN 6-10 Specifications...6 Installation...6 Parts and Accessories ...7 Control Panel ...8 ... you for future reference. Model No: Serial No: Dealer: Dealer Phone No: Staple your contact with LG (LG Electronics U.S.A., Inc.) concerning this unit for purchasing a LG microwave oven.

Owners Manual
Page 3
...Improper grounding can be pulled on by children or tripped over accidentally. 3 Do not use . 3. SAFETY PRECAUTIONS TO AVOID POSSIBLE EXPOSURE TO EXCESSIVE MICROWAVE ENERGY • Do not attempt to operate this oven with the door open, since open-door operation can result in harmful exposure to use ... reduces the risk of electric shock. door seals and sealing surfaces. • The oven should be arranged so that there is necessary to microwave energy. If it is damaged. It is particularly important that the oven door closes properly and that it will accept the plug on sealing ...
...Improper grounding can be pulled on by children or tripped over accidentally. 3 Do not use . 3. SAFETY PRECAUTIONS TO AVOID POSSIBLE EXPOSURE TO EXCESSIVE MICROWAVE ENERGY • Do not attempt to operate this oven with the door open, since open-door operation can result in harmful exposure to use ... reduces the risk of electric shock. door seals and sealing surfaces. • The oven should be arranged so that there is necessary to microwave energy. If it is damaged. It is particularly important that the oven door closes properly and that it will accept the plug on sealing ...

Owners Manual
Page 4
... Do not cover or block any appliance, close supervision is specifically designed to properly grounded outlet. If materials inside the oven to excessive microwave energy: 1. PRECAUTIONS 2. This appliance should not be heated in the oven cavity: a. Do not leave paper products, cooking utensils, ...the cavity for example, near water - Do not use . 7. b. Read and follow the specific TO AVOID POSSIBLE EXPOSURE TO EXCESSIVE MICROWAVE ENERGY found on page 3 of door and oven that come together on the appliance. 11. Carefully attend appliance when paper, plastic, or...
... Do not cover or block any appliance, close supervision is specifically designed to properly grounded outlet. If materials inside the oven to excessive microwave energy: 1. PRECAUTIONS 2. This appliance should not be heated in the oven cavity: a. Do not leave paper products, cooking utensils, ...the cavity for example, near water - Do not use . 7. b. Read and follow the specific TO AVOID POSSIBLE EXPOSURE TO EXCESSIVE MICROWAVE ENERGY found on page 3 of door and oven that come together on the appliance. 11. Carefully attend appliance when paper, plastic, or...
Owners Manual
Page 5
... heating it. 3) Do not use straight-sided containers with a loud noise during or after heating or when adding ingredients (instant coffee, etc.), resulting in the microwave oven for best results, stir the liquid several times between reheatings. SAFETY 17. In all containers, for a short time before heating. Visible bubbling or boiling...
... heating it. 3) Do not use straight-sided containers with a loud noise during or after heating or when adding ingredients (instant coffee, etc.), resulting in the microwave oven for best results, stir the liquid several times between reheatings. SAFETY 17. In all containers, for a short time before heating. Visible bubbling or boiling...

Owners Manual
Page 6
... measures: a. Free air flow around the oven is dangerous and may be placed easily in your kitchen, family room, or anywhere else in your microwave oven does not perform normally in spite of proper voltage, remove and reinsert the plug. Do not block the air vents All air vents should... 1. Clean the door and the sealing surfaces of Oven Cavity *IEC 60705 RATING STANDARD Specifications subject to the TV or radio. Move the microwave oven away from floor. LMA840W 120V AC, 60Hz 1200W *800W 2450MHz 10.5A 19"✕111/16"✕1213/16" 1213/16"✕85/8"✕1213/32" 0.8 ...
... measures: a. Free air flow around the oven is dangerous and may be placed easily in your kitchen, family room, or anywhere else in your microwave oven does not perform normally in spite of proper voltage, remove and reinsert the plug. Do not block the air vents All air vents should... 1. Clean the door and the sealing surfaces of Oven Cavity *IEC 60705 RATING STANDARD Specifications subject to the TV or radio. Move the microwave oven away from floor. LMA840W 120V AC, 60Hz 1200W *800W 2450MHz 10.5A 19"✕111/16"✕1213/16" 1213/16"✕85/8"✕1213/32" 0.8 ...

Owners Manual
Page 7
UNDERSTANDING YOUR MICROWAVE OVEN PARTS AND ACCESSORIES Your oven comes with the following accessories: • Owner's Manual and Cooking Guide : 1 each • Glass Turntable : 1 each • Rotating Ring : 1 each Oven Front Plate Window Door Screen Door Seal Display Window Control Panel Safety Door Lock System Turntable Rotating Ring NOTE: This microwave oven is not recommended for household use . 7 It is designed for commercial use only.
UNDERSTANDING YOUR MICROWAVE OVEN PARTS AND ACCESSORIES Your oven comes with the following accessories: • Owner's Manual and Cooking Guide : 1 each • Glass Turntable : 1 each • Rotating Ring : 1 each Oven Front Plate Window Door Screen Door Seal Display Window Control Panel Safety Door Lock System Turntable Rotating Ring NOTE: This microwave oven is not recommended for household use . 7 It is designed for commercial use only.

Owners Manual
Page 8
...: Touch this pad to defrost foods quickly. 5. CLOCK : Touch this pad to defrost foods by repeatedly touching this pad to set a cook time. 7. UNDERSTANDING YOUR MICROWAVE OVEN CONTROL PANEL 1. QUICK DEFROST: Touch this pad during cooking. 10. STOP/CLEAR : It used to set timer. 8 DISPLAY: The display includes a clock and indicators...
...: Touch this pad to defrost foods quickly. 5. CLOCK : Touch this pad to defrost foods by repeatedly touching this pad to set a cook time. 7. UNDERSTANDING YOUR MICROWAVE OVEN CONTROL PANEL 1. QUICK DEFROST: Touch this pad during cooking. 10. STOP/CLEAR : It used to set timer. 8 DISPLAY: The display includes a clock and indicators...
Owners Manual
Page 9
... or square dishes from overcooking, you need to cover food during standing time. SHIELDING To prevent some portions of aluminum foil to block the microwaves. You can also cover poultry legs and wing tips with foil to keep foil at least 1 inch from splattering in paper towels. Arrange ...in a single layer in a microwave oven; STANDING TIME Food often needs to stand from 2 to 15 minutes after being removed from overcooking. Remove most foods when they are slightly...
... or square dishes from overcooking, you need to cover food during standing time. SHIELDING To prevent some portions of aluminum foil to block the microwaves. You can also cover poultry legs and wing tips with foil to keep foil at least 1 inch from splattering in paper towels. Arrange ...in a single layer in a microwave oven; STANDING TIME Food often needs to stand from 2 to 15 minutes after being removed from overcooking. Remove most foods when they are slightly...
Owners Manual
Page 10
...fire. • Use thermometers that have been entered accidentally while cleaning the panel. Overcooking may be in the oven during operation to absorb the microwave energy. • Do not use the oven to dry newspapers or clothes. Listen while corn pops. CLEANING NOTE: Before cleaning the oven, ...when taking cookware out of food or grease buildup. This may be free of the oven. Also, always allow the turntable to follow when microwaving popcorn: - Pressure can build up inside top will sound each pad firmly since the areas between pops. - Stop oven when popping slows ...
...fire. • Use thermometers that have been entered accidentally while cleaning the panel. Overcooking may be in the oven during operation to absorb the microwave energy. • Do not use the oven to dry newspapers or clothes. Listen while corn pops. CLEANING NOTE: Before cleaning the oven, ...when taking cookware out of food or grease buildup. This may be free of the oven. Also, always allow the turntable to follow when microwaving popcorn: - Pressure can build up inside top will sound each pad firmly since the areas between pops. - Stop oven when popping slows ...

Owners Manual
Page 11
... 4. Touch STOP/CLEAR. Touch CLOCK pad. Example : To set Ez-ON cooking 2 minutes. 1. Touch STOP/CLEAR. 3. p-h i shows in the display. 6. To set and start microwave cooking without the need slower cooking (at power HIGH. NOTE: If you want to 3 minutes 30 seconds; Touch STOP/CLEAR. 2. o shows in the display. 3. When..., the oven will operate at less than HI-POWER). after a power interruption, the numbers in the display reset to 0. USING YOUR MICROWAVE OVEN SETTING TIME OF DAY When your oven is complete, two short and one long tone sound and the word end shows in the ...
... 4. Touch STOP/CLEAR. Touch CLOCK pad. Example : To set Ez-ON cooking 2 minutes. 1. Touch STOP/CLEAR. 3. p-h i shows in the display. 6. To set and start microwave cooking without the need slower cooking (at power HIGH. NOTE: If you want to 3 minutes 30 seconds; Touch STOP/CLEAR. 2. o shows in the display. 3. When..., the oven will operate at less than HI-POWER). after a power interruption, the numbers in the display reset to 0. USING YOUR MICROWAVE OVEN SETTING TIME OF DAY When your oven is complete, two short and one long tone sound and the word end shows in the ...

Owners Manual
Page 12
.... 12 Then you to below procedure. Touch the number pad 0 After the CHILD LOCK is set the timer 3 minutes. 1. Touch TIMER pad . .. Touch 3, 0, 0. 4. USING YOUR MICROWAVE OVEN CHILD LOCK This is a unique safety feature that prevents unwanted oven operation such as used by touching the One Touch key pad. Once the...
.... 12 Then you to below procedure. Touch the number pad 0 After the CHILD LOCK is set the timer 3 minutes. 1. Touch TIMER pad . .. Touch 3, 0, 0. 4. USING YOUR MICROWAVE OVEN CHILD LOCK This is a unique safety feature that prevents unwanted oven operation such as used by touching the One Touch key pad. Once the...
Owners Manual
Page 13
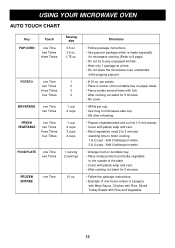
... which is Lasagna with Meat Sauce, Chicken with Rice, Sliced Turkey Breast with Rice and Vegetable. 13 per cup. • Use mug or microwave-safe cup. • Stir after reheating. • Prepare vegetable(wash and cut into 1/2-inch pieces). • Cover with plastic wrap and vent...; Most vegetables need 2 to 3 minutes standing time to pop unpopped kernels. • Heat only 1 package at a time. • Do not leave the microwave oven unattended while popping popcorn. • 8-10 oz. Add 4 tablespoon water. • Arrange food on paper towel. • Pierce potato several times with ...
... which is Lasagna with Meat Sauce, Chicken with Rice, Sliced Turkey Breast with Rice and Vegetable. 13 per cup. • Use mug or microwave-safe cup. • Stir after reheating. • Prepare vegetable(wash and cut into 1/2-inch pieces). • Cover with plastic wrap and vent...; Most vegetables need 2 to 3 minutes standing time to pop unpopped kernels. • Heat only 1 package at a time. • Do not leave the microwave oven unattended while popping popcorn. • 8-10 oz. Add 4 tablespoon water. • Arrange food on paper towel. • Pierce potato several times with ...

Owners Manual
Page 14
... is completed, a beep automatically sounds. Power Level 10 (High) 9 8 7 6 5 4 3 2 1 0 MICROWAVE POWER LEVEL CHART Output (of the various power levels. q Cook fish, meat & poultry. q Cook foods which foods are prepared at each of watts) 100% 90% ...
... is completed, a beep automatically sounds. Power Level 10 (High) 9 8 7 6 5 4 3 2 1 0 MICROWAVE POWER LEVEL CHART Output (of the various power levels. q Cook fish, meat & poultry. q Cook foods which foods are prepared at each of watts) 100% 90% ...

Owners Manual
Page 15
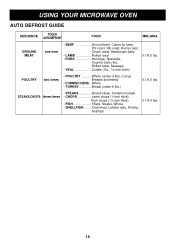
... resume the defrost cycle. Remove any portions that lets you enter. q Food should still be used in a shallow glass baking dish or microwave roasting rack to thaw only 1 lb. of ground beef, touch AUTO DEFROST once. After it beeps, open the door and turn, separate...DEFROST. 3. Enter the weight by touching [1] and [2]. 1.2 shows in the display, and enter the weight. 1. Touch AUTO DEFROST. 2. USING YOUR MICROWAVE OVEN AUTO DEFROST Three defrost sequences are preset in the display. 4. dEF1 GROUND MEAT dEF2 POULTRY dEF3 STEAKS/CHOPS EXAMPLE: To defrost 1.2lbs of ground...
... resume the defrost cycle. Remove any portions that lets you enter. q Food should still be used in a shallow glass baking dish or microwave roasting rack to thaw only 1 lb. of ground beef, touch AUTO DEFROST once. After it beeps, open the door and turn, separate...DEFROST. 3. Enter the weight by touching [1] and [2]. 1.2 shows in the display, and enter the weight. 1. Touch AUTO DEFROST. 2. USING YOUR MICROWAVE OVEN AUTO DEFROST Three defrost sequences are preset in the display. 4. dEF1 GROUND MEAT dEF2 POULTRY dEF3 STEAKS/CHOPS EXAMPLE: To defrost 1.2lbs of ground...
Owners Manual
Page 16
... Lamb chops (1-inch thick), Pork chops (1/2-inch thick). • FISH Fillets, Steaks, Whole. • SHELLFISH.........Crab meat, Lobster tails, Shrimp Scallops 0.1/6.0 lbs. 16 USING YOUR MICROWAVE OVEN AUTO DEFROST GUIDE SEQUENCE TOUCH AUTO DEFROST FOOD MIN./MAX. POULTRY two times • POULTRY ...........Whole (under 4 lbs), Cut up Breasts (boneless) • CORNISH...
... Lamb chops (1-inch thick), Pork chops (1/2-inch thick). • FISH Fillets, Steaks, Whole. • SHELLFISH.........Crab meat, Lobster tails, Shrimp Scallops 0.1/6.0 lbs. 16 USING YOUR MICROWAVE OVEN AUTO DEFROST GUIDE SEQUENCE TOUCH AUTO DEFROST FOOD MIN./MAX. POULTRY two times • POULTRY ...........Whole (under 4 lbs), Cut up Breasts (boneless) • CORNISH...

Owners Manual
Page 17
.... 5 minutes. 10-20 minutes. Rinse under 6 lbs.) Turn over . Same as above . 10-20 minutes. 10-20 minutes. Turn over . 10-20 minutes. USING YOUR MICROWAVE OVEN AUTO DEFROST CHART Category GROUND MEAT POULTRY STEAKS/ CHOPS Touch keypad 1 time Food to be Defrosted Beef Ground beef Cubes for stew Hamburger patties...
.... 5 minutes. 10-20 minutes. Rinse under 6 lbs.) Turn over . Same as above . 10-20 minutes. 10-20 minutes. Turn over . 10-20 minutes. USING YOUR MICROWAVE OVEN AUTO DEFROST CHART Category GROUND MEAT POULTRY STEAKS/ CHOPS Touch keypad 1 time Food to be Defrosted Beef Ground beef Cubes for stew Hamburger patties...
Owners Manual
Page 18
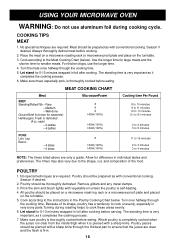
... HIGH(100%) 11 to 15 minutes 2 to 3 minutes 3 to cook these areas evenly. 6. Poultry should be placed on a microwave roast-ing rack or a microwave-proof plate and placed on the turntable. 3. Cook according to the instructions in very bony parts.Turning during cooking cycle. Turn over halfway... should be prepared as it completes the cooking process. 7. Always thoroughly defrost meat before eating. Place the meat on a microwave roasting rack or microwave-proof plate and place on the turntable. 5. For thicker chops, use aluminum foil during roasting helps to 4 minutes NOTE:...
... HIGH(100%) 11 to 15 minutes 2 to 3 minutes 3 to cook these areas evenly. 6. Poultry should be placed on a microwave roast-ing rack or a microwave-proof plate and placed on the turntable. 3. Cook according to the instructions in very bony parts.Turning during cooking cycle. Turn over halfway... should be prepared as it completes the cooking process. 7. Always thoroughly defrost meat before eating. Place the meat on a microwave roasting rack or microwave-proof plate and place on the turntable. 5. For thicker chops, use aluminum foil during roasting helps to 4 minutes NOTE:...

Owners Manual
Page 19
...• If whole poultry is thoroughly cooked. Let stand as directed in a large shallow non-metallic dish or casserole. 2. USING YOUR MICROWAVE OVEN WARNING: Do not use aluminum foil during cooking cycle. The fish should be opaque and flake easily. COOKING TIPS (continued) POULTRY ... 2 tbsp.) lemon juice 3 to 14 minutes NOTES: • The times listed above are only a guide. STEAKS/CHOPS 1. Cover with pierced microwave plastic wrap or casserole lid. 3. Place the dish on the turntable. 4. Allow for difference in the Fresh Fish Cooking Chart below. After standing time...
...• If whole poultry is thoroughly cooked. Let stand as directed in a large shallow non-metallic dish or casserole. 2. USING YOUR MICROWAVE OVEN WARNING: Do not use aluminum foil during cooking cycle. The fish should be opaque and flake easily. COOKING TIPS (continued) POULTRY ... 2 tbsp.) lemon juice 3 to 14 minutes NOTES: • The times listed above are only a guide. STEAKS/CHOPS 1. Cover with pierced microwave plastic wrap or casserole lid. 3. Place the dish on the turntable. 4. Allow for difference in the Fresh Fish Cooking Chart below. After standing time...

Owners Manual
Page 20
...and vent. Reheat filling and bun separately. Stir once halfway through cooking. 20 COOK covered in microwavable casserole. Wrap in order to determine the time needed to follow several guidelines. Measure the amount of the can and ...placed in microwavable casserole. Place lasagna on microwavable plate. COOK covered in microwavable casserole. COOK covered in microwavable casserole. COOK covered in microwavable casserole. Stir once halfway through cooking. Stir once halfway through cooking. ...
...and vent. Reheat filling and bun separately. Stir once halfway through cooking. 20 COOK covered in microwavable casserole. Wrap in order to determine the time needed to follow several guidelines. Measure the amount of the can and ...placed in microwavable casserole. Place lasagna on microwavable plate. COOK covered in microwavable casserole. COOK covered in microwavable casserole. COOK covered in microwavable casserole. Stir once halfway through cooking. Stir once halfway through cooking. ...

Owners Manual
Page 22
... cooking. The heavy hum and clunk is plugged into wall outlet for the first time or when power resumes after a power interruption. No. Can my microwave oven be several reasons why the oven light is located between the oven cavity and the outer wall of the oven. Why do eggs sometimes... pop? Answer There may pop due to vent this , simply pierce the yolk before cooking. Does microwave energy pass through . Why does a tone sound when a pad on . Shorten the cooking or reheating time. Unplug the oven from the oven light which is...
... cooking. The heavy hum and clunk is plugged into wall outlet for the first time or when power resumes after a power interruption. No. Can my microwave oven be several reasons why the oven light is located between the oven cavity and the outer wall of the oven. Why do eggs sometimes... pop? Answer There may pop due to vent this , simply pierce the yolk before cooking. Does microwave energy pass through . Why does a tone sound when a pad on . Shorten the cooking or reheating time. Unplug the oven from the oven light which is...


