
Owners Manual
Page 2
.... Protect the power cord from that no objects filled with the instruction manual, may generate or use of this unit. Copy protection signals are dangerous. Use of this product, please read this owner's manual to copy, broadcast, show, broadcast via cable, play in the literature accompanying the appliance. Serial No 2 REGULATORY INFORMATION: FCC Part 15 This product has been tested and found on a VCR, picture noise...
.... Protect the power cord from that no objects filled with the instruction manual, may generate or use of this unit. Copy protection signals are dangerous. Use of this product, please read this owner's manual to copy, broadcast, show, broadcast via cable, play in the literature accompanying the appliance. Serial No 2 REGULATORY INFORMATION: FCC Part 15 This product has been tested and found on a VCR, picture noise...
Owners Manual
Page 3
... - This set has been designed and manufactured to . 12. Heed all servicing to ensure reliable operation of the obsolete outlet. 10. Clean only with apparatus. Read these instructions. - The wide blade or the third prong are provided for replacement of the product and to avoid injury from the wall outlet before the product is operated. 2. Protect the power cord from...
... - This set has been designed and manufactured to . 12. Heed all servicing to ensure reliable operation of the obsolete outlet. 10. Clean only with apparatus. Read these instructions. - The wide blade or the third prong are provided for replacement of the product and to avoid injury from the wall outlet before the product is operated. 2. Protect the power cord from...
Owners Manual
Page 4
...Symbols used in this Manual 6 About the Symbol Display 6 Notes on Discs 6 HANDLING DISCS 6 STORING DISCS 6 CLEANING DISCS 6 Types of Playable Discs 7 Regional code 7 Disc-related terms 8 REMOTE CONTROL OPERATION RANGE . . . . .8 REMOTE CONTROL BATTERY INSTALLATION .8 Front Panel 9 Display Window 10 Remote Control 11 Rear Panel 12 System Setup 13-28 Connections 13-18 CONNECTING ANTENNA/CABLE TV TO HOME THEATER SYSTEM 13 • Cable Service Without Cable Box 13 • Cable Service With Cable Box 13 CONNECTING TO A TV 14 • RF coaxial connection 14 • Audio/Video...
...Symbols used in this Manual 6 About the Symbol Display 6 Notes on Discs 6 HANDLING DISCS 6 STORING DISCS 6 CLEANING DISCS 6 Types of Playable Discs 7 Regional code 7 Disc-related terms 8 REMOTE CONTROL OPERATION RANGE . . . . .8 REMOTE CONTROL BATTERY INSTALLATION .8 Front Panel 9 Display Window 10 Remote Control 11 Rear Panel 12 System Setup 13-28 Connections 13-18 CONNECTING ANTENNA/CABLE TV TO HOME THEATER SYSTEM 13 • Cable Service Without Cable Box 13 • Cable Service With Cable Box 13 CONNECTING TO A TV 14 • RF coaxial connection 14 • Audio/Video...
Owners Manual
Page 5
... TO MP3/WMA MUSIC WATCHING PICTURE 43 Playing a DVD VR format Disc 44 Maintenance and Service 44 HANDLING THE UNIT 44 Playing a DivX Movie Disc 45 5.1 Speaker Setup 46 SPEAKER SETUP 46 Additional Features 47 SCREEN SAVER 47 VIDEO MODE SETTING 47 XTS (EXCELLENT TRUE SOUND 47 RADIO Operation 48-49 PRESETTING THE RADIO STATIONS 48 LISTENING TO THE RADIO 48 TO CLEAR THE STORED RADIO STATIONS . .48 TUNING STATIONS MANUALLY 49 FOR YOUR REFERENCE 49 TUNING STATIONS AUTOMATICALLY 49 LABELING...
... TO MP3/WMA MUSIC WATCHING PICTURE 43 Playing a DVD VR format Disc 44 Maintenance and Service 44 HANDLING THE UNIT 44 Playing a DivX Movie Disc 45 5.1 Speaker Setup 46 SPEAKER SETUP 46 Additional Features 47 SCREEN SAVER 47 VIDEO MODE SETTING 47 XTS (EXCELLENT TRUE SOUND 47 RADIO Operation 48-49 PRESETTING THE RADIO STATIONS 48 LISTENING TO THE RADIO 48 TO CLEAR THE STORED RADIO STATIONS . .48 TUNING STATIONS MANUALLY 49 FOR YOUR REFERENCE 49 TUNING STATIONS AUTOMATICALLY 49 LABELING...
Owners Manual
Page 11
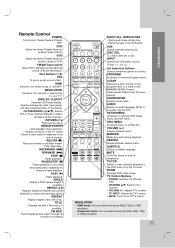
... a disc. TV INPUT: Selects the TV's source. - Component mode: You can switch among the 480i, 480p, 720p or 1080i resolution. 11 Introduction RESOLUTION Changes the resolution depending on the MARKER SEARCH menu. MEMORY/ENTER - DISC MENU Accesses menu on the display. SUBTITLE Selects a subtitle language. DVD Select the Home Theater System's function mode to view channels selected by the VCR tuner or by -frame playback. VOLUME (+/-) Adjusts speaker sound. SEARCH Displays Marker Search menu. MUTE Turns the sound on the TV screen -Stores a radio station's frequency...
... a disc. TV INPUT: Selects the TV's source. - Component mode: You can switch among the 480i, 480p, 720p or 1080i resolution. 11 Introduction RESOLUTION Changes the resolution depending on the MARKER SEARCH menu. MEMORY/ENTER - DISC MENU Accesses menu on the display. SUBTITLE Selects a subtitle language. DVD Select the Home Theater System's function mode to view channels selected by the VCR tuner or by -frame playback. VOLUME (+/-) Adjusts speaker sound. SEARCH Displays Marker Search menu. MUTE Turns the sound on the TV screen -Stores a radio station's frequency...

Owners Manual
Page 12
... the jacks on TV. AM ANTENNA CONNECTORS Connect the AM antenna to an S-Video Input on the rear panel. DVD/VCR OUT VIDEO OUT/AUDIO OUT (Left/Right)) Connect to a TV with RF coaxial inputs. ANTENNA IN Connect the VHF/UHF/CATV antenna to a TV with Pr Pb Y inputs. Cooling fan HDMI OUT HDMI output providing a high quality interface for digital audio and video. FOR DVD VIEWING ONLY. DVD/VCR OUT RF.OUT Connect to this terminal. SPEAKER CONNECTORS Connect the...
... the jacks on TV. AM ANTENNA CONNECTORS Connect the AM antenna to an S-Video Input on the rear panel. DVD/VCR OUT VIDEO OUT/AUDIO OUT (Left/Right)) Connect to a TV with RF coaxial inputs. ANTENNA IN Connect the VHF/UHF/CATV antenna to a TV with Pr Pb Y inputs. Cooling fan HDMI OUT HDMI output providing a high quality interface for digital audio and video. FOR DVD VIEWING ONLY. DVD/VCR OUT RF.OUT Connect to this terminal. SPEAKER CONNECTORS Connect the...
Owners Manual
Page 13
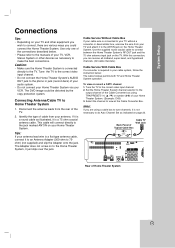
... DVD image could connect the Home Theater System. Connecting Antenna/Cable TV to view at the Cable Converter Box. Disconnect the antenna leads from the rear of your antenna lead wire is connected directly to the Home Theater System, it to an Antenna Adapter (300-ohm to the manuals of the TV. 2. Use the supplied round coaxial cable to connect between the Home Theater System's RF.OUT jack and the 75 ohm antenna input jack on to the TV. Select the channel...
... DVD image could connect the Home Theater System. Connecting Antenna/Cable TV to view at the Cable Converter Box. Disconnect the antenna leads from the rear of your antenna lead wire is connected directly to the Home Theater System, it to an Antenna Adapter (300-ohm to the manuals of the TV. 2. Use the supplied round coaxial cable to connect between the Home Theater System's RF.OUT jack and the 75 ohm antenna input jack on to the TV. Select the channel...
Owners Manual
Page 14
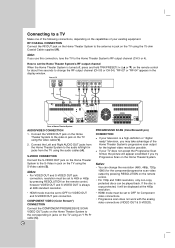
... or "digital ready" television, you try Progressive Scan on the remote control. • For 720p and 1080i resolution, only non-copy protected discs can change the RF output channel (CH 03 or CH 04). Rear of TV ANTENNA INPUT S-VIDEO INPUT VIDEO INPUT AUDIO INPUT COMPONENT/PROGRESSIVE VIDEO INPUT L R Pr Pb Y R S V A C Rear of your television is turned off, press and hold TRK/PRESET(-/+) (v or V) on the capabilities of Home Theater System AUDIO/VIDEO CONNECTION 1. Connecting to a TV Make one of...
... or "digital ready" television, you try Progressive Scan on the remote control. • For 720p and 1080i resolution, only non-copy protected discs can change the RF output channel (CH 03 or CH 04). Rear of TV ANTENNA INPUT S-VIDEO INPUT VIDEO INPUT AUDIO INPUT COMPONENT/PROGRESSIVE VIDEO INPUT L R Pr Pb Y R S V A C Rear of your television is turned off, press and hold TRK/PRESET(-/+) (v or V) on the capabilities of Home Theater System AUDIO/VIDEO CONNECTION 1. Connecting to a TV Make one of...
Owners Manual
Page 17
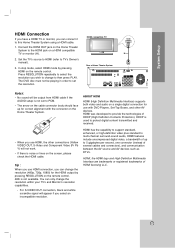
... multi-channel surround-sound audio, HDMI features include uncompressed digital video, a bandwidth of Home Theater System HDMI H Notes: • No sound will appear if you select an incompatible resolution. The DVD disc must not be output from HDMI cable if the AUDIO setup is not available. HDMI compatible TV Rear of up for correct alignment with DVD Players, Set-Top Boxes, and other connections (Yellow VIDEO OUT, S-Video and Component Video (Pr Pb Y) will not work. • If there is used to TV's Owner's manual). 3. ABOUT HDMI HDMI...
... multi-channel surround-sound audio, HDMI features include uncompressed digital video, a bandwidth of Home Theater System HDMI H Notes: • No sound will appear if you select an incompatible resolution. The DVD disc must not be output from HDMI cable if the AUDIO setup is not available. HDMI compatible TV Rear of up for correct alignment with DVD Players, Set-Top Boxes, and other connections (Yellow VIDEO OUT, S-Video and Component Video (Pr Pb Y) will not work. • If there is used to TV's Owner's manual). 3. ABOUT HDMI HDMI...

Owners Manual
Page 18
If the cables are reversed, the sound will be distorted and will lack bass. To obtain the best possible surround sound, adjust the speaker parameters (volume, distance, etc.). If you use front speakers with low maximum input rating, adjust the volume carefully to + and - Notes: Be sure to match the speaker cable to the appropriate terminal on the components: + to avoid excessive output on the speakers. 18 to -. Speaker System Connection Connect the speakers using the supplied speaker cables.
If the cables are reversed, the sound will be distorted and will lack bass. To obtain the best possible surround sound, adjust the speaker parameters (volume, distance, etc.). If you use front speakers with low maximum input rating, adjust the volume carefully to + and - Notes: Be sure to match the speaker cable to the appropriate terminal on the components: + to avoid excessive output on the speakers. 18 to -. Speaker System Connection Connect the speakers using the supplied speaker cables.
Owners Manual
Page 20
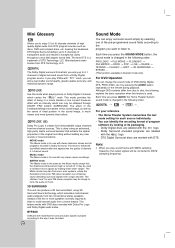
... DVD discs encoded with the logo. - Each time you press AUDIO, the Home Theater System sound mode is for use with 96kHz sampling frequency, the output signals will be simply to force the audio to mono. 3D SURROUND This unit can change the sound mode of DVD (Dolby Digital, DTS, PRO LOGIC, etc.) by making them seem "larger." Dolby Surround encoded programs are labeled with Dolby Pro Logic and Dolby Digital audio tracks. If you play sound tracks with stereo...
... DVD discs encoded with the logo. - Each time you press AUDIO, the Home Theater System sound mode is for use with 96kHz sampling frequency, the output signals will be simply to force the audio to mono. 3D SURROUND This unit can change the sound mode of DVD (Dolby Digital, DTS, PRO LOGIC, etc.) by making them seem "larger." Dolby Surround encoded programs are labeled with Dolby Pro Logic and Dolby Digital audio tracks. If you play sound tracks with stereo...

Owners Manual
Page 21
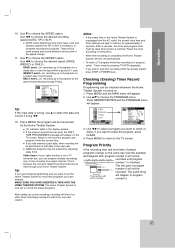
.... ❹ CHANNEL DISPLAY Indicates the selected channel (or LINE1, LINE2). ❺ STEREO/SAP DISPLAY (MONO is inserted. PROGRAM DETAILS LENGTH: Indicates the run length of a program. CH 4 SP WABC STEREO PROGRAM DETAILS "Home video" "Home video" FEB 7 , MON 2:15 PM Easy Information Screen (Station ID) LENGTH 01:00 TIME REMAINING 00:26 RATING N/A Easy Information Screen (Program details) On-Screen Menus Setup The SETUP, clock setting (CLOCK), and timer recordings (PROGRAM) functions are accessed...
.... ❹ CHANNEL DISPLAY Indicates the selected channel (or LINE1, LINE2). ❺ STEREO/SAP DISPLAY (MONO is inserted. PROGRAM DETAILS LENGTH: Indicates the run length of a program. CH 4 SP WABC STEREO PROGRAM DETAILS "Home video" "Home video" FEB 7 , MON 2:15 PM Easy Information Screen (Station ID) LENGTH 01:00 TIME REMAINING 00:26 RATING N/A Easy Information Screen (Program details) On-Screen Menus Setup The SETUP, clock setting (CLOCK), and timer recordings (PROGRAM) functions are accessed...
Owners Manual
Page 22
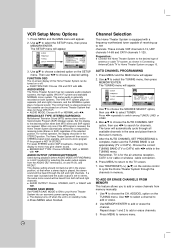
.... Use v/V to your Home Theater System into an economic power saving mode. Use V to choose the SOURCE SELECT option, then use b/B to choose a desired option on -screen display of antenna or cable TV system, as shown in the stereo position, so that when a stereo tape is for selecting the audio output signals from both MTS stereo and SAP signals are received. After the AUTO CHANNEL SET PROCEEDING is complete, make sure the TUNING BAND is always played so...
.... Use v/V to your Home Theater System into an economic power saving mode. Use V to choose the SOURCE SELECT option, then use b/B to choose a desired option on -screen display of antenna or cable TV system, as shown in the stereo position, so that when a stereo tape is for selecting the audio output signals from both MTS stereo and SAP signals are received. After the AUTO CHANNEL SET PROCEEDING is complete, make sure the TUNING BAND is always played so...

Owners Manual
Page 24
... discs may not provide all of the features shown below. • If no button is highlighted. 3. inputting the title number). B Repeat sequence 1 / 9 Enter a Marker MARKER SEARCH Marker Search menu Resume play from this point Action prohibited or not available Example: On-Screen Display during playing DVD Video Items Title Number Selection Method b / B, Numbers 1 / 3 ENTER Chapter Number 1 / 12 b / B, Numbers ENTER Time search 0:20:09 Numbers, ENTER Audio language and Digital Audio Output mode...
... discs may not provide all of the features shown below. • If no button is highlighted. 3. inputting the title number). B Repeat sequence 1 / 9 Enter a Marker MARKER SEARCH Marker Search menu Resume play from this point Action prohibited or not available Example: On-Screen Display during playing DVD Video Items Title Number Selection Method b / B, Numbers 1 / 3 ENTER Chapter Number 1 / 12 b / B, Numbers ENTER Time search 0:20:09 Numbers, ENTER Audio language and Digital Audio Output mode...

Owners Manual
Page 25
... language code, press CLEAR. 25 System Setup Initial Settings By using the Setup menu, you can also set to items such as alternate setting(s). 3. To display and exit the Menu: Press SETUP to exit the Setup menu. General Operation 1. The Setup menu appears. 2. Use v / V to select the desired setting then press ENTER to the previous level: Press b on the Remote Control. DISPLAY MODE DVD-V DVD-A Display Mode setting works only when the TV Aspect mode is connected. Language LANGUAGE Menu Language Disc Audio Disc Subtitle Disc Menu English...
... language code, press CLEAR. 25 System Setup Initial Settings By using the Setup menu, you can also set to items such as alternate setting(s). 3. To display and exit the Menu: Press SETUP to exit the Setup menu. General Operation 1. The Setup menu appears. 2. Use v / V to select the desired setting then press ENTER to the previous level: Press b on the Remote Control. DISPLAY MODE DVD-V DVD-A Display Mode setting works only when the TV Aspect mode is connected. Language LANGUAGE Menu Language Disc Audio Disc Subtitle Disc Menu English...
Owners Manual
Page 29
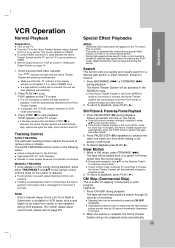
... , press POWER once. It will be played back at a time while viewing a still picture in Still mode, press FORWARD (>). The AUTO TRACKING function works in Setting the Output Source on page 14. 1. MANUAL TRACKING If noise appears on the screen during playback, press either direction: forward or reverse. 1. This is normal. • The audio is automatically muted during special effect modes, so there is no sound during...
... , press POWER once. It will be played back at a time while viewing a still picture in Still mode, press FORWARD (>). The AUTO TRACKING function works in Setting the Output Source on page 14. 1. MANUAL TRACKING If noise appears on the screen during playback, press either direction: forward or reverse. 1. This is normal. • The audio is automatically muted during special effect modes, so there is no sound during...
Owners Manual
Page 30
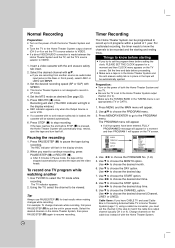
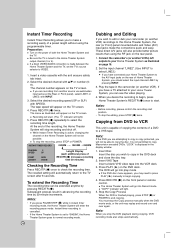
... another source via audio/video input jacks (at the Rear or Front panel), select LINE1 or LINE2 with v/V. Use V to be automatically ejected. Things to know the channels to VIDEO. Using the TV, select the channel to choose the DAY option. Use b/B to record in the display window.) REC indicator appears only when the Output Source is set the program timer before proceeding. Select the desired channel with INPUT. 3. This Home Theater System is in Connecting Antenna/Cable...
... another source via audio/video input jacks (at the Rear or Front panel), select LINE1 or LINE2 with v/V. Use V to be automatically ejected. Things to know the channels to VIDEO. Using the TV, select the channel to choose the DAY option. Use b/B to record in the display window.) REC indicator appears only when the Output Source is set the program timer before proceeding. Select the desired channel with INPUT. 3. This Home Theater System is in Connecting Antenna/Cable...
Owners Manual
Page 31
... preset programs overlap on the converter box output channel. MAY 8 Tip: If the input data is finished. Press MENU, the program will be some picture and sound distortion at the same time(s) Monday through your cable hookup is unplugged from SP to SLP, if necessary, to record the preset programs. 3. Tip: If you have entered, MAKE SURE YOU HAVE INSERTED A TAPE INTO THE HOME THEATER SYSTEM. Use b/B to select a program...
... preset programs overlap on the converter box output channel. MAY 8 Tip: If the input data is finished. Press MENU, the program will be some picture and sound distortion at the same time(s) Monday through your cable hookup is unplugged from SP to SLP, if necessary, to record the preset programs. 3. Tip: If you have entered, MAKE SURE YOU HAVE INSERTED A TAPE INTO THE HOME THEATER SYSTEM. Use b/B to select a program...
Owners Manual
Page 32
... the TV is finished playing, press STOP (x) or POWER to the Home Theater System output channel (3 or 4). The Home Theater System will not be extended anytime by 30-minute increments. Stop the Copy Process When the DVD is tuned to end copying. Insert a video cassette with v/V or number (09). Connect the camcorder's (or another source via audio/video input jacks (at the Rear or Front panel), select LINE1 or LINE2. If...
... the TV is finished playing, press STOP (x) or POWER to the Home Theater System output channel (3 or 4). The Home Theater System will not be extended anytime by 30-minute increments. Stop the Copy Process When the DVD is tuned to end copying. Insert a video cassette with v/V or number (09). Connect the camcorder's (or another source via audio/video input jacks (at the Rear or Front panel), select LINE1 or LINE2. If...
Owners Manual
Page 52
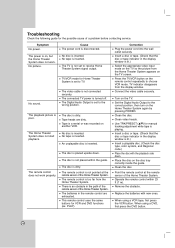
... receive Home Theater System signal output. Operate the remote control within the guide. The TV is dirty. PLAY). Correction Plug the power cord into the wall outlet securely. Turn on the disc tray correctly inside the guide. Use TRK/PRESET (v/V) for Home Theater System is an obstacle in the remote control are dirty. Clean the disc. No disc is playing. There is set to TV. Connect the video cable securely. Clean video heads. When using a DVD, first press the DVD button. 52 TV/VCR mode for manual...
... receive Home Theater System signal output. Operate the remote control within the guide. The TV is dirty. PLAY). Correction Plug the power cord into the wall outlet securely. Turn on the disc tray correctly inside the guide. Use TRK/PRESET (v/V) for Home Theater System is an obstacle in the remote control are dirty. Clean the disc. No disc is playing. There is set to TV. Connect the video cable securely. Clean video heads. When using a DVD, first press the DVD button. 52 TV/VCR mode for manual...


