
Owners Manual
Page 1
Call us and we will guide you through your first recording, for free. 1-800-243-0000 FOR THE WARRANTY TERMS & CONDITIONS, PLEASE REFER TO BACK COVER OF THIS MANUAL. LH-T9654MB_NA1ULLA_ENG DVD RECEIVER OWNER'S MANUAL MODEL: LH-T9654MB (Main Unit: LH-T9654 Speakers: LHS-96MBF, LHS-96MBC, LHS-96SBS, LHS-96SBW) R USB Before connecting, operating or repairing this product, please read this instruction booklet carefully and completely.
Call us and we will guide you through your first recording, for free. 1-800-243-0000 FOR THE WARRANTY TERMS & CONDITIONS, PLEASE REFER TO BACK COVER OF THIS MANUAL. LH-T9654MB_NA1ULLA_ENG DVD RECEIVER OWNER'S MANUAL MODEL: LH-T9654MB (Main Unit: LH-T9654 Speakers: LHS-96MBF, LHS-96MBC, LHS-96SBS, LHS-96SBW) R USB Before connecting, operating or repairing this product, please read this instruction booklet carefully and completely.

Owners Manual
Page 2
... READ AND OBSERVE ALL WARNINGS AND INSTRUCTIONS IN THIS OWNER'S MANUAL. DO NOT REMOVE THE CABINET COVER, OR YOU MAY BE EXPOSED TO DANGEROUS VOLTAGE. other similar surface. The openings should never be repaired by instructions should be retained for replacement of the polarized or grounding-type plug. All operating and use this product will protect you if you observe the following...
... READ AND OBSERVE ALL WARNINGS AND INSTRUCTIONS IN THIS OWNER'S MANUAL. DO NOT REMOVE THE CABINET COVER, OR YOU MAY BE EXPOSED TO DANGEROUS VOLTAGE. other similar surface. The openings should never be repaired by instructions should be retained for replacement of the polarized or grounding-type plug. All operating and use this product will protect you if you observe the following...

Owners Manual
Page 3
... the manufacturer's instructions. Slots and openings in accordance with an exact replacement part by one or more of important operating and maintenance (servicing) instructions in electric shock or fire. CAUTION: This product employs a Laser System. Changes or modifications to this owner's manual carefully and retain it , discontinue use of the product and to protect it from that to which powers only that may...
... the manufacturer's instructions. Slots and openings in accordance with an exact replacement part by one or more of important operating and maintenance (servicing) instructions in electric shock or fire. CAUTION: This product employs a Laser System. Changes or modifications to this owner's manual carefully and retain it , discontinue use of the product and to protect it from that to which powers only that may...
Owners Manual
Page 4
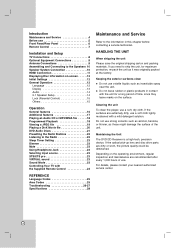
... and Service 4 Before use 5 Front Panel/Rear Panel 6 Remote Control 7 Installation and Setup TV Connections 8 Optional Equipment Connections 9 Antenna Connections 9 Assembling and Connecting to the Speakers 10 Speaker System Connection 10 HDMI Connection 11 Displaying Disc Information on-screen . . . . . .12 Initial Settings 12 General Operation 12 Language 12 Display 13 Audio 14 5.1 Speaker Setup 14 Lock (Parental Control 15 Others 15 Operation General features 16 Additional features 17 Playing an Audio CD or MP3/WMA file . . . . . .18 Programmed Playback 18 Viewing a JPEG...
... and Service 4 Before use 5 Front Panel/Rear Panel 6 Remote Control 7 Installation and Setup TV Connections 8 Optional Equipment Connections 9 Antenna Connections 9 Assembling and Connecting to the Speakers 10 Speaker System Connection 10 HDMI Connection 11 Displaying Disc Information on-screen . . . . . .12 Initial Settings 12 General Operation 12 Language 12 Display 13 Audio 14 5.1 Speaker Setup 14 Lock (Parental Control 15 Others 15 Operation General features 16 Additional features 17 Playing an Audio CD or MP3/WMA file . . . . . .18 Programmed Playback 18 Viewing a JPEG...
Owners Manual
Page 5
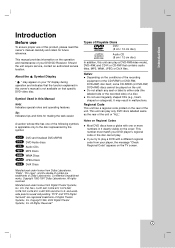
... Regional Code" appears on the cover. Copyright 1992-1997 Dolby Laboratories. "DTS" and "DTS Digital Surround" are trademarks of Digital Theater Systems, Inc. Notes on Regional Codes Most DVD discs have a globe with a different regional code from your DVD/CD Receiver. Should the unit require service, contact an authorized service location. It may appear on your DVD player's regional code or the disc cannot play a DVD-RW(video mode), DVD+RW, and CD-R or CD-RW that specific DVD video disc...
... Regional Code" appears on the cover. Copyright 1992-1997 Dolby Laboratories. "DTS" and "DTS Digital Surround" are trademarks of Digital Theater Systems, Inc. Notes on Regional Codes Most DVD discs have a globe with a different regional code from your DVD/CD Receiver. Should the unit require service, contact an authorized service location. It may appear on your DVD player's regional code or the disc cannot play a DVD-RW(video mode), DVD+RW, and CD-R or CD-RW that specific DVD video disc...

Owners Manual
Page 6
... LG Wireless Accessnry Kit : ACC95WK) 6 Wireless Rear Speaker Ready ( with Y Pb Pr inputs. DISC Tray OPEN/CLOSE button DISPLAY Window PHONES connector FUNC./PLAY Press and hold down this button about 3 seconds, then press repeatedly to the unit. VOLUME controller Remote sensor USB Port Connect the USB port of the jacks on the rear panel. Electrostatic discharge may cause permanent damage to select other function. Notes: Wireless transmitter and receiver is in Standby mode (off). Front Panel/Rear Panel STANDBY/ON STANDBY indicator Lights red when the receiver...
... LG Wireless Accessnry Kit : ACC95WK) 6 Wireless Rear Speaker Ready ( with Y Pb Pr inputs. DISC Tray OPEN/CLOSE button DISPLAY Window PHONES connector FUNC./PLAY Press and hold down this button about 3 seconds, then press repeatedly to the unit. VOLUME controller Remote sensor USB Port Connect the USB port of the jacks on the rear panel. Electrostatic discharge may cause permanent damage to select other function. Notes: Wireless transmitter and receiver is in Standby mode (off). Front Panel/Rear Panel STANDBY/ON STANDBY indicator Lights red when the receiver...
Owners Manual
Page 7
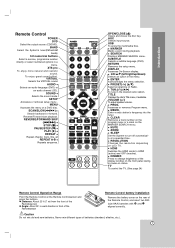
... menu. DISPLAY Accesses On-Screen display. RESOLUTION Changes the resolution depending on the MARKER SEARCH menu. REVERSE/FORWARD SKIP (./>) STOP (x) PAUSE/STEP (X) PLAY (B) REPEAT Repeat chapter, track, title, all REPEAT A-B Repeats sequence. HDMI Switches the HDMI mode to turn off automatically at the Remote Controlsensor and press the buttons. MENU Accesses the menu on a DVD disc. OPEN/CLOSE (Z) Opens and closes the disc tray. Introduction Remote Control POWER DVD Select the output source (CD/DVD). VOLUME (+/-) To adjust speaker volume. ENTER Acknowledges the menu...
... menu. DISPLAY Accesses On-Screen display. RESOLUTION Changes the resolution depending on the MARKER SEARCH menu. REVERSE/FORWARD SKIP (./>) STOP (x) PAUSE/STEP (X) PLAY (B) REPEAT Repeat chapter, track, title, all REPEAT A-B Repeats sequence. HDMI Switches the HDMI mode to turn off automatically at the Remote Controlsensor and press the buttons. MENU Accesses the menu on a DVD disc. OPEN/CLOSE (Z) Opens and closes the disc tray. Introduction Remote Control POWER DVD Select the output source (CD/DVD). VOLUME (+/-) To adjust speaker volume. ENTER Acknowledges the menu...

Owners Manual
Page 8
... TV using the video cable supplied (V). The DVD image could connect the DVD/CD Receiver. Note: HDMI mode must be distorted by the copy protection system. Caution: Make sure the DVD/CD Receiver is connected directly to OFF for VIDEO OUT and S-VIDEO OUT and Component video connections. Do not connect your DVD/CD Receiver to TV via your existing equipment. Rear of TV S-VIDEO INPUT VIDEO INPUT L COMPONENT VIDEO / PROGRESSIVE SCAN INPUT Y Pb Pr S V C L AUDIO R HDMI OUT Rear of your VCR. Installation and Setup TV Connections Make...
... TV using the video cable supplied (V). The DVD image could connect the DVD/CD Receiver. Note: HDMI mode must be distorted by the copy protection system. Caution: Make sure the DVD/CD Receiver is connected directly to OFF for VIDEO OUT and S-VIDEO OUT and Component video connections. Do not connect your DVD/CD Receiver to TV via your existing equipment. Rear of TV S-VIDEO INPUT VIDEO INPUT L COMPONENT VIDEO / PROGRESSIVE SCAN INPUT Y Pb Pr S V C L AUDIO R HDMI OUT Rear of your VCR. Installation and Setup TV Connections Make...

Owners Manual
Page 9
... the FM antenna connector. Note: If the audio format of the digital output does not match the capabilities of your DVD/CD Receiver, the receiver will not be played. L AUDIO R HDMI OUT Notes: Don't extract the USB device while operating. Antenna Connections Connect the supplied FM/AM antenna for proper operation. This unit can be supported. 9 Compatable with : FAT16, FAT32 - Up to the radio. Connect the AM Loop antenna to the OPTICAL IN connector. 3. Music files (MP3...
... the FM antenna connector. Note: If the audio format of the digital output does not match the capabilities of your DVD/CD Receiver, the receiver will not be played. L AUDIO R HDMI OUT Notes: Don't extract the USB device while operating. Antenna Connections Connect the supplied FM/AM antenna for proper operation. This unit can be supported. 9 Compatable with : FAT16, FAT32 - Up to the radio. Connect the AM Loop antenna to the OPTICAL IN connector. 3. Music files (MP3...

Owners Manual
Page 10
... you use front speakers with low maximum input rating, adjust the volume carefully to avoid excessive output on the components: + to + and - Assembling and Connecting to the Speakers The front is detached from speaker stands as illustrated. 1. Connect the speaker cords to the appropriate terminals on rear of each front and rear speaker. 2. To obtain the best possible surround sound, adjust the speaker parameters (volume, distance, etc.). Speaker System Connection Connect the speakers using the supplied speaker cables. Connect the speaker cords and...
... you use front speakers with low maximum input rating, adjust the volume carefully to avoid excessive output on the components: + to + and - Assembling and Connecting to the Speakers The front is detached from speaker stands as illustrated. 1. Connect the speaker cords to the appropriate terminals on rear of each front and rear speaker. 2. To obtain the best possible surround sound, adjust the speaker parameters (volume, distance, etc.). Speaker System Connection Connect the speakers using the supplied speaker cables. Connect the speaker cords and...
Owners Manual
Page 11
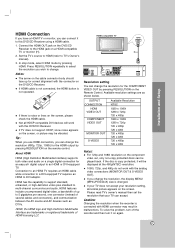
... to multi-channel surround-sound audio, HDMI features include uncompressed digital video, a bandwidth of up for the HDMI output by pressing RESOLUTION on the DVD/CD Receiver. If you wish to change the resolution for an easy all HDCP-compatible DVI devices will be displayed at the 480p(NTSC) resolution. 1080i, 720p, and 480p do not work with the connector on the remote control. Connect the HDMI OUT jack on the cable connector body...
... to multi-channel surround-sound audio, HDMI features include uncompressed digital video, a bandwidth of up for the HDMI output by pressing RESOLUTION on the DVD/CD Receiver. If you wish to change the resolution for an easy all HDCP-compatible DVI devices will be displayed at the 480p(NTSC) resolution. 1080i, 720p, and 480p do not work with the connector on the remote control. Connect the HDMI OUT jack on the cable connector body...
Owners Manual
Page 12
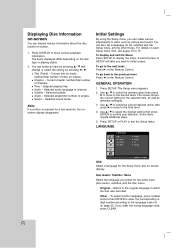
... Settings By using the Setup menu, you back to the next level: Press B on the Remote Control. The screen shows the current setting for the selected item, as well as picture and sound. Press SETUP or PLAY to show various playback information. You can display various information about the disc loaded on the Remote Control. number/total number of chapters. You can make various adjustments to the previous level: Press b on -screen. 1. GENERAL OPERATION 1. Elapsed playing...
... Settings By using the Setup menu, you back to the next level: Press B on the Remote Control. The screen shows the current setting for the selected item, as well as picture and sound. Press SETUP or PLAY to show various playback information. You can display various information about the disc loaded on the Remote Control. number/total number of chapters. You can make various adjustments to the previous level: Press b on -screen. 1. GENERAL OPERATION 1. Elapsed playing...
Owners Manual
Page 14
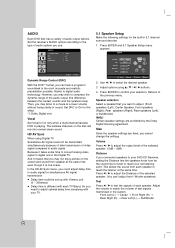
... SubWoofer) Note: Certain speaker settings are fixed, you connected speakers to your selection. Adjust the volume to digital one in the most accurate and realistic presentation possible, thanks to On only when a multi-channel karaoke DVD is one scene. Because it is playing. So you can 't adjust front / Woofer speakers) Test Press b / B to audio signal for simultaneous AV signal transmission Delay time could adjust delay time to test the signals of test signals memorized in 5.1 channel surround decoder. 1. Use b / B to adjust optimal delay...
... SubWoofer) Note: Certain speaker settings are fixed, you connected speakers to your selection. Adjust the volume to digital one in the most accurate and realistic presentation possible, thanks to On only when a multi-channel karaoke DVD is one scene. Because it is playing. So you can 't adjust front / Woofer speakers) Test Press b / B to audio signal for simultaneous AV signal transmission Delay time could adjust delay time to test the signals of test signals memorized in 5.1 channel surround decoder. 1. Use b / B to adjust optimal delay...

Owners Manual
Page 15
... service at www.divx.com/vod. To change password. 1. Input a password and press ENTER. Input the 6-digit number "210499" and press ENTER. Press B and select the second character using v / V buttons. 4. OTHERS OTHERS DivX(R) Registration Select Move Select DivX(R) Registration We provide you the DivX® VOD (Video On Demand) registration code that allows you select unlock, parental control is not active and the disc plays in full. 4. Use the registration code to...
... service at www.divx.com/vod. To change password. 1. Input a password and press ENTER. Input the 6-digit number "210499" and press ENTER. Press B and select the second character using v / V buttons. 4. OTHERS OTHERS DivX(R) Registration Select Move Select DivX(R) Registration We provide you the DivX® VOD (Video On Demand) registration code that allows you select unlock, parental control is not active and the disc plays in full. 4. Use the registration code to...
Owners Manual
Page 22
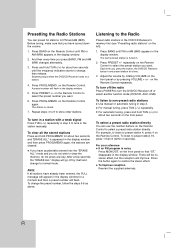
... program is stored. 7. on the Remote Control repeatedly. Press PRESET +/- After a few seconds, the "ERASE ALL" display will go off or select another function mode (DVD/CD, AUX, USB). For manual tuning, press TUN.(-/+) repeatedly. To improve reception Reorient the supplied antennas. 22 A preset number will appear in the display window. 2. on the Remote Control to change, then release. Listening to select a preset radio station directly. repeatedly on the Remote Control again. Adjust the volume by rotating VOLUME on the Remote Control...
... program is stored. 7. on the Remote Control repeatedly. Press PRESET +/- After a few seconds, the "ERASE ALL" display will go off or select another function mode (DVD/CD, AUX, USB). For manual tuning, press TUN.(-/+) repeatedly. To improve reception Reorient the supplied antennas. 22 A preset number will appear in the display window. 2. on the Remote Control to change, then release. Listening to select a preset radio station directly. repeatedly on the Remote Control again. Adjust the volume by rotating VOLUME on the Remote Control...
Owners Manual
Page 23
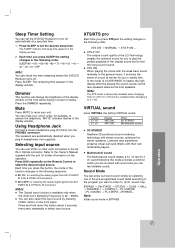
... 3D STEREO Multichannel sound 3D STEREO Realtime 3D positioned sound rendering technology with their own multimedia players. Each time you to play the perfect playback of the function changes in power-on the operation. button on the Remote Control to select input source. XTS ON → NORMAL → XTS-P ON... Listeners may experience amazing virtual surround effects with stereo sources, optimized for example, to turn off . Multichannel sound The Multichannel sound makes a 5.1 ch...
... 3D STEREO Multichannel sound 3D STEREO Realtime 3D positioned sound rendering technology with their own multimedia players. Each time you to play the perfect playback of the function changes in power-on the operation. button on the Remote Control to select input source. XTS ON → NORMAL → XTS-P ON... Listeners may experience amazing virtual surround effects with stereo sources, optimized for example, to turn off . Multichannel sound The Multichannel sound makes a 5.1 ch...

Owners Manual
Page 24
... through memorized channels. When you may not function on the right column). 2. Turns on or off TV sound. Set the appropriate code number again. 24 Controlling Your TV with the Supplied Remote Control You can control the sound level, input source, and power switch of the TV. Switch the TV's input source between the TV and other TVs with the Remote You can control your LG TV with the supplied remote. Adjust the volume of your...
... through memorized channels. When you may not function on the right column). 2. Turns on or off TV sound. Set the appropriate code number again. 24 Controlling Your TV with the Supplied Remote Control You can control the sound level, input source, and power switch of the TV. Switch the TV's input source between the TV and other TVs with the Remote You can control your LG TV with the supplied remote. Adjust the volume of your...
Owners Manual
Page 26
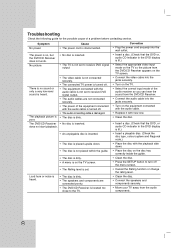
... SETUP button to turn off the menu screen. • The Rating level is on , but the DVD/CD Receiver does not work. The playback picture is • The disc is damaged. poor. There is no sound or only a very low-level sound is heard. • The connected TV power is turned off . • The audio connecting cable is dirty. The DVD/CD Receiver • No disc is located too close to receive DVD signal output. • The audio cables are connected...
... SETUP button to turn off the menu screen. • The Rating level is on , but the DVD/CD Receiver does not work. The playback picture is • The disc is damaged. poor. There is no sound or only a very low-level sound is heard. • The connected TV power is turned off . • The audio connecting cable is dirty. The DVD/CD Receiver • No disc is located too close to receive DVD signal output. • The audio cables are connected...
Owners Manual
Page 27
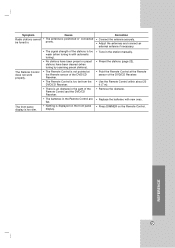
... Receiver. • The batteries in the Remote Control are flat. • Nothing is positioned or connected be tuned in the station manually. • Preset the stations (page 22). • Point the Remote Control at the Remote sensor of the DVD/CD Receiver. • Use the Remote Control within about 23 ft (7 m). • Remove the obstacle. • Replace the batteries with new ones. • Press DIMMER on the front panel display. • Tune...
... Receiver. • The batteries in the Remote Control are flat. • Nothing is positioned or connected be tuned in the station manually. • Preset the stations (page 22). • Point the Remote Control at the Remote sensor of the DVD/CD Receiver. • Use the Remote Control within about 23 ft (7 m). • Remove the obstacle. • Replace the batteries with new ones. • Press DIMMER on the front panel display. • Tune...
Owners Manual
Page 28
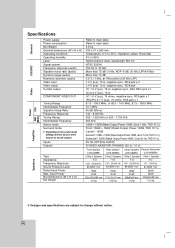
... dB/W (1m) 155W 310W 280x1200x280 mm 3.9 kg 155W 310W 117x210x111 mm 0.65 kg 155W 310W 495x83x90 mm 1.6 kg 225W 450W 240x450x390 mm 10.5 kg Amplifier Speakers ❋ Designs and specifications are subject to Noise Ratio Frequency Response Tuning Range Intermediate Frequency Stereo mode Surround mode (* Depending on the sound mode settings and the source, there may be no sound output.) Inputs Outputs Type Impedance Frequency Response Sound Pressure Level Rated Input Power Max.
... dB/W (1m) 155W 310W 280x1200x280 mm 3.9 kg 155W 310W 117x210x111 mm 0.65 kg 155W 310W 495x83x90 mm 1.6 kg 225W 450W 240x450x390 mm 10.5 kg Amplifier Speakers ❋ Designs and specifications are subject to Noise Ratio Frequency Response Tuning Range Intermediate Frequency Stereo mode Surround mode (* Depending on the sound mode settings and the source, there may be no sound output.) Inputs Outputs Type Impedance Frequency Response Sound Pressure Level Rated Input Power Max.


